Operation Manual
Page 4
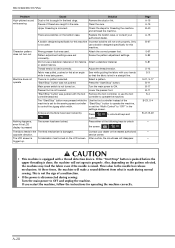
... close attention to change without notice. For additional product information and updates, visit our website at www.brother.com B-2 Keep ventilation openings of the sewing machine and foot control free from all moving parts. Use this machine only for this manual. Use accessories recommended by an authorized dealer. • In the event a malfunction occurs or adjustment is required, first follow careful instruction when free motion stitching so that you do...
... close attention to change without notice. For additional product information and updates, visit our website at www.brother.com B-2 Keep ventilation openings of the sewing machine and foot control free from all moving parts. Use this machine only for this manual. Use accessories recommended by an authorized dealer. • In the event a malfunction occurs or adjustment is required, first follow careful instruction when free motion stitching so that you do...
Operation Manual
Page 9
... Length 10 Setting the "L/R SHIFT 11 Setting the Thread Tension 12 USEFUL FUNCTIONS 14 Automatic Thread Cutting 14 Using the Knee Lifter 15 Pivoting 15 Automatic Fabric Sensor System (Automatic Presser Foot Pressure 17 Needle Position - CONTENTS CONTENTS TRADEMARKS INTRODUCTION 1 IMPORTANT SAFETY INSTRUCTIONS 1 WHAT YOU CAN DO WITH THIS MACHINE ..... 5 NAMES OF MACHINE PARTS AND THEIR FUNCTIONS 9 Machine 9 Needle and Presser Foot Section 10 Operation Buttons 11 Using the Flat Bed Attachment 11 Included Accessories 12 Accessories that Unwind Quickly 45 CHANGING THE PRESSER...
... Length 10 Setting the "L/R SHIFT 11 Setting the Thread Tension 12 USEFUL FUNCTIONS 14 Automatic Thread Cutting 14 Using the Knee Lifter 15 Pivoting 15 Automatic Fabric Sensor System (Automatic Presser Foot Pressure 17 Needle Position - CONTENTS CONTENTS TRADEMARKS INTRODUCTION 1 IMPORTANT SAFETY INSTRUCTIONS 1 WHAT YOU CAN DO WITH THIS MACHINE ..... 5 NAMES OF MACHINE PARTS AND THEIR FUNCTIONS 9 Machine 9 Needle and Presser Foot Section 10 Operation Buttons 11 Using the Flat Bed Attachment 11 Included Accessories 12 Accessories that Unwind Quickly 45 CHANGING THE PRESSER...
Operation Manual
Page 11
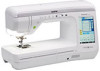
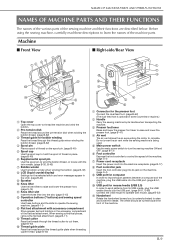
... Insert the power cord into the machine receptacle. (page B-17) h Foot controller jack Insert the foot controller plug into the slot. (page S-15) l Operation buttons (7 buttons) and sewing speed controller Use these descriptions to operate the sewing machine. (page B-11) m Flat bed attachment with accessory compartment Store presser feet and bobbins in place. (page B-40) f Supplemental spool pin Use this thread guide when winding the bobbin thread. (page B-32) d Spool pin Place a spool of thread on the machine. (page S-4) i USB port for computer In order to import/export patterns...
... Insert the power cord into the machine receptacle. (page B-17) h Foot controller jack Insert the foot controller plug into the slot. (page S-15) l Operation buttons (7 buttons) and sewing speed controller Use these descriptions to operate the sewing machine. (page B-11) m Flat bed attachment with accessory compartment Store presser feet and bobbins in place. (page B-40) f Supplemental spool pin Use this thread guide when winding the bobbin thread. (page B-32) d Spool pin Place a spool of thread on the machine. (page S-4) i USB port for computer In order to import/export patterns...
Operation Manual
Page 13
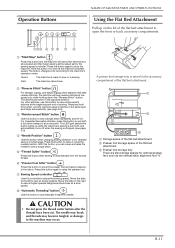
... bed attachment. f "Presser Foot Lifter" button Press this button to open the front or back accessory compartments. b "Reverse Stitch" button For straight, zigzag, and elastic zigzag stitch patterns that take reverse stitches, the machine will sew a few stitches at a slow speed and then begin sewing at the beginning and end of the flat bed attachment to raise or lower the needle position. Hold the button in the same spot and stops automatically. (see page S-5) d "Needle Position" button Use this button to automatically trim the excess thread...
... bed attachment. f "Presser Foot Lifter" button Press this button to open the front or back accessory compartments. b "Reverse Stitch" button For straight, zigzag, and elastic zigzag stitch patterns that take reverse stitches, the machine will sew a few stitches at a slow speed and then begin sewing at the beginning and end of the flat bed attachment to raise or lower the needle position. Hold the button in the same spot and stops automatically. (see page S-5) d "Needle Position" button Use this button to automatically trim the excess thread...
Operation Manual
Page 15
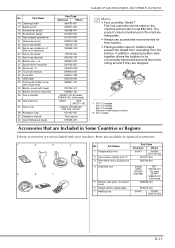
... Touch pen (stylus) 30 Knee lifter 31 USB cable 32 Cord guide bobbin cover (with single hole) 33 Bobbin cover (with your machine, these accessories are available as optional accessories. 1 2 3 4 5 6 7 No. Part Name 1 Straight stitch foot 2 Free motion quilting foot "C" 3 Free motion echo quilting foot "E" 4 Dual feed foot 5 Bobbin case (gray, for this machine. • Placing bobbin clips on the machine with product code 882-D10. NAMES OF MACHINE PARTS AND THEIR FUNCTIONS No. Part Name 16 Cleaning brush 17 Eyelet punch 18 Screwdriver (small...
... Touch pen (stylus) 30 Knee lifter 31 USB cable 32 Cord guide bobbin cover (with single hole) 33 Bobbin cover (with your machine, these accessories are available as optional accessories. 1 2 3 4 5 6 7 No. Part Name 1 Straight stitch foot 2 Free motion quilting foot "C" 3 Free motion echo quilting foot "E" 4 Dual feed foot 5 Bobbin case (gray, for this machine. • Placing bobbin clips on the machine with product code 882-D10. NAMES OF MACHINE PARTS AND THEIR FUNCTIONS No. Part Name 16 Cleaning brush 17 Eyelet punch 18 Screwdriver (small...
Operation Manual
Page 24
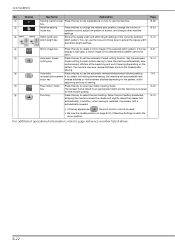
... additional operational information, refer to use the machine. LCD SCREEN No. m Stitch width and Shows the zigzag width and stitch length settings of the selected stitch pattern cannot be used. • Be sure the needle position on the pattern, at the beginning and end of the selected stitch pattern. key The presser foot is set the automatic thread cutting function. Display Key Name Explanation Page k Sewing machine help Press this key to page reference number listed...
... additional operational information, refer to use the machine. LCD SCREEN No. m Stitch width and Shows the zigzag width and stitch length settings of the selected stitch pattern cannot be used. • Be sure the needle position on the pattern, at the beginning and end of the selected stitch pattern. key The presser foot is set the automatic thread cutting function. Display Key Name Explanation Page k Sewing machine help Press this key to page reference number listed...

Operation Manual
Page 25
...) Basic operations B-23 k When set to free motion sewing mode (see page S-15) j Change the height of the dual feed foot (see page S-39). Getting Ready a f i g j b k c d h e l l l a Select whether to use the sewing speed controller to display a different settings screen. LCD SCREEN Using the Machine Setting Mode Key B Press to change the default machine settings (needle stop position, opening display, etc.). 1 Memo • Press or next to the page numbers, to determine the zigzag width...
...) Basic operations B-23 k When set to free motion sewing mode (see page S-15) j Change the height of the dual feed foot (see page S-39). Getting Ready a f i g j b k c d h e l l l a Select whether to use the sewing speed controller to display a different settings screen. LCD SCREEN Using the Machine Setting Mode Key B Press to change the default machine settings (needle stop position, opening display, etc.). 1 Memo • Press or next to the page numbers, to determine the zigzag width...
Operation Manual
Page 39
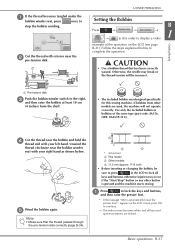
... designed specifically for this order to display a video example of the same type (part code: SA156, (SFB: XA5539-151)). Unwind the thread clockwise near the bobbin and hold the thread end with your right hand as shown below to lock the keys and raise the presser foot. a If the thread becomes tangled under the bobbin winder seat, press once to automatically lower the presser foot? Getting Ready CAUTION • Use a bobbin thread...
... designed specifically for this order to display a video example of the same type (part code: SA156, (SFB: XA5539-151)). Unwind the thread clockwise near the bobbin and hold the thread end with your right hand as shown below to lock the keys and raise the presser foot. a If the thread becomes tangled under the bobbin winder seat, press once to automatically lower the presser foot? Getting Ready CAUTION • Use a bobbin thread...
Operation Manual
Page 78
...9632; Cord Guide Bobbin Cover (Using a Zigzag Stitch 32 Elastic Zigzag Stitches 33 ■ Tape Attaching 33 ■ Overcasting 33 Overcasting 33 ■ Overcasting Using Presser Foot "G 33 ■ Overcasting Using Presser Foot "J 34 Quilting 35 ■ Piecing 36 ■ Piecing Using the 1/4" Quilting Foot with Guide (optional with some models 37 ■ Appliqu 38 ■ Quilting 38 ■ Quilting with Satin Stitches 39 ■ Free Motion Quilting 40 ■ Echo Quilting Using the Free Motion Echo Quilting Foot "E" (optional with some models 43 Blind Hem Stitches 45...
...9632; Cord Guide Bobbin Cover (Using a Zigzag Stitch 32 Elastic Zigzag Stitches 33 ■ Tape Attaching 33 ■ Overcasting 33 Overcasting 33 ■ Overcasting Using Presser Foot "G 33 ■ Overcasting Using Presser Foot "J 34 Quilting 35 ■ Piecing 36 ■ Piecing Using the 1/4" Quilting Foot with Guide (optional with some models 37 ■ Appliqu 38 ■ Quilting 38 ■ Quilting with Satin Stitches 39 ■ Free Motion Quilting 40 ■ Echo Quilting Using the Free Motion Echo Quilting Foot "E" (optional with some models 43 Blind Hem Stitches 45...
Operation Manual
Page 98
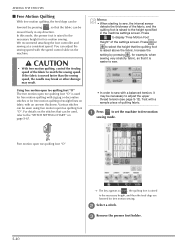
... quilting fabric. a Press to set the machine to adjust the upper thread tension (see page S-12). Test with a sample piece of the settings screen. b Select a stitch. c Remove the presser foot holder. In this mode, the presser foot is raised to the height specified in any direction. CAUTION • With free motion quilting, control the feeding speed of the fabric, and the quilting foot is raised to the necessary height, and then the feed dogs are lowered for free motion sewing. Using free motion open toe quilting foot "O" The free motion open...
... quilting fabric. a Press to set the machine to adjust the upper thread tension (see page S-12). Test with a sample piece of the settings screen. b Select a stitch. c Remove the presser foot holder. In this mode, the presser foot is raised to the height specified in any direction. CAUTION • With free motion quilting, control the feeding speed of the fabric, and the quilting foot is raised to the necessary height, and then the feed dogs are lowered for free motion sewing. Using free motion open toe quilting foot "O" The free motion open...
Operation Manual
Page 99
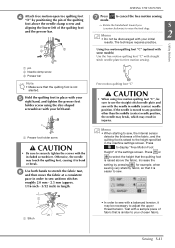
... of the quilting foot and the presser bar. f Use both hands to stretch the and then move the fabric at a fabric taut, consistent pace in injuries. a pin b Needle clamp screw c Presser bar Note • Make sure that the quilting foot is similar to any position other than the middle (center) needle position, the needle may break, which may result in order to raise the feed dogs. SEWING THE STITCHES g Press mode. to cancel the free motion sewing Rotate...
... of the quilting foot and the presser bar. f Use both hands to stretch the and then move the fabric at a fabric taut, consistent pace in injuries. a pin b Needle clamp screw c Presser bar Note • Make sure that the quilting foot is similar to any position other than the middle (center) needle position, the needle may break, which may result in order to raise the feed dogs. SEWING THE STITCHES g Press mode. to cancel the free motion sewing Rotate...
Operation Manual
Page 119
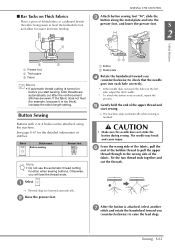
...; Make sure the needle does not strike the button during sewing. Button Sewing Buttons with 2 or 4 holes can be attached, using the machine. the upper thread and The machine stops automatically when sewing is too thick), increase the stitch length setting. If the fabric does not feed (for easier and even feeding. Otherwise, you will lose the thread ends. Sewing S-61 SEWING THE STITCHES c Attach button button sewing foot "M", slide the along the metal plate and into each hole correctly. * If the needle...
...; Make sure the needle does not strike the button during sewing. Button Sewing Buttons with 2 or 4 holes can be attached, using the machine. the upper thread and The machine stops automatically when sewing is too thick), increase the stitch length setting. If the fabric does not feed (for easier and even feeding. Otherwise, you will lose the thread ends. Sewing S-61 SEWING THE STITCHES c Attach button button sewing foot "M", slide the along the metal plate and into each hole correctly. * If the needle...
Operation Manual
Page 143
... machine default setting is raised to display an enlarged image of the selected stitch S-88 pattern. S-40 The feed dog is lowered and presser foot is highlighted. UP/DOWN" of the stitch pattern (large, small). c Free motion mode key Press this key to a height appropriate for the selected stitch pattern. S-12 Character/Decorative Stitches h Thread tension key Shows the thread tension setting for free motion quilting. "Basic (Single/Double) operations" l Size selection key Use this key to enter free motion sewing...
... machine default setting is raised to display an enlarged image of the selected stitch S-88 pattern. S-40 The feed dog is lowered and presser foot is highlighted. UP/DOWN" of the stitch pattern (large, small). c Free motion mode key Press this key to a height appropriate for the selected stitch pattern. S-12 Character/Decorative Stitches h Thread tension key Shows the thread tension setting for free motion quilting. "Basic (Single/Double) operations" l Size selection key Use this key to enter free motion sewing...
Operation Manual
Page 172
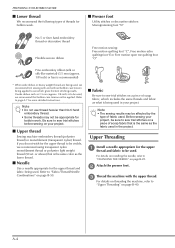
...9632; Bobbin case and bobbin cover 3 ■ Lower thread 4 ■ Upper thread 4 ■ Needle 4 ■ Presser foot 4 ■ Fabric 4 Upper Threading 4 Preparing the Bobbin Thread 5 ■ When tension is applied to the bobbin thread 6 ■ When tension is not applied to the bobbin thread 7 CREATING BOBBIN WORK 9 Positioning the Fabric and Sewing 9 ■ Finishing the thread ends 11 Bobbin Work Free Motion Sewing 11 ADJUSTING THE THREAD TENSION 12 ■ Adjusting the upper thread tension 12 ■ Adjusting the tension of the bobbin thread 12 TROUBLESHOOTING 13...
...9632; Bobbin case and bobbin cover 3 ■ Lower thread 4 ■ Upper thread 4 ■ Needle 4 ■ Presser foot 4 ■ Fabric 4 Upper Threading 4 Preparing the Bobbin Thread 5 ■ When tension is applied to the bobbin thread 6 ■ When tension is not applied to the bobbin thread 7 CREATING BOBBIN WORK 9 Positioning the Fabric and Sewing 9 ■ Finishing the thread ends 11 Bobbin Work Free Motion Sewing 11 ADJUSTING THE THREAD TENSION 12 ■ Adjusting the upper thread tension 12 ■ Adjusting the tension of the bobbin thread 12 TROUBLESHOOTING 13...
Operation Manual
Page 174
... bobbin work . ■ Presser foot Utility stitches or decorative stitches: Monogramming foot "N" No.5 or finer hand embroidery thread or decorative thread Flexible woven ribbon Free motion sewing: Free motion quilting foot "C", Free motion echo quilting foot "E or Free motion open toe quilting foot "O" Fine embroidery ribbon (silk or silk-like material) (3.5 mm (approx. 1/8 inch) or less is being applied to sew trial stitches on page B-40. or above) that bobbin case tension not be used . PREPARING FOR BOBBIN WORK ■ Lower thread We recommend the following types of threads...
... bobbin work . ■ Presser foot Utility stitches or decorative stitches: Monogramming foot "N" No.5 or finer hand embroidery thread or decorative thread Flexible woven ribbon Free motion sewing: Free motion quilting foot "C", Free motion echo quilting foot "E or Free motion open toe quilting foot "O" Fine embroidery ribbon (silk or silk-like material) (3.5 mm (approx. 1/8 inch) or less is being applied to sew trial stitches on page B-40. or above) that bobbin case tension not be used . PREPARING FOR BOBBIN WORK ■ Lower thread We recommend the following types of threads...
Operation Manual
Page 196
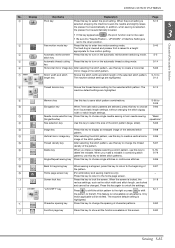
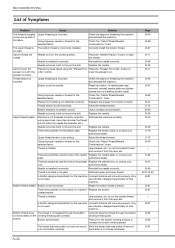
.... Using improper needle or thread for threading the machine and rethread the machine. Correctly install the bobbin thread. Reset the bobbin. (If needle plate was removed, reinstall needle plate and tighten screws prior to raise the needle. Presser foot holder is incorrect. Replace the needle. wrong spool cap, spool cap is loose, the thread did not catch the needle bar threader, etc.) Needle is turned, bent or the point is too strong. Upper thread tension is dull. A bobbin designed specifically for this machine Incorrect bobbins will not work properly. Thread is...
.... Using improper needle or thread for threading the machine and rethread the machine. Correctly install the bobbin thread. Reset the bobbin. (If needle plate was removed, reinstall needle plate and tighten screws prior to raise the needle. Presser foot holder is incorrect. Replace the needle. wrong spool cap, spool cap is loose, the thread did not catch the needle bar threader, etc.) Needle is turned, bent or the point is too strong. Upper thread tension is dull. A bobbin designed specifically for this machine Incorrect bobbins will not work properly. Thread is...

Operation Manual
Page 197
... dealer. Replace the bobbin case, or consult your authorized dealer. Replace the needle. Upper threading is attached incorrectly. Reset the bobbin thread correctly. Presser foot is incorrect. Attach the presser foot correctly. Securely tighten the screw of the presser foot. Use fabric that the needle can pierce when the handwheel is incorrectly wound. Fabric is a mistake in the down position. Adjust the stitch length. Bobbin thread is turned. Feed dogs are scratches around the holes in the Replace the presser foot, or consult your presser foot. Press...
... dealer. Replace the bobbin case, or consult your authorized dealer. Replace the needle. Upper threading is attached incorrectly. Reset the bobbin thread correctly. Presser foot is incorrect. Attach the presser foot correctly. Securely tighten the screw of the presser foot. Use fabric that the needle can pierce when the handwheel is incorrectly wound. Fabric is a mistake in the down position. Adjust the stitch length. Bobbin thread is turned. Feed dogs are scratches around the holes in the Replace the presser foot, or consult your presser foot. Press...
Operation Manual
Page 198
... foot controller, or use a stabilizer material on thin fabrics Attach a stabilizer material. use a bobbin designed specifically for threading the machine and rethread the machine. Pattern adjustment settings were set for operating the machine correctly. The fabric feeds in the feed dogs. TROUBLESHOOTING Problem Cause Solution High-pitched sound Dust or lint is caught in the The feed mechanism is damaged. or stretch fabrics. Also, depending on the bobbin case. Adjust the thread tension. At these times, the machine will not work properly. to ON. Presser foot...
... foot controller, or use a stabilizer material on thin fabrics Attach a stabilizer material. use a bobbin designed specifically for threading the machine and rethread the machine. Pattern adjustment settings were set for operating the machine correctly. The fabric feeds in the feed dogs. TROUBLESHOOTING Problem Cause Solution High-pitched sound Dust or lint is caught in the The feed mechanism is damaged. or stretch fabrics. Also, depending on the bobbin case. Adjust the thread tension. At these times, the machine will not work properly. to ON. Presser foot...
Operation Manual
Page 204
..., S-107 Insert key S-109 K Key functions character/decorative stitches S-84 MY CUSTOM STITCH S-105 , utility stitches B-21 Knee lifter B-9 S-15 L , L/R SHIFT S-11 LCD screen B-9 B-20 cleaning A-15 locking S-18 Lower threading pulling up the bobbin thread B-39 setting B-37 winding B-32 Bobbin case cleaning A-15 , Bobbin clip B-13 Bobbin cover B-10 B-38 Bobbin holder (switch B-34 Bobbin winder B-9 Bobbin work A-2 Button sewing S-61 4 hole buttons S-62 , , shank S-62 Buttonhole lever B-10 S-56 S-59 Buttonholes odd-shaped/buttons that do not fit the button holder plate ....
..., S-107 Insert key S-109 K Key functions character/decorative stitches S-84 MY CUSTOM STITCH S-105 , utility stitches B-21 Knee lifter B-9 S-15 L , L/R SHIFT S-11 LCD screen B-9 B-20 cleaning A-15 locking S-18 Lower threading pulling up the bobbin thread B-39 setting B-37 winding B-32 Bobbin case cleaning A-15 , Bobbin clip B-13 Bobbin cover B-10 B-38 Bobbin holder (switch B-34 Bobbin winder B-9 Bobbin work A-2 Button sewing S-61 4 hole buttons S-62 , , shank S-62 Buttonhole lever B-10 S-56 S-59 Buttonholes odd-shaped/buttons that do not fit the button holder plate ....
Operation Manual
Page 205
...23 stitch length S-10 stitch width S-10 thread tension S-12 , , Sewing machine help key B-28 Sewing speed controller (speed control slide B-9 B-11 S-3 Sewing type selection key B-30 Shelltuck stitches S-49 Shutoff support mode B-26 Single/Repeat sewing key S-86 Single/Triple stitching key S-106 Size selection key S-86 Smocking stitches S-51 Speaker B-24 Special spool cap B-33 Specifications A-31 Spool cap B-9 Spool net B-45 Spool pin B-9 Start/Stop button B-11 Step stitch patterns S-92 Stitch setting chart S-67 Straight stitch foot S-26 Straight stitch needle plate S-26...
...23 stitch length S-10 stitch width S-10 thread tension S-12 , , Sewing machine help key B-28 Sewing speed controller (speed control slide B-9 B-11 S-3 Sewing type selection key B-30 Shelltuck stitches S-49 Shutoff support mode B-26 Single/Repeat sewing key S-86 Single/Triple stitching key S-106 Size selection key S-86 Smocking stitches S-51 Speaker B-24 Special spool cap B-33 Specifications A-31 Spool cap B-9 Spool net B-45 Spool pin B-9 Start/Stop button B-11 Step stitch patterns S-92 Stitch setting chart S-67 Straight stitch foot S-26 Straight stitch needle plate S-26...


