
Users Manual - English
Page 1
SE-BrotherE_sgml.book Page 1 Monday, June 30, 2003 3:44 PM CPS5X V[Y GETTING READY SEWING BASICS UTILITY STITCHES EMBROIDERY APPENDIX Easy Thread Cassette System Operation Manual
SE-BrotherE_sgml.book Page 1 Monday, June 30, 2003 3:44 PM CPS5X V[Y GETTING READY SEWING BASICS UTILITY STITCHES EMBROIDERY APPENDIX Easy Thread Cassette System Operation Manual

Users Manual - English
Page 2
...500D XC5370-023 500 XC5370-024 Cover A Included Accessories After opening the box, check that the following accessories are included. only) z Foot controller: Model N5V This foot controller can be used on machine) XC3021-051 21 Needle-changing tool 6 Blind stitch foot "R" XC4051-051 22 Operation manual... (white) 12 Cleaning brush X59476-051 28 Grid sheet set : on machine 1set: in carton) 5 Zigzag foot "J" (on this machine model 500D/500, HE-120. Part Name Part Code U.S.A. If any item is available through your retailer. Accessories Note (For U.S.A. z The screw of the...
...500D XC5370-023 500 XC5370-024 Cover A Included Accessories After opening the box, check that the following accessories are included. only) z Foot controller: Model N5V This foot controller can be used on machine) XC3021-051 21 Needle-changing tool 6 Blind stitch foot "R" XC4051-051 22 Operation manual... (white) 12 Cleaning brush X59476-051 28 Grid sheet set : on machine 1set: in carton) 5 Zigzag foot "J" (on this machine model 500D/500, HE-120. Part Name Part Code U.S.A. If any item is available through your retailer. Accessories Note (For U.S.A. z The screw of the...

Users Manual - English
Page 9
...a spool of the various functions. Before using this sewing machine, carefully read the "Important Safety Instructions" (page 8), and then study this manual, store it where it can be cut automatically after you for purchasing this sewing machine. SE-BrotherE_sgml.book Page 3 Monday, June 30, 2003... 3:44 PM Introduction Introduction Thank you have finished reading this manual for the correct operation of thread into the compartment to thread the needle. (page 24) b Simple bobbin-winding The bobbin can quickly...
...a spool of the various functions. Before using this sewing machine, carefully read the "Important Safety Instructions" (page 8), and then study this manual, store it where it can be cut automatically after you for purchasing this sewing machine. SE-BrotherE_sgml.book Page 3 Monday, June 30, 2003... 3:44 PM Introduction Introduction Thank you have finished reading this manual for the correct operation of thread into the compartment to thread the needle. (page 24) b Simple bobbin-winding The bobbin can quickly...

Users Manual - English
Page 10
... spool of thread ...23 Loading the spool into the thread cassette ...24 Threading the needle ...27 Using the extra spool pin ...29 Thread the needle manually (without using the needle threader 30 Using the twin needle ...31 Pulling up the bobbin thread...33 Replacing the Needle ...35 Needle precautions ...35 Needle...
... spool of thread ...23 Loading the spool into the thread cassette ...24 Threading the needle ...27 Using the extra spool pin ...29 Thread the needle manually (without using the needle threader 30 Using the twin needle ...31 Pulling up the bobbin thread...33 Replacing the Needle ...35 Needle precautions ...35 Needle...

Users Manual - English
Page 14
...the machine is used or where oxygen is intended for examination, repair, electrical or mechanical adjustment. 4. Never operate the machine with this manual. 3. To unplug, grasp the plug, not the cord. 10.Keep fingers away from the electrical outlet immediately after using and before... dealer. Always unplug the machine from all instructions before cleaning. Use only accessories recommended by the manufacturer as contained in the instruction manual. 16.This sewing machine is damaged, it must be used as threading needle, changing needle, threading bobbin, or changing presser foot...
...the machine is used or where oxygen is intended for examination, repair, electrical or mechanical adjustment. 4. Never operate the machine with this manual. 3. To unplug, grasp the plug, not the cord. 10.Keep fingers away from the electrical outlet immediately after using and before... dealer. Always unplug the machine from all instructions before cleaning. Use only accessories recommended by the manufacturer as contained in the instruction manual. 16.This sewing machine is damaged, it must be used as threading needle, changing needle, threading bobbin, or changing presser foot...

Users Manual - English
Page 16
...other parts • A power failure occurs during use extension cords. To fully enjoy all the features, we suggest that you study the manual before using the machine. When storing this machine, avoid direct sunlight and high humidity locations. For additional product information and updates, visit ...our web site at www.brother.com 10 Do not store anything on the needle while sewing. Do not use • Maintaining the machine • Leaving the machine...
...other parts • A power failure occurs during use extension cords. To fully enjoy all the features, we suggest that you study the manual before using the machine. When storing this machine, avoid direct sunlight and high humidity locations. For additional product information and updates, visit ...our web site at www.brother.com 10 Do not store anything on the needle while sewing. Do not use • Maintaining the machine • Leaving the machine...

Users Manual - English
Page 23
... item selection screen. Press (Sewing machine help screen appears. X The sewing machine help key) on . Press the item to the corresponding page in this Operation Manual. Note z For details on each topic, refer to be displayed. a X The LCD comes on the b display panel. Turn on the LCD. c 2 3 1 4 After you finish looking...
... item selection screen. Press (Sewing machine help screen appears. X The sewing machine help key) on . Press the item to the corresponding page in this Operation Manual. Note z For details on each topic, refer to be displayed. a X The LCD comes on the b display panel. Turn on the LCD. c 2 3 1 4 After you finish looking...
Users Manual - English
Page 33
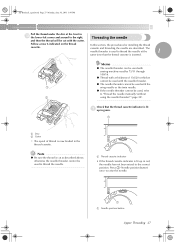
... the 1 wing needle or the twin needle. Press (Needle position button) once to the correct position. The needle threader is used to "Thread the needle manually (without 2 using the needle threader)" (page 30). Note z Be sure the thread is cut as described above, otherwise the needle threader cannot be used to...
... the 1 wing needle or the twin needle. Press (Needle position button) once to the correct position. The needle threader is used to "Thread the needle manually (without 2 using the needle threader)" (page 30). Note z Be sure the thread is cut as described above, otherwise the needle threader cannot be used to...
Users Manual - English
Page 36
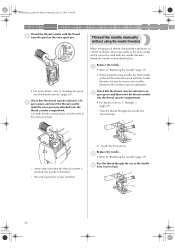
... then insert the thread cassette into the thread cassette compartment. Check that the thread cassette is inserted, the needle is now installed. Thread the needle manually (without using special thread, thread with a thickness of 130/20 or thicker, the wing needle or the twin needle which cannot be used with the...
... then insert the thread cassette into the thread cassette compartment. Check that the thread cassette is inserted, the needle is now installed. Thread the needle manually (without using special thread, thread with a thickness of 130/20 or thicker, the wing needle or the twin needle which cannot be used with the...
Users Manual - English
Page 38
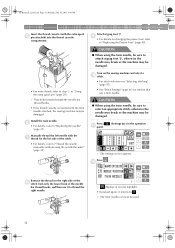
...; For details, refer to select an appropriate stitch, otherwise the needle may break or the machine may be damaged. Install the twin needle. Manually thread the left needle with the extra spool e pin attached) into the thread cassette compartment. X The twin needle can now be damaged.... Press . Attach zigzag foot "J". CAUTION ● When using the twin needle, be sure to "Thread the needle manually (without using the needle threader)" (page 30). SE-BrotherE_sgml.book Page 32 Monday, June 30, 2003 3:44 PM GETTING READY Insert the thread ...
...; For details, refer to select an appropriate stitch, otherwise the needle may break or the machine may be damaged. Install the twin needle. Manually thread the left needle with the extra spool e pin attached) into the thread cassette compartment. X The twin needle can now be damaged.... Press . Attach zigzag foot "J". CAUTION ● When using the twin needle, be sure to "Thread the needle manually (without using the needle threader)" (page 30). SE-BrotherE_sgml.book Page 32 Monday, June 30, 2003 3:44 PM GETTING READY Insert the thread ...
Users Manual - English
Page 72
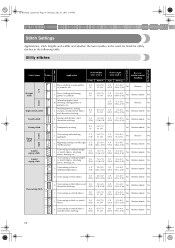
Stitch Width [mm (inch.)] Auto 0.0 (0) Manual 0.0-7.0 (0-1/4) Stitch Length [mm (inch.)] Auto Manual Reverse/ Reinforcement Stitching 2.5 (3/32) 0.2-5.0 (1/64-3/16) Yes Reverse No Left Straight stitch 2 J Basic stitching and sewing gathers or pintucks 0.0 (0) 0.0-7.0 (0-1/4) 2.5 (3/32) 0.2-5.0 (1/64-3/16) Yes Reinforcement Yes 3 4 ...
Stitch Width [mm (inch.)] Auto 0.0 (0) Manual 0.0-7.0 (0-1/4) Stitch Length [mm (inch.)] Auto Manual Reverse/ Reinforcement Stitching 2.5 (3/32) 0.2-5.0 (1/64-3/16) Yes Reverse No Left Straight stitch 2 J Basic stitching and sewing gathers or pintucks 0.0 (0) 0.0-7.0 (0-1/4) 2.5 (3/32) 0.2-5.0 (1/64-3/16) Yes Reinforcement Yes 3 4 ...

Users Manual - English
Page 73
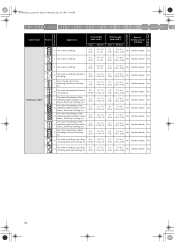
... Blind hem stitch 18 R Blind hem stitching on mediumweight fabrics R Blind hem stitching on stretch fabrics Stitch Width [mm (inch.)] Stitch Length [mm (inch.)] Auto Manual Auto Manual Reverse/ Reinforcement Stitching 0.0 (0) 3← - 3→ 2.0 (1/16) 1.0-3.5 (1/16-1/8) No Reinforcement No 0.0 (0) 3← - 3→ 2.0 (1/16) 1.0-3.5 (1/16-1/8) No Reinforcement No 19 Appliqué stitch J Appliqué stitching...
... Blind hem stitch 18 R Blind hem stitching on mediumweight fabrics R Blind hem stitching on stretch fabrics Stitch Width [mm (inch.)] Stitch Length [mm (inch.)] Auto Manual Auto Manual Reverse/ Reinforcement Stitching 0.0 (0) 3← - 3→ 2.0 (1/16) 1.0-3.5 (1/16-1/8) No Reinforcement No 0.0 (0) 3← - 3→ 2.0 (1/16) 1.0-3.5 (1/16-1/8) No Reinforcement No 19 Appliqué stitch J Appliqué stitching...
Users Manual - English
Page 74
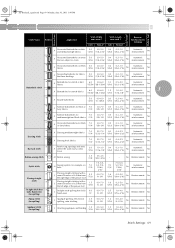
... 3:44 PM UTILITY STITCHES Presser Foot Twin Needle Walking Foot Stitch Name Pattern Application 29 J Decorative stitching Stitch Width [mm (inch.)] Auto 4.0 (3/16) Manual 0.0-7.0 (0-1/4) Stitch Length [mm (inch.)] Auto Manual Reverse/ Reinforcement Stitching 3.0 (1/8) 2.0-4.0 (1/16-3/16) No Reinforcement No 30 J Decorative stitching 4.0 (3/16) 0.0-7.0 (0-1/4) 2.5 (3/32) 1.0-4.0 (1/16-3/16) Yes Reinforcement No 31 J Decorative stitching 5.5 (7/32...
... 3:44 PM UTILITY STITCHES Presser Foot Twin Needle Walking Foot Stitch Name Pattern Application 29 J Decorative stitching Stitch Width [mm (inch.)] Auto 4.0 (3/16) Manual 0.0-7.0 (0-1/4) Stitch Length [mm (inch.)] Auto Manual Reverse/ Reinforcement Stitching 3.0 (1/8) 2.0-4.0 (1/16-3/16) No Reinforcement No 30 J Decorative stitching 4.0 (3/16) 0.0-7.0 (0-1/4) 2.5 (3/32) 1.0-4.0 (1/16-3/16) Yes Reinforcement No 31 J Decorative stitching 5.5 (7/32...
Users Manual - English
Page 75
... Twin Needle Walking Foot Stitch Name Pattern Application 42 A Horizontal buttonholes on thin and mediumweight fabrics Stitch Width [mm (inch.)] Stitch Length [mm (inch.)] Auto Manual Auto Manual Reverse/ Reinforcement Stitching 5.0 (3/16) 3.0-5.0 (1/8-3/16) 0.4 (1/64) 0.2-1.0 (1/64-1/16) No Automatic reinforcement No 43 A Horizontal buttonholes on areas that are subject to strain 5.0 (3/16) 3.0-5.0 (1/8-3/16...
... Twin Needle Walking Foot Stitch Name Pattern Application 42 A Horizontal buttonholes on thin and mediumweight fabrics Stitch Width [mm (inch.)] Stitch Length [mm (inch.)] Auto Manual Auto Manual Reverse/ Reinforcement Stitching 5.0 (3/16) 3.0-5.0 (1/8-3/16) 0.4 (1/64) 0.2-1.0 (1/64-1/16) No Automatic reinforcement No 43 A Horizontal buttonholes on areas that are subject to strain 5.0 (3/16) 3.0-5.0 (1/8-3/16...
Users Manual - English
Page 76
... Foot Stitch Name Quilting stitch (for stippling) Side cutter Pattern Application 62 J Quilting background stitching (stippling) Stitch Width [mm (inch.)] Stitch Length [mm (inch.)] Auto Manual Auto Manual Reverse/ Reinforcement Stitching 7.0 (1/4) 1.0-7.0 (1/16-1/4) 1.6 (1/16) 1.0-4.0 (1/16-3/16) No Reinforcement No 63 S Sewing straight stitches while cutting the fabric 0.0 (0) 0.0-2.5 (0-3/32) 2.5 (3/32) 0.2-5.0 (1/64-3/16) No Reinforcement...
... Foot Stitch Name Quilting stitch (for stippling) Side cutter Pattern Application 62 J Quilting background stitching (stippling) Stitch Width [mm (inch.)] Stitch Length [mm (inch.)] Auto Manual Auto Manual Reverse/ Reinforcement Stitching 7.0 (1/4) 1.0-7.0 (1/16-1/4) 1.6 (1/16) 1.0-4.0 (1/16-3/16) No Reinforcement No 63 S Sewing straight stitches while cutting the fabric 0.0 (0) 0.0-2.5 (0-3/32) 2.5 (3/32) 0.2-5.0 (1/64-3/16) No Reinforcement...
Users Manual - English
Page 80
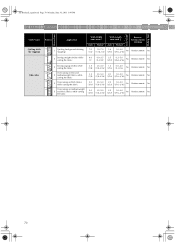
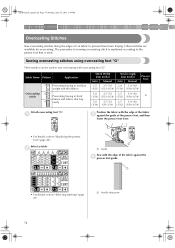
... Preventing fraying in thick fabrics and fabrics that is explained according to the presser foot that fray easily Stitch Width [mm (inch.)] Auto Manual Stitch Length [mm (inch.)] Auto Manual Presser Foot 3.5 2.5-5.0 2.0 1.0-4.0 (1/8) (3/32-3/16) (1/16) (1/16-3/16) 5.0 2.5-5.0 2.5 1.0-4.0 (3/16) (3/32-3/16) (3/32) (1/16-3/16) G 5.0 3.5-5.0 2.5 1.0-4.0 (3/16) (1/8-3/16) (3/32) (1/16-3/16) Attach overcasting foot "G". Select...
... Preventing fraying in thick fabrics and fabrics that is explained according to the presser foot that fray easily Stitch Width [mm (inch.)] Auto Manual Stitch Length [mm (inch.)] Auto Manual Presser Foot 3.5 2.5-5.0 2.0 1.0-4.0 (1/8) (3/32-3/16) (1/16) (1/16-3/16) 5.0 2.5-5.0 2.5 1.0-4.0 (3/16) (3/32-3/16) (3/32) (1/16-3/16) G 5.0 3.5-5.0 2.5 1.0-4.0 (3/16) (1/8-3/16) (3/32) (1/16-3/16) Attach overcasting foot "G". Select...
Users Manual - English
Page 81
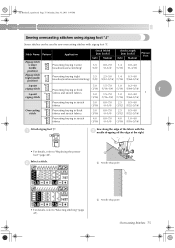
..." (page 40). Select a stitch. a J Sew along the edge of the fabric with zigzag foot "J". Stitch Name Pattern Application Stitch Width [mm (inch.)] Auto Manual Stitch Length [mm (inch.)] Auto Manual Presser Foot Zigzag stitch (center 7 needle position) Preventing fraying (center baseline/reverse stitching) 3.5 0.0-7.0 1.4 0.0-4.0 (1/8) (0-1/4) (1/16) (0-3/16) Zigzag stitch 8 (right needle position) Preventing fraying...
..." (page 40). Select a stitch. a J Sew along the edge of the fabric with zigzag foot "J". Stitch Name Pattern Application Stitch Width [mm (inch.)] Auto Manual Stitch Length [mm (inch.)] Auto Manual Presser Foot Zigzag stitch (center 7 needle position) Preventing fraying (center baseline/reverse stitching) 3.5 0.0-7.0 1.4 0.0-4.0 (1/8) (0-1/4) (1/16) (0-3/16) Zigzag stitch 8 (right needle position) Preventing fraying...
Users Manual - English
Page 82
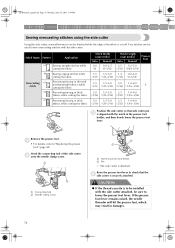
... side cutter attached, be sure to be installed with the notch in thick fabrics while cutting the fabric Stitch Width [mm (inch.)] Auto Manual Stitch Length [mm (inch.)] Auto Manual Presser Foot 0.0 0.0-2.5 2.5 0.2-5.0 (0) (0-3/32) (3/32) (1/64-3/16) 3.5 3.5-5.0 1.4 0.0-4.0 (1/8) (1/8-3/16) (1/16) (0-3/16) 3.5 3.5-5.0 2.0 1.0-4.0 (1/8) (1/8-3/16) (1/16) ( 1/16-3/16) S 5.0 3.5-5.0 2.5 1.0-4.0 (3/16) (1/8-3/16) (3/32) ( 1/16-3/16) 5.0 3.5-5.0 2.5 1.0-4.0 (3/16) (1/8-3/16) (3/32) ( 1/16...
... side cutter attached, be sure to be installed with the notch in thick fabrics while cutting the fabric Stitch Width [mm (inch.)] Auto Manual Stitch Length [mm (inch.)] Auto Manual Presser Foot 0.0 0.0-2.5 2.5 0.2-5.0 (0) (0-3/32) (3/32) (1/64-3/16) 3.5 3.5-5.0 1.4 0.0-4.0 (1/8) (1/8-3/16) (1/16) (0-3/16) 3.5 3.5-5.0 2.0 1.0-4.0 (1/8) (1/8-3/16) (1/16) ( 1/16-3/16) S 5.0 3.5-5.0 2.5 1.0-4.0 (3/16) (1/8-3/16) (3/32) ( 1/16-3/16) 5.0 3.5-5.0 2.5 1.0-4.0 (3/16) (1/8-3/16) (3/32) ( 1/16...
Users Manual - English
Page 84
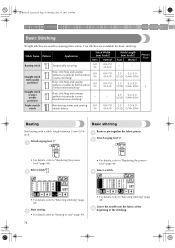
...available for basic stitching. Triple stretch 4 stitch Reinforcing seams and sewing 0.0 0.0-7.0 stretch fabrics (0) (0-1/4) Stitch Length [mm (inch.)] Auto Manual - - a Attach zigzag foot "J". Select a stitch. Start sewing. Attach zigzag foot "J". c • For details, refer to...• For details, refer to "Replacing the presser foot" (page 40). Stitch Name Pattern Application Stitch Width [mm (inch.)] Auto Manual 6 Basting stitch Temporarily securing 0.0 0.0-7.0 (0) (0-1/4) 1 Straight stitch (left needle position) 2 Basic stitching and sewing gathers or pintucks (...
...available for basic stitching. Triple stretch 4 stitch Reinforcing seams and sewing 0.0 0.0-7.0 stretch fabrics (0) (0-1/4) Stitch Length [mm (inch.)] Auto Manual - - a Attach zigzag foot "J". Select a stitch. Start sewing. Attach zigzag foot "J". c • For details, refer to...• For details, refer to "Replacing the presser foot" (page 40). Stitch Name Pattern Application Stitch Width [mm (inch.)] Auto Manual 6 Basting stitch Temporarily securing 0.0 0.0-7.0 (0) (0-1/4) 1 Straight stitch (left needle position) 2 Basic stitching and sewing gathers or pintucks (...

Users Manual - English
Page 86
... Blind hem stitch 18 Blind hem stitching on mediumweight fabrics Blind hem stitching on stretch fabrics Stitch Width [mm (inch.)] Auto Manual 0.0 (0) 3← - 3→ 0.0 (0) 3← - 3→ Stitch Length [mm (inch.)] Auto Manual 2.0 1.0-3.5 (1/16) (1/16-1/8) 2.0 1.0-3.5 (1/16) (1/16-1/8) Presser Foot R Sew a blind hem according to "Selecting stitching" (page 47). Two stitches are available for...
... Blind hem stitch 18 Blind hem stitching on mediumweight fabrics Blind hem stitching on stretch fabrics Stitch Width [mm (inch.)] Auto Manual 0.0 (0) 3← - 3→ 0.0 (0) 3← - 3→ Stitch Length [mm (inch.)] Auto Manual 2.0 1.0-3.5 (1/16) (1/16-1/8) 2.0 1.0-3.5 (1/16) (1/16-1/8) Presser Foot R Sew a blind hem according to "Selecting stitching" (page 47). Two stitches are available for...


