

Users Manual - English
Page 3
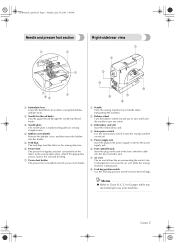
... during free-arm sewing. j Operation buttons Use the operation buttons to create a table. g Embroidery unit connector slot Plug in the connector for bobbin winding Pass the thread around this spool pin in the operation panel. (page Cover E) l Bobbin winder Use the bobbin winder when winding the bobbin. h Flap Use the flap to start the sewing machine and raise and lower the needle. (page Cover D) k Operation panel Select a stitch from those that appear in order to eject the installed thread cassette. Remove the flap to cut them. p Thread guide...
... during free-arm sewing. j Operation buttons Use the operation buttons to create a table. g Embroidery unit connector slot Plug in the connector for bobbin winding Pass the thread around this spool pin in the operation panel. (page Cover E) l Bobbin winder Use the bobbin winder when winding the bobbin. h Flap Use the flap to start the sewing machine and raise and lower the needle. (page Cover D) k Operation panel Select a stitch from those that appear in order to eject the installed thread cassette. Remove the flap to cut them. p Thread guide...
Users Manual - English
Page 4
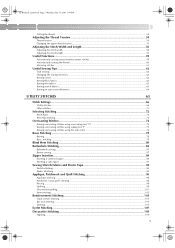
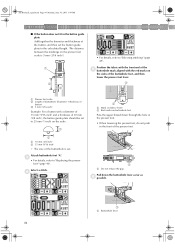
... the sewing machine is installed onto the presser foot holder. 4 8 5 7 6 a Handle Carry the sewing machine by its handle when transporting the machine. Attach the appropriate presser foot for sewing straight seams. d Bobbin cover/Shuttle Remove the bobbin cover, and then insert the bobbin into the shuttle. h Feed dog position switch Use the feed dog position switch to use your machine. d Main power switch Use the main power switch to turn the sewing machine on the fabric as the sewing takes place. c Needle plate The needle plate is marked with guides for the selected stitching...
... the sewing machine is installed onto the presser foot holder. 4 8 5 7 6 a Handle Carry the sewing machine by its handle when transporting the machine. Attach the appropriate presser foot for sewing straight seams. d Bobbin cover/Shuttle Remove the bobbin cover, and then insert the bobbin into the shuttle. h Feed dog position switch Use the feed dog position switch to use your machine. d Main power switch Use the main power switch to turn the sewing machine on the fabric as the sewing takes place. c Needle plate The needle plate is marked with guides for the selected stitching...

Users Manual - English
Page 5
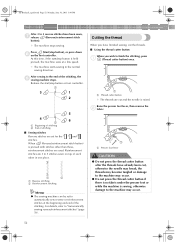
... to sew in the fabric. CAUTION ● Do not press the thread cutter button after sewing is stopped to cut , otherwise the needle may break, the threads may become tangled or damage to the machine may occur. Cover D Orange: The machine is winding the bobbin thread, or the bobbin winder shaft is lowered in the opposite direction. Reinforcement stitches are sewn by sewing 3 to 5 stitches on top of each other special threads, use the thread cutter...
... to sew in the fabric. CAUTION ● Do not press the thread cutter button after sewing is stopped to cut , otherwise the needle may break, the threads may become tangled or damage to the machine may occur. Cover D Orange: The machine is winding the bobbin thread, or the bobbin winder shaft is lowered in the opposite direction. Reinforcement stitches are sewn by sewing 3 to 5 stitches on top of each other special threads, use the thread cutter...

Users Manual - English
Page 10
...spool pin ...29 Thread the needle manually (without using the needle threader 30 Using the twin needle ...31 Pulling up the bobbin thread...33 Replacing the Needle ...35 Needle precautions ...35 Needle types and their uses...36 Checking the needle ...37 Replacing the needle...37 Replacing the Presser Foot 40 Presser foot precautions ...40 Replacing the presser foot ...40 Removing the presser foot holder ...42 Sewing Cylindrical Pieces 43 Free-arm sewing...43 SEWING BASICS 45 Sewing ...46 General sewing procedure ...46 Selecting stitching ...47 Positioning the fabric ...48 Starting to sew...
...spool pin ...29 Thread the needle manually (without using the needle threader 30 Using the twin needle ...31 Pulling up the bobbin thread...33 Replacing the Needle ...35 Needle precautions ...35 Needle types and their uses...36 Checking the needle ...37 Replacing the needle...37 Replacing the Presser Foot 40 Presser foot precautions ...40 Replacing the presser foot ...40 Removing the presser foot holder ...42 Sewing Cylindrical Pieces 43 Free-arm sewing...43 SEWING BASICS 45 Sewing ...46 General sewing procedure ...46 Selecting stitching ...47 Positioning the fabric ...48 Starting to sew...
Users Manual - English
Page 11
... stitches using zigzag foot "J 75 Sewing overcasting stitches using the side cutter 76 Basic Stitching ...78 Basting ...78 Basic stitching ...78 Blind Hem Stitching ...80 Buttonhole Stitching...82 Buttonhole sewing ...83 Button sewing ...87 Zipper Insertion...89 Inserting a centered zipper ...89 Inserting a side zipper ...91 Sewing Stretch Fabrics and Elastic Tape 94 Stretch stitching...94 Elastic attaching ...94 Appliqué, Patchwork and Quilt Stitching 96 Appliqué stitching ...96 Patchwork (crazy quilt) stitching ...98 Piecing ...98 Quilting ...99 Free-motion quilting...101 Satin...
... stitches using zigzag foot "J 75 Sewing overcasting stitches using the side cutter 76 Basic Stitching ...78 Basting ...78 Basic stitching ...78 Blind Hem Stitching ...80 Buttonhole Stitching...82 Buttonhole sewing ...83 Button sewing ...87 Zipper Insertion...89 Inserting a centered zipper ...89 Inserting a side zipper ...91 Sewing Stretch Fabrics and Elastic Tape 94 Stretch stitching...94 Elastic attaching ...94 Appliqué, Patchwork and Quilt Stitching 96 Appliqué stitching ...96 Patchwork (crazy quilt) stitching ...98 Piecing ...98 Quilting ...99 Free-motion quilting...101 Satin...

Users Manual - English
Page 16
... household sewing machines. Always consult the operation manual when replacing or installing any other moving parts. 2. For additional product information and updates, visit our web site at www.brother.com 10 When storing this machine, avoid direct sunlight and high humidity locations. Do not drop or hit the machine. 4. Do not touch the balance wheel, thread take-up lever, needle, or other parts • A power failure occurs during use extension cords...
... household sewing machines. Always consult the operation manual when replacing or installing any other moving parts. 2. For additional product information and updates, visit our web site at www.brother.com 10 When storing this machine, avoid direct sunlight and high humidity locations. Do not drop or hit the machine. 4. Do not touch the balance wheel, thread take-up lever, needle, or other parts • A power failure occurs during use extension cords...

Users Manual - English
Page 23
...of setting upper thread / bobbin winding / setting bobbin thread / needle † Example: Upper threading 1 replacement / embroidery unit attachment / embroidery frame attachment / embroidery foot attachment / presser foot replacement on the b display panel. Press (Sewing machine help screen appears. X The initial stitch screen appears again. Turn on . a X The LCD comes on the sewing machine. c 2 3 1 4 After you finish looking, press e two times. (Back key) 5 6 8 7 a Threading the upper thread b Winding the bobbin c Installing the bobbin d Needle replacement...
...of setting upper thread / bobbin winding / setting bobbin thread / needle † Example: Upper threading 1 replacement / embroidery unit attachment / embroidery frame attachment / embroidery foot attachment / presser foot replacement on the b display panel. Press (Sewing machine help screen appears. X The initial stitch screen appears again. Turn on . a X The LCD comes on the sewing machine. c 2 3 1 4 After you finish looking, press e two times. (Back key) 5 6 8 7 a Threading the upper thread b Winding the bobbin c Installing the bobbin d Needle replacement...

Users Manual - English
Page 27
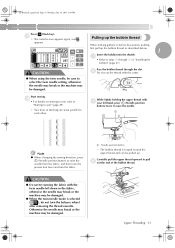
... "Winding bobbin thread..." Slide the bobbin winder shaft to its original position. o Remove the bobbin from the shaft. a 1 2 Remove the spool cap and spool. this sewing machine. Installing the bobbin X When winding is turned after winding the bobbin, the machine will not operate correctly. Use scissors to cut the end of the same type (part code: SA156, SFB:XA5539151). 11.5 mm (7/16 inch) Actual size This model Older model Slide the bobbin cover latch to the right. a Bobbin cover b Latch X The bobbin cover opens...
... "Winding bobbin thread..." Slide the bobbin winder shaft to its original position. o Remove the bobbin from the shaft. a 1 2 Remove the spool cap and spool. this sewing machine. Installing the bobbin X When winding is turned after winding the bobbin, the machine will not operate correctly. Use scissors to cut the end of the same type (part code: SA156, SFB:XA5539151). 11.5 mm (7/16 inch) Actual size This model Older model Slide the bobbin cover latch to the right. a Bobbin cover b Latch X The bobbin cover opens...
Users Manual - English
Page 39
... the fabric with the twin needle left hand, press (Needle position button) twice to raise the needle. 1 Note z When changing the sewing direction, press (Needle position button) to select the twin needle setting, otherwise the needle may break or the machine may be pulled up the bobbin thread as described below. 1 Insert the bobbin into the shuttle. Start sewing. While lightly holding the upper thread with the cutter. Upper Threading 33 m X The initial screen appears again, and appears. CAUTION ● When using the twin needle...
... the fabric with the twin needle left hand, press (Needle position button) twice to raise the needle. 1 Note z When changing the sewing direction, press (Needle position button) to select the twin needle setting, otherwise the needle may break or the machine may be pulled up the bobbin thread as described below. 1 Insert the bobbin into the shuttle. Start sewing. While lightly holding the upper thread with the cutter. Upper Threading 33 m X The initial screen appears again, and appears. CAUTION ● When using the twin needle...
Users Manual - English
Page 58
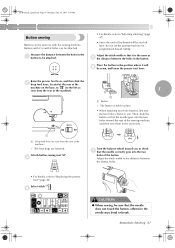
... foot controller. Reinforcement stitches are used. Raise the presser foot lever, then remove the b fabric. 1 a Presser foot lever CAUTION ● Do not press the thread cutter button after the threads have already been cut, otherwise the needle may break, the threads may become tangled or damage to the machine may occur. 52 X The machine starts sewing in one place. 1 2 a Reverse stitching b Reinforcement stitching Memo z The sewing machine can be set for the 1 3 and 7 stitches. Press (Start/stop button is held pressed, the machine sews...
... foot controller. Reinforcement stitches are used. Raise the presser foot lever, then remove the b fabric. 1 a Presser foot lever CAUTION ● Do not press the thread cutter button after the threads have already been cut, otherwise the needle may break, the threads may become tangled or damage to the machine may occur. 52 X The machine starts sewing in one place. 1 2 a Reverse stitching b Reinforcement stitching Memo z The sewing machine can be set for the 1 3 and 7 stitches. Press (Start/stop button is held pressed, the machine sews...

Users Manual - English
Page 62
... left needle position or triple stretch stitch) was selected, changing the stitch width changes the needle position. For details, refer to the right; SE-BrotherE_sgml.book Page 56 Monday, June 30, 2003 3:44 PM SEWING BASICS Adjusting the Stitch Width and Length The stitch width and length can be adjusted on the LCD. Adjusting the stitch width The zigzag width can be adjusted. X The LCD comes on the sewing machine. Select a stitch. X The stitch width is changed...
... left needle position or triple stretch stitch) was selected, changing the stitch width changes the needle position. For details, refer to the right; SE-BrotherE_sgml.book Page 56 Monday, June 30, 2003 3:44 PM SEWING BASICS Adjusting the Stitch Width and Length The stitch width and length can be adjusted on the LCD. Adjusting the stitch width The zigzag width can be adjusted. X The LCD comes on the sewing machine. Select a stitch. X The stitch width is changed...
Users Manual - English
Page 90
... button guide plate should be set to 25 mm (1 inch) on the scale. 1 A 2 a Mark on fabric (front) b Red marks on buttonhole foot Pass the upper thread down the buttonhole lever as far as f possible. 1 a Buttonhole lever 84 Pull down through the hole in the presser foot. • When lowering the presser foot, do not push in the button guide plate Add together the diameter and thickness of the button, and then set . SE-BrotherE_sgml.book...
... button guide plate should be set to 25 mm (1 inch) on the scale. 1 A 2 a Mark on fabric (front) b Red marks on buttonhole foot Pass the upper thread down the buttonhole lever as far as f possible. 1 a Buttonhole lever 84 Pull down through the hole in the presser foot. • When lowering the presser foot, do not push in the button guide plate Add together the diameter and thickness of the button, and then set . SE-BrotherE_sgml.book...
Users Manual - English
Page 93
... rear of the machine) X The feed dogs are lowered. Select stitch 55 . Measure the distance between the holes in the a button to be attached. • For details, refer to "Selecting stitching" (page 47). • Since the end of the thread will f be tied off later, do not set the sewing machine for programmed-thread cutting. Raise the presser foot lever, and then slide the b drop feed lever, located at the...
... rear of the machine) X The feed dogs are lowered. Select stitch 55 . Measure the distance between the holes in the a button to be attached. • For details, refer to "Selecting stitching" (page 47). • Since the end of the thread will f be tied off later, do not set the sewing machine for programmed-thread cutting. Raise the presser foot lever, and then slide the b drop feed lever, located at the...
Users Manual - English
Page 122
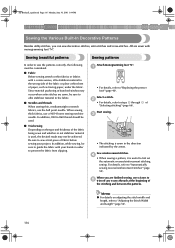
... thread should be sure to guide the fabric with monogramming foot "N". In addition, while sewing, be used. ■ Trial sewing Depending on adjusting the stitch width and length, refer to "Automatically sewing reverse/reinforcement stitches" (page 59). SE-BrotherE_sgml.book Page 116 Monday, June 30, 2003 3:44 PM UTILITY STITCHES Sewing the Various Built-In Decorative Patterns Besides utility stitches, you are finished sewing, use scissors to steps c through h of fabric before sewing your...
... thread should be sure to guide the fabric with monogramming foot "N". In addition, while sewing, be used. ■ Trial sewing Depending on adjusting the stitch width and length, refer to "Automatically sewing reverse/reinforcement stitches" (page 59). SE-BrotherE_sgml.book Page 116 Monday, June 30, 2003 3:44 PM UTILITY STITCHES Sewing the Various Built-In Decorative Patterns Besides utility stitches, you are finished sewing, use scissors to steps c through h of fabric before sewing your...

Users Manual - English
Page 170
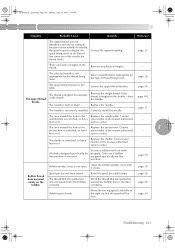
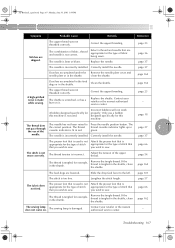
... foot controller is used . Lower the presser foot lever. Do not use the start /stop button, disconnect the foot controller. The combination of fabric being sewn. The spool is not correct. The area around the hole in the Replace the needle plate. Replace the shuttle. The sewing machine does not operate. The start /stop button was not pressed. Select a thread and needle that you wish to sew. Contact your retailer or the nearest authorized service center. Incorrect bobbins will not work...
... foot controller is used . Lower the presser foot lever. Do not use the start /stop button, disconnect the foot controller. The combination of fabric being sewn. The spool is not correct. The area around the hole in the Replace the needle plate. Replace the shuttle. The sewing machine does not operate. The start /stop button was not pressed. Select a thread and needle that you wish to sew. Contact your retailer or the nearest authorized service center. Incorrect bobbins will not work...
Users Manual - English
Page 171
... thread being used . Only use a bobbin designed specifically for the type of the needle bar thread hook). page 18 page 20 Bobbin spins slowly. page 54 The upper thread breaks. page 162 page 37 The area around the hole in the shuttle, clean the shuttle. burr on the bobbin. The thread that the speed will not work properly. The selected needle is tangled in the Replace the presser foot. The needle is appropriate for this machine is not used . Replace the shuttle. Spool pin...
... thread being used . Only use a bobbin designed specifically for the type of the needle bar thread hook). page 18 page 20 Bobbin spins slowly. page 54 The upper thread breaks. page 162 page 37 The area around the hole in the shuttle, clean the shuttle. burr on the bobbin. The thread that the speed will not work properly. The selected needle is tangled in the Replace the presser foot. The needle is appropriate for this machine is not used . Replace the shuttle. Spool pin...
Users Manual - English
Page 173
... needle. clean the shuttle. page 162 Dust has accumulated in the feed dogs or in green. The upper thread was not threaded correctly. Incorrect bobbins will not work properly. The needle is incorrectly installed. Slide the drop feed lever to the correct position. The presser foot that is used is not Attach the presser foot that you wish to sew. page 162 The sewing lamp does not come on it. Correct the upper threading. Replace the needle. Press the needle position button. Remove...
... needle. clean the shuttle. page 162 Dust has accumulated in the feed dogs or in green. The upper thread was not threaded correctly. Incorrect bobbins will not work properly. The needle is incorrectly installed. Slide the drop feed lever to the correct position. The presser foot that is used is not Attach the presser foot that you wish to sew. page 162 The sewing lamp does not come on it. Correct the upper threading. Replace the needle. Press the needle position button. Remove...

Users Manual - English
Page 180
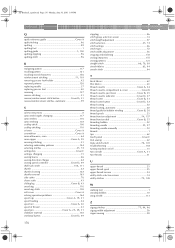
... basic stitching 78 basting stitch 78 beep 172 blind hem stitch 80 bobbin Cover A bobbin installation 21 bobbin shuttle Cover C bobbin storage compartment Cover B bobbin thread spool pin 18 bobbin thread, pulling up 33 bobbin threading 22 bobbin winder Cover B bobbin winding 18 bobbin winding thread guide 20 button guide plate 84 button sewing 87 buttonhole lever Cover C buttonhole sewing 83 buttonhole stitching 82 buzzer 172 C changing sewing direction 62 character storage 155 characters, recalling 156 checking needle 37 cleaning brush Cover A cleaning machine surface...
... basic stitching 78 basting stitch 78 beep 172 blind hem stitch 80 bobbin Cover A bobbin installation 21 bobbin shuttle Cover C bobbin storage compartment Cover B bobbin thread spool pin 18 bobbin thread, pulling up 33 bobbin threading 22 bobbin winder Cover B bobbin winding 18 bobbin winding thread guide 20 button guide plate 84 button sewing 87 buttonhole lever Cover C buttonhole sewing 83 buttonhole stitching 82 buzzer 172 C changing sewing direction 62 character storage 155 characters, recalling 156 checking needle 37 cleaning brush Cover A cleaning machine surface...

Users Manual - English
Page 181
...-motion quilting 101 front view Cover B G needle bar thread hooks Cover C needle condition 37 needle plate Cover C needle plate marking 64 needle position button Cover D needle position, changing 79 needle replacement 37 needle set Cover A needle threader 27 , needle threading 23 27 needle types, sizes & uses 36 , needle-changing tool Cover A 38 needles 35 next page key Cover E general sewing procedures 46 grid sheet set Cover A guide foot 1 H handle Cover C heirloom stitching 113 , help key Cover E 17 I inserting thread cassette 28 installing bobbin 21 O operation...
...-motion quilting 101 front view Cover B G needle bar thread hooks Cover C needle condition 37 needle plate Cover C needle plate marking 64 needle position button Cover D needle position, changing 79 needle replacement 37 needle set Cover A needle threader 27 , needle threading 23 27 needle types, sizes & uses 36 , needle-changing tool Cover A 38 needles 35 next page key Cover E general sewing procedures 46 grid sheet set Cover A guide foot 1 H handle Cover C heirloom stitching 113 , help key Cover E 17 I inserting thread cassette 28 installing bobbin 21 O operation...
Users Manual - English
Page 182
... Cover E settings, changing 15 sewing basics 46 sewing direction change 62 , sewing speed controller Cover D 49 , shell tuck stitch 108 111 shuttle 22 shuttle cleaning 162 shuttle removal 163 side cutter 76 sleeve cuffs 43 , sliding leg Cover B 43 smocking 110 smocking stitch 108 soft cover Cover A solving operation problems 164 spool cap Cover A, 19, 21 spool loading 24 , spool net Cover A 20 spool of thread 23 spool pin Cover A, 25, 29, 31 stabilizer material 138 , start/stop button Cover D 49 stippling 96 stitch group selection screen 14 stitch length adjustment...
... Cover E settings, changing 15 sewing basics 46 sewing direction change 62 , sewing speed controller Cover D 49 , shell tuck stitch 108 111 shuttle 22 shuttle cleaning 162 shuttle removal 163 side cutter 76 sleeve cuffs 43 , sliding leg Cover B 43 smocking 110 smocking stitch 108 soft cover Cover A solving operation problems 164 spool cap Cover A, 19, 21 spool loading 24 , spool net Cover A 20 spool of thread 23 spool pin Cover A, 25, 29, 31 stabilizer material 138 , start/stop button Cover D 49 stippling 96 stitch group selection screen 14 stitch length adjustment...


