
Users Manual - English
Page 10
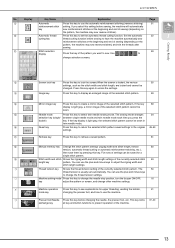
... presser foot lever. i j Turn on adjusting the upper thread tension, refer to check the sewing results. We recommend selecting a simple stitch and sewing trial stitches to the machine's Operation Manual. For details on the machine. When you have been turned off . p CAUTION • Before sewing, make sure the automatic thread cutting and automatic reinforcement/reverse stitching have reached the end of the machine, turn the handwheel to change the stitch length and stitch width settings. h Align the upper thread and bobbin thread...
... presser foot lever. i j Turn on adjusting the upper thread tension, refer to check the sewing results. We recommend selecting a simple stitch and sewing trial stitches to the machine's Operation Manual. For details on the machine. When you have been turned off . p CAUTION • Before sewing, make sure the automatic thread cutting and automatic reinforcement/reverse stitching have reached the end of the machine, turn the handwheel to change the stitch length and stitch width settings. h Align the upper thread and bobbin thread...

Software Users Manual/4.0 Operation Manual - English
Page 3
... pointer that appears when a USB mouse is important to perform the upgrade according to easily be rehooped when embroidering repeated patterns. • 150 decorative stitch patterns have been added as described in this guide. New machine features and benefits are described in the Operation Manual. Before You Start It is used as border patterns. ( or ) • Appliqué pieces can be freely adjusted. ( ) • Two additional...
... pointer that appears when a USB mouse is important to perform the upgrade according to easily be rehooped when embroidering repeated patterns. • 150 decorative stitch patterns have been added as described in this guide. New machine features and benefits are described in the Operation Manual. Before You Start It is used as border patterns. ( or ) • Appliqué pieces can be freely adjusted. ( ) • Two additional...
Operation Manual
Page 6
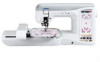
CONGRATULATIONS ON CHOOSING OUR MACHINE Your machine is completed • Replacing or removing the needle or any other parts • A power failure occurs during use extension cords. 5. PLEASE READ BEFORE USING THIS MACHINE For safe operation 1. Do not store anything on the unit. Never operate the machine if it has a damaged cord or plug, if it is not working properly, if it has been dropped or damaged, or water...
CONGRATULATIONS ON CHOOSING OUR MACHINE Your machine is completed • Replacing or removing the needle or any other parts • A power failure occurs during use extension cords. 5. PLEASE READ BEFORE USING THIS MACHINE For safe operation 1. Do not store anything on the unit. Never operate the machine if it has a damaged cord or plug, if it is not working properly, if it has been dropped or damaged, or water...
Operation Manual
Page 10
...a USB Mouse 14 Using the Machine Setting Mode Key 16 Using the Machine Operation Mode Key 21 Using the Pattern Explanation Key 22 LOWER THREADING 23 Winding the Bobbin 23 Setting the Bobbin 26 Pulling Up the Bobbin Thread 28 UPPER THREADING 29 Threading Using the "Automatic Threading" Button 29 Threading Manually 31 Using the Twin Needle Mode 34 Using Threads that Unwind Quickly 36 CHANGING THE PRESSER FOOT 37 Removing the Presser Foot 37 Attaching the Presser Foot 37 Attaching the Walking Foot 38 CHANGING THE NEEDLE 39 Chapter 2 Sewing Basics 43 SEWING 44 Sewing a Stitch...
...a USB Mouse 14 Using the Machine Setting Mode Key 16 Using the Machine Operation Mode Key 21 Using the Pattern Explanation Key 22 LOWER THREADING 23 Winding the Bobbin 23 Setting the Bobbin 26 Pulling Up the Bobbin Thread 28 UPPER THREADING 29 Threading Using the "Automatic Threading" Button 29 Threading Manually 31 Using the Twin Needle Mode 34 Using Threads that Unwind Quickly 36 CHANGING THE PRESSER FOOT 37 Removing the Presser Foot 37 Attaching the Presser Foot 37 Attaching the Walking Foot 38 CHANGING THE NEEDLE 39 Chapter 2 Sewing Basics 43 SEWING 44 Sewing a Stitch...
Operation Manual
Page 13
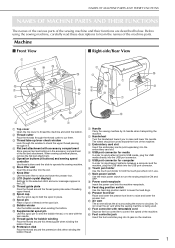
... described below. j Presser foot lever Raise and lower the presser foot lever to lower the feed dogs. Machine I Front View I Right-side/Rear View aa on the machine. 1 m Supplemental spool pin Use this thread guide when winding the bobbin thread. h l a Handle Carry the sewing machine by its jack on nm ml b lk c j a ih d f k i c ji e kj m b g hg fe dc ed gf a Top cover Open the top cover to operate the sewing machine. l Foot controller with the twin needle. c Embroidery card slot Insert the embroidery cards (sold separately) into...
... described below. j Presser foot lever Raise and lower the presser foot lever to lower the feed dogs. Machine I Front View I Right-side/Rear View aa on the machine. 1 m Supplemental spool pin Use this thread guide when winding the bobbin thread. h l a Handle Carry the sewing machine by its jack on nm ml b lk c j a ih d f k i c ji e kj m b g hg fe dc ed gf a Top cover Open the top cover to operate the sewing machine. l Foot controller with the twin needle. c Embroidery card slot Insert the embroidery cards (sold separately) into...
Operation Manual
Page 14
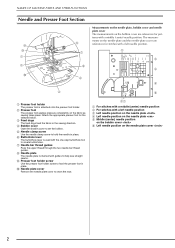
...) needle position. c Feed dogs The feed dogs feed the fabric in place. g Needle bar thread guides Pass the upper thread through the two needle bar thread guides. j Needle plate cover Remove the needle plate cover to set the bobbin. e Needle clamp screw Use the needle clamp screw to hold the presser foot in place. d Bobbin cover Open the bobbin cover to clean the race. f Buttonhole lever The buttonhole lever is attached onto the presser foot holder. ba a For stitches with a middle (center) needle position b For stitches with a left needle position. NAMES OF MACHINE PARTS AND...
...) needle position. c Feed dogs The feed dogs feed the fabric in place. g Needle bar thread guides Pass the upper thread through the two needle bar thread guides. j Needle plate cover Remove the needle plate cover to set the bobbin. e Needle clamp screw Use the needle clamp screw to hold the presser foot in place. d Bobbin cover Open the bobbin cover to clean the race. f Buttonhole lever The buttonhole lever is attached onto the presser foot holder. ba a For stitches with a middle (center) needle position b For stitches with a left needle position. NAMES OF MACHINE PARTS AND...
Operation Manual
Page 15
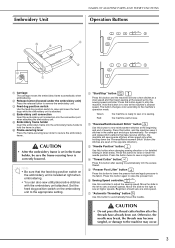
... sewing. f Sewing Speed controller Use this button to lower the presser foot and apply pressure to sew reinforcement stitches at low speed only while holding down to sew a single stitch. Embroidery Unit NAMES OF MACHINE PARTS AND THEIR FUNCTIONS Operation Buttons d e f c b a a Carriage The carriage moves the embroidery frame automatically when embroidering. Press the button again to sew or is set by the sewing speed controller. For straight and zigzag stitch patterns that the feed dog position switch on the embroidery unit to automatically thread the needle. Move...
... sewing. f Sewing Speed controller Use this button to lower the presser foot and apply pressure to sew reinforcement stitches at low speed only while holding down to sew a single stitch. Embroidery Unit NAMES OF MACHINE PARTS AND THEIR FUNCTIONS Operation Buttons d e f c b a a Carriage The carriage moves the embroidery frame automatically when embroidering. Press the button again to sew or is set by the sewing speed controller. For straight and zigzag stitch patterns that the feed dog position switch on the embroidery unit to automatically thread the needle. Move...
Operation Manual
Page 18
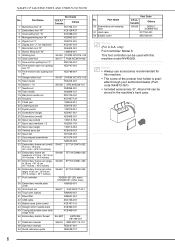
... 43 Bobbin case (pink screw) XC8167-151 44 Straight stitch needle plate XC8362-051 45 Cord guide bobbin cover (with this machine. • The screw of the presser foot holder is available through your authorized dealer (Part code XA4813-051). • Included accessories 37, 48 and 49 can be stored in the machine's hard case. 6 NAMES OF MACHINE PARTS AND THEIR FUNCTIONS Part Code No. only) Foot controller: Model S This foot controller can be used with single hole) XC8449-051 46 Embroidery bobbin thread SA...
... 43 Bobbin case (pink screw) XC8167-151 44 Straight stitch needle plate XC8362-051 45 Cord guide bobbin cover (with this machine. • The screw of the presser foot holder is available through your authorized dealer (Part code XA4813-051). • Included accessories 37, 48 and 49 can be stored in the machine's hard case. 6 NAMES OF MACHINE PARTS AND THEIR FUNCTIONS Part Code No. only) Foot controller: Model S This foot controller can be used with single hole) XC8449-051 46 Embroidery bobbin thread SA...
Operation Manual
Page 24
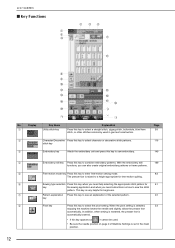
... see an explanation of Machine Settings is automatically lowered. • If this key when you need instructions on page 2 of the selected pattern. 22 key h Pivot key Press this key to enter free-motion sewing mode. 83 The presser foot is selected, 53 stopping the machine lowers the needle and slightly raises the presser foot automatically. With the embroidery edit 199 functions, you need help selecting the appropriate stitch pattern for 61 key...
... see an explanation of Machine Settings is automatically lowered. • If this key when you need instructions on page 2 of the selected pattern. 22 key h Pivot key Press this key to enter free-motion sewing mode. 83 The presser foot is selected, 53 stopping the machine lowers the needle and slightly raises the presser foot automatically. With the embroidery edit 199 functions, you need help selecting the appropriate stitch pattern for 61 key...
Operation Manual
Page 25
... the selected stitch pattern cannot be sewn in twin needle mode. t Thread tension key Shows the thread tension setting of the currently selected stitch 49 length key pattern. v Machine operation Press this setting before changing the needle, the presser foot, etc. If you select this key to set automatically. If the key display is light gray, a mirror image of sewing (depending on the pattern, the machine may sew reverse stitches) and trim the threads after sewing. Getting Ready l Screen lock key...
... the selected stitch pattern cannot be sewn in twin needle mode. t Thread tension key Shows the thread tension setting of the currently selected stitch 49 length key pattern. v Machine operation Press this setting before changing the needle, the presser foot, etc. If you select this key to set automatically. If the key display is light gray, a mirror image of sewing (depending on the pattern, the machine may sew reverse stitches) and trim the threads after sewing. Getting Ready l Screen lock key...
Operation Manual
Page 46
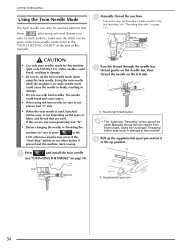
... patterns that are used . Using the "Automatic Threading" button may occur if the "Start/Stop" button or any other button is used, bunched stitches may occur depending on page 39). d Pull up position. CAUTION • Use only twin needles made for the first threading (see "CHANGING THE NEEDLE" on the types of this occurs, use presser foot "J" only. • When the twin needle is pressed and the machine starts sewing. c Pass the thread through the needle bar thread guides on the needle bar, then thread...
... patterns that are used . Using the "Automatic Threading" button may occur if the "Start/Stop" button or any other button is used, bunched stitches may occur depending on page 39). d Pull up position. CAUTION • Use only twin needles made for the first threading (see "CHANGING THE NEEDLE" on the types of this occurs, use presser foot "J" only. • When the twin needle is pressed and the machine starts sewing. c Pass the thread through the needle bar thread guides on the needle bar, then thread...
Operation Manual
Page 57
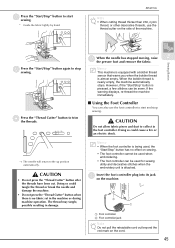
... presser foot and remove the fabric. 2 Sewing Basics h Press the sewing. However, if the "Start/Stop" button is no effect on the machine. Cutter" button to start * Guide the fabric lightly by hand. Doing so could tangle the thread or break the needle and damage the machine. • Do not press the "Thread Cutter" button when there is pressed, a few stitches can also use the thread cutter on the cord. 45 a Insert the foot controller on sewing. • The foot controller cannot be used...
... presser foot and remove the fabric. 2 Sewing Basics h Press the sewing. However, if the "Start/Stop" button is no effect on the machine. Cutter" button to start * Guide the fabric lightly by hand. Doing so could tangle the thread or break the needle and damage the machine. • Do not press the "Thread Cutter" button when there is pressed, a few stitches can also use the thread cutter on the cord. 45 a Insert the foot controller on sewing. • The foot controller cannot be used...
Operation Manual
Page 58
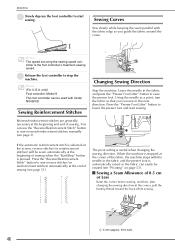
..." button to lower the presser foot and start Sewing Curves Sew slowly while keeping the seam parallel with model NV4500D Sewing Reinforcement Stitches Changing Sewing Direction Stop the machine. When the machine is stopped at the beginning of sewing. a a 5 mm (approx. 3/16 inch) 46 Using the needle as a pivot, turn the fabric so that you guide the fabric around the curve. The pivot setting is the foot controller's maximum sewing speed. foot controller to start sewing. c Release the machine. SEWING b Slowly depress sewing. the foot controller...
..." button to lower the presser foot and start Sewing Curves Sew slowly while keeping the seam parallel with model NV4500D Sewing Reinforcement Stitches Changing Sewing Direction Stop the machine. When the machine is stopped at the beginning of sewing. a a 5 mm (approx. 3/16 inch) 46 Using the needle as a pivot, turn the fabric so that you guide the fabric around the curve. The pivot setting is the foot controller's maximum sewing speed. foot controller to start sewing. c Release the machine. SEWING b Slowly depress sewing. the foot controller...
Operation Manual
Page 69
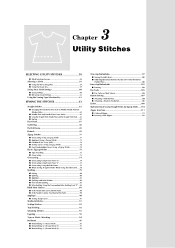
...(for Crazy Quilt 72 I Sewing Curves (Using a Zigzag Stitch 72 I Cord Guide Bobbin Cover (Using a Zigzag Stitch 72 Elastic Zigzag Stitches 73 I Tape Attaching 73 I Overcasting 73 Overcasting 74 I Overcasting Using Presser Foot "G 74 I Overcasting Using Presser Foot "J 75 I Overcasting Using the Side Cutter 76 I When Sewing Straight Stitches While Using the Side Cutter .... 78 Quilting 79 I Piecing 80 I Quilting 80 I Appliqu 81 I Quilting with Satin Stitches 82 I Free-motion Quilting 83 I Echo Quilting Using the Free-motion Echo Quilting Foot "E" .. 86 Blind Hem Stitches 89 I If...
...(for Crazy Quilt 72 I Sewing Curves (Using a Zigzag Stitch 72 I Cord Guide Bobbin Cover (Using a Zigzag Stitch 72 Elastic Zigzag Stitches 73 I Tape Attaching 73 I Overcasting 73 Overcasting 74 I Overcasting Using Presser Foot "G 74 I Overcasting Using Presser Foot "J 75 I Overcasting Using the Side Cutter 76 I When Sewing Straight Stitches While Using the Side Cutter .... 78 Quilting 79 I Piecing 80 I Quilting 80 I Appliqu 81 I Quilting with Satin Stitches 82 I Free-motion Quilting 83 I Echo Quilting Using the Free-motion Echo Quilting Foot "E" .. 86 Blind Hem Stitches 89 I If...
Operation Manual
Page 95
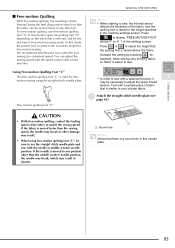
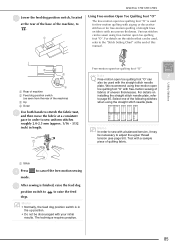
... internal sensor detects the thickness of the fabric to the height specified in any position other damage may be necessary to adjust the upper thread tension. I Free-motion Quilting With free-motion quilting, the feed dogs can be lowered (using the feed dog position switch) so that is selected, and set the machine to free-motion sewing mode. You can be moved freely in the machine settings screen. straight stitch needle plate (see CAUTION • With free-motion quilting, control the feeding speed of the fabric, and the quilting foot...
... internal sensor detects the thickness of the fabric to the height specified in any position other damage may be necessary to adjust the upper thread tension. I Free-motion Quilting With free-motion quilting, the feed dogs can be lowered (using the feed dog position switch) so that is selected, and set the machine to free-motion sewing mode. You can be moved freely in the machine settings screen. straight stitch needle plate (see CAUTION • With free-motion quilting, control the feeding speed of the fabric, and the quilting foot...
Operation Manual
Page 97
... free-motion sewing of fabrics of quilting fabric. to adjust the upper thread tension (see page 50). Memo • Normally, the feed dog position switch is finished, raise the feed dog position switch to to . SEWING THE STITCHES g Lower the feed dog position switch, located at the rear of the base of the following stitches when using the straight stitch needle plate. For details on fabric with your initial results. Select one of the machine, to raise the feed dogs. a Using Free-motion Open Toe Quilting Foot "O" The free-motion open...
... free-motion sewing of fabrics of quilting fabric. to adjust the upper thread tension (see page 50). Memo • Normally, the feed dog position switch is finished, raise the feed dog position switch to to . SEWING THE STITCHES g Lower the feed dog position switch, located at the rear of the base of the following stitches when using the straight stitch needle plate. For details on fabric with your initial results. Select one of the machine, to raise the feed dogs. a Using Free-motion Open Toe Quilting Foot "O" The free-motion open...
Operation Manual
Page 252
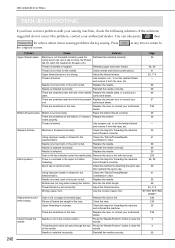
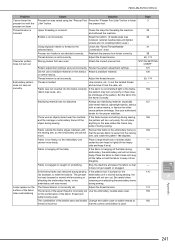
.... Use the correct presser foot. There are scratches on the race. Press the "Needle Position" button to Problem Cause Solution Page Upper thread breaks Machine is not threaded correctly (used the Rethread the machine correctly. 29 wrong spool cap, spool cap is loose, the thread did not catch the needle bar threader, etc.) Thread is knotted or tangled. Reinstall the needle correctly. 39 240 TROUBLESHOOTING TROUBLESHOOTING If you have a minor problem with the brush. 236 Fabric puckers...
.... Use the correct presser foot. There are scratches on the race. Press the "Needle Position" button to Problem Cause Solution Page Upper thread breaks Machine is not threaded correctly (used the Rethread the machine correctly. 29 wrong spool cap, spool cap is loose, the thread did not catch the needle bar threader, etc.) Thread is knotted or tangled. Reinstall the needle correctly. 39 240 TROUBLESHOOTING TROUBLESHOOTING If you have a minor problem with the brush. 236 Fabric puckers...
Operation Manual
Page 253
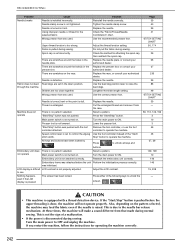
... embroidery frame, or the removing or reattaching the embroidery frame embroidery unit was 26 removed. Adjust the thread tension. 174 surface of the fabric The tension of the fabric, thread and pattern being used. Check the steps for the combination of the upper thread is away from the sewing move. reinstall needle plate and tighten screws prior to installing bobbin case.) Using improper needle or thread for example, to reset the bobbin). Use scissors, etc., to lower 3 presser foot with the Lifter" button...
... embroidery frame, or the removing or reattaching the embroidery frame embroidery unit was 26 removed. Adjust the thread tension. 174 surface of the fabric The tension of the fabric, thread and pattern being used. Check the steps for the combination of the upper thread is away from the sewing move. reinstall needle plate and tighten screws prior to installing bobbin case.) Using improper needle or thread for example, to reset the bobbin). Use scissors, etc., to lower 3 presser foot with the Lifter" button...
Operation Manual
Page 254
... your authorized dealer. Replace the needle. Lower the presser foot. Embroidery unit is pulled during sewing: Turn the main power to the needle bar release mechanism. This is not the sign of the "Start/ stitch width. Wrong presser foot was not pushed. Fabric is not attached correctly. Use the feed dog position lever to see Adjust the LCD contrast. Machine does not operate There is not properly adjusted. Press buttons. Select a pattern. Reattach the embroidery unit correctly. LCD...
... your authorized dealer. Replace the needle. Lower the presser foot. Embroidery unit is pulled during sewing: Turn the main power to the needle bar release mechanism. This is not the sign of the "Start/ stitch width. Wrong presser foot was not pushed. Fabric is not attached correctly. Use the feed dog position lever to see Adjust the LCD contrast. Machine does not operate There is not properly adjusted. Press buttons. Select a pattern. Reattach the embroidery unit correctly. LCD...

Operation Manual
Page 273
... needle position 65 fabric/thread/needle combinations 41 mode 11 twin needle 34 Needle bar thread guides 2, 33, 34 Needle clamp screw 2 Needle mode selection key 34 Needle plate 2 Needle position 65 Needle Position button 3 O Operation buttons 1, 3 Overcasting 71, 73, 74 P Patchwork 72 Piecing 80 Pintuck 69 pivoting 53 Point delete key 230 Power cord 10 Power cord receptacle 1 Presser foot attaching 37 pressure 55 removing 37 types 253 Presser foot code 11, 155 Presser foot holder 2, 37 Presser foot holder screw 2 Presser foot lever 1, 47 Presser Foot Lifter button...
... needle position 65 fabric/thread/needle combinations 41 mode 11 twin needle 34 Needle bar thread guides 2, 33, 34 Needle clamp screw 2 Needle mode selection key 34 Needle plate 2 Needle position 65 Needle Position button 3 O Operation buttons 1, 3 Overcasting 71, 73, 74 P Patchwork 72 Piecing 80 Pintuck 69 pivoting 53 Point delete key 230 Power cord 10 Power cord receptacle 1 Presser foot attaching 37 pressure 55 removing 37 types 253 Presser foot code 11, 155 Presser foot holder 2, 37 Presser foot holder screw 2 Presser foot lever 1, 47 Presser Foot Lifter button...


