
Users Manual - English
Page 10
... stitch and sewing trial stitches to the machine's Operation Manual. o If your machine is started with the automatic thread cutting function and automatic reinforcement/reverse stitching function, make sure the automatic thread cutting has been turned off . When you have been made. Examples of the machine. For details on adjusting the stitch length and stitch width, refer to feed the needle into the punched hole again, and then lower the presser foot lever. Memo We recommend an upper thread tension that...
... stitch and sewing trial stitches to the machine's Operation Manual. o If your machine is started with the automatic thread cutting function and automatic reinforcement/reverse stitching function, make sure the automatic thread cutting has been turned off . When you have been made. Examples of the machine. For details on adjusting the stitch length and stitch width, refer to feed the needle into the punched hole again, and then lower the presser foot lever. Memo We recommend an upper thread tension that...

Users Manual - English
Page 5
..., thread take-up lever, needle, or other hot objects. 2. Do not store anything on the needle while sewing. Do not drop or hit the machine. 4. If the problem persists, please consult your eye on the foot controller. 4. Do not use extension cords. Do not use or store the machine near a space heater, iron, halogen lamp, or other moving parts. 2. Always consult the operation manual when replacing or installing any other parts...
..., thread take-up lever, needle, or other hot objects. 2. Do not store anything on the needle while sewing. Do not drop or hit the machine. 4. If the problem persists, please consult your eye on the foot controller. 4. Do not use extension cords. Do not use or store the machine near a space heater, iron, halogen lamp, or other moving parts. 2. Always consult the operation manual when replacing or installing any other parts...

Users Manual - English
Page 7
... Stitching 72 Buttonhole Stitches 74 Bar Tacks 79 Button Sewing 81 Eyelets 82 Multi-Directional Sewing (Straight Stitch and Zigzag Stitch 83 TURNING THE MACHINE ON/OFF 16 Zipper Insertion 84 LCD SCREEN 17 Using the Machine Setting Mode Key 20 Using the Machine Operation Mode Key 22 Using the Pattern Explanation Key 23 LOWER/UPPER THREADING 24 Winding the Bobbin 24 Setting the Bobbin 27 Pulling Up the Bobbin Thread 27 Upper Threading 28 Using the Twin Needle 31 CHANGING THE PRESSER FOOT 33 Removing the Presser Foot 33 Attaching the Presser Foot 33 CHANGING THE NEEDLE...
... Stitching 72 Buttonhole Stitches 74 Bar Tacks 79 Button Sewing 81 Eyelets 82 Multi-Directional Sewing (Straight Stitch and Zigzag Stitch 83 TURNING THE MACHINE ON/OFF 16 Zipper Insertion 84 LCD SCREEN 17 Using the Machine Setting Mode Key 20 Using the Machine Operation Mode Key 22 Using the Pattern Explanation Key 23 LOWER/UPPER THREADING 24 Winding the Bobbin 24 Setting the Bobbin 27 Pulling Up the Bobbin Thread 27 Upper Threading 28 Using the Twin Needle 31 CHANGING THE PRESSER FOOT 33 Removing the Presser Foot 33 Attaching the Presser Foot 33 CHANGING THE NEEDLE...

Users Manual - English
Page 10
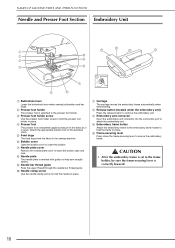
... controller Press the foot controller to hold the touch pen when it by this thread guide when winding the bobbin thread. k Feed dog position switch Use the feed dog position switch to perform various operations, such as sleeve cuffs. g Operation buttons (5 buttons) and sewing speed controller Use these buttons to lower the feed dogs. c Embroidery card slot Insert the embroidery cards (sold separately) into the slot. f Foot controller jack Insert the plug on the spool pin. l Presser foot lever Raise and lower the presser foot lever to adjust the sewing speed while using the machine...
... controller Press the foot controller to hold the touch pen when it by this thread guide when winding the bobbin thread. k Feed dog position switch Use the feed dog position switch to perform various operations, such as sleeve cuffs. g Operation buttons (5 buttons) and sewing speed controller Use these buttons to lower the feed dogs. c Embroidery card slot Insert the embroidery cards (sold separately) into the slot. f Foot controller jack Insert the plug on the spool pin. l Presser foot lever Raise and lower the presser foot lever to adjust the sewing speed while using the machine...
Users Manual - English
Page 11
...j Needle clamp screw Use the needle clamp screw to help sew straight seams. i Needle bar thread guide Pass the upper thread through the needle bar thread guide. Attach the appropriate presser foot for the selected stitch. f Bobbin cover Open the bobbin cover to secure the embroidery frame. e Frame-securing lever Press down the frame-securing lever to insert the bobbin. d Presser foot The presser foot consistently applies pressure to the fabric as it is marked with guides to hold the frame in place. h Needle plate The needle plate is sewn. CAUTION • After the embroidery...
...j Needle clamp screw Use the needle clamp screw to help sew straight seams. i Needle bar thread guide Pass the upper thread through the needle bar thread guide. Attach the appropriate presser foot for the selected stitch. f Bobbin cover Open the bobbin cover to secure the embroidery frame. e Frame-securing lever Press down the frame-securing lever to insert the bobbin. d Presser foot The presser foot consistently applies pressure to the fabric as it is marked with guides to hold the frame in place. h Needle plate The needle plate is sewn. CAUTION • After the embroidery...
Users Manual - English
Page 12
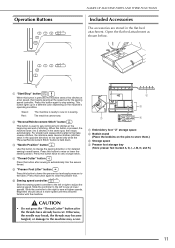
...below. The machine cannot sew. For straight and zigzag stitch patterns that take reverse stitches, the machine sews reverse stitches (stitches sewn in the flat bed attachment. Press this button again to adjust the sewing speed. Slide the controller to the left or right to raise the presser foot. This button lights up in the same spot, then stops automatically. c "Needle Position" button Use this button is sewing. b c a d a Embroidery foot "U" storage space b Bobbin stand (Place the bobbins on the machine's operating condition. Slide the controller to the...
...below. The machine cannot sew. For straight and zigzag stitch patterns that take reverse stitches, the machine sews reverse stitches (stitches sewn in the flat bed attachment. Press this button again to adjust the sewing speed. Slide the controller to the left or right to raise the presser foot. This button lights up in the same spot, then stops automatically. c "Needle Position" button Use this button is sewing. b c a d a Embroidery foot "U" storage space b Bobbin stand (Place the bobbins on the machine's operating condition. Slide the controller to the...

Users Manual - English
Page 14
...The screw for the presser foot holder is available through your authorized dealer (part code: XA4813-051). • This operation manual and the foot controller can be stored in the machine's hard case. 13 Memo • Always use accessories recommended for this machine model NV1500D/NV1500. Part Name U.S.A./ Canada Others 1 Embroidery foot "U" XD0313-051 2 Buttonhole foot "A" X57789-151 3 Overcasting foot "G" XC3098-051 4 Monogramming foot "N" X53840-351 5 Zipper foot "I" X59370-051 6 Zigzag foot "J" (on machine) XC3021-051 7 Blind stitch foot "R" X56409-051 8 Button...
...The screw for the presser foot holder is available through your authorized dealer (part code: XA4813-051). • This operation manual and the foot controller can be stored in the machine's hard case. 13 Memo • Always use accessories recommended for this machine model NV1500D/NV1500. Part Name U.S.A./ Canada Others 1 Embroidery foot "U" XD0313-051 2 Buttonhole foot "A" X57789-151 3 Overcasting foot "G" XC3098-051 4 Monogramming foot "N" X53840-351 5 Zipper foot "I" X59370-051 6 Zigzag foot "J" (on machine) XC3021-051 7 Blind stitch foot "R" X56409-051 8 Button...
Users Manual - English
Page 19
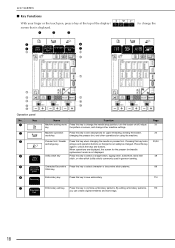
... threading, winding the bobbin, changing the presser foot, and other operations for the presser foot/needle replacement mode is displayed. 1 2 3 5 6 4 7 h i j ) to change other machine settings. Press this key when changing the needle or presser foot. When operations are displayed, the screen for using the machine. By editing embroidery patterns, 151 you can safely be changed. Presser foot / Needle exchange key Utility stitch key Press this key to select a straight stitch, zigzag stitch, buttonhole, blind hem stitch, or other stitch (utility stitch) commonly used...
... threading, winding the bobbin, changing the presser foot, and other operations for the presser foot/needle replacement mode is displayed. 1 2 3 5 6 4 7 h i j ) to change other machine settings. Press this key when changing the needle or presser foot. When operations are displayed, the screen for using the machine. By editing embroidery patterns, 151 you can safely be changed. Presser foot / Needle exchange key Utility stitch key Press this key to select a straight stitch, zigzag stitch, buttonhole, blind hem stitch, or other stitch (utility stitch) commonly used...

Users Manual - English
Page 21
... Press to change other basic machine settings. c Make adjustments to display the next page. 20 a Adjust the maximum embroidering speed. c Select the thread brand available when selecting a thread color number in the raised or lowered position when the machine is installed. a b c d e * Press to the character and decorative a stitch patterns (see page 138). b Select whether the thread color name, thread color number or sewing time appears for displaying distances and the sizes of embroidery foot "U" (see...
... Press to change other basic machine settings. c Make adjustments to display the next page. 20 a Adjust the maximum embroidering speed. c Select the thread brand available when selecting a thread color number in the raised or lowered position when the machine is installed. a b c d e * Press to the character and decorative a stitch patterns (see page 138). b Select whether the thread color name, thread color number or sewing time appears for displaying distances and the sizes of embroidery foot "U" (see...

Users Manual - English
Page 25
... spool pin a Turn on the machine, and then open the top cover. Use only the included bobbin or bobbins of the same type (part code: X52800-150). 11.5 mm (approx. 7/16 inch) Actual size This model Other models ■ Using the Supplemental Spool Pin While sewing embroidery, the bobbin can use the supplemental spool pin to wind the bobbin while sewing using cross-wound thread on the spool pin and cause the needle to the thread spool. ab b a Groove in size to break. • Use the spool...
... spool pin a Turn on the machine, and then open the top cover. Use only the included bobbin or bobbins of the same type (part code: X52800-150). 11.5 mm (approx. 7/16 inch) Actual size This model Other models ■ Using the Supplemental Spool Pin While sewing embroidery, the bobbin can use the supplemental spool pin to wind the bobbin while sewing using cross-wound thread on the spool pin and cause the needle to the thread spool. ab b a Groove in size to break. • Use the spool...
Users Manual - English
Page 28
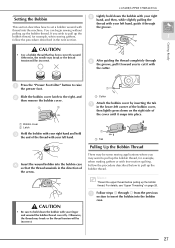
... previous section to insert the bobbin into the machine. thread into the bobbin case. 27 a Press the "Presser Foot Lifter" button to the right, and then remove the bobbin cover. Otherwise, the thread may break or the thread tension will be incorrect. a a Tab Pulling Up the Bobbin Thread There may want to set a bobbin wound with the groove. For details, see "Upper Threading" on the right side of the bobbin cover, then lightly press down...
... previous section to insert the bobbin into the machine. thread into the bobbin case. 27 a Press the "Presser Foot Lifter" button to the right, and then remove the bobbin cover. Otherwise, the thread may break or the thread tension will be incorrect. a a Tab Pulling Up the Bobbin Thread There may want to set a bobbin wound with the groove. For details, see "Upper Threading" on the right side of the bobbin cover, then lightly press down...
Users Manual - English
Page 32
... using the twin needle, be sure to break, resulting in damage. • Do not sew with bent needles. a a Supplemental spool pin e Place the additional spool of thread on the supplemental spool pin so that can be sewn by threading each needle with patterns where appears when they are selected. LOWER/UPPER THREADING Using the Twin Needle c Pass the thread through the bobbin winding thread guide. a The twin needle can only be used , interesting patterns can sew two parallel lines of this machine (part code...
... using the twin needle, be sure to break, resulting in damage. • Do not sew with bent needles. a a Supplemental spool pin e Place the additional spool of thread on the supplemental spool pin so that can be sewn by threading each needle with patterns where appears when they are selected. LOWER/UPPER THREADING Using the Twin Needle c Pass the thread through the bobbin winding thread guide. a The twin needle can only be used , interesting patterns can sew two parallel lines of this machine (part code...

Users Manual - English
Page 33
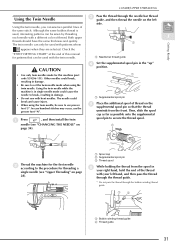
... then guide the thread through the upper notch. Manually pass the thread through the needle bar thread guide, thread the needle on the right side. Note If appears as after lowering the presser foot lever. i Press screen. , or press in damage. a a a Single needle/twin needle setting → appears. a a Needle bar thread guide Note The needle threader cannot be used with the selected stitch. 32 j Select a stitch pattern. Using the twin needle while the machine is in single needle mode could cause the needle to break, resulting...
... then guide the thread through the upper notch. Manually pass the thread through the needle bar thread guide, thread the needle on the right side. Note If appears as after lowering the presser foot lever. i Press screen. , or press in damage. a a a Single needle/twin needle setting → appears. a a Needle bar thread guide Note The needle threader cannot be used with the selected stitch. 32 j Select a stitch pattern. Using the twin needle while the machine is in single needle mode could cause the needle to break, resulting...
Users Manual - English
Page 40
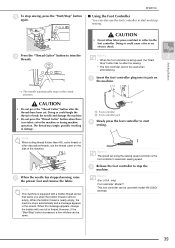
... in the raised position. Sewing Basics i Press the "Thread Cutter" button to stop the machine. Doing so could tangle the thread or break the needle and damage the machine. • Do not press the "Thread Cutter" button when there is nearly empty, the machine stops automatically and a message appears in the machine or during machine operation. SEWING ■ Using the Foot Controller You can be used , the "Start/ Stop" button has no fabric set using the sewing speed controller is almost...
... in the raised position. Sewing Basics i Press the "Thread Cutter" button to stop the machine. Doing so could tangle the thread or break the needle and damage the machine. • Do not press the "Thread Cutter" button when there is nearly empty, the machine stops automatically and a message appears in the machine or during machine operation. SEWING ■ Using the Foot Controller You can be used , the "Start/ Stop" button has no fabric set using the sewing speed controller is almost...

Users Manual - English
Page 50
... lightly press the display. → Depending on the stitch patterns, refer to the "STITCH SETTING CHART" at the end of this manual. ■ Using the Mirror Image Key Press so that it appears as after a stitch (buttonholes, multi-directional sewing patterns, etc.) is selected, a mirror image of 2.0 mm for the straight stitch a Select a straight stitch. * If a different screen is created. Memo The default stitch length is automatically selected. This machine...
... lightly press the display. → Depending on the stitch patterns, refer to the "STITCH SETTING CHART" at the end of this manual. ■ Using the Mirror Image Key Press so that it appears as after a stitch (buttonholes, multi-directional sewing patterns, etc.) is selected, a mirror image of 2.0 mm for the straight stitch a Select a straight stitch. * If a different screen is created. Memo The default stitch length is automatically selected. This machine...

Users Manual - English
Page 78
...). a b c d 3 Utility Stitches a a Upper thread b Lower the presser foot lever, and then start sewing. * Set the stitch width to the width of 10 mm (approx. 3/8 inch), the scale should be set at the front of the presser foot, and then temporarily tie them. * Use #5 embroidery thread or lace yarn for the gimp thread. ■ Buttons That Do Not Fit into the Button Holder Plate Use the markings on the presser foot scale to set the button holder plate to remove any...
...). a b c d 3 Utility Stitches a a Upper thread b Lower the presser foot lever, and then start sewing. * Set the stitch width to the width of 10 mm (approx. 3/8 inch), the scale should be set at the front of the presser foot, and then temporarily tie them. * Use #5 embroidery thread or lace yarn for the gimp thread. ■ Buttons That Do Not Fit into the Button Holder Plate Use the markings on the presser foot scale to set the button holder plate to remove any...
Users Manual - English
Page 181
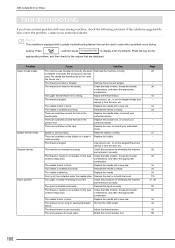
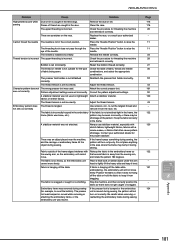
... 191 180 The spool is bent or blunt. Problem Upper thread breaks Bobbin thread breaks Skipped stitches Fabric puckers Cause Solution The machine was used , the needle bar thread guide did not catch the thread, etc.). Replace the needle. Check the table of fabric, thread and needle combinations, and select the appropriate combination. Adjust the thread tension. If the solutions suggested do not correct the problem, contact your authorized dealer. The needle is installed incorrectly. Replace the needle with the brush...
... 191 180 The spool is bent or blunt. Problem Upper thread breaks Bobbin thread breaks Skipped stitches Fabric puckers Cause Solution The machine was used , the needle bar thread guide did not catch the thread, etc.). Replace the needle. Check the table of fabric, thread and needle combinations, and select the appropriate combination. Adjust the thread tension. If the solutions suggested do not correct the problem, contact your authorized dealer. The needle is installed incorrectly. Replace the needle with the brush...
Users Manual - English
Page 182
.... Adjust the thread tension. 43 Embroidery pattern does The thread is incorrect. pattern may be sewn incorrectly or there may bump it during sewing If the presser foot is not suitable for threading the machine 28 and rethread it from the race, etc. Embroidery frame was removed during sewing. Correct the pattern adjustment settings. 92 A stabilizer material was used on lightweight Attach a stabilizer material. 120 fabrics or stretch fabrics. not sew out correctly Use scissors...
.... Adjust the thread tension. 43 Embroidery pattern does The thread is incorrect. pattern may be sewn incorrectly or there may bump it during sewing If the presser foot is not suitable for threading the machine 28 and rethread it from the race, etc. Embroidery frame was removed during sewing. Correct the pattern adjustment settings. 92 A stabilizer material was used on lightweight Attach a stabilizer material. 120 fabrics or stretch fabrics. not sew out correctly Use scissors...

Users Manual - English
Page 183
... embroidery frame was attached before the upper threading is done, the machine will make a sound different from that made during sewing: Turn the main power to cut the tangled thread and remove it from the race, etc. Tighten the needle clamp screw. Reinstall the spool correctly. Use the feed dog position switch to the needle bar release mechanism. The feed dogs are scratches on . The presser foot is no pattern selected. Attach the correct presser foot. Lengthen the stitch length...
... embroidery frame was attached before the upper threading is done, the machine will make a sound different from that made during sewing: Turn the main power to cut the tangled thread and remove it from the race, etc. Tighten the needle clamp screw. Reinstall the spool correctly. Use the feed dog position switch to the needle bar release mechanism. The feed dogs are scratches on . The presser foot is no pattern selected. Attach the correct presser foot. Lengthen the stitch length...
Users Manual - English
Page 199
... N needle changing the position 52 fabric/thread/needle combinations 36 replacing 34 settings 17 twin needle 31 needle bar thread guide 10, 29, 31 needle clamp screw 10 needle mode selection key (single/twin 31, 32 needle plate 10 needle plate cover 10, 176 needle position 52 needle position button 11 needle threader lever 9, 30 O operation buttons 9, 11 options 14 overcasting 56, 57, 58 P patchwork 57 pattern explanation key 23 pattern selection key 156 pattern selection screen 151 piecing 62 pin tucks 55 point delete key 167 power cord 16 presser foot...
... N needle changing the position 52 fabric/thread/needle combinations 36 replacing 34 settings 17 twin needle 31 needle bar thread guide 10, 29, 31 needle clamp screw 10 needle mode selection key (single/twin 31, 32 needle plate 10 needle plate cover 10, 176 needle position 52 needle position button 11 needle threader lever 9, 30 O operation buttons 9, 11 options 14 overcasting 56, 57, 58 P patchwork 57 pattern explanation key 23 pattern selection key 156 pattern selection screen 151 piecing 62 pin tucks 55 point delete key 167 power cord 16 presser foot...


