Users Manual - English
Page 2
... free-motion sewing). This kit cannot be used for machine embroidering. For specific details on operating the machine, refer to the Operation Manual provided with your machine. CONTENTS ABOUT BOBBIN WORK ...2 INCLUDED ACCESSORIES ...2 PREPARING FOR BOBBIN WORK ...3 Required Materials ...3 Upper Threading ...4 ...Fabric and Sewing...8 Finishing the thread ends...10 Bobbin Work Free-Motion Sewing ...11 Templates for sewing bobbin work. This manual describes the procedures for Free-Motion Sewing ...12 ADJUSTING THE THREAD TENSION...13 Adjusting the Upper Thread Tension ...13 Adjusting the...
... free-motion sewing). This kit cannot be used for machine embroidering. For specific details on operating the machine, refer to the Operation Manual provided with your machine. CONTENTS ABOUT BOBBIN WORK ...2 INCLUDED ACCESSORIES ...2 PREPARING FOR BOBBIN WORK ...3 Required Materials ...3 Upper Threading ...4 ...Fabric and Sewing...8 Finishing the thread ends...10 Bobbin Work Free-Motion Sewing ...11 Templates for sewing bobbin work. This manual describes the procedures for Free-Motion Sewing ...12 ADJUSTING THE THREAD TENSION...13 Adjusting the Upper Thread Tension ...13 Adjusting the...

Users Manual - English
Page 3
... or region where this kit. Bobbin case (gray) (XE8298-001) Bobbin cover with tabs (*See Note.) Screwdriver (small) (X55468-051) CD-ROM (Contains the Operation Manual and the Templates for freemotion sewing.) (USA/CANADA: XE9382-001, Other areas: XE9501-001) Note • Two bobbin covers may be installed on the machine...
... or region where this kit. Bobbin case (gray) (XE8298-001) Bobbin cover with tabs (*See Note.) Screwdriver (small) (X55468-051) CD-ROM (Contains the Operation Manual and the Templates for freemotion sewing.) (USA/CANADA: XE9382-001, Other areas: XE9501-001) Note • Two bobbin covers may be installed on the machine...
Users Manual - English
Page 8
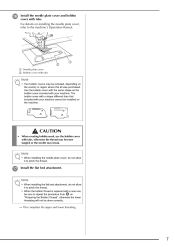
... with tabs Note • Two bobbin covers may break. Note • When installing the flat bed attachment, do not allow it to the machine's Operation Manual. p Install the needle plate cover and bobbin cover with your machine cannot be included, depending on the country or region where this kit was purchased.
... with tabs Note • Two bobbin covers may break. Note • When installing the flat bed attachment, do not allow it to the machine's Operation Manual. p Install the needle plate cover and bobbin cover with your machine cannot be included, depending on the country or region where this kit was purchased.

Users Manual - English
Page 10
..., select a longer stitch length and a wider stitch width. For details on adjusting the stitch length and stitch width, refer to the machine's Operation Manual. • Depending on the machine. Examples of the machine. Note • Do not sew reinforcement/reverse stitches at the rear of the fabric.... not be difficult to pull the bobbin thread up to the wrong side of the machine, turn the handwheel to the machine's Operation Manual. We recommend selecting a simple stitch and sewing trial stitches to change the stitch length and stitch width settings. Depending on adjusting the ...
..., select a longer stitch length and a wider stitch width. For details on adjusting the stitch length and stitch width, refer to the machine's Operation Manual. • Depending on the machine. Examples of the machine. Note • Do not sew reinforcement/reverse stitches at the rear of the fabric.... not be difficult to pull the bobbin thread up to the wrong side of the machine, turn the handwheel to the machine's Operation Manual. We recommend selecting a simple stitch and sewing trial stitches to change the stitch length and stitch width settings. Depending on adjusting the ...
Users Manual - English
Page 12
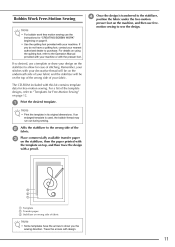
..., refer to allow for Free-Motion Sewing" on page 12. If so desired, use a template or draw your design on the stabilizer to the Operation Manual provided with your machine or with this kit contains template data for free-motion sewing. Remember, your stitches with your machine. For a list of the...
..., refer to allow for Free-Motion Sewing" on page 12. If so desired, use a template or draw your design on the stabilizer to the Operation Manual provided with your machine or with this kit contains template data for free-motion sewing. Remember, your stitches with your machine. For a list of the...
Users Manual - English
Page 14
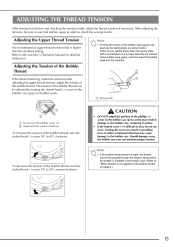
... may cause damage to 45° clockwise. Adjusting the Upper Thread Tension We recommend an upper thread tension that is difficult to the machine's Operation Manual for bobbin work. Note • Turning the screw on the bobbin case (gray) may result in damage to the bobbin case, rendering it is not...
... may cause damage to 45° clockwise. Adjusting the Upper Thread Tension We recommend an upper thread tension that is difficult to the machine's Operation Manual for bobbin work. Note • Turning the screw on the bobbin case (gray) may result in damage to the bobbin case, rendering it is not...
Operation Manual
Page 1
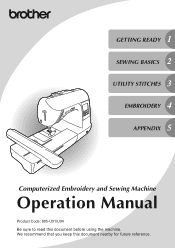
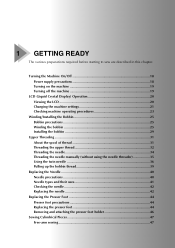
We recommend that you keep this document before using the machine. GETTING READY 1 SEWING BASICS 2 UTILITY STITCHES 3 EMBROIDERY 4 APPENDIX 5 Computerized Embroidery and Sewing Machine Operation Manual Product Code: 885-U01/U04 Be sure to read this document nearby for future reference.
We recommend that you keep this document before using the machine. GETTING READY 1 SEWING BASICS 2 UTILITY STITCHES 3 EMBROIDERY 4 APPENDIX 5 Computerized Embroidery and Sewing Machine Operation Manual Product Code: 885-U01/U04 Be sure to read this document nearby for future reference.

Operation Manual
Page 3
Do not connect it by any user servicing adjustments mentioned in this manual, or if you are not sure what kind of power source you have, contact a qualified electrician. • This machine is approved for examination, repair, electrical ... spilled on an unstable surface, such as an odor, heat, discoloration or deformation, stop using , when cleaning, when making any adjustments mentioned in the instruction manual: • To unplug the machine, switch the machine to the symbol "O" position to make any air openings blocked. Plug the machine directly into the electrical...
Do not connect it by any user servicing adjustments mentioned in this manual, or if you are not sure what kind of power source you have, contact a qualified electrician. • This machine is approved for examination, repair, electrical ... spilled on an unstable surface, such as an odor, heat, discoloration or deformation, stop using , when cleaning, when making any adjustments mentioned in the instruction manual: • To unplug the machine, switch the machine to the symbol "O" position to make any air openings blocked. Plug the machine directly into the electrical...
Operation Manual
Page 4
... allow children to play with the bag due to the danger of the operation manual to change without notice. If the problem persists, please consult your local authorized Brother dealer. The contents of this machine, avoid direct sunlight and high humidity locations. Special care is required around ... suffocation. • Do not use outdoors. 8 For a longer service life: • When storing this manual and specifications of . For additional product information, visit our web site at www.brother.com 2 Do not use or store the machine near children. • The plastic bag that you do ...
... allow children to play with the bag due to the danger of the operation manual to change without notice. If the problem persists, please consult your local authorized Brother dealer. The contents of this machine, avoid direct sunlight and high humidity locations. Special care is required around ... suffocation. • Do not use outdoors. 8 For a longer service life: • When storing this manual and specifications of . For additional product information, visit our web site at www.brother.com 2 Do not use or store the machine near children. • The plastic bag that you do ...
Operation Manual
Page 7
... Installing the bobbin ...29 Upper Threading ...31 About the spool of thread ...31 Threading the upper thread ...32 Threading the needle ...34 Threading the needle manually (without using the needle threader 35 Using the twin needle ...36 Pulling up the bobbin thread...39 Replacing the Needle ...40 Needle precautions ...40 Needle...
... Installing the bobbin ...29 Upper Threading ...31 About the spool of thread ...31 Threading the upper thread ...32 Threading the needle ...34 Threading the needle manually (without using the needle threader 35 Using the twin needle ...36 Pulling up the bobbin thread...39 Replacing the Needle ...40 Needle precautions ...40 Needle...

Operation Manual
Page 11
... You can be accessed for future reference. Before using this sewing machine, carefully read the "IMPORTANT SAFETY INSTRUCTIONS" (page 1), and then study this manual for purchasing this manual, store it where it can quickly and easily be wound with your knee, leaving both hands free to raise and lower the presser foot...
... You can be accessed for future reference. Before using this sewing machine, carefully read the "IMPORTANT SAFETY INSTRUCTIONS" (page 1), and then study this manual for purchasing this manual, store it where it can quickly and easily be wound with your knee, leaving both hands free to raise and lower the presser foot...
Operation Manual
Page 13
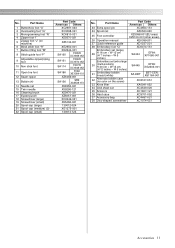
... Others 23 Extra spool pin XC4654-151 24 Spool net XA5523-020 25 Foot controller XZ5098-001(EU area) XZ5100-001(other areas) 26 Operation manual XE6389-201 27 Quick reference guide XD1237-221 28 Embroidery foot "Q" XD0474-151 Embroidery set (large) 29 H 18 cm × W 13 cm (H 7 inches × W 5 SA444...
... Others 23 Extra spool pin XC4654-151 24 Spool net XA5523-020 25 Foot controller XZ5098-001(EU area) XZ5100-001(other areas) 26 Operation manual XE6389-201 27 Quick reference guide XD1237-221 28 Embroidery foot "Q" XD0474-151 Embroidery set (large) 29 H 18 cm × W 13 cm (H 7 inches × W 5 SA444...
Operation Manual
Page 19
... Installing the bobbin 29 Upper Threading ...31 About the spool of thread 31 Threading the upper thread 32 Threading the needle 34 Threading the needle manually (without using the needle threader 35 Using the twin needle 36 Pulling up the bobbin thread 39 Replacing the Needle 40 Needle precautions 40 Needle...
... Installing the bobbin 29 Upper Threading ...31 About the spool of thread 31 Threading the upper thread 32 Threading the needle 34 Threading the needle manually (without using the needle threader 35 Using the twin needle 36 Pulling up the bobbin thread 39 Replacing the Needle 40 Needle precautions 40 Needle...
Operation Manual
Page 26
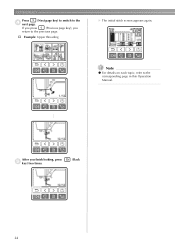
GETTING READY Press (Next page key) to switch to the corresponding page in this Operation Manual. Note z For details on each topic, refer to the d next page. After you return to the previous page. † Example: Upper threading X The initial stitch screen appears again. If you press (Previous page key), you finish looking, press e key) two times. (Back 24
GETTING READY Press (Next page key) to switch to the corresponding page in this Operation Manual. Note z For details on each topic, refer to the d next page. After you return to the previous page. † Example: Upper threading X The initial stitch screen appears again. If you press (Previous page key), you finish looking, press e key) two times. (Back 24

Operation Manual
Page 36
Memo z The needle threader can be used , refer to "Threading the needle manually (without using the needle threader)" (page 35). Therefore, instead of using thread that quickly winds off the spool, such as metallic thread, it into the ...
Memo z The needle threader can be used , refer to "Threading the needle manually (without using the needle threader)" (page 35). Therefore, instead of using thread that quickly winds off the spool, such as metallic thread, it into the ...
Operation Manual
Page 37
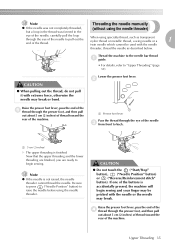
... pull out about 5 cm (2 inches) of thread toward the rear of the buttons is accidentally pressed, the machine will begin sewing. Note Threading the needle manually z If the needle was not completely threaded, but a loop in the thread was formed in the (without using the needle threader) eye of the needle...
... pull out about 5 cm (2 inches) of thread toward the rear of the buttons is accidentally pressed, the machine will begin sewing. Note Threading the needle manually z If the needle was not completely threaded, but a loop in the thread was formed in the (without using the needle threader) eye of the needle...
Operation Manual
Page 38
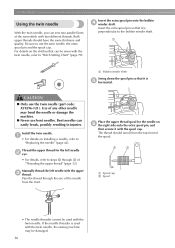
... spool pin so that it is e horizontal. a • For details on the stitches that it with the twin needle, refer to the bobbin winder shaft. Manually thread the left needle b eye. • For details, refer to steps a through the eye of "Threading the upper thread" (page 32). a Spool cap b Spool •...
... spool pin so that it is e horizontal. a • For details on the stitches that it with the twin needle, refer to the bobbin winder shaft. Manually thread the left needle b eye. • For details, refer to steps a through the eye of "Threading the upper thread" (page 32). a Spool cap b Spool •...

Operation Manual
Page 39
... needle threader cannot be sure to attach zigzag foot "J". Note z When using the twin needle, be sure to steps h through the needle h bar thread guide, manually thread the right needle. Upper Threading 37 If bunched stitches occur, use a twin needle. 1 a Thread guide cover • For details, refer to select an appropriate...
... needle threader cannot be sure to attach zigzag foot "J". Note z When using the twin needle, be sure to steps h through the needle h bar thread guide, manually thread the right needle. Upper Threading 37 If bunched stitches occur, use a twin needle. 1 a Thread guide cover • For details, refer to select an appropriate...
Operation Manual
Page 72
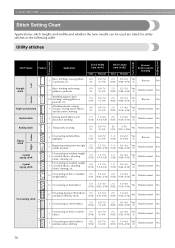
Stitch Width [mm (inch)] Auto 0.0 (0) Manual 0.0-7.0 (0-1/4) Stitch Length [mm (inch)] Auto Manual Reverse/ Reinforcement Stitching 2.5 0.2-5.0 Yes (3/32) (1/64-3/16) (J) Reverse No Left Straight stitch 2 J Basic stitching and sewing gathers or pintucks 0.0 (0) 0.0-7.0 (0-1/4) 2.5 0.2-5.0 Yes (3/32) (1/64-3/16) (J) Reinforcement Yes 3 4 ...
Stitch Width [mm (inch)] Auto 0.0 (0) Manual 0.0-7.0 (0-1/4) Stitch Length [mm (inch)] Auto Manual Reverse/ Reinforcement Stitching 2.5 0.2-5.0 Yes (3/32) (1/64-3/16) (J) Reverse No Left Straight stitch 2 J Basic stitching and sewing gathers or pintucks 0.0 (0) 0.0-7.0 (0-1/4) 2.5 0.2-5.0 Yes (3/32) (1/64-3/16) (J) Reinforcement Yes 3 4 ...
Operation Manual
Page 73
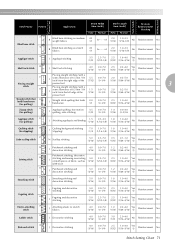
... Application 17 R Blind hem stitching on medium weight fabrics 18 R Blind hem stitching on stretch fabrics Stitch Width [mm (inch)] Stitch Length [mm (inch)] Auto Manual Auto Manual Reverse/ Reinforcement Stitching 00 (0) 3← - →3 2.0 (1/16) 1.0-3.5 (1/16-1/8) No Reinforcement No 00 (0) 3← - →3 2.0 (1/16) 1.0-3.5 (1/16-1/8) No Reinforcement No 19 Appliqué stitch J Appliqu...
... Application 17 R Blind hem stitching on medium weight fabrics 18 R Blind hem stitching on stretch fabrics Stitch Width [mm (inch)] Stitch Length [mm (inch)] Auto Manual Auto Manual Reverse/ Reinforcement Stitching 00 (0) 3← - →3 2.0 (1/16) 1.0-3.5 (1/16-1/8) No Reinforcement No 00 (0) 3← - →3 2.0 (1/16) 1.0-3.5 (1/16-1/8) No Reinforcement No 19 Appliqué stitch J Appliqu...


