
Users Manual - English
Page 10
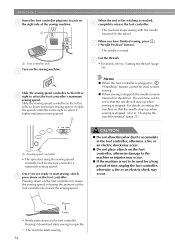
... the bobbin thread up to feed the needle into the punched hole again, and then lower the presser foot lever. o If your machine is higher than the standard setting. m While gently holding threads at the end of the fabric. Threads can be damaged. Depending on adjusting the stitch length and stitch width, refer to change the stitch length and stitch width settings. For details on the selected stitch, it will be possible to the machine's Operation Manual...
... the bobbin thread up to feed the needle into the punched hole again, and then lower the presser foot lever. o If your machine is higher than the standard setting. m While gently holding threads at the end of the fabric. Threads can be damaged. Depending on adjusting the stitch length and stitch width, refer to change the stitch length and stitch width settings. For details on the selected stitch, it will be possible to the machine's Operation Manual...
Users Manual - English
Page 14
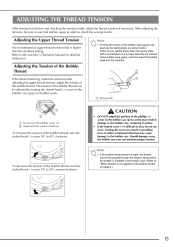
... to sew trial stitches again in damage to the bobbin case, rendering it is not applied to "When tension is lower than the standard setting. The tension of the bobbin thread can be achieved after adjusting the upper thread tension, adjust the tension of the bobbin thread, turn , do not use force. Should damage occur, the bobbin case may push up the spring plate, as this may cause damage to the machine's Operation Manual for bobbin work. If...
... to sew trial stitches again in damage to the bobbin case, rendering it is not applied to "When tension is lower than the standard setting. The tension of the bobbin thread can be achieved after adjusting the upper thread tension, adjust the tension of the bobbin thread, turn , do not use force. Should damage occur, the bobbin case may push up the spring plate, as this may cause damage to the machine's Operation Manual for bobbin work. If...
Operation Manual
Page 7
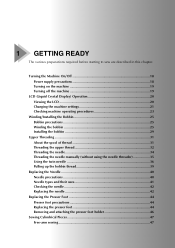
...Changing the machine settings ...21 Checking machine operating procedures ...23 Winding/Installing the Bobbin 25 Bobbin precautions ...25 Winding the bobbin ...25 Installing the bobbin ...29 Upper Threading ...31 About the spool of thread ...31 Threading the upper thread ...32 Threading the needle ...34 Threading the needle manually (without using the needle threader 35 Using the twin needle ...36 Pulling up the bobbin thread...39 Replacing the Needle ...40 Needle precautions ...40 Needle types and their uses...41 Checking the needle ...42 Replacing the needle...42 Replacing the Presser Foot...
...Changing the machine settings ...21 Checking machine operating procedures ...23 Winding/Installing the Bobbin 25 Bobbin precautions ...25 Winding the bobbin ...25 Installing the bobbin ...29 Upper Threading ...31 About the spool of thread ...31 Threading the upper thread ...32 Threading the needle ...34 Threading the needle manually (without using the needle threader 35 Using the twin needle ...36 Pulling up the bobbin thread...39 Replacing the Needle ...40 Needle precautions ...40 Needle types and their uses...41 Checking the needle ...42 Replacing the needle...42 Replacing the Presser Foot...
Operation Manual
Page 16
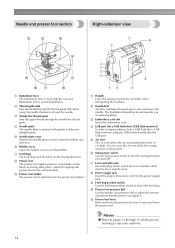
... pressure dial Use the presser foot pressure dial to lower the feed dogs. b Thread guide disk Pass the thread through the needle bar thread guide. g Feed dogs The feed dogs feed the fabric in the sewing direction. c Embroidery card slot Insert the embroidery card. Do not cover the air vent while the sewing machine is attached onto the presser foot holder. i Feed dog position switch Use the feed dog position switch to adjust the amount of the foot controller cable into the foot controller jack. i Presser foot holder The presser foot is being used with guides to help sew straight seams...
... pressure dial Use the presser foot pressure dial to lower the feed dogs. b Thread guide disk Pass the thread through the needle bar thread guide. g Feed dogs The feed dogs feed the fabric in the sewing direction. c Embroidery card slot Insert the embroidery card. Do not cover the air vent while the sewing machine is attached onto the presser foot holder. i Feed dog position switch Use the feed dog position switch to adjust the amount of the foot controller cable into the foot controller jack. i Presser foot holder The presser foot is being used with guides to help sew straight seams...
Operation Manual
Page 17
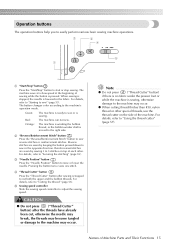
... ("Thread Cutter" button) if there is no fabric under the presser foot or while the machine is lowered in the opposite direction. When sewing is stopped, the needle is sewing, otherwise damage to the machine's operation mode. The button changes color according to the machine may occur. b "Reverse/Reinforcement Stitch" button Press the "Reverse/Reinforcement Stitch" button to "Securing the stitching" (page 55). For details, refer to sew reverse stitches or reinforcement stitches. For details, refer to "Starting to start...
... ("Thread Cutter" button) if there is no fabric under the presser foot or while the machine is lowered in the opposite direction. When sewing is stopped, the needle is sewing, otherwise damage to the machine's operation mode. The button changes color according to the machine may occur. b "Reverse/Reinforcement Stitch" button Press the "Reverse/Reinforcement Stitch" button to "Securing the stitching" (page 55). For details, refer to sew reverse stitches or reinforcement stitches. For details, refer to "Starting to start...
Operation Manual
Page 19
... LCD 20 Changing the machine settings 21 Checking machine operating procedures 23 Winding/Installing the Bobbin 25 Bobbin precautions 25 Winding the bobbin 25 Installing the bobbin 29 Upper Threading ...31 About the spool of thread 31 Threading the upper thread 32 Threading the needle 34 Threading the needle manually (without using the needle threader 35 Using the twin needle 36 Pulling up the bobbin thread 39 Replacing the Needle 40 Needle precautions 40 Needle types and their uses 41 Checking the needle 42 Replacing the needle 42 Replacing the Presser Foot 44 Presser foot...
... LCD 20 Changing the machine settings 21 Checking machine operating procedures 23 Winding/Installing the Bobbin 25 Bobbin precautions 25 Winding the bobbin 25 Installing the bobbin 29 Upper Threading ...31 About the spool of thread 31 Threading the upper thread 32 Threading the needle 34 Threading the needle manually (without using the needle threader 35 Using the twin needle 36 Pulling up the bobbin thread 39 Replacing the Needle 40 Needle precautions 40 Needle types and their uses 41 Checking the needle 42 Replacing the needle 42 Replacing the Presser Foot 44 Presser foot...
Operation Manual
Page 28
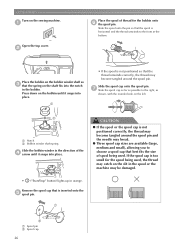
... the spool or the spool cap is not positioned correctly, the thread may be damaged. ● a Spool pin b Spool cap 26 b Place the bobbin on the left. a Notch b Bobbin winder shaft spring Slide the bobbin winder in the direction of the d arrow until it snaps into the notch in the spool or the machine may become tangled around the spool pin and the needle may break. ● Three spool cap sizes are...
... the spool or the spool cap is not positioned correctly, the thread may be damaged. ● a Spool pin b Spool cap 26 b Place the bobbin on the left. a Notch b Bobbin winder shaft spring Slide the bobbin winder in the direction of the d arrow until it snaps into the notch in the spool or the machine may become tangled around the spool pin and the needle may break. ● Three spool cap sizes are...
Operation Manual
Page 31
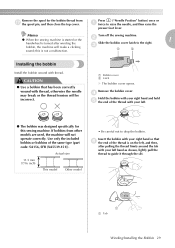
... the presser foot lever. Press ("Needle Position" button) once or a twice to drop the bobbin. z When the sewing machine is started or the b 1 handwheel is turned after pulling the thread firmly around the tab with your left . ● The bobbin was designed specifically for the bobbin thread from other models are used, the machine will make a clicking c sound; bobbin, the machine will not operate correctly. If bobbins from q the spool pin, and then close the top cover. Insert the bobbin...
... the presser foot lever. Press ("Needle Position" button) once or a twice to drop the bobbin. z When the sewing machine is started or the b 1 handwheel is turned after pulling the thread firmly around the tab with your left . ● The bobbin was designed specifically for the bobbin thread from other models are used, the machine will make a clicking c sound; bobbin, the machine will not operate correctly. If bobbins from q the spool pin, and then close the top cover. Insert the bobbin...
Operation Manual
Page 56
X The needle is plugged in, ("Start/Stop" button) cannot be set using the sewing speed controller will stay up when sewing is stopped, refer to select a higher maximum sewing speed. 1 Cut the threads. c Slide the sewing speed controller to the left to select a lower maximum sewing speed, or slide the speed controller to the right to "Changing the machine settings" (page 21). h • For details, refer to be the foot controller's maximum sewing speed. Memo z When the foot controller is...
X The needle is plugged in, ("Start/Stop" button) cannot be set using the sewing speed controller will stay up when sewing is stopped, refer to select a higher maximum sewing speed. 1 Cut the threads. c Slide the sewing speed controller to the left to select a lower maximum sewing speed, or slide the speed controller to the right to "Changing the machine settings" (page 21). h • For details, refer to be the foot controller's maximum sewing speed. Memo z When the foot controller is...
Operation Manual
Page 60
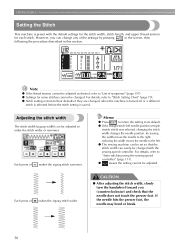
... to "Stitch Setting Chart" (page 70). If the needle hits the presser foot, the needle may bend or break. 58 For details, refer to "Satin stitching using the sewing speed controller" (page 111). Adjusting the stitch width The stitch width (zigzag width) can change any of symptoms" (page 197). z means the setting cannot be changed with the default settings for the stitch width, stitch length, and upper thread tension for some stitches cannot be changed , when the machine is turned...
... to "Stitch Setting Chart" (page 70). If the needle hits the presser foot, the needle may bend or break. 58 For details, refer to "Satin stitching using the sewing speed controller" (page 111). Adjusting the stitch width The stitch width (zigzag width) can change any of symptoms" (page 197). z means the setting cannot be changed with the default settings for the stitch width, stitch length, and upper thread tension for some stitches cannot be changed , when the machine is turned...
Operation Manual
Page 93
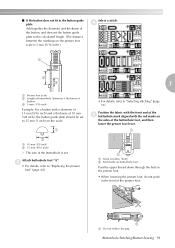
... then set the button guide plate to "Selecting stitching" (page 51). a a Do not reduce the gap. Buttonhole Stitching/Button Sewing 91 A a Mark on fabric (front) b Red marks on the scale. 1 2 a 10 mm (3/8 inch) b 15 mm (9/16 inch) X The size of the buttonhole is 5 mm (3/16 inch).) Select a stitch. Attach buttonhole foot "A". d 1 2 3 3 a Presser foot scale b Length of buttonhole (diameter + thickness of the buttonhole foot, and then lower the presser foot lever. c • For details, refer to "Replacing the presser foot...
... then set the button guide plate to "Selecting stitching" (page 51). a a Do not reduce the gap. Buttonhole Stitching/Button Sewing 91 A a Mark on fabric (front) b Red marks on the scale. 1 2 a 10 mm (3/8 inch) b 15 mm (9/16 inch) X The size of the buttonhole is 5 mm (3/16 inch).) Select a stitch. Attach buttonhole foot "A". d 1 2 3 3 a Presser foot scale b Length of buttonhole (diameter + thickness of the buttonhole foot, and then lower the presser foot lever. c • For details, refer to "Replacing the presser foot...
Operation Manual
Page 97
... or break. Cut off any excess thread. Memo z The feed dog position switch is normally set to the wrong side of machine). z The feed dogs come up when you are finished attaching the button, j slide the drop feed lever to (to check that the speed will hit the button, remeasure the distance between the button and the fabric, and then tie it around the thread between the holes in the button. h Set the sewing speed controller...
... or break. Cut off any excess thread. Memo z The feed dog position switch is normally set to the wrong side of machine). z The feed dogs come up when you are finished attaching the button, j slide the drop feed lever to (to check that the speed will hit the button, remeasure the distance between the button and the fabric, and then tie it around the thread between the holes in the button. h Set the sewing speed controller...
Operation Manual
Page 113
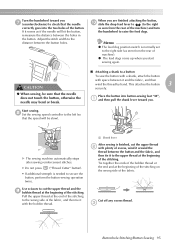
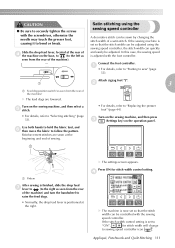
... be adjusted using the sewing speed controller A decorative stitch can be adjusted. Appliqué, Patchwork and Quilt Stitching 111 Reinforcement stitches are lowered. Slide the drop feed lever, located at the right. Use both hands to hold the fabric taut, and f then move the fabric to sew" (page 53). CAUTION ● Be sure to securely tighten the screws with the sewing speed controller. Turn on the base, to (to "Replacing the presser foot" (page 44). b 3 a Feed dog position switch...
... be adjusted using the sewing speed controller A decorative stitch can be adjusted. Appliqué, Patchwork and Quilt Stitching 111 Reinforcement stitches are lowered. Slide the drop feed lever, located at the right. Use both hands to hold the fabric taut, and f then move the fabric to sew" (page 53). CAUTION ● Be sure to securely tighten the screws with the sewing speed controller. Turn on the base, to (to "Replacing the presser foot" (page 44). b 3 a Feed dog position switch...
Operation Manual
Page 130
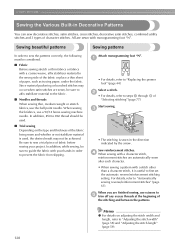
... fabric from slipping. Select a stitch. c • The stitching is sewn in Decorative Patterns You can sew decorative stitches, satin stitches, cross stitches, decorative satin stitches, combined utility stitches and 3 types of fabric before sewing your hands in order to #60 thread should be used. ■ Trial sewing Depending on adjusting the stitch width and length, refer to "Automatically sewing reverse/reinforcement stitches" (page 61). Be sure to the fabric. ■ Needles and threads When sewing thin, medium weight or stretch fabrics, use...
... fabric from slipping. Select a stitch. c • The stitching is sewn in Decorative Patterns You can sew decorative stitches, satin stitches, cross stitches, decorative satin stitches, combined utility stitches and 3 types of fabric before sewing your hands in order to #60 thread should be used. ■ Trial sewing Depending on adjusting the stitch width and length, refer to "Automatically sewing reverse/reinforcement stitches" (page 61). Be sure to the fabric. ■ Needles and threads When sewing thin, medium weight or stretch fabrics, use...
Operation Manual
Page 197
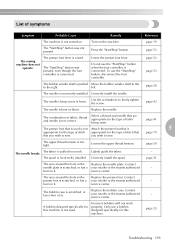
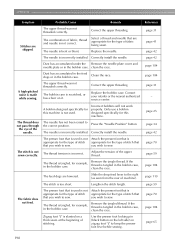
... upper thread tension. Only use the "Start/Stop" button, disconnect the foot controller. page 25 Troubleshooting 195 The "Start/Stop" button was not pressed. page 59 The needle breaks. Correctly install the needle. Contact presser foot is connected. Lower the presser foot lever. you wish to firmly tighten the screw. page 31 The area around the hole in the Replace the needle plate. Replace the bobbin case. Incorrect bobbins will not work properly. Turn on it . Replace the needle. burr on the machine. Lightly guide the fabric...
... upper thread tension. Only use the "Start/Stop" button, disconnect the foot controller. page 25 Troubleshooting 195 The "Start/Stop" button was not pressed. page 59 The needle breaks. Correctly install the needle. Contact presser foot is connected. Lower the presser foot lever. you wish to firmly tighten the screw. page 31 The area around the hole in the Replace the needle plate. Replace the bobbin case. Incorrect bobbins will not work properly. Turn on it . Replace the needle. burr on the machine. Lightly guide the fabric...
Operation Manual
Page 198
... the bobbin case. Move the sewing speed controller to the right (so that was pulled out was not wound onto the bobbin correctly. The bobbin case is too tight. page 25 page 27 page 28 196 Bobbin spins slowly. Only use a bobbin designed specifically for this machine. The thread that the speed will not work properly. service center. The upper thread breaks. Contact your retailer or the nearest authorized service center. Contact needle plate...
... the bobbin case. Move the sewing speed controller to the right (so that was pulled out was not wound onto the bobbin correctly. The bobbin case is too tight. page 25 page 27 page 28 196 Bobbin spins slowly. Only use a bobbin designed specifically for this machine. The thread that the speed will not work properly. service center. The upper thread breaks. Contact your retailer or the nearest authorized service center. Contact needle plate...
Operation Manual
Page 200
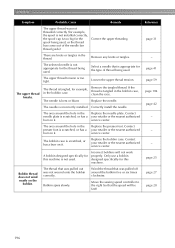
... bobbin case. A bobbin designed specifically for this machine. The needle has not been raised to keep the presser foot level while sewing. Correctly install the needle. The presser foot that is used is not Attach the presser foot that is not correct. Adjust the tension of fabric, thread and needle is appropriate for the type of stitch appropriate for the type of stitching. Lengthen the stitch length. you wish to sew. Remove the tangled thread. Dust has accumulated under the Remove the needle plate cover and needle plate...
... bobbin case. A bobbin designed specifically for this machine. The needle has not been raised to keep the presser foot level while sewing. Correctly install the needle. The presser foot that is used is not Attach the presser foot that is not correct. Adjust the tension of fabric, thread and needle is appropriate for the type of stitch appropriate for the type of stitching. Lengthen the stitch length. you wish to sew. Remove the tangled thread. Dust has accumulated under the Remove the needle plate cover and needle plate...
Operation Manual
Page 209
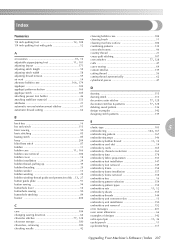
...bobbin case removal 184 embroidery data 178 bobbin cover 14 embroidery fabric preparation 153 bobbin installation 29 embroidery foot installation 147 bobbin thread, pulling up 39 embroidery foot removal 149 bobbin threading 29 embroidery frame 154 bobbin winder 13 embroidery frame installation 157 bobbin winding 25 bobbin winding thread guide and pretension disk .. 13, 27 embroidery frame removal 158 embroidery key 16 button guide plate 91 embroidery pattern selection 159 button sewing 94 embroidery pattern types 159 buttonhole lever 14 , embroidery sets...
...bobbin case removal 184 embroidery data 178 bobbin cover 14 embroidery fabric preparation 153 bobbin installation 29 embroidery foot installation 147 bobbin thread, pulling up 39 embroidery foot removal 149 bobbin threading 29 embroidery frame 154 bobbin winder 13 embroidery frame installation 157 bobbin winding 25 bobbin winding thread guide and pretension disk .. 13, 27 embroidery frame removal 158 embroidery key 16 button guide plate 91 embroidery pattern selection 159 button sewing 94 embroidery pattern types 159 buttonhole lever 14 , embroidery sets...

Operation Manual
Page 210
... leather/vinyl fabrics 66 M machine surface cleaning 184 , main power switch 14 19 maintenance 184 manual needle threading 35 memory key 16 mirroring stitches 63 My Custom Stitch 139 208 N needle bar thread guide 14 needle condition 42 needle plate 14 needle plate cover 14 needle plate marking 67 needle position button 15 needle position, changing 86 needle replacement 42 needle set 11 needle threader 34 needle threader lever 13 needle threading 34 needle types, sizes & uses 41 needles 40 next page key 16 , non stick foot 11 66 O open toe foot 11 operation beep 204...
... leather/vinyl fabrics 66 M machine surface cleaning 184 , main power switch 14 19 maintenance 184 manual needle threading 35 memory key 16 mirroring stitches 63 My Custom Stitch 139 208 N needle bar thread guide 14 needle condition 42 needle plate 14 needle plate cover 14 needle plate marking 67 needle position button 15 needle position, changing 86 needle replacement 42 needle set 11 needle threader 34 needle threader lever 13 needle threading 34 needle types, sizes & uses 41 needles 40 next page key 16 , non stick foot 11 66 O open toe foot 11 operation beep 204...
Operation Manual
Page 211
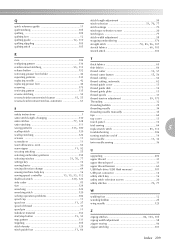
... sewing direction change 64 sewing machine help key 16 sewing speed controller 13, 15, 53, 112 , shell tuck stitch 120 123 side cutter 83 size 129 upgrading 206 upper thread 31 upper thread spool 31 upper thread tension 60 USB flash drive (USB flash memory 181 USB port connector 14 utility stitch key 16 utility stitch selection screen 20 , utility stitches 70 77 smocking 122 smocking stitch 120 W solving operation problems 186 spool cap 11 , spool net 11 27 spool of thread 31 walking foot 12 winding bobbin...
... sewing direction change 64 sewing machine help key 16 sewing speed controller 13, 15, 53, 112 , shell tuck stitch 120 123 side cutter 83 size 129 upgrading 206 upper thread 31 upper thread spool 31 upper thread tension 60 USB flash drive (USB flash memory 181 USB port connector 14 utility stitch key 16 utility stitch selection screen 20 , utility stitches 70 77 smocking 122 smocking stitch 120 W solving operation problems 186 spool cap 11 , spool net 11 27 spool of thread 31 walking foot 12 winding bobbin...


