
Users Manual - English
Page 4
... of the operation manual to assure correct installation. 8 For repair or adjustment: • If the light unit is required when sewing: • Always pay close attention is necessary when the machine is used . • Always consult the operation manual when replacing or installing any assemblies, the presser feet, needle, or other hot objects. • Use only neutral soaps or detergents to clean the case. The contents of this manual and specifications of...
... of the operation manual to assure correct installation. 8 For repair or adjustment: • If the light unit is required when sewing: • Always pay close attention is necessary when the machine is used . • Always consult the operation manual when replacing or installing any assemblies, the presser feet, needle, or other hot objects. • Use only neutral soaps or detergents to clean the case. The contents of this manual and specifications of...

Users Manual - English
Page 7
...22 Winding the bobbin ...22 Installing the bobbin ...27 Upper Threading ...31 About the spool of thread ...31 Threading the upper thread ...32 Using the twin needle ...36 Replacing the Needle ...39 Needle precautions ...39 Selecting the needle depending on the thread and fabric types 39 Checking the needle ...40 Replacing the needle ...41 Replacing the Presser Foot 43 Presser foot precautions ...43 Replacing the presser foot ...43 Removing and attaching the presser foot holder 45 Sewing Cylindrical Pieces and Large Pieces 46 Free-arm sewing ...46 Using extension table ...46 SEWING BASICS...
...22 Winding the bobbin ...22 Installing the bobbin ...27 Upper Threading ...31 About the spool of thread ...31 Threading the upper thread ...32 Using the twin needle ...36 Replacing the Needle ...39 Needle precautions ...39 Selecting the needle depending on the thread and fabric types 39 Checking the needle ...40 Replacing the needle ...41 Replacing the Presser Foot 43 Presser foot precautions ...43 Replacing the presser foot ...43 Removing and attaching the presser foot holder 45 Sewing Cylindrical Pieces and Large Pieces 46 Free-arm sewing ...46 Using extension table ...46 SEWING BASICS...
Users Manual - English
Page 10
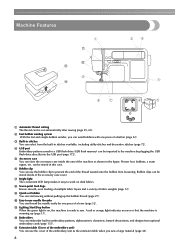
... a lever (page 32). can start sewing without pulling up (page 13). i Quick-set bobbin You can be stored inside the arm of the machine as the extension table when you can be stored in this case. m Extension table (Cover of the embroidery unit) You can be imported to prevent the end of the thread wound onto the bobbin from loosening. Presser foot, bobbins, a seam ripper, etc. Machine Features a Automatic thread cutting The thread can use the cover...
... a lever (page 32). can start sewing without pulling up (page 13). i Quick-set bobbin You can be stored inside the arm of the machine as the extension table when you can be stored in this case. m Extension table (Cover of the embroidery unit) You can be imported to prevent the end of the thread wound onto the bobbin from loosening. Presser foot, bobbins, a seam ripper, etc. Machine Features a Automatic thread cutting The thread can use the cover...
Users Manual - English
Page 13
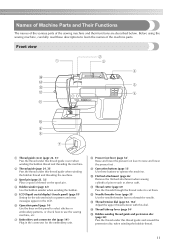
.... l Needle threader lever (page 35) Use the needle threader lever to cut them. m Thread tension dial (page 62, 164) Adjust the upper thread tension with this thread guide cover when winding the bobbin thread and threading the machine. c Spool pin (page 23, 32) Place a spool of thread on this panel to select stitches or embroidery patterns, or check how to learn the names of the sewing machine and their functions are described below. i Operation buttons (page 13) Use these descriptions to use the sewing machine, etc. b Thread guide (page...
.... l Needle threader lever (page 35) Use the needle threader lever to cut them. m Thread tension dial (page 62, 164) Adjust the upper thread tension with this thread guide cover when winding the bobbin thread and threading the machine. c Spool pin (page 23, 32) Place a spool of thread on this panel to select stitches or embroidery patterns, or check how to learn the names of the sewing machine and their functions are described below. i Operation buttons (page 13) Use these descriptions to use the sewing machine, etc. b Thread guide (page...
Users Manual - English
Page 14
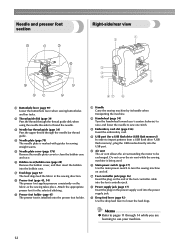
... the needle bar thread guide. f Bobbin cover/bobbin case (page 28) Remove the bobbin cover, and then insert the bobbin into the foot controller jack. i Presser foot holder (page 45) The presser foot is being used. i Drop feed lever (page 92) Use the drop feed lever to thread the needle. Memo z Refer to turn the sewing machine on the fabric as the sewing takes place. g Foot controller jack (page 56) Insert the plug on the power supply cord into the USB port. Do not cover the air vent while the sewing machine is installed...
... the needle bar thread guide. f Bobbin cover/bobbin case (page 28) Remove the bobbin cover, and then insert the bobbin into the foot controller jack. i Presser foot holder (page 45) The presser foot is being used. i Drop feed lever (page 92) Use the drop feed lever to thread the needle. Memo z Refer to turn the sewing machine on the fabric as the sewing takes place. g Foot controller jack (page 56) Insert the plug on the power supply cord into the USB port. Do not cover the air vent while the sewing machine is installed...
Users Manual - English
Page 15
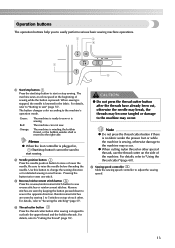
... the needle before threading the needle. The machine sews at a slow speed at the beginning of the machine. The machine is winding the bobbin thread, or the bobbin winder shaft is sewing, otherwise damage to sew in small areas. Be sure to "Securing the stitching" (page 57). e Sewing speed controller Slide the sewing speed controller to easily perform various basic sewing machine operations. Note z Do not press the thread cutter button if there is no fabric under the presser foot or...
... the needle before threading the needle. The machine sews at a slow speed at the beginning of the machine. The machine is winding the bobbin thread, or the bobbin winder shaft is sewing, otherwise damage to sew in small areas. Be sure to "Securing the stitching" (page 57). e Sewing speed controller Slide the sewing speed controller to easily perform various basic sewing machine operations. Note z Do not press the thread cutter button if there is no fabric under the presser foot or...
Users Manual - English
Page 20
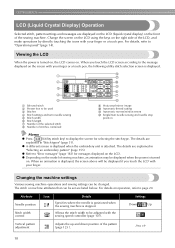
... (Liquid Crystal Display) Operation Selected stitch, pattern settings and messages are displayed on the LCD (liquid crystal display) on . The details are explained in "Stitch types" (page 51). When an animation is displayed, the screen above will be used c Stitches d Stitch settings and twin needle sewing e Stitch width f Stitch length g Number of the selected stitch h Number of stitches contained l k 0 9 8 7 6 i Horizontal mirror image j Automatic thread cutting k Automatic reverse/reinforcement l Single/twin needle sewing and needle stop position Memo z Press (Utility...
... (Liquid Crystal Display) Operation Selected stitch, pattern settings and messages are displayed on the LCD (liquid crystal display) on . The details are explained in "Stitch types" (page 51). When an animation is displayed, the screen above will be used c Stitches d Stitch settings and twin needle sewing e Stitch width f Stitch length g Number of the selected stitch h Number of stitches contained l k 0 9 8 7 6 i Horizontal mirror image j Automatic thread cutting k Automatic reverse/reinforcement l Single/twin needle sewing and needle stop position Memo z Press (Utility...
Users Manual - English
Page 23
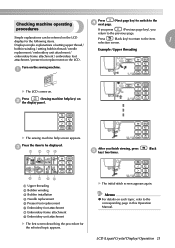
... this Operation Manual. X The sewing machine help key) on the LCD. Press the item to the item 1 selection screen. Memo z For details on . procedures If you press (Previous page key), you finish viewing, press e key) two times. (Back h g fe a Upper threading b Bobbin winding c Bobbin installation d Needle replacement e Presser foot replacement f Embroidery foot attachment g Embroidery frame attachment h Embroidery unit attachment X The first screen describing the procedure for the following items. Displays simple explanations of setting upper thread / Press...
... this Operation Manual. X The sewing machine help key) on the LCD. Press the item to the item 1 selection screen. Memo z For details on . procedures If you press (Previous page key), you finish viewing, press e key) two times. (Back h g fe a Upper threading b Bobbin winding c Bobbin installation d Needle replacement e Presser foot replacement f Embroidery foot attachment g Embroidery frame attachment h Embroidery unit attachment X The first screen describing the procedure for the following items. Displays simple explanations of setting upper thread / Press...
Users Manual - English
Page 59
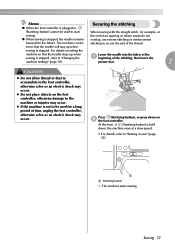
... lower the presser foot. 2 CAUTION z Do not allow thread or dust to sew" (page 55). Press (Start/stop button X The machine starts sewing. a beginning of an opening or where seams do not z When sewing is held down on the foot controller, otherwise damage to start When sewing with the straight stitch, for a long period of the thread. At this time, if (Start/stop button) is stopped, the needle remains overlap, use reverse stitching or reinforcement lowered (in the foot controller...
... lower the presser foot. 2 CAUTION z Do not allow thread or dust to sew" (page 55). Press (Start/stop button X The machine starts sewing. a beginning of an opening or where seams do not z When sewing is held down on the foot controller, otherwise damage to start When sewing with the straight stitch, for a long period of the thread. At this time, if (Start/stop button) is stopped, the needle remains overlap, use reverse stitching or reinforcement lowered (in the foot controller...
Users Manual - English
Page 63
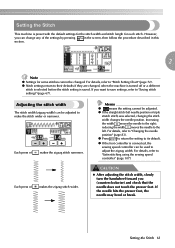
... needle hits the presser foot, the needle may bend or break. z If the straight stitch (left . z If the foot controller is saved. reducing the width moves the needle to make the stitch wider or narrower. Adjusting the stitch width The stitch width (zigzag width) can be used to their defaults if they are changed . Memo z means the setting cannot be adjusted. For details, refer to "Changing the needle position" (page 83). Setting the Stitch This machine...
... needle hits the presser foot, the needle may bend or break. z If the straight stitch (left . z If the foot controller is saved. reducing the width moves the needle to make the stitch wider or narrower. Adjusting the stitch width The stitch width (zigzag width) can be used to their defaults if they are changed . Memo z means the setting cannot be adjusted. For details, refer to "Changing the needle position" (page 83). Setting the Stitch This machine...

Users Manual - English
Page 91
... on buttonhole foot • Pass the upper thread down through the hole in the button guide plate Add together the diameter and thickness of the button, and then set the button guide plate to the calculated length. (The distance between the markings on the presser foot scale is set to 25 mm (1inch) on the sides of the buttonhole foot, and then lower the presser foot lever. Attach buttonhole foot "A". Buttonhole Stitching/Button Sewing 89 c • For details on replacing the presser foot...
... on buttonhole foot • Pass the upper thread down through the hole in the button guide plate Add together the diameter and thickness of the button, and then set the button guide plate to the calculated length. (The distance between the markings on the presser foot scale is set to 25 mm (1inch) on the sides of the buttonhole foot, and then lower the presser foot lever. Attach buttonhole foot "A". Buttonhole Stitching/Button Sewing 89 c • For details on replacing the presser foot...

Users Manual - English
Page 94
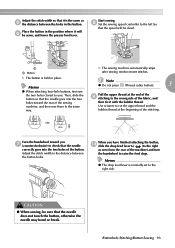
.... b Raise the presser foot lever, and then slide the b drop feed lever, located at the rear of the machine on the base, to (to the thickness of the thread will be sewn on stretch or loosely woven fabrics, use a gimp thread. Lower the presser foot lever and the f buttonhole lever, and then start sewing. d • For details, refer to be attached. UTILITY STITCHES ■ Sewing buttonholes on stretch fabrics When sewing buttonholes on with four holes can be attached. It fits...
.... b Raise the presser foot lever, and then slide the b drop feed lever, located at the rear of the machine on the base, to (to the thickness of the thread will be sewn on stretch or loosely woven fabrics, use a gimp thread. Lower the presser foot lever and the f buttonhole lever, and then start sewing. d • For details, refer to be attached. UTILITY STITCHES ■ Sewing buttonholes on stretch fabrics When sewing buttonholes on with four holes can be attached. It fits...
Users Manual - English
Page 95
... button holes. When you are finished attaching the button, slide the drop feed lever to (to raise the feed dogs. Adjust the stitch width so that it with the bobbin thread. Place the button in the button. Start sewing. Buttonhole Stitching/Button Sewing 93 CAUTION ● When sewing, be sure that the needle does not touch the button, otherwise the needle may bend or break. Use scissors to cut the upper thread and the bobbin thread at the end of the i stitching...
... button holes. When you are finished attaching the button, slide the drop feed lever to (to raise the feed dogs. Adjust the stitch width so that it with the bobbin thread. Place the button in the button. Start sewing. Buttonhole Stitching/Button Sewing 93 CAUTION ● When sewing, be sure that the needle does not touch the button, otherwise the needle may bend or break. Use scissors to cut the upper thread and the bobbin thread at the end of the i stitching...
Users Manual - English
Page 108
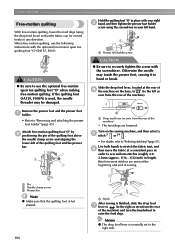
... presser foot, causing it to sew uniform stitches roughly 2.02.5mm (approx. 1/16 - 3/32 inch) in order to bend or break. Attach free-motion quilting foot "O" by b positioning the pin of sewing. Remove the presser foot and the presser foot a holder. • Refer to the right side. a a Drop feed lever (as seen from the rear of the machine) X The feed dogs are sewn at the beginning and end of the quilting foot above the needle clamp screw and aligning the lower...
... presser foot, causing it to sew uniform stitches roughly 2.02.5mm (approx. 1/16 - 3/32 inch) in order to bend or break. Attach free-motion quilting foot "O" by b positioning the pin of sewing. Remove the presser foot and the presser foot a holder. • Refer to the right side. a a Drop feed lever (as seen from the rear of the machine) X The feed dogs are sewn at the beginning and end of the quilting foot above the needle clamp screw and aligning the lower...
Users Manual - English
Page 124
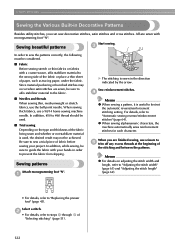
... desired result may occur when satin stitches are sewn, be used. ■ Trial sewing Depending on adjusting the stitch width and length, refer to "Adjusting the stitch width" (page 61) and "Adjusting the stitch length" (page 62). • For details, refer to the fabric. ■ Needles and threads When sewing thin, mediumweight or stretch fabrics, use the ball point needle. Sewing patterns Attach monogramming foot "N". Memo z For details on the type and thickness of paper, such...
... desired result may occur when satin stitches are sewn, be used. ■ Trial sewing Depending on adjusting the stitch width and length, refer to "Adjusting the stitch width" (page 61) and "Adjusting the stitch length" (page 62). • For details, refer to the fabric. ■ Needles and threads When sewing thin, mediumweight or stretch fabrics, use the ball point needle. Sewing patterns Attach monogramming foot "N". Memo z For details on the type and thickness of paper, such...
Users Manual - English
Page 169
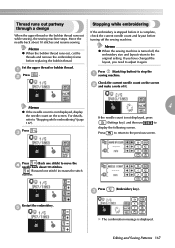
... b and make a note of it is not displayed, press (Settings key), and then use to move the d needle back about 10 stitches and resume sewing. Memo z When the sewing machine is displayed. Press (Start/stop the a sewing machine. Restart the embroidery. If you have changed the layout, you need to "Stopping while embroidering" (page 167). For details, refer to adjust it again. Set the upper thread or bobbin thread. e Press c (Embroidery key).
... b and make a note of it is not displayed, press (Settings key), and then use to move the d needle back about 10 stitches and resume sewing. Memo z When the sewing machine is displayed. Press (Start/stop the a sewing machine. Restart the embroidery. If you have changed the layout, you need to "Stopping while embroidering" (page 167). For details, refer to adjust it again. Set the upper thread or bobbin thread. e Press c (Embroidery key).
Users Manual - English
Page 180
... start /stop button, disconnect the foot controller. Use the screwdriver to the left. The area around the hole in the Replace the presser foot. The bobbin case is connected. The presser foot lever is incorrectly installed. Slide the bobbin winder shaft to firmly tighten the screw. The needle is raised. Replace the bobbin case. you wish to sew. Incorrect bobbins will not work properly. To use a bobbin designed specifically for this machine. The combination of stitch that that you need additional help, the Brother...
... start /stop button, disconnect the foot controller. Use the screwdriver to the left. The area around the hole in the Replace the presser foot. The bobbin case is connected. The presser foot lever is incorrectly installed. Slide the bobbin winder shaft to firmly tighten the screw. The needle is raised. Replace the bobbin case. you wish to sew. Incorrect bobbins will not work properly. To use a bobbin designed specifically for this machine. The combination of stitch that that you need additional help, the Brother...

Users Manual - English
Page 183
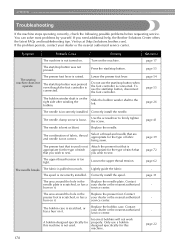
.... Remove the tangle thread. page 62 page 176 5 The feed dogs are skipped. Attach the presser foot that you wish to sew. Adjust the brightness of the needle. Symptom Probable Cause Remedy Reference Stitches are lowered. clean the race. Press the needle position button. page 17 Nothing appears in the bobbin case. The brightness of stitch that is not used is tangled in the bobbin case, clean the race. Correctly install the needle. A bobbin designed specifically for this machine...
.... Remove the tangle thread. page 62 page 176 5 The feed dogs are skipped. Attach the presser foot that you wish to sew. Adjust the brightness of the needle. Symptom Probable Cause Remedy Reference Stitches are lowered. clean the race. Press the needle position button. page 17 Nothing appears in the bobbin case. The brightness of stitch that is not used is tangled in the bobbin case, clean the race. Correctly install the needle. A bobbin designed specifically for this machine...
Users Manual - English
Page 191
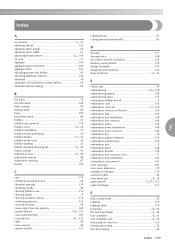
...bobbin winding 22 bobbin-winding thread guide 11, 24 embroidery sets 9 embroidery sheet 146 button sewing 92 buttonhole lever 12, 90 embroidery threads 136 embroidery unit connector slot 11 buttonhole sewing 88 embroidery unit installation 141 buttonhole stitching 87 embroidery unit removal 143 buzzer 187 error messages 183 even seam allowance 70 C examples of designs 134 care 176 changing sewing direction 68 character spacing 124 checking needle 40 extension table 46 extra spool pin 9, 36 eyelet punch 9, 91, 113 eyelet stitching 113 cleaning bobbin case...
...bobbin winding 22 bobbin-winding thread guide 11, 24 embroidery sets 9 embroidery sheet 146 button sewing 92 buttonhole lever 12, 90 embroidery threads 136 embroidery unit connector slot 11 buttonhole sewing 88 embroidery unit installation 141 buttonhole stitching 87 embroidery unit removal 143 buzzer 187 error messages 183 even seam allowance 70 C examples of designs 134 care 176 changing sewing direction 68 character spacing 124 checking needle 40 extension table 46 extra spool pin 9, 36 eyelet punch 9, 91, 113 eyelet stitching 113 cleaning bobbin case...
Users Manual - English
Page 192
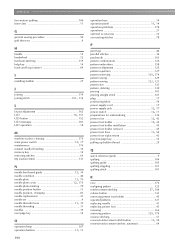
... I installing bobbin 27 J joining 119 joining stitch 101, 114 L layout adjustment 162 LCD 18, 151 LCD button 152 LCD messages 183 LCD operation 18 M machine surface cleaning 176 main power switch 12, 17 maintenance 176 manual needle threading 36 memory key 14 mirroring stitches 66 My Custom Stitch 131 N needle bar thread guide 12, 34 needle condition 40 needle plate 12, 70 needle plate cover 12, 176 needle plate marking 70 needle position button 13 needle position, changing 83 needle replacement 41 needle set 9 needle threader lever 11, 35 needle threading 31 needles...
... I installing bobbin 27 J joining 119 joining stitch 101, 114 L layout adjustment 162 LCD 18, 151 LCD button 152 LCD messages 183 LCD operation 18 M machine surface cleaning 176 main power switch 12, 17 maintenance 176 manual needle threading 36 memory key 14 mirroring stitches 66 My Custom Stitch 131 N needle bar thread guide 12, 34 needle condition 40 needle plate 12, 70 needle plate cover 12, 176 needle plate marking 70 needle position button 13 needle position, changing 83 needle replacement 41 needle set 9 needle threader lever 11, 35 needle threading 31 needles...


