Users Manual - English
Page 3
.... 5 Special care is required when sewing: • Always pay close attention is necessary when the machine is used . • Always consult the operation manual when replacing or installing any assemblies, the presser feet, needle, or other hot objects. • Use only neutral soaps or detergents to clean the case. Do not...
.... 5 Special care is required when sewing: • Always pay close attention is necessary when the machine is used . • Always consult the operation manual when replacing or installing any assemblies, the presser feet, needle, or other hot objects. • Use only neutral soaps or detergents to clean the case. Do not...
Users Manual - English
Page 4
... or instruction concerning use of the appliance by a person responsible for its intended use as described in this equipment, you should be replaced by authorized dealer. • In the event a malfunction occurs or adjustment is not intended for use a fuse approved by persons ...(including children) with this manual. carrying the mark, rating as marked on plug. • Always replace the fuse cover. Children should contact your local authorized Brother dealer. The contents of this manual and specifications of the operation manual to inspect and adjust the machine yourself...
... or instruction concerning use of the appliance by a person responsible for its intended use as described in this equipment, you should be replaced by authorized dealer. • In the event a malfunction occurs or adjustment is not intended for use a fuse approved by persons ...(including children) with this manual. carrying the mark, rating as marked on plug. • Always replace the fuse cover. Children should contact your local authorized Brother dealer. The contents of this manual and specifications of the operation manual to inspect and adjust the machine yourself...
Users Manual - English
Page 5
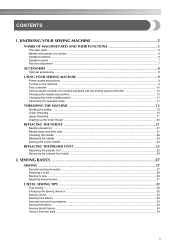
... Lower threading ...15 Upper threading ...17 Drawing up the lower thread ...20 REPLACING THE NEEDLE 21 Needle precautions ...21 Needle types and their uses ...21 Checking the needle ...22 Replacing the needle ...22 Sewing with a twin needle ...24 REPLACING THE PRESSER FOOT 25 Replacing the presser foot ...25 Removing the presser foot holder ...26 2.
... Lower threading ...15 Upper threading ...17 Drawing up the lower thread ...20 REPLACING THE NEEDLE 21 Needle precautions ...21 Needle types and their uses ...21 Checking the needle ...22 Replacing the needle ...22 Sewing with a twin needle ...24 REPLACING THE PRESSER FOOT 25 Replacing the presser foot ...25 Removing the presser foot holder ...26 2.
Users Manual - English
Page 18
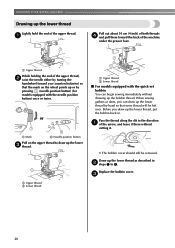
..."Drawing up the lower thread" (page 20). If the thread unrolls in the wrong direction, it may cause incorrect thread tension (page 31). • Replace the cover so that the end of the thread comes out from the left side of the bobbin case, it . 1 a Tension-adjusting spring Memo ●... bobbin thread. Slide the button and open the cover. CAUTION ● Make sure you start to be incorrect or break the needle. 1 a Cutter 16 Replace the bobbin cover. Memo ● You can begin sewing immediately without drawing up the bobbin thread before you set bobbin Raise the needle to be...
..."Drawing up the lower thread" (page 20). If the thread unrolls in the wrong direction, it may cause incorrect thread tension (page 31). • Replace the cover so that the end of the thread comes out from the left side of the bobbin case, it . 1 a Tension-adjusting spring Memo ●... bobbin thread. Slide the button and open the cover. CAUTION ● Make sure you start to be incorrect or break the needle. 1 a Cutter 16 Replace the bobbin cover. Memo ● You can begin sewing immediately without drawing up the bobbin thread before you set bobbin Raise the needle to be...
Users Manual - English
Page 22
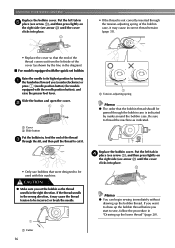
Replace the bobbin cover. a Upper thread While holding the end of the upper thread, b raise the needle either by turning the handwheel toward the back of ...
Replace the bobbin cover. a Upper thread While holding the end of the upper thread, b raise the needle either by turning the handwheel toward the back of ...

Users Manual - English
Page 23
...; CAUTION ● Only use bent needles. Needle types and their uses The sewing machine needle that you wish to observe these precautions is purchased. 21 REPLACING THE NEEDLE This section provides information on sewing machine needles. 1 Needle precautions Be sure to observe the following table when choosing the thread and needle...
...; CAUTION ● Only use bent needles. Needle types and their uses The sewing machine needle that you wish to observe these precautions is purchased. 21 REPLACING THE NEEDLE This section provides information on sewing machine needles. 1 Needle precautions Be sure to observe the following table when choosing the thread and needle...

Users Manual - English
Page 24
...With models equipped with a bent needle is extremely dangerous since the needle may be straight according to be skipped stitches. CAUTION ● Before replacing the needle, be sure to 75/11), the needle may occur if the foot controller or the start/ stop button is accidentally pressed ...and the machine starts sewing. If the combination of the needle on the previous page. Replacing the needle Replace the needle as 65/9 to turn off the sewing machine. KNOWING YOUR SEWING MACHINE CAUTION ● The appropriate fabric, thread and ...
...With models equipped with a bent needle is extremely dangerous since the needle may be straight according to be skipped stitches. CAUTION ● Before replacing the needle, be sure to 75/11), the needle may occur if the foot controller or the start/ stop button is accidentally pressed ...and the machine starts sewing. If the combination of the needle on the previous page. Replacing the needle Replace the needle as 65/9 to turn off the sewing machine. KNOWING YOUR SEWING MACHINE CAUTION ● The appropriate fabric, thread and ...

Users Manual - English
Page 27
... select a stitch, refer to be used with each stitch appears in the holder. If you have been designed to turn off . CAUTION ● Before replacing the presser foot, be sure to be read. c a Presser foot holder b Shank c Pin Note ● The presser foot to release the presser ... presser foot holder to be injured. ● Always use the correct presser foot for the stitch pattern you use presser feet that have chosen. REPLACING THE PRESSER FOOT CAUTION 1 ● Always turn off the power before you (counterclockwise) so that the mark on the wheel points up. (With...
... select a stitch, refer to be used with each stitch appears in the holder. If you have been designed to turn off . CAUTION ● Before replacing the presser foot, be sure to be read. c a Presser foot holder b Shank c Pin Note ● The presser foot to release the presser ... presser foot holder to be injured. ● Always use the correct presser foot for the stitch pattern you use presser feet that have chosen. REPLACING THE PRESSER FOOT CAUTION 1 ● Always turn off the power before you (counterclockwise) so that the mark on the wheel points up. (With...

Users Manual - English
Page 28
... the presser foot holder when cleaning the sewing machine or when installing a presser foot that the g presser foot is securely attached. Use the screwdriver to "Replacing the presser foot" (page 25). a Screwdriver b Presser foot holder c Presser foot holder screw 26 a • For details, refer to remove the presser foot holder. ■...
... the presser foot holder when cleaning the sewing machine or when installing a presser foot that the g presser foot is securely attached. Use the screwdriver to "Replacing the presser foot" (page 25). a Screwdriver b Presser foot holder c Presser foot holder screw 26 a • For details, refer to remove the presser foot holder. ■...

Users Manual - English
Page 29
Bent needles can easily break, possibly resulting in operation, pay special attention to the needle location. Turn on the machine, refer to "Replacing the presser foot" (page 25). For details on selecting a stitch, refer to sew" (page 29). 27 For details on starting... BASICS SEWING Basic sewing operations are described below to sew. 1 Turn on the machine. Select the stitch appropriate for the stitch. For details on replacing the presser foot, refer to "Turning on the machine" (page 9). Before operating the sewing machine, read the following precautions. 2 CAUTION ●...
Bent needles can easily break, possibly resulting in operation, pay special attention to the needle location. Turn on the machine, refer to "Replacing the presser foot" (page 25). For details on selecting a stitch, refer to sew" (page 29). 27 For details on starting... BASICS SEWING Basic sewing operations are described below to sew. 1 Turn on the machine. Select the stitch appropriate for the stitch. For details on replacing the presser foot, refer to "Turning on the machine" (page 9). Before operating the sewing machine, read the following precautions. 2 CAUTION ●...

Users Manual - English
Page 30
... stitch cannot be adjusted, "--" appears to increase or reduce the stitch width. ABC ABC a Utility stitch key b Utility stitch indicator Press (stitch selection keys) to "Replacing the presser foot" (page 25). X The stitch is not lit, press the utility stitch key. When the sewing machine is lit. If it is selected...
... stitch cannot be adjusted, "--" appears to increase or reduce the stitch width. ABC ABC a Utility stitch key b Utility stitch indicator Press (stitch selection keys) to "Replacing the presser foot" (page 25). X The stitch is not lit, press the utility stitch key. When the sewing machine is lit. If it is selected...

Users Manual - English
Page 35
...-and-loop fastener which is for thick fabrics (page 21). a Sewing direction When you encounter a seam that the needle passes through the hook-andloop fastener, replace the needle with the needle for sewing. Press the black button on the left side of the hook-and-loop fastener • Once the trouble...
...-and-loop fastener which is for thick fabrics (page 21). a Sewing direction When you encounter a seam that the needle passes through the hook-andloop fastener, replace the needle with the needle for sewing. Press the black button on the left side of the hook-and-loop fastener • Once the trouble...
Users Manual - English
Page 65
... When sewing with the wing needle, otherwise the sewing machine may be damaged. c CAUTION ● Select a stitch width of the needle from the front to "Replacing the needle" (page 22). a • Use a 130/705H 100/16 wing needle. • For details on thin or medium weight fabrics in addition to "Upper...
... When sewing with the wing needle, otherwise the sewing machine may be damaged. c CAUTION ● Select a stitch width of the needle from the front to "Replacing the needle" (page 22). a • Use a 130/705H 100/16 wing needle. • For details on thin or medium weight fabrics in addition to "Upper...

Users Manual - English
Page 66
...; Selecting a character [Example] Selecting stitch "C" (No. 03). a Stitch width adjustment key X The following the procedure below. c The total number of (stitch width d adjustment key) to "Replacing the presser foot" (page 25). a The presser foot to use • For details, refer to enter the selected character. If you would like to select...
...; Selecting a character [Example] Selecting stitch "C" (No. 03). a Stitch width adjustment key X The following the procedure below. c The total number of (stitch width d adjustment key) to "Replacing the presser foot" (page 25). a The presser foot to use • For details, refer to enter the selected character. If you would like to select...

Users Manual - English
Page 69
... sewing characters, the machine automatically sews reinforcement stitches for each character. ● While sewing, the LCD shows the pattern No. a • For details, refer to "Replacing the presser foot" (page 25). b • For details, refer to "Selecting characters" (page 64) Attach monogramming foot "N". Start sewing. When you have finished sewing, use...
... sewing characters, the machine automatically sews reinforcement stitches for each character. ● While sewing, the LCD shows the pattern No. a • For details, refer to "Replacing the presser foot" (page 25). b • For details, refer to "Selecting characters" (page 64) Attach monogramming foot "N". Start sewing. When you have finished sewing, use...

Users Manual - English
Page 70
.... a • For details, refer to "Combining characters" (page 65). Combine the character stitches "034" (No. 31 b + No. 34 + No. 35). • For details, refer to "Replacing the presser foot" (page 25). Each press of "+" or "-" side of (stitch length adjustment key) widens or narrows the stitches. A B C A: Correctly sewn (with character stitches...
.... a • For details, refer to "Combining characters" (page 65). Combine the character stitches "034" (No. 31 b + No. 34 + No. 35). • For details, refer to "Replacing the presser foot" (page 25). Each press of "+" or "-" side of (stitch length adjustment key) widens or narrows the stitches. A B C A: Correctly sewn (with character stitches...
Users Manual - English
Page 74
... presser foot. Replace the bobbin case. The upper thread tension is tangled, for the type of stitch that for example, in . The thread is too tight. You can solve most problems by yourself. Visit us at [http://solutions.brother.com]. You have not used the foot controller ...thread tension is bent or blunt. Loosen the upper thread tension. You are knots or tangles in the needle plate is turned off. Replace the needle plate. The area around the hole in the thread. The bobbin case is scratched. Contact your retailer or the nearest authorized...
... presser foot. Replace the bobbin case. The upper thread tension is tangled, for the type of stitch that for example, in . The thread is too tight. You can solve most problems by yourself. Visit us at [http://solutions.brother.com]. You have not used the foot controller ...thread tension is bent or blunt. Loosen the upper thread tension. You are knots or tangles in the needle plate is turned off. Replace the needle plate. The area around the hole in the thread. The bobbin case is scratched. Contact your retailer or the nearest authorized...
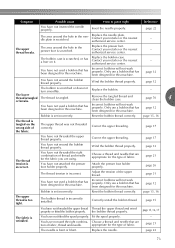
Users Manual - English
Page 75
... holder properly. Incorrect bobbins will not work properly. Correctly install the bobbin thread. appropriate for the type of the fabric. Replace the needle. Replace the bobbin. - page 70 4 You have not used a bobbin that has been designed for this machine. Reset the bobbin... incorrectly. Wind the bobbin thread properly. Correct the upper threading. page 12 Bobbin is scratched. The bobbin thread is incorrect. Replace the needle plate. Adjust the tension of fabric. - page 12 The thread tension is incorrectly installed. page 12 You have...
... holder properly. Incorrect bobbins will not work properly. Correctly install the bobbin thread. appropriate for the type of the fabric. Replace the needle. Replace the bobbin. - page 70 4 You have not used a bobbin that has been designed for this machine. Reset the bobbin... incorrectly. Wind the bobbin thread properly. Correct the upper threading. page 12 Bobbin is scratched. The bobbin thread is incorrect. Replace the needle plate. Adjust the tension of fabric. - page 12 The thread tension is incorrectly installed. page 12 You have...
Users Manual - English
Page 76
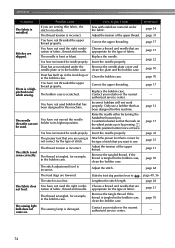
...this machine. You have not threaded the upper thread properly. The thread is a highpitched noise while sewing. How to its highest position. Replace the needle. Contact your retailer or the nearest authorized service center. Insert the needle properly. Remove the tangled thread. You have not ...clean the plate and the bobbin case. Adjust the stitch. The stitch is incorrect. Lengthen the stitch length. Insert the needle properly. Replace the bobbin case. Attach the presser foot that is not correct for example, in the bobbin case. Slide the feed dog position ...
...this machine. You have not threaded the upper thread properly. The thread is a highpitched noise while sewing. How to its highest position. Replace the needle. Contact your retailer or the nearest authorized service center. Insert the needle properly. Remove the tangled thread. You have not ...clean the plate and the bobbin case. Adjust the stitch. The stitch is incorrect. Lengthen the stitch length. Insert the needle properly. Replace the bobbin case. Attach the presser foot that is not correct for example, in the bobbin case. Slide the feed dog position ...


