Users Manual - English
Page 5
... main parts ...5 Needle and presser foot section ...6 Operation buttons ...6 Operation panel ...7 Flat bed attachment ...7 ACCESSORIES ...8 Optional accessories ...8 USING YOUR SEWING MACHINE 9 Power supply precautions ...9 Turning on the machine ...9 Foot controller ...10 Sewing speed controller (for models equipped with the sewing speed controller 10 Changing the needle stop position ...10 Changing the initial needle position ...11 Cancelling the operation beep ...11 THREADING THE MACHINE 12 Winding the bobbin ...12 Lower threading ...15 Upper threading ...17 Drawing up the lower thread...
... main parts ...5 Needle and presser foot section ...6 Operation buttons ...6 Operation panel ...7 Flat bed attachment ...7 ACCESSORIES ...8 Optional accessories ...8 USING YOUR SEWING MACHINE 9 Power supply precautions ...9 Turning on the machine ...9 Foot controller ...10 Sewing speed controller (for models equipped with the sewing speed controller 10 Changing the needle stop position ...10 Changing the initial needle position ...11 Cancelling the operation beep ...11 THREADING THE MACHINE 12 Winding the bobbin ...12 Lower threading ...15 Upper threading ...17 Drawing up the lower thread...
Users Manual - English
Page 6
... MAINTENANCE ...70 Cleaning the machine surface ...70 Cleaning the bobbin case ...70 TROUBLESHOOTING ...72 ERROR MESSAGES ...75 Operation beep (for models equipped with the operation beep 75 INDEX ...76 4 VARIOUS STITCHES 35 STITCH SETTINGS ...35 Utility stitches ...35 Character stitches (for models equipped with character stitches 41 OVERCASTING STITCHES 42 BASIC STITCHING ...43 Basic stitching ...43 BLIND HEM STITCHING 44 BUTTONHOLE SEWING 46 Button sewing ...49 ZIPPER INSERTION ...51 SEWING STRETCH FABRICS AND ELASTIC TAPE 52 Stretch stitching ...52 Elastic attaching ...52 APPLIQU...
... MAINTENANCE ...70 Cleaning the machine surface ...70 Cleaning the bobbin case ...70 TROUBLESHOOTING ...72 ERROR MESSAGES ...75 Operation beep (for models equipped with the operation beep 75 INDEX ...76 4 VARIOUS STITCHES 35 STITCH SETTINGS ...35 Utility stitches ...35 Character stitches (for models equipped with character stitches 41 OVERCASTING STITCHES 42 BASIC STITCHING ...43 Basic stitching ...43 BLIND HEM STITCHING 44 BUTTONHOLE SEWING 46 Button sewing ...49 ZIPPER INSERTION ...51 SEWING STRETCH FABRICS AND ELASTIC TAPE 52 Stretch stitching ...52 Elastic attaching ...52 APPLIQU...
Users Manual - English
Page 7
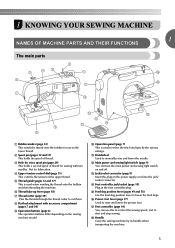
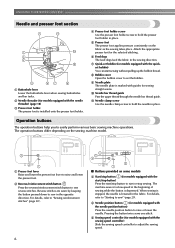
... used to raise and lower the presser foot. 1 KNOWING YOUR SEWING MACHINE 1 NAMES OF MACHINE PARTS AND THEIR FUNCTIONS The main parts a Bobbin winder (page 12) This winds the thread onto the bobbin for use this to control the sewing speed, and to cut them. c Hole for extra spool pin (page 24) This holds a second spool of thread for lubrication. Not for sewing with accessory compartment (pages 7 and 34) i Operation buttons (page 6) The operation buttons differ depending on the sewing machine model. e Thread guide...
... used to raise and lower the presser foot. 1 KNOWING YOUR SEWING MACHINE 1 NAMES OF MACHINE PARTS AND THEIR FUNCTIONS The main parts a Bobbin winder (page 12) This winds the thread onto the bobbin for use this to control the sewing speed, and to cut them. c Hole for extra spool pin (page 24) This holds a second spool of thread for lubrication. Not for sewing with accessory compartment (pages 7 and 34) i Operation buttons (page 6) The operation buttons differ depending on the sewing machine model. e Thread guide...
Users Manual - English
Page 8
...machine operations. d Presser foot holder screw Use the presser foot holder screw to hold the needle in place. g Quick-set the bobbin. k Needle clamp screw Use the needle clamp screw to sew in the fabric. When sewing is stopped, the needle is lowered in the opposite direction. Reverse stitches are sewn by keeping the button pressed down to hold the presser foot holder in place. e Presser foot The presser foot applies pressure consistently on some models c Start/stop button (for sewing straight seams. j Needle bar thread guide Pass the upper thread through the needle...
...machine operations. d Presser foot holder screw Use the presser foot holder screw to hold the needle in place. g Quick-set the bobbin. k Needle clamp screw Use the needle clamp screw to sew in the fabric. When sewing is stopped, the needle is lowered in the opposite direction. Reverse stitches are sewn by keeping the button pressed down to hold the presser foot holder in place. e Presser foot The presser foot applies pressure consistently on some models c Start/stop button (for sewing straight seams. j Needle bar thread guide Pass the upper thread through the needle...
Users Manual - English
Page 10
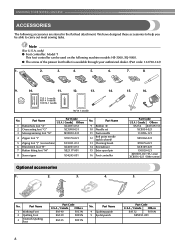
... accessories to help you be used on machine) 6 Blind stitch foot "R" 7 Button fitting foot "M" XC3021-031 XC4051-031 XE2137-001 8 Seam ripper X54243-051 No. KNOWING YOUR SEWING MACHINE ACCESSORIES The following machine models: HS-3000, SQ-9000. ● The screw of the presser foot holder is available through your authorized dealer. (Part code: 132730-122) 1. 2. 3. 4. 5. 6. 7. 8. 9. 10. 11. 12. 13. 14. 75/11 1 needle 90/14 1 needle 100/16 1 needle 90/14 1 needle No. Part Name 9 Bobbin (4) 10 Needle set 11 Twin needle...
... accessories to help you be used on machine) 6 Blind stitch foot "R" 7 Button fitting foot "M" XC3021-031 XC4051-031 XE2137-001 8 Seam ripper X54243-051 No. KNOWING YOUR SEWING MACHINE ACCESSORIES The following machine models: HS-3000, SQ-9000. ● The screw of the presser foot holder is available through your authorized dealer. (Part code: 132730-122) 1. 2. 3. 4. 5. 6. 7. 8. 9. 10. 11. 12. 13. 14. 75/11 1 needle 90/14 1 needle 100/16 1 needle 90/14 1 needle No. Part Name 9 Bobbin (4) 10 Needle set 11 Twin needle...
Users Manual - English
Page 12
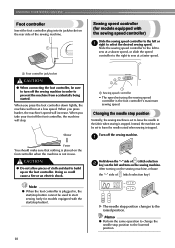
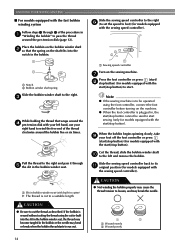
... machine is not in the fabric when sewing is stopped. Changing the needle stop position changes to the lowered position. 10 Note ● When the foot controller is set to select the desired sewing speed. X The needle stop position Normally, the sewing machine is plugged in order to prevent the machine from accidentally being started. Sewing speed controller (for models equipped with the sewing speed controller) Slide the sewing speed controller to the left or a right to leave the needle in use...
... machine is not in the fabric when sewing is stopped. Changing the needle stop position changes to the lowered position. 10 Note ● When the foot controller is set to select the desired sewing speed. X The needle stop position Normally, the sewing machine is plugged in order to prevent the machine from accidentally being started. Sewing speed controller (for models equipped with the sewing speed controller) Slide the sewing speed controller to the left or a right to leave the needle in use...
Users Manual - English
Page 15
... (start/stop button) (for models equipped with the sewing speed controller). Slide the sewing speed controller back to be operated using the foot controller, connect the foot controller before turning on the machine. ● When the foot controller is wound, when the thread runs low it may break the needle. 1 2 a Wound evenly b Wound poorly a Sewing speed controller 13 Slide the sewing speed controller to the right h (to set the speed to the right. g CAUTION ● Make sure you slide the bobbin winding...
... (start/stop button) (for models equipped with the sewing speed controller). Slide the sewing speed controller back to be operated using the foot controller, connect the foot controller before turning on the machine. ● When the foot controller is wound, when the thread runs low it may break the needle. 1 2 a Wound evenly b Wound poorly a Sewing speed controller 13 Slide the sewing speed controller to the right h (to set the speed to the right. g CAUTION ● Make sure you slide the bobbin winding...
Users Manual - English
Page 16
... button cannot be operated using the cutter built into the notch in , the start/stop button). g Press the foot controller or press (start/ h stop button) (for models equipped with the start/stop button) to fast) (for models equipped with the sewing speed controller). Note ● If the sewing machine is to be used to wind the free end of the procedure in cutter) X The thread is cut the thread as described. Cut the thread, slide the bobbin winder...
... button cannot be operated using the cutter built into the notch in , the start/stop button). g Press the foot controller or press (start/ h stop button) (for models equipped with the start/stop button) to fast) (for models equipped with the sewing speed controller). Note ● If the sewing machine is to be used to wind the free end of the procedure in cutter) X The thread is cut the thread as described. Cut the thread, slide the bobbin winder...
Users Manual - English
Page 17
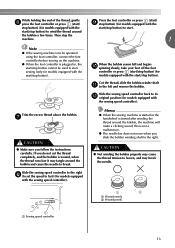
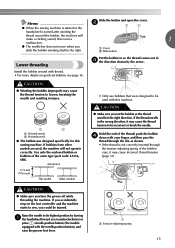
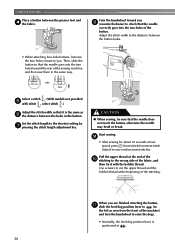
Install the bobbin wound with the needle position button), and raise the presser foot lever. 1 a Tension-adjusting spring 15 CAUTION ● Winding the bobbin improperly may cause the thread tension to sew, you (counterclockwise) or press (needle position button) (for this sewing machine. CAUTION ● Make sure you turn the power off while threading the machine. Memo ● When the sewing machine is turned after winding the thread around the bobbin, the machine will not operate correctly. If bobbins from other models are used with your...
Install the bobbin wound with the needle position button), and raise the presser foot lever. 1 a Tension-adjusting spring 15 CAUTION ● Winding the bobbin improperly may cause the thread tension to sew, you (counterclockwise) or press (needle position button) (for this sewing machine. CAUTION ● Make sure you turn the power off while threading the machine. Memo ● When the sewing machine is turned after winding the thread around the bobbin, the machine will not operate correctly. If bobbins from other models are used with your...
Users Manual - English
Page 18
... bobbin in, feed the end of the thread c through the slit, and then pull the thread to cut it. 1 a Tension-adjusting spring Memo ● The order that were designed to be used with the needle position button), and raise the presser foot lever. Put the left side of the cover (as indicated. • Only use bobbins that the bobbin thread should be passed through the bobbin case is not correctly inserted through the tension-adjusting spring...
... bobbin in, feed the end of the thread c through the slit, and then pull the thread to cut it. 1 a Tension-adjusting spring Memo ● The order that were designed to be used with the needle position button), and raise the presser foot lever. Put the left side of the cover (as indicated. • Only use bobbins that the bobbin thread should be passed through the bobbin case is not correctly inserted through the tension-adjusting spring...
Users Manual - English
Page 20
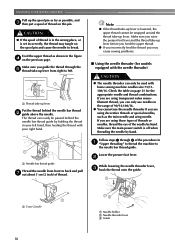
... presser foot lever. b While lowering the needle threader lever, c hook the thread onto the guide. Make sure you guide the thread through 6 of thread is off when threading the needle by hand. Make sure the main power switch is in the range of thread on the previous page. If you may tangle on the spool pin and cause the needle to left hand, then feeding the thread with home sewing machine needles size 75/11100/16. Check the table...
... presser foot lever. b While lowering the needle threader lever, c hook the thread onto the guide. Make sure you guide the thread through 6 of thread is off when threading the needle by hand. Make sure the main power switch is in the range of thread on the previous page. If you may tangle on the spool pin and cause the needle to left hand, then feeding the thread with home sewing machine needles size 75/11100/16. Check the table...
Users Manual - English
Page 26
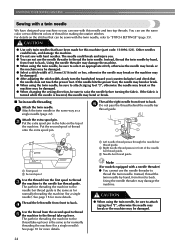
... "STITCH SETTINGS" (page 35). See page 18 for a single needle). c Needle bar thread guide Note (For models equipped with a needle threader) ● You cannot use the same color or two different colors of thread for making decorative stitches. KNOWING YOUR SEWING MACHINE Sewing with a twin needle We have been made for this needle and two top threads. The needle could break, and damage the machine. ● Do not sew with this machine (part code: 131096-121). If the fabric...
... "STITCH SETTINGS" (page 35). See page 18 for a single needle). c Needle bar thread guide Note (For models equipped with a needle threader) ● You cannot use the same color or two different colors of thread for making decorative stitches. KNOWING YOUR SEWING MACHINE Sewing with a twin needle We have been made for this needle and two top threads. The needle could break, and damage the machine. ● Do not sew with this machine (part code: 131096-121). If the fabric...
Users Manual - English
Page 34
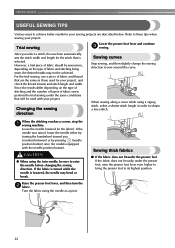
... stitching and the number of layers of fabric and thread that are described below. Changing the sewing direction Sewing curves Stop sewing, and then slightly change the sewing direction to these tips when sewing your project. When the stitching reaches a corner, stop the a sewing machine. CAUTION ● When using the needle as those used with the needle position button). For the trial sewing, use a piece of fabric sewn, perform the trial sewing under the presser foot, raise the presser foot lever...
... stitching and the number of layers of fabric and thread that are described below. Changing the sewing direction Sewing curves Stop sewing, and then slightly change the sewing direction to these tips when sewing your project. When the stitching reaches a corner, stop the a sewing machine. CAUTION ● When using the needle as those used with the needle position button). For the trial sewing, use a piece of fabric sewn, perform the trial sewing under the presser foot, raise the presser foot lever...
Users Manual - English
Page 49
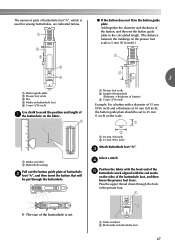
... inch).) 1 3 2 4 3 3 A a Button guide plate b Presser foot scale c Pin d Marks on buttonhole foot e 5 mm (3/16 inch) Use chalk to 25 mm (1 inch) on the scale. 1 2 a 10 mm (3/8 inch) b 15 mm (9/16 inch) Attach buttonhole foot "A". Pass the upper thread down through the buttonhole. c a Marks on fabric b Buttonhole sewing Pull out the button guide plate of buttonhole b foot "A", and then insert the button that will be set to mark the position and length of a the buttonhole on the fabric. 2 1 a Presser foot scale b Length of buttonhole (Diameter...
... inch).) 1 3 2 4 3 3 A a Button guide plate b Presser foot scale c Pin d Marks on buttonhole foot e 5 mm (3/16 inch) Use chalk to 25 mm (1 inch) on the scale. 1 2 a 10 mm (3/8 inch) b 15 mm (9/16 inch) Attach buttonhole foot "A". Pass the upper thread down through the buttonhole. c a Marks on fabric b Buttonhole sewing Pull out the button guide plate of buttonhole b foot "A", and then insert the button that will be set to mark the position and length of a the buttonhole on the fabric. 2 1 a Presser foot scale b Length of buttonhole (Diameter...
Users Manual - English
Page 51
... of the gimp thread. Attach presser foot "M". Trim off any slack. X The feed dogs are lowered. Lower the presser foot lever and the e buttonhole lever, and then start sewing. Buttons with 2 or with the sewing machine. b Select a stitch or . Hook the gimp thread onto the part of a buttonhole foot "A" shown in the a button to the right 3 as seen from the front of the d gimp thread. ■ Sewing buttonholes on stretch fabrics When sewing buttonholes on with 4 holes can be attached. Attach buttonhole foot "A". c Adjust the stitch width to the...
... of the gimp thread. Attach presser foot "M". Trim off any slack. X The feed dogs are lowered. Lower the presser foot lever and the e buttonhole lever, and then start sewing. Buttons with 2 or with the sewing machine. b Select a stitch or . Hook the gimp thread onto the part of a buttonhole foot "A" shown in the a button to the right 3 as seen from the front of the d gimp thread. ■ Sewing buttonholes on stretch fabrics When sewing buttonholes on with 4 holes can be attached. Attach buttonhole foot "A". c Adjust the stitch width to the...
Users Manual - English
Page 52
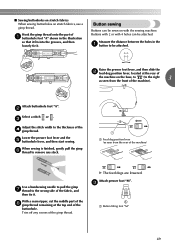
... button. Pull the upper thread at low speed, press (reverse/reinforcement stitch button) to sew reinforcement stitches. When you are finished attaching the button, k slide the feed dog position lever to (to the left as seen from the front of the button. Then, slide the button so that the needle does not touch the button, otherwise the needle may bend or break. Adjust the stitch width to the distance between the presser foot and d the fabric...
... button. Pull the upper thread at low speed, press (reverse/reinforcement stitch button) to sew reinforcement stitches. When you are finished attaching the button, k slide the feed dog position lever to (to the left as seen from the front of the button. Then, slide the button so that the needle does not touch the button, otherwise the needle may bend or break. Adjust the stitch width to the distance between the presser foot and d the fabric...
Users Manual - English
Page 59
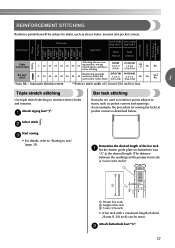
... holes and inseams. Attach zigzag foot "J". Bar tack stitch A Reinforcing openings 2.0 (1/16) 0.4 (1/64) 42 42 42 36 36 34 30 and areas where the 1.0-3.0 0.3-1.0 No seam easily comes loose (1/16-1/8) (1/64-1/16) No Auto* Rfc. 3 *Auto Rfc.: Automatic Reinforcement **Select a stitch width of the bar tack. a Set the button guide plate on buttonhole foot "A" to the desired length. (The distance between the markings on the presser foot scale is described below. Triple stretch stitching Use...
... holes and inseams. Attach zigzag foot "J". Bar tack stitch A Reinforcing openings 2.0 (1/16) 0.4 (1/64) 42 42 42 36 36 34 30 and areas where the 1.0-3.0 0.3-1.0 No seam easily comes loose (1/16-1/8) (1/64-1/16) No Auto* Rfc. 3 *Auto Rfc.: Automatic Reinforcement **Select a stitch width of the bar tack. a Set the button guide plate on buttonhole foot "A" to the desired length. (The distance between the markings on the presser foot scale is described below. Triple stretch stitching Use...
Users Manual - English
Page 74
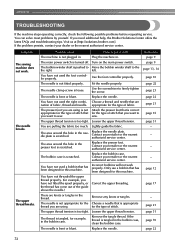
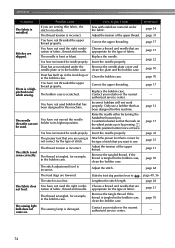
... come out of fabric. You are using is not Attach the presser foot that is turned off. Loosen the upper thread tension. page 12 page 17 - appropriate for example, you need additional help, the Brother Solutions Center offers the latest FAQs and troubleshooting tips. Loosen the upper thread tension. Remove the tangle thread. page 21 page 31 page 70 page 22 72 The needle clamp screw is bent or blunt. Replace the needle plate...
... come out of fabric. You are using is not Attach the presser foot that is turned off. Loosen the upper thread tension. page 12 page 17 - appropriate for example, you need additional help, the Brother Solutions Center offers the latest FAQs and troubleshooting tips. Loosen the upper thread tension. Remove the tangle thread. page 21 page 31 page 70 page 22 72 The needle clamp screw is bent or blunt. Replace the needle plate...
Users Manual - English
Page 75
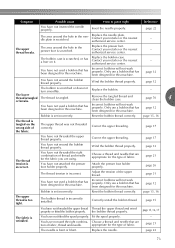
... The fabric is too tight. page 22 73 page 22 The area around the hole in the needle plate is tangled. Replace the bobbin case. Remove the tangled thread and clean the bobbin case. page 17 You have not threaded the upper thread Thread the upper thread and wind properly or fitted the bobbin properly. Attach the presser foot holder properly. Incorrect bobbins will not work properly. You have not used a bobbin that has been designed for this machine. Contact...
... The fabric is too tight. page 22 73 page 22 The area around the hole in the needle plate is tangled. Replace the bobbin case. Remove the tangled thread and clean the bobbin case. page 17 You have not threaded the upper thread Thread the upper thread and wind properly or fitted the bobbin properly. Attach the presser foot holder properly. Incorrect bobbins will not work properly. You have not used a bobbin that has been designed for this machine. Contact...
Users Manual - English
Page 76
... (needle position button) once or twice. page 49, 56 The fabric does not feed. The sewing lamp is a highpitched noise while sewing. You have not moved the needle holder to put it right Sew with stabilizer material under the needle plate or in the bobbin case. You have not used bobbin that has been designed for the type of fabric. The thread tension is incorrect. The stitch adjustment level is incorrect. Insert the needle properly. Replace...
... (needle position button) once or twice. page 49, 56 The fabric does not feed. The sewing lamp is a highpitched noise while sewing. You have not moved the needle holder to put it right Sew with stabilizer material under the needle plate or in the bobbin case. You have not used bobbin that has been designed for the type of fabric. The thread tension is incorrect. The stitch adjustment level is incorrect. Insert the needle properly. Replace...


