Users Manual - English
Page 1
Computerized Sewing Machine Operation Manual Product Code:885-V60/V61/V62 KNOWING YOUR SEWING MACHINE SEWING BASICS UTILITY STITCHES APPENDIX Please visit us at http://solutions.brother.com where you can get product support and answers to frequently asked questions (FAQs).
Computerized Sewing Machine Operation Manual Product Code:885-V60/V61/V62 KNOWING YOUR SEWING MACHINE SEWING BASICS UTILITY STITCHES APPENDIX Please visit us at http://solutions.brother.com where you can get product support and answers to frequently asked questions (FAQs).
Users Manual - English
Page 3
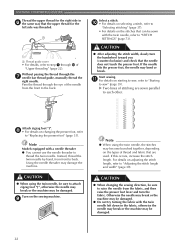
... electric shock, or injury to persons. 2 Always unplug the machine from the electrical outlet when making any adjustments mentioned in the instruction manual: • To unplug the machine, switch the machine to the symbol "O" position to the nearest authorized dealer or service center for ...examination, repair, electrical or mechanical adjustment. • While the machine is cut. 3 Never operate this manual, or if you notice anything unusual, such as an odor, heat, discoloration or deformation, stop using , when cleaning, when making any ...
... electric shock, or injury to persons. 2 Always unplug the machine from the electrical outlet when making any adjustments mentioned in the instruction manual: • To unplug the machine, switch the machine to the symbol "O" position to the nearest authorized dealer or service center for ...examination, repair, electrical or mechanical adjustment. • While the machine is cut. 3 Never operate this manual, or if you notice anything unusual, such as an odor, heat, discoloration or deformation, stop using , when cleaning, when making any ...
Users Manual - English
Page 4
... play with any opening. • Do not operate where aerosol (spray) products are being used or where oxygen is used . • Always consult the operation manual when replacing or installing any adjustments in the needle area. • Do not use bent or damaged needles. • Keep fingers away from the build...
... play with any opening. • Do not operate where aerosol (spray) products are being used or where oxygen is used . • Always consult the operation manual when replacing or installing any adjustments in the needle area. • Do not use bent or damaged needles. • Keep fingers away from the build...
Users Manual - English
Page 5
...as marked on plug. • Always replace the fuse cover. carrying the mark, rating as contained in this manual. Children should contact your local authorized Brother dealer. Use accessories recommended by ASTA to BS 1362, i.e. FOR USERS IN AC INPUT 220-240V COUNTRIES AND ...the problem persists, please consult your authorized dealer to change without notice. For additional product information, visit our web site at www.brother.com SAVE THESE INSTRUCTIONS This machine is intended for use by persons (including children) with reduced physical, sensory or mental capabilities,...
...as marked on plug. • Always replace the fuse cover. carrying the mark, rating as contained in this manual. Children should contact your local authorized Brother dealer. Use accessories recommended by ASTA to BS 1362, i.e. FOR USERS IN AC INPUT 220-240V COUNTRIES AND ...the problem persists, please consult your authorized dealer to change without notice. For additional product information, visit our web site at www.brother.com SAVE THESE INSTRUCTIONS This machine is intended for use by persons (including children) with reduced physical, sensory or mental capabilities,...
Users Manual - English
Page 10
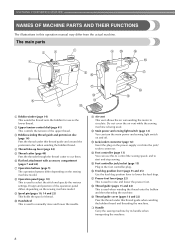
..., 14 and 22) This holds the spool of the upper thread. s Thread guide cover (pages 16 and 22) Pass the thread under this operation manual may differ from the actual machine. b Upper tension-control dial (page 41) This controls the tension of thread. h Operation panel (page 10) This... is used to raise and lower the presser foot. j Handwheel This is used to manually raise and lower the needle. m Jack/socket connector (page 12) Insert the plug on the sewing machine model. d Thread take-up lever (page 24) ...
..., 14 and 22) This holds the spool of the upper thread. s Thread guide cover (pages 16 and 22) Pass the thread under this operation manual may differ from the actual machine. b Upper tension-control dial (page 41) This controls the tension of thread. h Operation panel (page 10) This... is used to raise and lower the presser foot. j Handwheel This is used to manually raise and lower the needle. m Jack/socket connector (page 12) Insert the plug on the sewing machine model. d Thread take-up lever (page 24) ...
Users Manual - English
Page 12
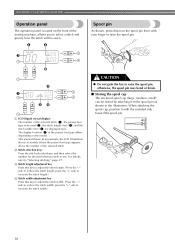
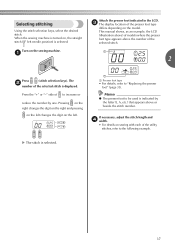
... spool pin as an example, the LCD (illustration above) of models where the presser foot type appears above the number of the selected stitch. This manual shows, as shown in the illustration. For details, refer to reduce the stitch length; c Stitch length adjustment key Press this key to adjust the stitch...
... spool pin as an example, the LCD (illustration above) of models where the presser foot type appears above the number of the selected stitch. This manual shows, as shown in the illustration. For details, refer to reduce the stitch length; c Stitch length adjustment key Press this key to adjust the stitch...
Users Manual - English
Page 33
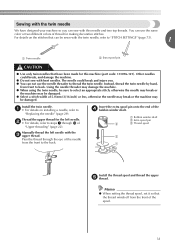
... damaged. a • For details on the stitches that the thread winds off from the front of the needle from front to thread the twin needle. Manually thread the left needle. Memo ● When setting the thread spool, set it so that can use the needle threader to back. The needle could...
... damaged. a • For details on the stitches that the thread winds off from the front of the needle from front to thread the twin needle. Manually thread the left needle. Memo ● When setting the thread spool, set it so that can use the needle threader to back. The needle could...
Users Manual - English
Page 34
... right side in the fabric, otherwise the needle may break or the machine may be damaged. Pass the thread through the g needle bar thread guide, manually thread the right needle. CAUTION ● After adjusting the stitch width, slowly turn the fabric. Note Models equipped with a needle threader ● You cannot use...
... right side in the fabric, otherwise the needle may break or the machine may be damaged. Pass the thread through the g needle bar thread guide, manually thread the right needle. CAUTION ● After adjusting the stitch width, slowly turn the fabric. Note Models equipped with a needle threader ● You cannot use...
Users Manual - English
Page 39
... machine is selected. 37 Memo ● The presser foot to the following example. X The stitch is turned on the left needle position) is selected. This manual shows, as an example, the LCD (illustration above) of to "Replacing the presser foot" (page 33). Turn on the sewing machine. a Presser foot type •...
... machine is selected. 37 Memo ● The presser foot to the following example. X The stitch is turned on the left needle position) is selected. This manual shows, as an example, the LCD (illustration above) of to "Replacing the presser foot" (page 33). Turn on the sewing machine. a Presser foot type •...
Users Manual - English
Page 47
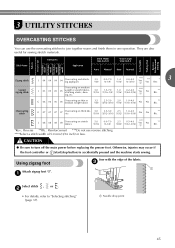
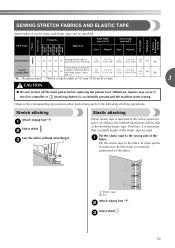
... 06 Overcasting on medium 05 weight or stretch fabrics, attaching elastic, darn- c Attach zigzag foot "J". Application Stitch Width [mm (inch.)] Stitch Length [mm (inch.)] Auto Manual Auto Manual Zigzag stitch 3-point zigzag stitch J 04 04 04 04 Overcasting and attaching appliqués 3.5 (1/8) 0.0-7.0 (0-1/4) 1.4 (1/16) 0.0-4.0 (0-3/16) **** Yes ( J ) *** Yes * Rev. 3 J 05 05 05 Overcasting on...
... 06 Overcasting on medium 05 weight or stretch fabrics, attaching elastic, darn- c Attach zigzag foot "J". Application Stitch Width [mm (inch.)] Stitch Length [mm (inch.)] Auto Manual Auto Manual Zigzag stitch 3-point zigzag stitch J 04 04 04 04 Overcasting and attaching appliqués 3.5 (1/8) 0.0-7.0 (0-1/4) 1.4 (1/16) 0.0-4.0 (0-3/16) **** Yes ( J ) *** Yes * Rev. 3 J 05 05 05 Overcasting on...
Users Manual - English
Page 49
... b Stitch width adjustment key c Left needle position d Right needle position 47 Attach zigzag foot "J". Application Stitch Width [mm (inch.)] Stitch Length [mm (inch.)] Auto Manual Auto Manual Straight Pattern Presser Foot 70 stitches model 60 stitches model 50 stitches model 40 stitches model Twin Needle Walking Foot Reverse/ Reinforcement Stitching Left J 00...
... b Stitch width adjustment key c Left needle position d Right needle position 47 Attach zigzag foot "J". Application Stitch Width [mm (inch.)] Stitch Length [mm (inch.)] Auto Manual Auto Manual Straight Pattern Presser Foot 70 stitches model 60 stitches model 50 stitches model 40 stitches model Twin Needle Walking Foot Reverse/ Reinforcement Stitching Left J 00...

Users Manual - English
Page 50
Stitch Width [mm (inch.)] Stitch Length [mm (inch.)] Stitch Name Application Auto Manual Auto Manual Pattern Presser Foot 70 stitches model 60 stitches model 50 stitches model 40 stitches model Twin Needle Walking Foot Reverse/ Reinforcement Stitching Blind hem stitch R ...
Stitch Width [mm (inch.)] Stitch Length [mm (inch.)] Stitch Name Application Auto Manual Auto Manual Pattern Presser Foot 70 stitches model 60 stitches model 50 stitches model 40 stitches model Twin Needle Walking Foot Reverse/ Reinforcement Stitching Blind hem stitch R ...

Users Manual - English
Page 53
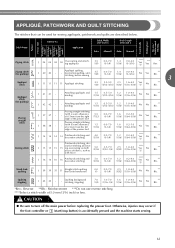
... stitching, button sewing 3.5 (1/8) *Auto Rfc.: Automatic Reinforcement **Rfc.: Reinforcement 0.0-7.0 (0-1/4) 1.4 (1/16) 0.0-4.0 (0-3/16) No Yes ** Rfc. Application Stitch Width [mm (inch.)] Stitch Length [mm (inch.)] Auto Manual Auto Manual Horizontal buttonholes A 29 29 29 25 on . Zigzag stitch (for - Appliqué quilting, free- Otherwise, injuries may occur if the foot controller or (start/stop...
... stitching, button sewing 3.5 (1/8) *Auto Rfc.: Automatic Reinforcement **Rfc.: Reinforcement 0.0-7.0 (0-1/4) 1.4 (1/16) 0.0-4.0 (0-3/16) No Yes ** Rfc. Application Stitch Width [mm (inch.)] Stitch Length [mm (inch.)] Auto Manual Auto Manual Horizontal buttonholes A 29 29 29 25 on . Zigzag stitch (for - Appliqué quilting, free- Otherwise, injuries may occur if the foot controller or (start/stop...
Users Manual - English
Page 59
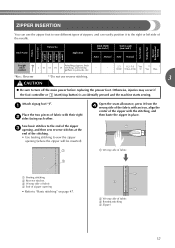
... the zipper c opening, and then sew reverse stitches at the end of the needle. Application Stitch Width [mm (inch.)] Stitch Length [mm (inch.)] Auto Manual Auto Manual Pattern Presser Foot 70 stitches model 60 stitches model 50 stitches model 40 stitches model Twin Needle Walking Foot Reverse/ Reinforcement Stitching Straight stitch (center...
... the zipper c opening, and then sew reverse stitches at the end of the needle. Application Stitch Width [mm (inch.)] Stitch Length [mm (inch.)] Auto Manual Auto Manual Pattern Presser Foot 70 stitches model 60 stitches model 50 stitches model 40 stitches model Twin Needle Walking Foot Reverse/ Reinforcement Stitching Straight stitch (center...
Users Manual - English
Page 61
...; Be sure to turn off the main power before replacing the presser foot. c 59 Stitch Width [mm (inch.)] Stitch Name Application Auto Manual Stitch Length [mm (inch.)] Auto Manual Pattern Presser Foot 70 stitches model 60 stitches model 50 stitches model 40 stitches model Twin Needle Walking Foot Reverse/ Reinforcement Stitching Stretch...
...; Be sure to turn off the main power before replacing the presser foot. c 59 Stitch Width [mm (inch.)] Stitch Name Application Auto Manual Stitch Length [mm (inch.)] Auto Manual Pattern Presser Foot 70 stitches model 60 stitches model 50 stitches model 40 stitches model Twin Needle Walking Foot Reverse/ Reinforcement Stitching Stretch...
Users Manual - English
Page 63
... power before replacing the presser foot. Stitch Name Pattern No. J 37 37 J 38 38 - Application Stitch Width [mm (inch.)] Stitch Length [mm (inch.)] Auto Manual Auto Manual Zigzag stitch Zigzag stitch (for quilting) Piecing straight stitch Joining stitch Hand-look quilting J 41 41 - - J 39 39 35 31 Straight stitch quilting that can...
... power before replacing the presser foot. Stitch Name Pattern No. J 37 37 J 38 38 - Application Stitch Width [mm (inch.)] Stitch Length [mm (inch.)] Auto Manual Auto Manual Zigzag stitch Zigzag stitch (for quilting) Piecing straight stitch Joining stitch Hand-look quilting J 41 41 - - J 39 39 35 31 Straight stitch quilting that can...
Users Manual - English
Page 68
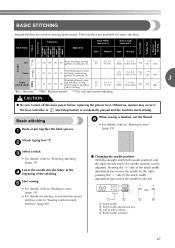
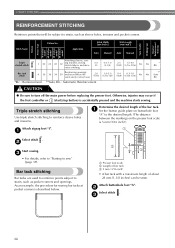
... bar tacks at pocket corners is accidentally pressed and the machine starts sewing. b Select stitch . Application Stitch Width [mm (inch.)] Stitch Length [mm (inch.)] Auto Manual Auto Manual Triple stretch stitch Attaching sleeves, sew- J 02 02 02 02 ing inseams, sewing stretch fabrics and deco- 0.0 (0) rative stitching 0.0-7.0 (0-1/4) 2.5 (3/32) 1.5-4.0 (1/16-3/16) No No...
... bar tacks at pocket corners is accidentally pressed and the machine starts sewing. b Select stitch . Application Stitch Width [mm (inch.)] Stitch Length [mm (inch.)] Auto Manual Auto Manual Triple stretch stitch Attaching sleeves, sew- J 02 02 02 02 ing inseams, sewing stretch fabrics and deco- 0.0 (0) rative stitching 0.0-7.0 (0-1/4) 2.5 (3/32) 1.5-4.0 (1/16-3/16) No No...
Users Manual - English
Page 70
....: Reinforcement **Select a stitch width of fabrics, such as with this sewing machine. Pattern No. Stitch Width [mm (inch.)] Stitch Name Application Auto Manual Stitch Length [mm (inch.)] Auto Manual Pattern Presser Foot 70 stitches model 60 stitches model 50 stitches model 40 stitches model Twin Needle Walking Foot Reverse/ Reinforcement Stitching Fagoting...
....: Reinforcement **Select a stitch width of fabrics, such as with this sewing machine. Pattern No. Stitch Width [mm (inch.)] Stitch Name Application Auto Manual Stitch Length [mm (inch.)] Auto Manual Pattern Presser Foot 70 stitches model 60 stitches model 50 stitches model 40 stitches model Twin Needle Walking Foot Reverse/ Reinforcement Stitching Fagoting...
Users Manual - English
Page 71
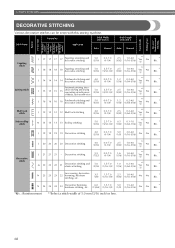
... before replacing the presser foot. d After sewing is accidentally pressed and the machine starts sewing. Application Stitch Width [mm (inch.)] Stitch Length [mm (inch.)] Auto Manual Auto Manual Decorative stitch Decorative hemming on 24 thin, medium weight and plain weave fabrics, heir- 5.0 (3/16) loom stitching, etc. 1.5-7.0 (1/16-1/4) 4.0 (3/16) 1.5-4.0 (1/16-3/16) ** Yes ( J ) No...
... before replacing the presser foot. d After sewing is accidentally pressed and the machine starts sewing. Application Stitch Width [mm (inch.)] Stitch Length [mm (inch.)] Auto Manual Auto Manual Decorative stitch Decorative hemming on 24 thin, medium weight and plain weave fabrics, heir- 5.0 (3/16) loom stitching, etc. 1.5-7.0 (1/16-1/4) 4.0 (3/16) 1.5-4.0 (1/16-3/16) ** Yes ( J ) No...

Users Manual - English
Page 74
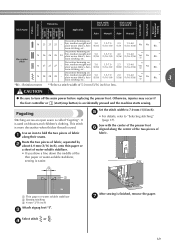
... ● The needle threader cannot be used to decorate hems and tablecloths on inserting a needle, refer to "Upper threading" (page 22). d 72 b Select stitch , , , , or . Manually pass the thread through the eye of 6.0 mm (15/64 inch) or less, otherwise the needle may bend or break.
... ● The needle threader cannot be used to decorate hems and tablecloths on inserting a needle, refer to "Upper threading" (page 22). d 72 b Select stitch , , , , or . Manually pass the thread through the eye of 6.0 mm (15/64 inch) or less, otherwise the needle may bend or break.


