
Users Manual - English
Page 6
...Operation buttons ...9 Operation panel ...10 Spool pin ...10 USING YOUR SEWING MACHINE 12 Power supply precautions ...12 Power supply ...12 Foot controller ...13 Sewing speed controller (for models equipped with the start/stop button 13 Changing the needle stop position ...13 THREADING THE MACHINE 14 Winding the bobbin ...14 Lower threading ...19 Upper threading ...22 Drawing up the lower thread ...27 REPLACING THE NEEDLE 28 Needle precautions ...28 Needle types and their uses ...28 Checking the needle ...29 Replacing the needle ...29 Sewing with the twin needle ...31 REPLACING THE PRESSER...
...Operation buttons ...9 Operation panel ...10 Spool pin ...10 USING YOUR SEWING MACHINE 12 Power supply precautions ...12 Power supply ...12 Foot controller ...13 Sewing speed controller (for models equipped with the start/stop button 13 Changing the needle stop position ...13 THREADING THE MACHINE 14 Winding the bobbin ...14 Lower threading ...19 Upper threading ...22 Drawing up the lower thread ...27 REPLACING THE NEEDLE 28 Needle precautions ...28 Needle types and their uses ...28 Checking the needle ...29 Replacing the needle ...29 Sewing with the twin needle ...31 REPLACING THE PRESSER...

Users Manual - English
Page 7
...of fabric ...82 Incorrect thread tension ...85 Fabric is caught in the machine and cannot be removed 86 List of symptoms ...90 ERROR MESSAGES ...95 Operation beep (for models equipped with the operation beep 95 INDEX ...96 5 3. UTILITY STITCHES 45 OVERCASTING STITCHES 45 Using zigzag foot ...45 Using overcasting foot ...46 BASIC STITCHING ...47 Basic stitching ...47 BLIND HEM STITCHING 48 BUTTONHOLE SEWING 51 Button sewing ...55 ZIPPER INSERTION ...57 SEWING STRETCH FABRICS AND ELASTIC TAPE 59 Stretch stitching ...59 Elastic attaching ...59 APPLIQUÉ, PATCHWORK AND QUILT STITCHING...
...of fabric ...82 Incorrect thread tension ...85 Fabric is caught in the machine and cannot be removed 86 List of symptoms ...90 ERROR MESSAGES ...95 Operation beep (for models equipped with the operation beep 95 INDEX ...96 5 3. UTILITY STITCHES 45 OVERCASTING STITCHES 45 Using zigzag foot ...45 Using overcasting foot ...46 BASIC STITCHING ...47 Basic stitching ...47 BLIND HEM STITCHING 48 BUTTONHOLE SEWING 51 Button sewing ...55 ZIPPER INSERTION ...57 SEWING STRETCH FABRICS AND ELASTIC TAPE 59 Stretch stitching ...59 Elastic attaching ...59 APPLIQUÉ, PATCHWORK AND QUILT STITCHING...
Users Manual - English
Page 8
... 5 Zigzag foot "J" (on machine) XC3021-031 6 Blind stitch foot "R" XC4051-031 7 Button fitting foot "M" XE2137-001 8 Seam ripper X54243-051 9 Bobbin (4) (One is on the machine rating plate. ● The screw of sewing thick fabrics. (page 43) aBlack button 6 Part Name 11 Twin needle 12 Ball point needle (gold colored) 13 Cleaning brush 14 Disc-shaped screwdriver 15 Spool cap (large) 16 Spool cap (medium) (on machine) 17 Spool cap (small) 18 Extra spool pin 19 Foot controller Part Code U.S.A. / Canada...
... 5 Zigzag foot "J" (on machine) XC3021-031 6 Blind stitch foot "R" XC4051-031 7 Button fitting foot "M" XE2137-001 8 Seam ripper X54243-051 9 Bobbin (4) (One is on the machine rating plate. ● The screw of sewing thick fabrics. (page 43) aBlack button 6 Part Name 11 Twin needle 12 Ball point needle (gold colored) 13 Cleaning brush 14 Disc-shaped screwdriver 15 Spool cap (large) 16 Spool cap (medium) (on machine) 17 Spool cap (small) 18 Extra spool pin 19 Foot controller Part Code U.S.A. / Canada...
Users Manual - English
Page 10
... the various settings. l Main power and sewing light switch (page 12) You can use as the lower thread. The main parts a Bobbin winder (page 14) This winds the thread onto the bobbin for use this operation manual may differ from the actual machine. h Operation panel (page 10) This is used to cut them. b Upper tension-control dial (page 41) This controls the tension of the upper thread. m Jack/socket connector (page 12) Insert the plug on the sewing machine model. q Presser foot lever (page...
... the various settings. l Main power and sewing light switch (page 12) You can use as the lower thread. The main parts a Bobbin winder (page 14) This winds the thread onto the bobbin for use this operation manual may differ from the actual machine. h Operation panel (page 10) This is used to cut them. b Upper tension-control dial (page 41) This controls the tension of the upper thread. m Jack/socket connector (page 12) Insert the plug on the sewing machine model. q Presser foot lever (page...

Users Manual - English
Page 11
... stitching. 1 f Needle plate cover release Use when removing the needle plate cover. Use this button to change the sewing direction or for models equipped with the quick- j Bobbin cover Open the bobbin cover to adjust the sewing speed. 9 Reverse stitches are sewn by keeping the button pressed down to easily perform various basic sewing machine operations. d Sewing speed controller (for detailed sewing in place. i Quick-set bobbin (for models equipped with the start/stop button) Press the start sewing without pulling up the bobbin thread. c Presser foot holder The presser...
... stitching. 1 f Needle plate cover release Use when removing the needle plate cover. Use this button to change the sewing direction or for models equipped with the quick- j Bobbin cover Open the bobbin cover to adjust the sewing speed. 9 Reverse stitches are sewn by keeping the button pressed down to easily perform various basic sewing machine operations. d Sewing speed controller (for detailed sewing in place. i Quick-set bobbin (for models equipped with the start/stop button) Press the start sewing without pulling up the bobbin thread. c Presser foot holder The presser...

Users Manual - English
Page 21
.... Use only the enclosed bobbin or bobbins of the same type (part code: SA156, SFB). b ● Winding the bobbin improperly may cause the thread tension to be injured. Slide the button and open the cover. Memo ● The direction for models Install the bobbin wound with the needle position button), and • For more details on quick-set the bobbin so the thread unrolls in d the direction shown by marks on the needle plate cover. Lower threading Raise the needle to...
.... Use only the enclosed bobbin or bobbins of the same type (part code: SA156, SFB). b ● Winding the bobbin improperly may cause the thread tension to be injured. Slide the button and open the cover. Memo ● The direction for models Install the bobbin wound with the needle position button), and • For more details on quick-set the bobbin so the thread unrolls in d the direction shown by marks on the needle plate cover. Lower threading Raise the needle to...
Users Manual - English
Page 24
... of 20 or lower. ● Use the needle and the thread in the correct combination. a Spool pin b Mark on the wheel points up , or press (needle position button) (for models equipped with the needle position button) once or twice to "Needle types and their uses" (page 28). a Presser foot lever CAUTION ● If the presser foot is not raised, the sewing machine cannot be threaded correctly. 22 or a Mark b Needle position button • If the needle is not...
... of 20 or lower. ● Use the needle and the thread in the correct combination. a Spool pin b Mark on the wheel points up , or press (needle position button) (for models equipped with the needle position button) once or twice to "Needle types and their uses" (page 28). a Presser foot lever CAUTION ● If the presser foot is not raised, the sewing machine cannot be threaded correctly. 22 or a Mark b Needle position button • If the needle is not...
Users Manual - English
Page 27
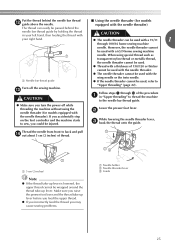
... power off the sewing machine. Lower the presser foot lever. m CAUTION "Upper threading" (page 22). If you accidentally step on the foot controller and the machine starts to Turn off while threading the machine without using special thread such as transparent nylon thread or metallic thread, the needle threader cannot be used. ● Thread with a thickness of thread. a Needle bar thread guide ● If the needle threader cannot be injured. Thread the needle from front to the needle bar thread guide. ● Make sure you may cause sewing problems. a Needle holder b Needle...
... power off the sewing machine. Lower the presser foot lever. m CAUTION "Upper threading" (page 22). If you accidentally step on the foot controller and the machine starts to Turn off while threading the machine without using special thread such as transparent nylon thread or metallic thread, the needle threader cannot be used. ● Thread with a thickness of thread. a Needle bar thread guide ● If the needle threader cannot be injured. Thread the needle from front to the needle bar thread guide. ● Make sure you may cause sewing problems. a Needle holder b Needle...
Users Manual - English
Page 45
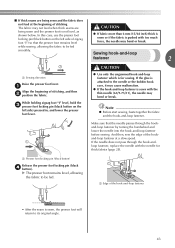
..., and lower the presser foot lever. a Edge of stitching, and then b position the fabric. ■ If thick seams are CAUTION being sewn and the fabric does not feed at a slow speed. CAUTION ● Use only the ungummed hook-and-loop fastener which is pushed with the needle for sewing. Note ● Before start sewing, baste together the fabric and the hook-and-loop fastener. a Presser foot locking pin (black button) Release the presser foot locking pin (black d button). X The presser foot remains...
..., and lower the presser foot lever. a Edge of stitching, and then b position the fabric. ■ If thick seams are CAUTION being sewn and the fabric does not feed at a slow speed. CAUTION ● Use only the ungummed hook-and-loop fastener which is pushed with the needle for sewing. Note ● Before start sewing, baste together the fabric and the hook-and-loop fastener. a Presser foot locking pin (black button) Release the presser foot locking pin (black d button). X The presser foot remains...
Users Manual - English
Page 49
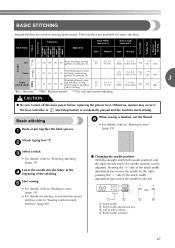
.... Basic stitching Baste or pin together the fabric pieces. a Stitch width b Stitch width adjustment key c Left needle position d Right needle position 47 rative stitching *Rev.: Reverse **Rfc.: Reinforcement ***Do not use reverse stitching. Otherwise, injuries may occur if the foot controller or (start/stop button) is finished, cut the thread. Attach zigzag foot "J". Lower the needle into the fabric at the d beginning of the stitch width adjustment key moves the needle to the left needle position) and the triple stretch stitch, the needle position can be adjusted...
.... Basic stitching Baste or pin together the fabric pieces. a Stitch width b Stitch width adjustment key c Left needle position d Right needle position 47 rative stitching *Rev.: Reverse **Rfc.: Reinforcement ***Do not use reverse stitching. Otherwise, injuries may occur if the foot controller or (start/stop button) is finished, cut the thread. Attach zigzag foot "J". Lower the needle into the fabric at the d beginning of the stitch width adjustment key moves the needle to the left needle position) and the triple stretch stitch, the needle position can be adjusted...
Users Manual - English
Page 54
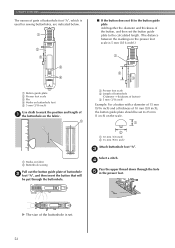
... the hole e in the button guide plate Add together the diameter and thickness of the button, and then set the button guide plate to the calculated length. (The distance between the markings on the presser foot scale is set to 25 mm (1 inch) on the scale. 1 2 a 10 mm (3/8 inch) b 15 mm (9/16 inch) Attach buttonhole foot "A". c Select a stitch. UTILITY STITCHES The names of parts of buttonhole foot "A", which is used for sewing buttonholes, are...
... the hole e in the button guide plate Add together the diameter and thickness of the button, and then set the button guide plate to the calculated length. (The distance between the markings on the presser foot scale is set to 25 mm (1 inch) on the scale. 1 2 a 10 mm (3/8 inch) b 15 mm (9/16 inch) Attach buttonhole foot "A". c Select a stitch. UTILITY STITCHES The names of parts of buttonhole foot "A", which is used for sewing buttonholes, are...
Users Manual - English
Page 57
... attached. Raise the presser foot lever, and then slide the b feed dog position lever, located at the rear of the machine on with stitch , select stitch .) Adjust the stitch width so that the needle goes into the two holes toward the rear of the sewing machine, and then sew them in the a button to the shortest setting by g pressing the stitch length adjustment key. Button sewing Buttons can be attached. Measure the distance between the presser foot and d the fabric...
... attached. Raise the presser foot lever, and then slide the b feed dog position lever, located at the rear of the machine on with stitch , select stitch .) Adjust the stitch width so that the needle goes into the two holes toward the rear of the sewing machine, and then sew them in the a button to the shortest setting by g pressing the stitch length adjustment key. Button sewing Buttons can be attached. Measure the distance between the presser foot and d the fabric...
Users Manual - English
Page 65
... the presser e foot, and then evenly guide the fabric while sewing. Hook the connecting fork of the walking foot c onto the needle clamp screw, lower the presser foot lever, and then use other patterns. Sew with the side of the presser foot aligned d with the edge of the fabric. ■ For a seam allowance on the right side Align the right side of the presser foot with the edge of the fabric, and sew using stitch . 1 Remove the presser foot and the presser foot b holder...
... the presser e foot, and then evenly guide the fabric while sewing. Hook the connecting fork of the walking foot c onto the needle clamp screw, lower the presser foot lever, and then use other patterns. Sew with the side of the presser foot aligned d with the edge of the fabric. ■ For a seam allowance on the right side Align the right side of the presser foot with the edge of the fabric, and sew using stitch . 1 Remove the presser foot and the presser foot b holder...
Users Manual - English
Page 75
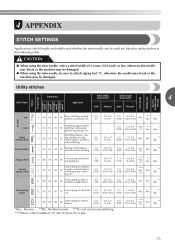
... Auto Manual Auto Manual Straight Pattern Presser Foot 70 stitches model 60 stitches model 50 stitches model 40 stitches model Twin Needle Walking Foot Reverse/ Reinforcement Stitching Left Center Triple stretch stitch Stretch stitch Zigzag stitch 3-point zigzag stitch J 00 00 00 00 Basic stitching, sewing gathers or pintucks, etc. 0.0 (0) 0.0-7.0 (0-1/4) 2.5 (3/32) 0.2-5.0 (1/64-3/16) No *** * Yes Rev. Attaching sleeves, sew- G 06 06 06 06 Overcasting on medium 05 weight or stretch fabrics, attaching elastic, darn- CAUTION ● When using the twin needle...
... Auto Manual Auto Manual Straight Pattern Presser Foot 70 stitches model 60 stitches model 50 stitches model 40 stitches model Twin Needle Walking Foot Reverse/ Reinforcement Stitching Left Center Triple stretch stitch Stretch stitch Zigzag stitch 3-point zigzag stitch J 00 00 00 00 Basic stitching, sewing gathers or pintucks, etc. 0.0 (0) 0.0-7.0 (0-1/4) 2.5 (3/32) 0.2-5.0 (1/64-3/16) No *** * Yes Rev. Attaching sleeves, sew- G 06 06 06 06 Overcasting on medium 05 weight or stretch fabrics, attaching elastic, darn- CAUTION ● When using the twin needle...
Users Manual - English
Page 93
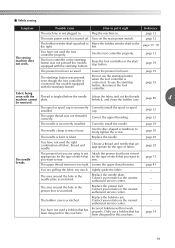
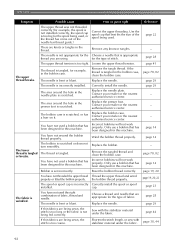
... area around the hole in the needle plate is not plugged in. Replace the presser foot. page 86 4 be removed. page 29 The needle clamp screw is raised. Lightly guide the fabric. - Replace the needle plate. ■ While sewing Symptom Possible cause How to put it , and clean the bobbin case. Turn on the main power switch. You have not used a bobbin that has been designed for this machine. The foot controller or the start/stop button was not...
... area around the hole in the needle plate is not plugged in. Replace the presser foot. page 86 4 be removed. page 29 The needle clamp screw is raised. Lightly guide the fabric. - Replace the needle plate. ■ While sewing Symptom Possible cause How to put it , and clean the bobbin case. Turn on the main power switch. You have not used a bobbin that has been designed for this machine. The foot controller or the start/stop button was not...
Users Manual - English
Page 94
... thin fabrics are using. Shorten the stitch length, or sew with the stabilizer material under the fabric. The needle is too tight. Replace the bobbin. Only use a bobbin that has been designed for this machine. The fabric is bent or blunt. Remove the tangle thread. Wind the bobbin thread properly. If thin fabrics are knots or tangles in the bobbin case, clean the bobbin case. The needle is wrinkled. The area around the hole in the presser foot is...
... thin fabrics are using. Shorten the stitch length, or sew with the stabilizer material under the fabric. The needle is too tight. Replace the bobbin. Only use a bobbin that has been designed for this machine. The fabric is bent or blunt. Remove the tangle thread. Wind the bobbin thread properly. If thin fabrics are knots or tangles in the bobbin case, clean the bobbin case. The needle is wrinkled. The area around the hole in the presser foot is...
Users Manual - English
Page 95
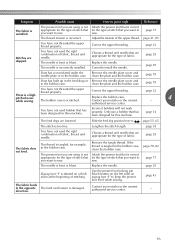
... stitch length. The thread tension is damaged. Slide the feed dog position lever to . If the thread is a high- Correctly install the needle. Attach the presser foot that is not appropriate for this machine. page 28 page 29 Dust has accumulated under the Remove the needle plate cover and needle plate or in the bobbin case. page 73 page 41, 85 You have not threaded the upper thread properly. Only use a bobbin that has been designed for the type of fabric, thread...
... stitch length. The thread tension is damaged. Slide the feed dog position lever to . If the thread is a high- Correctly install the needle. Attach the presser foot that is not appropriate for this machine. page 28 page 29 Dust has accumulated under the Remove the needle plate cover and needle plate or in the bobbin case. page 73 page 41, 85 You have not threaded the upper thread properly. Only use a bobbin that has been designed for the type of fabric, thread...
Users Manual - English
Page 96
... presser foot you are using is correct for the type of thread and needle for the type of stitch that is not appropriate for this machine. The thread tension is tangled in the bobbin case. Wind the bobbin thread properly. Choose a thread and needle that you want to sew. Adjust the tension of the fabric. Correct the upper threading. The thread is incorrectly installed. The stitch is incorrect. You have not attached the presserfoot holder properly. Adjust the tension of the upper thread. Remove...
... presser foot you are using is correct for the type of thread and needle for the type of stitch that is not appropriate for this machine. The thread tension is tangled in the bobbin case. Wind the bobbin thread properly. Choose a thread and needle that you want to sew. Adjust the tension of the fabric. Correct the upper threading. The thread is incorrectly installed. The stitch is incorrect. You have not attached the presserfoot holder properly. Adjust the tension of the upper thread. Remove...
Users Manual - English
Page 97
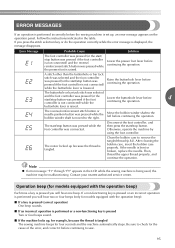
... buttonhole lever before continuing the operation. 4 buttonhole lever is displayed, the message disappears. The buttonhole or bar tack stitch was selected and the foot controller was pressed (or the start / stop button was pressed while the presser foot is lowered. If the needle is tangled The sewing machine beeps for example, because the thread is bent or broken, replace the needle. Be sure to check for models equipped with the operation beep) Each time...
... buttonhole lever before continuing the operation. 4 buttonhole lever is displayed, the message disappears. The buttonhole or bar tack stitch was selected and the foot controller was pressed (or the start / stop button was pressed while the presser foot is lowered. If the needle is tangled The sewing machine beeps for example, because the thread is bent or broken, replace the needle. Be sure to check for models equipped with the operation beep) Each time...
Users Manual - English
Page 98
... spool pin 31 eyelet punch 54 F fagoting 69 fast bobbin winding 17 feed dog position lever 8, 55, 65 feed , dogs 9 55, 64 flat bed , attachment 7 8, 44 foot controller 6 13, 39 free-motion quilting 64 H , handwheel 8 39 heirloom stitching 72 hook-and-loop fastener 43 J joining 71 , joining stitch 61 68 M main parts 8 main power switch 12 , monogramming 70 72 96 N needle 28 , needle bar thread guide 9 25 , needle clamp screw 9 30 needle plate 9 , needle plate cover 9 78 needle position 47 needle position button 9 , needle threader 9 25 O openings 66 operation beep...
... spool pin 31 eyelet punch 54 F fagoting 69 fast bobbin winding 17 feed dog position lever 8, 55, 65 feed , dogs 9 55, 64 flat bed , attachment 7 8, 44 foot controller 6 13, 39 free-motion quilting 64 H , handwheel 8 39 heirloom stitching 72 hook-and-loop fastener 43 J joining 71 , joining stitch 61 68 M main parts 8 main power switch 12 , monogramming 70 72 96 N needle 28 , needle bar thread guide 9 25 , needle clamp screw 9 30 needle plate 9 , needle plate cover 9 78 needle position 47 needle position button 9 , needle threader 9 25 O openings 66 operation beep...


