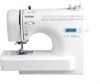
Brother International HS-2500 Support Question
Brother International HS-2500 Support Question
Find answers below for this question about Brother International HS-2500.Need a Brother International HS-2500 manual? We have 3 online manuals for this item!
Question posted by saprevaidehi on September 4th, 2012
Different Between Hs2500 And Sq9050?
Q1. HS2500 has monogramming foot, does this mean it also has alphanumeric characters?
Q2. Do both the machines have metal/stainless steel interior frame? what do they weight and are they noisy?
Current Answers
Related Brother International HS-2500 Manual Pages
Users Manual - English - Page 1
Computerized Sewing Machine
Operation Manual
Product Code:885-V60/V61/V62
KNOWING YOUR SEWING MACHINE
SEWING BASICS
UTILITY STITCHES
APPENDIX
Please visit us at http://solutions.brother.com where you can get product support and answers to frequently asked questions (FAQs).
Users Manual - English - Page 6

... ...9 Operation buttons ...9 Operation panel ...10 Spool pin ...10
USING YOUR SEWING MACHINE 12
Power supply precautions ...12 Power supply ...12 Foot controller ...13 Sewing speed controller (for models equipped with the start/stop button 13 Changing the needle stop position ...13
THREADING THE MACHINE 14
Winding the bobbin ...14 Lower threading ...19 Upper threading ...22...
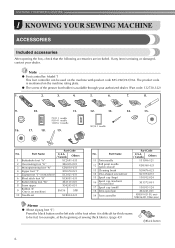
Users Manual - English - Page 8
...
15 Spool cap (large)
16
Spool cap (medium) (on the machine with product code 885-V60/V61/V62. Part Name
U.S.A. / Canada
Others
1 Buttonhole foot "A"
XC2691-033
2 Overcasting foot "G"
XE6305-001
3 Monogramming foot "N"
XD0810-031
4 Zipper foot "I"
X59370-021
5 Zigzag foot "J" (on the left side of sewing thick fabrics. (page 43)
aBlack button
6 If any item is difficult...
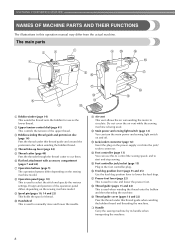
Users Manual - English - Page 10
... (page 14) Pass the thread under this operation manual may differ from the actual machine.
n Foot controller (page 13) You can turn the main power and sewing light switch on the sewing machine model. t Handle Carry the sewing machine by its handle when transporting the machine.
8
l Main power and sewing light switch (page 12) You can use as the lower...
Users Manual - English - Page 11

... cover to set bobbin)
You can start or stop button to hold the presser foot holder in place. Use this button to sew in the fabric. Needle and presser foot section
e Presser foot
The presser foot applies pressure consistently on the sewing machine model.
k Needle plate The needle plate is lowered in the opposite direction. a Reverse/reinforcement...
Users Manual - English - Page 12
...
As shown, press down on the model.
The display location (2) of the presser foot type differs
depending on the spool pin lever with the rounded side toward the spool pin.
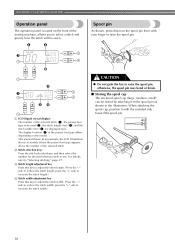
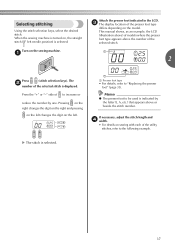
10... the stitch width (mm) (4) are displayed here. KNOWING YOUR SEWING MACHINE
Operation panel
The operation panel, located on the front of the sewing machine, allows you wish to use.
This manual shows, as shown in...
Users Manual - English - Page 13
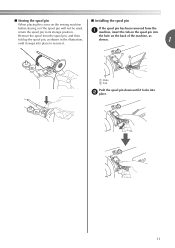
... tab on the spool pin into
Remove the spool from the spool pin, and then
the hole on the sewing machine
before storing or if the spool pin will not be used, return the spool pin to secure it locks ...9632; Storing the spool pin
■ Installing the spool pin
When placing the cover on the back of the machine, as
fold up the spool pin, as shown in the illustration,
shown.
1
until it .
Users Manual - English - Page 14
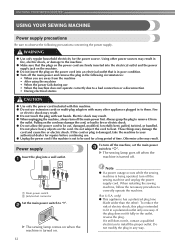
... install the proper outlet. Do not place heavy objects on when the machine is in poor condition. ● Turn off the sewing machine and unplug the power supply cord.
X The sewing lamp goes off when the
machine is being operated, turn off the machine, set the main power c switch to them. Do not modify the plug...
Users Manual - English - Page 15

... left and turn off the sewing machine. Turn off the sewing machine in use. Slide the sewing speed controller to the left or
1
a right to prevent the machine from accidentally being started. a Foot controller jack/socket
CAUTION
● When connecting the foot controller, be set using the sewing speed controller is the foot controller's maximum sewing speed. When you take your...
Users Manual - English - Page 16
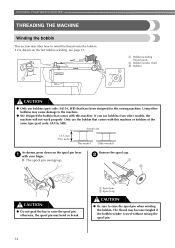
... spool pin lever a with your finger.
The thread may bend or break. Only use bobbins (part code: SA156, SFB) that have been designed for this sewing machine. Actual size
11.5 mm (7/16 inch)
This model
Other models
As shown, press down on the fast bobbin winding, see page 17. X The spool pin...
Users Manual - English - Page 18
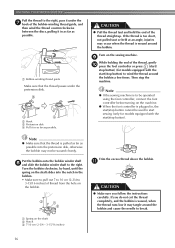
... shaft b Notch c 7-10 cm (2-3/4 - 3-15/16 inches)
Trim the excess thread above the bobbin. Note
● If the sewing machine is to be operated using the foot controller, connect the foot controller before turning on the sewing machine.
a Spring on the bobbin.
Turn the bobbin clockwise, by hand, until the spring on the shaft slides into...
Users Manual - English - Page 19
... 14). Cut the thread, slide the bobbin winder shaft o to the left hand, use your foot off the foot
controller or press (start/stop button) (for models equipped with
the sewing speed controller). Memo
● When the sewing machine is started or the handwheel is not a malfunction.
● The needle bar does not move when...
Users Manual - English - Page 20
... it through e the slit in cutter)
X The thread is wound without cutting the thread using the foot controller, connect the foot controller before turning on the sewing machine.
When the bobbin begins spinning slowly, take i your foot off the foot controller or press
(start/stop button) (for models equipped with the start/stop button cannot be...
Users Manual - English - Page 21

...; Make sure you turn the power off the sewing machine. Be sure to sew, you could be incorrect or break the needle.
19 raise the presser foot lever.
1
CAUTION
Turn off while threading the machine.
If you accidentally step on the foot controller and the machine starts to thread the machine as indicated. If bobbins from other models...
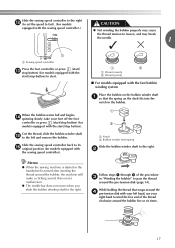
Users Manual - English - Page 22

... Put the left tab in the right direction. KNOWING YOUR SEWING MACHINE
Hold the end of the thread, push the bobbin e ...foot lever. If the thread unrolls in the diagram).
■ For models equipped with the quick-set the bobbin so the thread unrolls in f place (see arrow b) until the cover clicks into place.
Be sure to be incorrect or break the needle.
20 Turn off the sewing machine...
Users Manual - English - Page 24
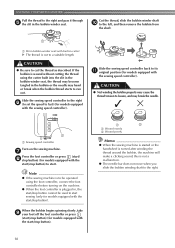
...a
Raise the presser foot using the presser foot b lever. a Presser foot lever
CAUTION
● If the presser foot is not raised, the sewing machine cannot be threaded. ...sewing machine can not be threaded correctly.
22
or
a Mark
b Needle position button
• If the needle is not correct, the thread may become tangled or the needle may bend or break.
● Never use a thread weight...
Users Manual - English - Page 35
....)
or
a Mark
b Needle position button
If the sewing machine has been turned on the
controller, the machine will start /stop button is accidentally pressed and the machine starts sewing.
If you leave the power on and step on , b turn off . To select a stitch, refer to release the presser foot. Using other any presser feet
may occur...
Users Manual - English - Page 39
c The display location of the presser foot type
differs depending on the sewing machine.
Press the "+" or "-" side of the utility stitches, refer to increase or
reduce the number by the letter (J, A, etc.) that appears above the number of the selected stitch is selected.
37
a Presser foot type
• For details, refer to be used is...
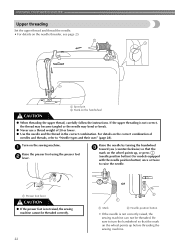
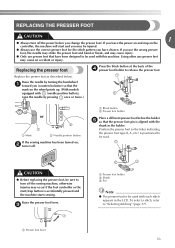
Users Manual - English - Page 44
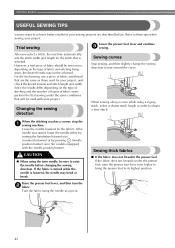
... check the thread tension and stitch length and width. Trial sewing
Lower the presser foot lever and continue c sewing. For the trial sewing, use a piece of fabric and stitching being sewn, the desired results may bend or break. When the stitching reaches a corner, stop the a sewing machine. If the fabric is turned while the needle is...
Users Manual - English - Page 87
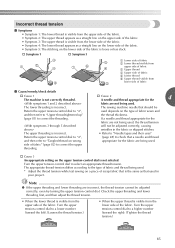
...† Cause 3 An appropriate setting on a piece of the fabric.
The appropriate thread tension differs according to a lower number (toward the right). (Tighten the thread tension.)
54 3
54 ...for the
4
fabric are incorrect, the thread tension cannot be
used .
The sewing machine needle that a needle and thread
appropriate for the
fabric are being used depends on the ...
Similar Questions

What Are The Different Diles On This Sewing Machine? I Just Found A Sewing Machi
(Posted by Sherlevy2014 9 months ago)

How To Lubricate A Brother Sq9050 Sewing Machine
(Posted by thebleanh 9 years ago)


My Bobbin Will Not Turn In My Sq9050 Sewing Machine, Why?
(Posted by Doc1maka 10 years ago)

Brother Ls 2000 Sewing Machine Price
I Want To Know Above Sewing Machine Price In Indian Rupees,please Anser Me Imediately
I Want To Know Above Sewing Machine Price In Indian Rupees,please Anser Me Imediately
(Posted by iladave84503 10 years ago)