Users Manual - English
Page 86
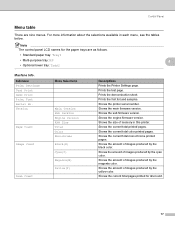
... size of images produced by the black color. Shows the current total color printed pages. Shows the sub firmware version. Version Page Count Image Count Drum Count Menu Selections Main Version Sub Version Engine Version RAM Size Total Color Monochrome Black(K) Cyan(C) Magenta(M) Yellow(Y) Descriptions Prints the Printer Settings page. Prints the demonstration sheet. Shows the engine firmware...
... size of images produced by the black color. Shows the current total color printed pages. Shows the sub firmware version. Version Page Count Image Count Drum Count Menu Selections Main Version Sub Version Engine Version RAM Size Total Color Monochrome Black(K) Cyan(C) Magenta(M) Yellow(Y) Descriptions Prints the Printer Settings page. Prints the demonstration sheet. Shows the engine firmware...
Users Manual - English
Page 87
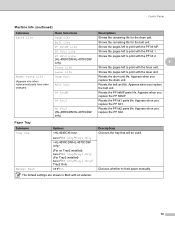
...PF KitMP Life PF Kit1 Life PF Kit2 Life (HL-4050CDN/HL-4070CDW only) Fuser Life Laser Life Drum Unit Belt Unit PF KitMP PF Kit1 PF Kit2 (HL-4050CDN/HL-4070CDW only) Descriptions Shows the remaining life for the belt unit. Shows the pages left to print with the PF kit 1. Shows the pages left ...to print with the PF kit MP. Resets the PF kit2 ...
...PF KitMP Life PF Kit1 Life PF Kit2 Life (HL-4050CDN/HL-4070CDW only) Fuser Life Laser Life Drum Unit Belt Unit PF KitMP PF Kit1 PF Kit2 (HL-4050CDN/HL-4070CDW only) Descriptions Shows the remaining life for the belt unit. Shows the pages left to print with the PF kit 1. Shows the pages left ...to print with the PF kit MP. Resets the PF kit2 ...
Users Manual - English
Page 106
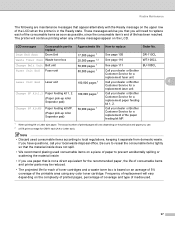
...paper that you that is in the Ready state. The printer will vary depending on the complexity of printed pages, percentage of coverage and type of media used ...Brother Customer Service for a replacement fuser unit. Laser Unit End Laser unit 100,000 pages 1 Call your dealer or Brother Customer Service for a replacement paper feeding kit 1, 2. Note • Discard used . 97 Drum End Soon Drum... actual number of printed pages will need to local regulations, keeping it separate from domestic waste. Frequency of replacement will continue printing when any color toner cartridge. Be...
...paper that you that is in the Ready state. The printer will vary depending on the complexity of printed pages, percentage of coverage and type of media used ...Brother Customer Service for a replacement fuser unit. Laser Unit End Laser unit 100,000 pages 1 Call your dealer or Brother Customer Service for a replacement paper feeding kit 1, 2. Note • Discard used . 97 Drum End Soon Drum... actual number of printed pages will need to local regulations, keeping it separate from domestic waste. Frequency of replacement will continue printing when any color toner cartridge. Be...
Users Manual - English
Page 108
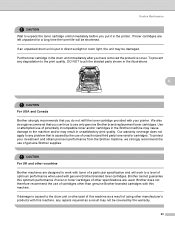
... the toner cartridge in the drum unit immediately after you put in the printer. Our warranty coverage does not apply to a level of optimum performance when used . If toner cartridges are left unpacked for a long time the toner life ..., DO NOT touch the shaded parts shown in unsatisfactory print quality. Brother does not therefore recommend the use of a particular specification and will be damaged. If an unpacked drum unit is put it in direct sunlight or room light, the unit may be shortened. CA UTI ON For UK and other than genuine...
... the toner cartridge in the drum unit immediately after you put in the printer. Our warranty coverage does not apply to a level of optimum performance when used . If toner cartridges are left unpacked for a long time the toner life ..., DO NOT touch the shaded parts shown in unsatisfactory print quality. Brother does not therefore recommend the use of a particular specification and will be damaged. If an unpacked drum unit is put it in direct sunlight or room light, the unit may be shortened. CA UTI ON For UK and other than genuine...

Users Manual - English
Page 111
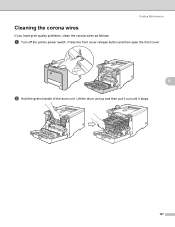
If you do not, printed pages may have a vertical stripe. 102 2 2 1 2 1 2 1 1 1 1 1 1 2 2 1 2 1 2 Routine Maintenance d Clean the corona wire as follows: 1 Push to release the latches of the white corona wire cover (1), and then open the cover. 6 1 2 Clean the corona wire inside the drum unit by gently sliding the green tab from left to right and right to left several times. 1 CA UTI ON Be sure to return the tab to the home position a (1).
If you do not, printed pages may have a vertical stripe. 102 2 2 1 2 1 2 1 1 1 1 1 1 2 2 1 2 1 2 Routine Maintenance d Clean the corona wire as follows: 1 Push to release the latches of the white corona wire cover (1), and then open the cover. 6 1 2 Clean the corona wire inside the drum unit by gently sliding the green tab from left to right and right to left several times. 1 CA UTI ON Be sure to return the tab to the home position a (1).
Users Manual - English
Page 114
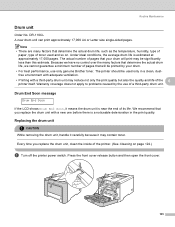
... open the front cover. 105 The printer should be printed by the use only genuine Brother toner. Under ideal conditions, the average drum life is near the end of the 6 printer itself. Replacing the drum unit 6 CA UTI ON While removing the drum unit, handle it carefully because it means the drum unit is estimated at approximately 17...
... open the front cover. 105 The printer should be printed by the use only genuine Brother toner. Under ideal conditions, the average drum life is near the end of the 6 printer itself. Replacing the drum unit 6 CA UTI ON While removing the drum unit, handle it carefully because it means the drum unit is estimated at approximately 17...

Users Manual - English
Page 116
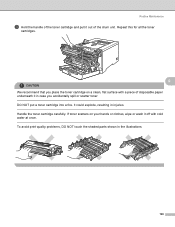
Routine Maintenance d Hold the handle of the toner cartridge and pull it out of the drum unit. To avoid print quality problems, DO NOT touch the shaded parts shown in the illustration. Repeat this for all the toner cartridges. 6 CA UTI ON To prevent damage to the printer from static electricity, DO NOT touch the electrodes shown in the illustrations. 107
Routine Maintenance d Hold the handle of the toner cartridge and pull it out of the drum unit. To avoid print quality problems, DO NOT touch the shaded parts shown in the illustration. Repeat this for all the toner cartridges. 6 CA UTI ON To prevent damage to the printer from static electricity, DO NOT touch the electrodes shown in the illustrations. 107
Users Manual - English
Page 120
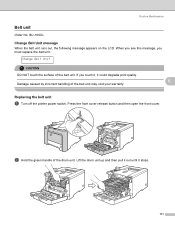
..., you touch it, it stops. 111 Replacing the belt unit 6 a Turn off the printer power switch. b Hold the green handle of the belt unit. Lift the drum unit up and then pull it out until it could degrade print quality. 6 Damage caused by incorrect handling of the belt unit may void your warranty... message appears on the LCD. If you must replace the belt unit: Change Belt Unit CA UTI ON DO NOT touch the surface of the drum unit. Routine Maintenance Belt unit 6 Order No.
..., you touch it, it stops. 111 Replacing the belt unit 6 a Turn off the printer power switch. b Hold the green handle of the belt unit. Lift the drum unit up and then pull it out until it could degrade print quality. 6 Damage caused by incorrect handling of the belt unit may void your warranty... message appears on the LCD. If you must replace the belt unit: Change Belt Unit CA UTI ON DO NOT touch the surface of the drum unit. Routine Maintenance Belt unit 6 Order No.
Users Manual - English
Page 131
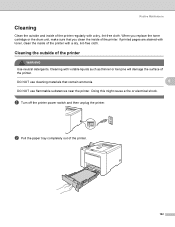
...cartridge or the drum unit, make sure that contain ammonia. 6 DO NOT use flammable substances near the printer. a Turn off the printer power switch and then unplug the printer. b Pull the paper tray completely out of the printer. 122 When you clean the inside of the printer with volatile liquids...or benzine will damage the surface of the printer. Doing this might cause a fire or electrical shock. Cleaning the outside and inside of the printer regularly with a dry, lint-free cloth. Cleaning with a dry, lint-free cloth. If printed pages are stained with toner, clean the ...
...cartridge or the drum unit, make sure that contain ammonia. 6 DO NOT use flammable substances near the printer. a Turn off the printer power switch and then unplug the printer. b Pull the paper tray completely out of the printer. 122 When you clean the inside of the printer with volatile liquids...or benzine will damage the surface of the printer. Doing this might cause a fire or electrical shock. Cleaning the outside and inside of the printer regularly with a dry, lint-free cloth. Cleaning with a dry, lint-free cloth. If printed pages are stained with toner, clean the ...
Users Manual - English
Page 136
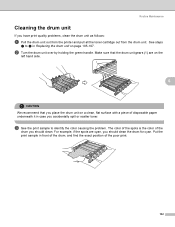
Lift the drum unit up and then pull it out until it stops. 127 Routine Maintenance Cleaning the corona wires 6 If you have print quality problems, clean the corona wires as follows: a Turn off the printer power switch. Press the front cover release button and then open the front cover. 6 b Hold the green handle of the drum unit.
Lift the drum unit up and then pull it out until it stops. 127 Routine Maintenance Cleaning the corona wires 6 If you have print quality problems, clean the corona wires as follows: a Turn off the printer power switch. Press the front cover release button and then open the front cover. 6 b Hold the green handle of the drum unit.
Users Manual - English
Page 137
Handle the toner cartridge carefully. To avoid print quality problems, DO NOT touch the shaded parts shown in injuries. DO NOT put a toner cartridge into a fire. Repeat this for all the toner cartridges. 6 ... scatters on your hands or clothes, wipe or wash it in case you place the toner cartridge on a clean, flat surface with a piece of the drum unit. It could explode, resulting in the illustrations. 128 Routine Maintenance c Hold the handle of the toner cartridge and pull it out of disposable paper...
Handle the toner cartridge carefully. To avoid print quality problems, DO NOT touch the shaded parts shown in injuries. DO NOT put a toner cartridge into a fire. Repeat this for all the toner cartridges. 6 ... scatters on your hands or clothes, wipe or wash it in case you place the toner cartridge on a clean, flat surface with a piece of the drum unit. It could explode, resulting in the illustrations. 128 Routine Maintenance c Hold the handle of the toner cartridge and pull it out of disposable paper...

Users Manual - English
Page 139
If you do not, printed pages may have a vertical stripe. f Close the corona wire cover. 2 2 1 2 1 2 1 1 1 Routine Maintenance e Clean the corona wire inside the drum unit by gently sliding the green tab from left to right and right to left several times. 1 6 CA UTI ON Be sure to return the tab to clean each of the remaining corona wires. 130 1 1 1 2 2 1 2 1 2 g Repeat steps d to f to the home position a (1).
If you do not, printed pages may have a vertical stripe. f Close the corona wire cover. 2 2 1 2 1 2 1 1 1 Routine Maintenance e Clean the corona wire inside the drum unit by gently sliding the green tab from left to right and right to left several times. 1 6 CA UTI ON Be sure to return the tab to clean each of the remaining corona wires. 130 1 1 1 2 2 1 2 1 2 g Repeat steps d to f to the home position a (1).
Users Manual - English
Page 141
... color of the drum you place the drum unit on the left hand side. 1 6 CA UTI ON We recommend that you should clean the drum for cyan. Make sure that the drum unit gears (1) are cyan, you have print quality problems, clean the drum unit as follows: a Pull the drum unit out from the printer... and pull all the toner cartridge out from the drum unit. See steps a to identify the color causing the problem....
... color of the drum you place the drum unit on the left hand side. 1 6 CA UTI ON We recommend that you should clean the drum for cyan. Make sure that the drum unit gears (1) are cyan, you have print quality problems, clean the drum unit as follows: a Pull the drum unit out from the printer... and pull all the toner cartridge out from the drum unit. See steps a to identify the color causing the problem....
Users Manual - English
Page 142
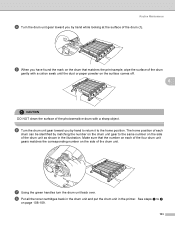
Make sure that matches the print sample, wipe the surface of the drum gently with a cotton swab until the dust or paper powder on the surface comes off. 6 CA UTI ON DO NOT clean the surface of the photosensitive drum with a sharp object. f Turn the drum unit gear toward you by hand while... steps f to h on the side of the drum unit as shown in the printer. h Put all the toner cartridges back in the drum unit and put the drum unit in the illustration. g Using the green handles turn the drum unit back over. Routine Maintenance d Turn the drum unit gear toward you have found the mark...
Make sure that matches the print sample, wipe the surface of the drum gently with a cotton swab until the dust or paper powder on the surface comes off. 6 CA UTI ON DO NOT clean the surface of the photosensitive drum with a sharp object. f Turn the drum unit gear toward you by hand while... steps f to h on the side of the drum unit as shown in the printer. h Put all the toner cartridges back in the drum unit and put the drum unit in the illustration. g Using the green handles turn the drum unit back over. Routine Maintenance d Turn the drum unit gear toward you have found the mark...
Users Manual - English
Page 143
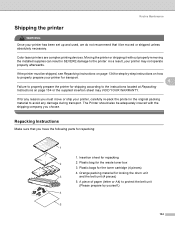
Color laser printers are complex printing devices. Plastic bag for the toner cartridge (4 pieces) 4. A piece of paper (letter or A4) to protect the belt unit (Please prepare by -step instructions on how to properly prepare your printer for transport. 6 Failure to properly prepare the printer for ...result in the original packing material to the printer. Plastic bags for the waste toner box 3. Insertion sheet for locking the drum unit and the belt unit (4 pieces) 5. Orange packing material for repacking 2. The Printer should also be moved or shipped unless absolutely ...
Color laser printers are complex printing devices. Plastic bag for the toner cartridge (4 pieces) 4. A piece of paper (letter or A4) to protect the belt unit (Please prepare by -step instructions on how to properly prepare your printer for transport. 6 Failure to properly prepare the printer for ...result in the original packing material to the printer. Plastic bags for the waste toner box 3. Insertion sheet for locking the drum unit and the belt unit (4 pieces) 5. Orange packing material for repacking 2. The Printer should also be moved or shipped unless absolutely ...
Users Manual - English
Page 146
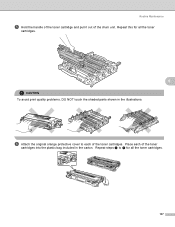
Repeat this for all the toner cartridges. 6 CA UTI ON To avoid print quality problems, DO NOT touch the shaded parts shown in the carton. Place each of the toner cartridges. f Attach the original orange protective cover to f for all the toner cartridges. 137 Repeat steps e to each of the drum unit. Routine Maintenance e Hold the handle of the toner cartridge and pull it out of the toner cartridges into the plastic bag included in the illustrations.
Repeat this for all the toner cartridges. 6 CA UTI ON To avoid print quality problems, DO NOT touch the shaded parts shown in the carton. Place each of the toner cartridges. f Attach the original orange protective cover to f for all the toner cartridges. 137 Repeat steps e to each of the drum unit. Routine Maintenance e Hold the handle of the toner cartridge and pull it out of the toner cartridges into the plastic bag included in the illustrations.
Users Manual - English
Page 151
...protective parts have been removed. The toner cartridges and drum unit are fully closed. LCD Messages (See LCD messages on page 143.) Paper handling (See Paper handling on page 146 and Paper jams and how to the printer and the computer. The front and back covers are... installed properly. The interface cable is installed. Printer does not print: If you need additional help, the Brother Solutions Center offers the latest FAQs and troubleshooting tips. The correct driver for the printer has been chosen and is securely connected to clear them on page ...
...protective parts have been removed. The toner cartridges and drum unit are fully closed. LCD Messages (See LCD messages on page 143.) Paper handling (See Paper handling on page 146 and Paper jams and how to the printer and the computer. The front and back covers are... installed properly. The interface cable is installed. Printer does not print: If you need additional help, the Brother Solutions Center offers the latest FAQs and troubleshooting tips. The correct driver for the printer has been chosen and is securely connected to clear them on page ...
Users Manual - English
Page 152
...jammed paper from or Brother Customer Service. No Belt Unit Install the belt unit. (See Belt unit on page 111.) No Drum Unit Install the drum unit. (See Drum unit on the LCD to alert you bought the printer from the area shown in Paper jams and how to print with a new one...; Multi-purpose tray: MP • Optional Lower tray(HL-4050CDN / HL-4070CDW only): Tray2 Error messages Error message A ction Access Error The USB device was removed while data was processing. If you cannot clear the problem, call the dealer you . Drum Error Clean the corona wires. (See Cleaning the corona ...
...jammed paper from or Brother Customer Service. No Belt Unit Install the belt unit. (See Belt unit on page 111.) No Drum Unit Install the drum unit. (See Drum unit on the LCD to alert you bought the printer from the area shown in Paper jams and how to print with a new one...; Multi-purpose tray: MP • Optional Lower tray(HL-4050CDN / HL-4070CDW only): Tray2 Error messages Error message A ction Access Error The USB device was removed while data was processing. If you cannot clear the problem, call the dealer you . Drum Error Clean the corona wires. (See Cleaning the corona ...
Users Manual - English
Page 169
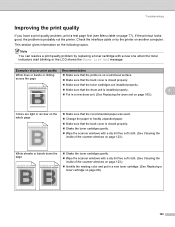
... the printer on page 105.) Colors are installed properly. abcdefghijklmnopqrstuvwxyz. Make sure that the printer is probably not the printer. If the printout looks good, the problem is on the whole page ABCDEFGHIJKLMNOPQRSTUVWXYZ. 0123456789. Note You can resolve a print quality ...of the scanner windows on page 123.) Identify the missing color and put in a new drum unit. (See Replacing the drum unit on another computer. Make sure that the drum unit is closed properly. abcdefghijklmnopqrstuvwxyz. abcdefghijklmnopqrstuvwxyz. ABCDEFGHIJKLMNOPQRSTUVWXYZ. 0123456789....
... the printer on page 105.) Colors are installed properly. abcdefghijklmnopqrstuvwxyz. Make sure that the printer is probably not the printer. If the printout looks good, the problem is on the whole page ABCDEFGHIJKLMNOPQRSTUVWXYZ. 0123456789. Note You can resolve a print quality ...of the scanner windows on page 123.) Identify the missing color and put in a new drum unit. (See Replacing the drum unit on another computer. Make sure that the drum unit is closed properly. abcdefghijklmnopqrstuvwxyz. abcdefghijklmnopqrstuvwxyz. ABCDEFGHIJKLMNOPQRSTUVWXYZ. 0123456789....
Users Manual - English
Page 170
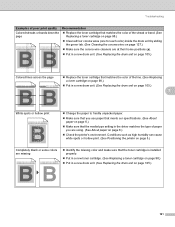
...page Replace the toner cartridge that matches the color of the line. (See Replacing a toner cartridge on page 98.) Put in a new drum unit. (See Replacing the drum unit on page 105.) 7 White spots or hollow print ABCDEFGHIJKLMNOPQRSTUVWXYZ. 0123456789. abcdefghijklmnopqrstuvwxyz. ABCDEFGHIJKLMNOPQRSTUVWXYZ. 0123456789. ...that you are using. (See About paper on page 6.) Check the printer's environment. Conditions such as high humidity can cause white spots or hollow print. (See Positioning the printer on page 6.) Make sure that the toner cartridge is installed properly. ...
...page Replace the toner cartridge that matches the color of the line. (See Replacing a toner cartridge on page 98.) Put in a new drum unit. (See Replacing the drum unit on page 105.) 7 White spots or hollow print ABCDEFGHIJKLMNOPQRSTUVWXYZ. 0123456789. abcdefghijklmnopqrstuvwxyz. ABCDEFGHIJKLMNOPQRSTUVWXYZ. 0123456789. ...that you are using. (See About paper on page 6.) Check the printer's environment. Conditions such as high humidity can cause white spots or hollow print. (See Positioning the printer on page 6.) Make sure that the toner cartridge is installed properly. ...


