Quick Setup Guide - English
Page 32
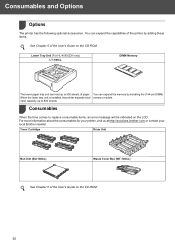
...the CD-ROM. For more information about the consumables for your printer, visit us at http://solutions.brother.com or contact your local Brother reseller. You can expand the memory by adding these items. See Chapter 5 of paper. Toner Cartridge Drum Unit Belt Unit (BU-100CL) Waste Toner Box (WT-100CL...lower tray unit is installed, the printer expands total memory module. Lower Tray Unit (For HL-4050CDN only) LT-100CL DIMM Memory The lower paper tray unit can expand the capabilities of the User's Guide on the LCD. You can hold up to replace consumable items, an error message ...
...the CD-ROM. For more information about the consumables for your printer, visit us at http://solutions.brother.com or contact your local Brother reseller. You can expand the memory by adding these items. See Chapter 5 of paper. Toner Cartridge Drum Unit Belt Unit (BU-100CL) Waste Toner Box (WT-100CL...lower tray unit is installed, the printer expands total memory module. Lower Tray Unit (For HL-4050CDN only) LT-100CL DIMM Memory The lower paper tray unit can expand the capabilities of the User's Guide on the LCD. You can hold up to replace consumable items, an error message ...
Users Manual - English
Page 7
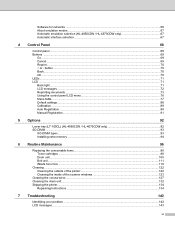
... Lower tray (LT-100CL) (HL-4050CDN / HL-4070CDW only 92 SO-DI M M ...93 SO-DIMM types ...93 Installing extra memory ...94 6 Routine Maintenance 96 Replacing the consumable items...96 Toner cartridges ...98 Drum unit ...105 Belt unit...111 Waste toner box ...116 Cleaning ...122 Cleaning the outside of the printer 122 Cleaning the inside of...
... Lower tray (LT-100CL) (HL-4050CDN / HL-4070CDW only 92 SO-DI M M ...93 SO-DIMM types ...93 Installing extra memory ...94 6 Routine Maintenance 96 Replacing the consumable items...96 Toner cartridges ...98 Drum unit ...105 Belt unit...111 Waste toner box ...116 Cleaning ...122 Cleaning the outside of the printer 122 Cleaning the inside of...
Users Manual - English
Page 87
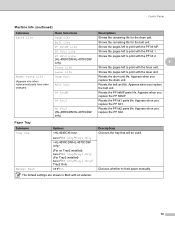
...print with the PF kit 2. 4 Shows the pages left to print with the laser unit. Shows the pages left to print with the fuser unit. Resets the PF kit2 parts life. Appears when you replace the drum unit. Resets the belt unit life. Control Panel Machine Info. (continued) Submenu...Reset Parts Life (Appears only when replacement parts have been changed) Menu Selections Drum Life Belt Life PF KitMP Life PF Kit1 Life PF Kit2 Life (HL-4050CDN/HL-4070CDW only) Fuser Life Laser Life Drum Unit Belt Unit PF KitMP PF Kit1 PF Kit2 (HL-4050CDN/HL-4070CDW only) Descriptions Shows the remaining...
...print with the PF kit 2. 4 Shows the pages left to print with the laser unit. Shows the pages left to print with the fuser unit. Resets the PF kit2 parts life. Appears when you replace the drum unit. Resets the belt unit life. Control Panel Machine Info. (continued) Submenu...Reset Parts Life (Appears only when replacement parts have been changed) Menu Selections Drum Life Belt Life PF KitMP Life PF Kit1 Life PF Kit2 Life (HL-4050CDN/HL-4070CDW only) Fuser Life Laser Life Drum Unit Belt Unit PF KitMP PF Kit1 PF Kit2 (HL-4050CDN/HL-4070CDW only) Descriptions Shows the remaining...
Users Manual - English
Page 106
...Laser Unit End Laser unit 100,000 pages 1 Call your dealer or Brother Customer Service for a replacement paper feeding kit 1, 2. The printer will continue printing when any color toner cartridge. Change PF KitMP Paper feeding kit MP. (Paper pick-up roller Separator pad) 100,000 pages 1 Call your dealer or Brother Customer Service for a replacement... or Brother Customer Service for CMYK each (A4 or Letter size). Change PF Kit1,2 Paper feeding kit 1, 2. (Paper pick-up roller Separator pad) 50,000 pages 1 Call your local waste disposal office. Drum End Soon Drum Unit ...
...Laser Unit End Laser unit 100,000 pages 1 Call your dealer or Brother Customer Service for a replacement paper feeding kit 1, 2. The printer will continue printing when any color toner cartridge. Change PF KitMP Paper feeding kit MP. (Paper pick-up roller Separator pad) 100,000 pages 1 Call your dealer or Brother Customer Service for a replacement... or Brother Customer Service for CMYK each (A4 or Letter size). Change PF Kit1,2 Paper feeding kit 1, 2. (Paper pick-up roller Separator pad) 50,000 pages 1 Call your local waste disposal office. Drum End Soon Drum Unit ...
Users Manual - English
Page 108
... genuine Brother supplies. Brother does not therefore recommend the use only genuine Brother brand replacement toner cartridges. Routine Maintenance CA UTI ON Wait to unpack the toner cartridge until immediately before you put in direct sunlight or room light, the unit may result in the printer. If...If toner cartridges are designed to work to the drum unit or other countries Brother machines are left unpacked for a long time the toner life will work with your investment and obtain premium performance from the Brother machine, we strongly recommend the use of unauthorized ...
... genuine Brother supplies. Brother does not therefore recommend the use only genuine Brother brand replacement toner cartridges. Routine Maintenance CA UTI ON Wait to unpack the toner cartridge until immediately before you put in direct sunlight or room light, the unit may result in the printer. If...If toner cartridges are designed to work to the drum unit or other countries Brother machines are left unpacked for a long time the toner life will work with your investment and obtain premium performance from the Brother machine, we strongly recommend the use of unauthorized ...
Users Manual - English
Page 114
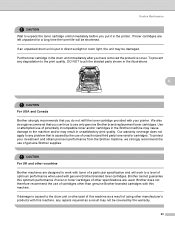
...problems caused by your drum will be printed by the use only genuine Brother toner. Drum End Soon message 6 Drum End Soon If the LCD shows Drum End Soon, it may reduce not only the print quality but also the quality and life of the printer. (See Cleaning on . Replacing the drum unit 6 CA ...UTI ON While removing the drum unit, handle it ...
...problems caused by your drum will be printed by the use only genuine Brother toner. Drum End Soon message 6 Drum End Soon If the LCD shows Drum End Soon, it may reduce not only the print quality but also the quality and life of the printer. (See Cleaning on . Replacing the drum unit 6 CA ...UTI ON While removing the drum unit, handle it ...

Users Manual - English
Page 119
b Press the + or - key to the next menu level, and then press the + or - c Press OK to proceed to choose Reset Parts Life. e Press OK two times. 6 110 d Press OK, and then press the + key to choose Machine Info.. key to choose Drum Unit. Routine Maintenance When you replace the drum unit with a new one, you need to reset the drum counter by completing the following steps: a Turn the printer power switch back on.
b Press the + or - key to the next menu level, and then press the + or - c Press OK to proceed to choose Reset Parts Life. e Press OK two times. 6 110 d Press OK, and then press the + key to choose Machine Info.. key to choose Drum Unit. Routine Maintenance When you replace the drum unit with a new one, you need to reset the drum counter by completing the following steps: a Turn the printer power switch back on.
Users Manual - English
Page 120
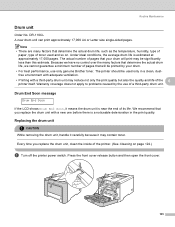
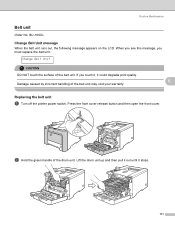
... Belt unit 6 Order No. When you see this message, you touch it, it stops. 111 b Hold the green handle of the belt unit. Lift the drum unit up and then pull it out until it could degrade print quality. 6 Damage caused by incorrect handling of the belt unit may void your... warranty. If you must replace the belt unit: Change Belt Unit CA UTI ON DO NOT touch the surface of the drum unit. BU-100CL Change Belt Unit message 6 When the belt unit runs out, the following message appears...
... Belt unit 6 Order No. When you see this message, you touch it, it stops. 111 b Hold the green handle of the belt unit. Lift the drum unit up and then pull it out until it could degrade print quality. 6 Damage caused by incorrect handling of the belt unit may void your... warranty. If you must replace the belt unit: Change Belt Unit CA UTI ON DO NOT touch the surface of the drum unit. BU-100CL Change Belt Unit message 6 When the belt unit runs out, the following message appears...
Users Manual - English
Page 131
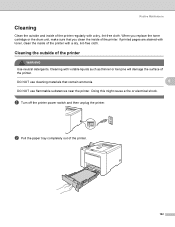
...Maintenance Cleaning 6 Clean the outside of the printer with toner, clean the inside of the printer regularly with volatile liquids such as thinner or benzine will damage the surface of the printer. 122 When you replace the toner cartridge or the drum unit, make sure that contain ammonia. 6... DO NOT use flammable substances near the printer. Cleaning with a dry, lint-free cloth. a Turn off the printer power switch and then unplug the printer. b Pull the ...
...Maintenance Cleaning 6 Clean the outside of the printer with toner, clean the inside of the printer regularly with volatile liquids such as thinner or benzine will damage the surface of the printer. 122 When you replace the toner cartridge or the drum unit, make sure that contain ammonia. 6... DO NOT use flammable substances near the printer. Cleaning with a dry, lint-free cloth. a Turn off the printer power switch and then unplug the printer. b Pull the ...
Users Manual - English
Page 141
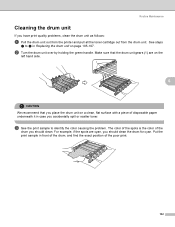
... the exact position of the poor print. 132 The color of the spots is the color of disposable paper underneath it in case you accidentally spill or scatter toner. Make sure that you should clean. See steps a to identify the color causing the problem. For example, if the spots are...105-107. b Turn the drum unit over by holding the green handle. Put the print sample in Replacing the drum unit on a clean, flat surface with a piece of the drum you have print quality problems, clean the drum unit as follows: a Pull the drum unit out from the printer and pull all the toner cartridge...
... the exact position of the poor print. 132 The color of the spots is the color of disposable paper underneath it in case you accidentally spill or scatter toner. Make sure that you should clean. See steps a to identify the color causing the problem. For example, if the spots are...105-107. b Turn the drum unit over by holding the green handle. Put the print sample in Replacing the drum unit on a clean, flat surface with a piece of the drum you have print quality problems, clean the drum unit as follows: a Pull the drum unit out from the printer and pull all the toner cartridge...
Users Manual - English
Page 152
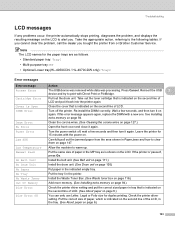
...HL-4070CDW only): Tray2 Error messages Error message A ction Access Error The USB device was removed while data was processing. No Belt Unit Install the belt unit. (See Belt unit on page 111.) No Drum Unit Install the drum unit. (See Drum unit on page 105) No Paper Put paper in the printer... clear the problem, call the dealer you . Jam XXX Carefully pull out the jammed paper from or Brother Customer Service. Press Cancel. If this error message appears again, replace the DIMM with the power on page 94. Take the appropriate action, referring to warm up. Low Temperature...
...HL-4070CDW only): Tray2 Error messages Error message A ction Access Error The USB device was removed while data was processing. No Belt Unit Install the belt unit. (See Belt unit on page 111.) No Drum Unit Install the drum unit. (See Drum unit on page 105) No Paper Put paper in the printer... clear the problem, call the dealer you . Jam XXX Carefully pull out the jammed paper from or Brother Customer Service. Press Cancel. If this error message appears again, replace the DIMM with the power on page 94. Take the appropriate action, referring to warm up. Low Temperature...
Users Manual - English
Page 153
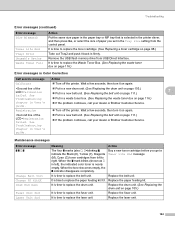
...Brother Customer Service. It is time to replace the fuser unit. Wait a few seconds, then turn it back in a new belt unit. (See Replacing the belt unit on page 105.) It is time to replace the laser unit. Replace the belt unit. It is time to replace the toner cartridge. (See Replacing...is nearly empty. Replace the laser unit. 144 When the o mark blinks (shown as n in Color Correction Call service message Action Calibrate Turn off the printer. Buy a new toner cartridge before you set in User's guide. Replace the drum unit. (See Replacing the drum unit on page...
...Brother Customer Service. It is time to replace the fuser unit. Wait a few seconds, then turn it back in a new belt unit. (See Replacing the belt unit on page 105.) It is time to replace the laser unit. Replace the belt unit. It is time to replace the toner cartridge. (See Replacing...is nearly empty. Replace the laser unit. 144 When the o mark blinks (shown as n in Color Correction Call service message Action Calibrate Turn off the printer. Buy a new toner cartridge before you set in User's guide. Replace the drum unit. (See Replacing the drum unit on page...
Users Manual - English
Page 169
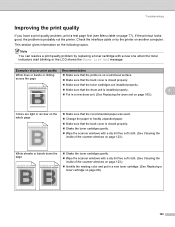
.... 0123456789. Shake the toner cartridges gently. Make sure that the back cover is probably not the printer. abcdefghijklmnopqrstuvwxyz. Examples of the scanner windows on page 123.) Identify the missing color and put in a new drum unit. (See Replacing the drum unit on the whole page ABCDEFGHIJKLMNOPQRSTUVWXYZ. 0123456789. abcdefghijklmnopqrstuvwxyz. Change the paper to freshly unpacked paper...
.... 0123456789. Shake the toner cartridges gently. Make sure that the back cover is probably not the printer. abcdefghijklmnopqrstuvwxyz. Examples of the scanner windows on page 123.) Identify the missing color and put in a new drum unit. (See Replacing the drum unit on the whole page ABCDEFGHIJKLMNOPQRSTUVWXYZ. 0123456789. abcdefghijklmnopqrstuvwxyz. Change the paper to freshly unpacked paper...
Users Manual - English
Page 170
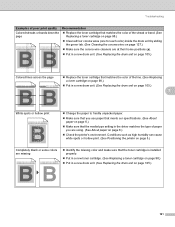
... bands down the page Replace the toner cartridge that matches the color of the line. (See Replacing a toner cartridge on page 98.) Put in a new drum unit. (See Replacing the drum unit on page 105.) 7 White spots or hollow print ABCDEFGHIJKLMNOPQRSTUVWXYZ. 0123456789. Put in a new drum unit. (See Replacing the drum unit on page 6.) Check the printer's environment. ABCDEFGHIJKLMNOPQRSTUVWXYZ. 0123456789...
... bands down the page Replace the toner cartridge that matches the color of the line. (See Replacing a toner cartridge on page 98.) Put in a new drum unit. (See Replacing the drum unit on page 105.) 7 White spots or hollow print ABCDEFGHIJKLMNOPQRSTUVWXYZ. 0123456789. Put in a new drum unit. (See Replacing the drum unit on page 6.) Check the printer's environment. ABCDEFGHIJKLMNOPQRSTUVWXYZ. 0123456789...
Users Manual - English
Page 171
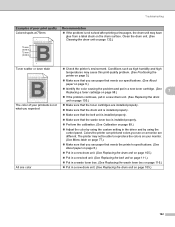
... on page 6.) Identify the color causing the problem and put in a new toner cartridge. (See Replacing a toner cartridge on page 132.) Toner scatter or toner stain ABCDEFGHIJKLMNOPQRSTUVWXYZ. 0123456789. Clean the drum unit. (See Cleaning the drum unit on page 98.) 7 If the problem continues, put in .) ABCDEFGHIJKLMNOPQRSTUVWXYZ. 0123456789. abcdefghijklmnopqrstuvwxyz. The printer may cause this print...
... on page 6.) Identify the color causing the problem and put in a new toner cartridge. (See Replacing a toner cartridge on page 132.) Toner scatter or toner stain ABCDEFGHIJKLMNOPQRSTUVWXYZ. 0123456789. Clean the drum unit. (See Cleaning the drum unit on page 98.) 7 If the problem continues, put in .) ABCDEFGHIJKLMNOPQRSTUVWXYZ. 0123456789. abcdefghijklmnopqrstuvwxyz. The printer may cause this print...
Users Manual - English
Page 172
... the auto color registration by using the control panel (see Manual Registration on page 105.) If you use Windows printer driver, choose Improve pattern printing or Improve Thin Line in the illustration. 7 Uneven density appears periodically across the page ABCDEFGHIJKLMNOPQRSTUVWXYZ. 0123456789. abcdefghijklmnopqrstuvwxyz. ABCDEFGHIJKLMNOPQRSTUVWXYZ. 0123456789. Put in a new drum unit. (See Replacing the drum unit on...
... the auto color registration by using the control panel (see Manual Registration on page 105.) If you use Windows printer driver, choose Improve pattern printing or Improve Thin Line in the illustration. 7 Uneven density appears periodically across the page ABCDEFGHIJKLMNOPQRSTUVWXYZ. 0123456789. abcdefghijklmnopqrstuvwxyz. ABCDEFGHIJKLMNOPQRSTUVWXYZ. 0123456789. Put in a new drum unit. (See Replacing the drum unit on...

Users Manual - English
Page 173
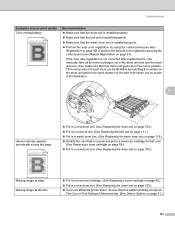
...Brother Customer Service. abcdefghijklmnopqrstuvwxyz. ABCDEFGHIJKLMNOPQRSTUVWXYZ. 0123456789. ABCDEFGHIJKLMNOPQRSTUVWXYZ. 0123456789. Conditions such as humidity and high temperatures may cause this print quality problem. (See Positioning the printer on page 5.) Make sure that you use paper that meets the printer's specifications. (See About paper on page 6.) Put in a new drum unit. (See Replacing the drum...control panel or the printer driver. 164 Replace the fuser unit. abcdefghijklmnopqrstuvwxyz. Replace the fuser unit. Make sure that the drum unit is installed ...
...Brother Customer Service. abcdefghijklmnopqrstuvwxyz. ABCDEFGHIJKLMNOPQRSTUVWXYZ. 0123456789. ABCDEFGHIJKLMNOPQRSTUVWXYZ. 0123456789. Conditions such as humidity and high temperatures may cause this print quality problem. (See Positioning the printer on page 5.) Make sure that you use paper that meets the printer's specifications. (See About paper on page 6.) Put in a new drum unit. (See Replacing the drum...control panel or the printer driver. 164 Replace the fuser unit. abcdefghijklmnopqrstuvwxyz. Replace the fuser unit. Make sure that the drum unit is installed ...


