Users Manual - English
Page 17
... ...5-10 Replacing the OPC belt cartridge 5-10 Fusing unit ...5-13 Replace fusing unit message 5-13 Replacing the fusing unit 5-14 120K kit ...5-16 Replacing the transfer belt cleaner 5-16 Replacing the transfer roller 5-18 Cleaning ...5-21 Cleaning the outside of the printer 5-22 Cleaning the inside of the...
... ...5-10 Replacing the OPC belt cartridge 5-10 Fusing unit ...5-13 Replace fusing unit message 5-13 Replacing the fusing unit 5-14 120K kit ...5-16 Replacing the transfer belt cleaner 5-16 Replacing the transfer roller 5-18 Cleaning ...5-21 Cleaning the outside of the printer 5-22 Cleaning the inside of the...
Users Manual - English
Page 107
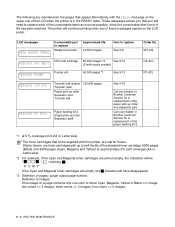
... 120 KIT Transfer belt cleaner 120,000 pages Transfer roller Paper pick-up roller Separator pad Transfer belt REPLACE PF KIT2 Paper feeding kit 2. (Paper pick-up roller Separator pad) See 5-16 Call your dealer or Brother Customer Service for...colors => 3 images, four colors => 4 images. 5 - 2 ROUTINE MAINTENANCE Call your dealer or Brother Customer Service for a replacement of pages: actual output page number. The printer will have disappeared. *3 Definition of the paper feeding kit 2. *1 at 5 % coverage print (A4 or Letter size). Starter toners, are toner cartridges with up roller...
... 120 KIT Transfer belt cleaner 120,000 pages Transfer roller Paper pick-up roller Separator pad Transfer belt REPLACE PF KIT2 Paper feeding kit 2. (Paper pick-up roller Separator pad) See 5-16 Call your dealer or Brother Customer Service for...colors => 3 images, four colors => 4 images. 5 - 2 ROUTINE MAINTENANCE Call your dealer or Brother Customer Service for a replacement of pages: actual output page number. The printer will have disappeared. *3 Definition of the paper feeding kit 2. *1 at 5 % coverage print (A4 or Letter size). Starter toners, are toner cartridges with up roller...
Users Manual - English
Page 121
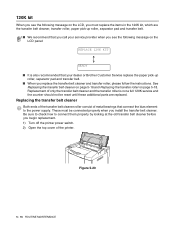
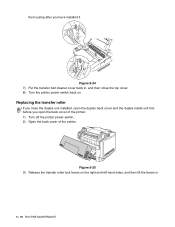
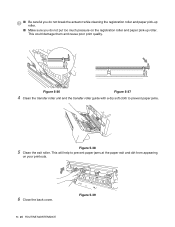
...the transfer belt cleaner, transfer roller, paper pick-up roller, separator pad and transfer belt. ■ We recommend that you call your dealer or Brother Customer Service replace the paper pick-up roller, separator pad and transfer belt. ■ When you replace the transfer belt cleaner and transfer roller, ...begin replacement. 1) Turn off the printer power switch. 2) Open the top cover of the printer. Replacing the transfer belt cleaner Both ends of the transfer belt cleaner roller consist of only the transfer belt cleaner and the transfer roller is also recommended that connect the ...
...the transfer belt cleaner, transfer roller, paper pick-up roller, separator pad and transfer belt. ■ We recommend that you call your dealer or Brother Customer Service replace the paper pick-up roller, separator pad and transfer belt. ■ When you replace the transfer belt cleaner and transfer roller, ...begin replacement. 1) Turn off the printer power switch. 2) Open the top cover of the printer. Replacing the transfer belt cleaner Both ends of the transfer belt cleaner roller consist of only the transfer belt cleaner and the transfer roller is also recommended that connect the ...
Users Manual - English
Page 123
Figure 5-25 3) Release the transfer roller lock levers on . Replacing the transfer roller If you open the back cover of the printer. 1) Turn off the printer power switch. 2) Open the back cover of the printer. the housing after you have the duplex unit installed, open the duplex back cover and the duplex inside unit first before you have installed it. Figure 5-24 7) Put the transfer belt cleaner cover back in, and then close the top cover. 8) Turn the printer power switch back on the right and left-hand sides, and then lift the levers to 5 - 18 ROUTINE MAINTENANCE
Figure 5-25 3) Release the transfer roller lock levers on . Replacing the transfer roller If you open the back cover of the printer. 1) Turn off the printer power switch. 2) Open the back cover of the printer. the housing after you have the duplex unit installed, open the duplex back cover and the duplex inside unit first before you have installed it. Figure 5-24 7) Put the transfer belt cleaner cover back in, and then close the top cover. 8) Turn the printer power switch back on the right and left-hand sides, and then lift the levers to 5 - 18 ROUTINE MAINTENANCE

Users Manual - English
Page 124
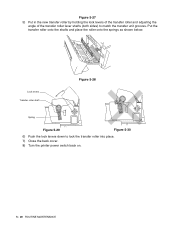
release the transfer roller. ROUTINE MAINTENANCE 5 - 19 Figure 5-26 4) Take out the transfer roller by gently pulling the right-hand side up and sliding the transfer roller to the right.
release the transfer roller. ROUTINE MAINTENANCE 5 - 19 Figure 5-26 4) Take out the transfer roller by gently pulling the right-hand side up and sliding the transfer roller to the right.
Users Manual - English
Page 125
Put the transfer roller onto the shafts and place the roller onto the springs as shown below: Lock levers Transfer roller shaft Figure 5-28 Spring Figure 5-29 Figure 5-30 6) Push the lock levers down to match the transfer unit grooves. Figure 5-27 5) Put in the new transfer roller by holding the lock levers of the transfer roller and adjusting the angle of the transfer roller lever shafts (both sides) to lock the transfer roller into place. 7) Close the back cover. 8) Turn the printer power switch back on. 5 - 20 ROUTINE MAINTENANCE
Put the transfer roller onto the shafts and place the roller onto the springs as shown below: Lock levers Transfer roller shaft Figure 5-28 Spring Figure 5-29 Figure 5-30 6) Push the lock levers down to match the transfer unit grooves. Figure 5-27 5) Put in the new transfer roller by holding the lock levers of the transfer roller and adjusting the angle of the transfer roller lever shafts (both sides) to lock the transfer roller into place. 7) Close the back cover. 8) Turn the printer power switch back on. 5 - 20 ROUTINE MAINTENANCE
Users Manual - English
Page 126
... liquids such as thinner or benzine will damage the surface of the printer. Cleaning Clean the outside and inside of the printer with a dry soft cloth. ■ Use water. They could damage the printer, particularly the toner cartridges. If printed pages are stained with a... of the printer every 20,000 printed pages or every 12 months: ■ Paper guides of the printer regularly with toner, clean the inside of the paper tray ■ Registration roller ■ Paper pick-up roller ■ Transfer roller unit ■ Transfer roller guide ■ Exit roller ■ Laser unit ■...
... liquids such as thinner or benzine will damage the surface of the printer. Cleaning Clean the outside and inside of the printer with a dry soft cloth. ■ Use water. They could damage the printer, particularly the toner cartridges. If printed pages are stained with a... of the printer every 20,000 printed pages or every 12 months: ■ Paper guides of the printer regularly with toner, clean the inside of the paper tray ■ Registration roller ■ Paper pick-up roller ■ Transfer roller unit ■ Transfer roller guide ■ Exit roller ■ Laser unit ■...
Users Manual - English
Page 128
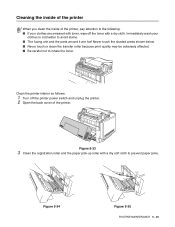
... 3 Clean the registration roller and the paper pick-up roller with a dry cloth. Immediately wash your clothes in cold water to avoid stains. ■ The fusing unit and the parts around it are smeared with toner, wipe off the printer power switch and unplug the printer. 2 Open the back... cover of the printer, pay attention to inhale the toner. Cleaning the inside of the printer When you clean the inside of the printer. Never touch the shaded areas shown below. ■ Never touch or clean the transfer roller because print...
... 3 Clean the registration roller and the paper pick-up roller with a dry cloth. Immediately wash your clothes in cold water to avoid stains. ■ The fusing unit and the parts around it are smeared with toner, wipe off the printer power switch and unplug the printer. 2 Open the back... cover of the printer, pay attention to inhale the toner. Cleaning the inside of the printer When you clean the inside of the printer. Never touch the shaded areas shown below. ■ Never touch or clean the transfer roller because print...
Users Manual - English
Page 129
... you do not put too much pressure on your printouts. 6 Close the back cover. 5 - 24 ROUTINE MAINTENANCE Figure 5-39 Figure 5-36 Figure 5-37 4 Clean the transfer roller unit and the transfer roller guide with a dry soft cloth to prevent paper jams at the paper exit and dirt from appearing on the registration...
... you do not put too much pressure on your printouts. 6 Close the back cover. 5 - 24 ROUTINE MAINTENANCE Figure 5-39 Figure 5-36 Figure 5-37 4 Clean the transfer roller unit and the transfer roller guide with a dry soft cloth to prevent paper jams at the paper exit and dirt from appearing on the registration...
Users Manual - English
Page 134
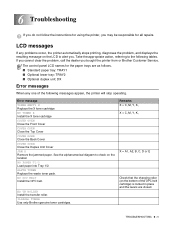
...OPEN Close the Duplex Unit Cover JAM X Remove the jammed paper. ILLEGAL TONER Use only Brother genuine toner cartridges. Remarks X = C, M, Y, K, X = C, M, Y, K, X = A1, A2, B, C, D or E Check that the charging roller (on the bottom of the following tables. Take the appropriate action, referring to check on...See the alphanumerical diagram to the following messages appear, the printer will stop operating. LCD messages If any one of the OPC belt cartridge) is locked in place and the levers are closed. WASTE TONER Replace the waste toner pack. NO TR ROLLER Install the transfer roller.
...OPEN Close the Duplex Unit Cover JAM X Remove the jammed paper. ILLEGAL TONER Use only Brother genuine toner cartridges. Remarks X = C, M, Y, K, X = C, M, Y, K, X = A1, A2, B, C, D or E Check that the charging roller (on the bottom of the following tables. Take the appropriate action, referring to check on...See the alphanumerical diagram to the following messages appear, the printer will stop operating. LCD messages If any one of the OPC belt cartridge) is locked in place and the levers are closed. WASTE TONER Replace the waste toner pack. NO TR ROLLER Install the transfer roller.
Users Manual - English
Page 136
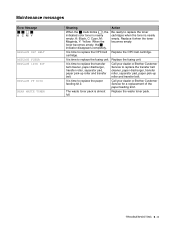
.... It is time to replace the transfer belt cleaner, paper discharger, transfer roller, separator pad, paper pick-up roller and transfer belt. K: Black, C: Cyan, M: Magenta, Y: Yellow. Call your dealer or Brother Customer Service to replace the transfer belt cleaner, paper discharger, transfer roller, separator pad, paper pick-up roller and transfer belt. TROUBLESHOOTING 6 - 3 Replace the...Y REPLACE OPC BELT REPLACE FUSER REPLACE 120K KIT REPLACE PF KIT2 NEAR WASTE TONER Meaning Action When the mark blinks ( ), the indicated color toner is almost full.
.... It is time to replace the transfer belt cleaner, paper discharger, transfer roller, separator pad, paper pick-up roller and transfer belt. K: Black, C: Cyan, M: Magenta, Y: Yellow. Call your dealer or Brother Customer Service to replace the transfer belt cleaner, paper discharger, transfer roller, separator pad, paper pick-up roller and transfer belt. TROUBLESHOOTING 6 - 3 Replace the...Y REPLACE OPC BELT REPLACE FUSER REPLACE 120K KIT REPLACE PF KIT2 NEAR WASTE TONER Meaning Action When the mark blinks ( ), the indicated color toner is almost full.
Users Manual - English
Page 138
..., and then turn it on again. Fusing unit clutch error Turn off the printer. Wait a few seconds, and then turn it on again. Transfer belt error Turn off the printer. Transfer roller solenoid error Turn off the printer. NVRAM read error Turn off the printer. Wait a few seconds, and then turn it on again. Engine controller hardware...
..., and then turn it on again. Fusing unit clutch error Turn off the printer. Wait a few seconds, and then turn it on again. Transfer belt error Turn off the printer. Transfer roller solenoid error Turn off the printer. NVRAM read error Turn off the printer. Wait a few seconds, and then turn it on again. Engine controller hardware...

Users Manual - English
Page 141
.... If there is stained with cold water. ■ Never touch the transfer roller. ■ If the paper in the paper tray, follow these steps: 1 Pull out the paper tray. 2 Take out the jammed paper. Figure 6-2 3 Put the paper tray back in the printer. 4 Open the back cover. It might stain your hands and...
.... If there is stained with cold water. ■ Never touch the transfer roller. ■ If the paper in the paper tray, follow these steps: 1 Pull out the paper tray. 2 Take out the jammed paper. Figure 6-2 3 Put the paper tray back in the printer. 4 Open the back cover. It might stain your hands and...
Users Manual - English
Page 149
... and the interface cables as shown below and follow the recommendation. Colors are installed properly. 4) Shake the toner cartridges gently. 5) Check that the transfer roller is closed properly. 3) Check that toner cartridge. *The toner ...abcdefghijklmnopqrstuvwxyz. ABCDEFGHIJKLMNOPQRSTUVWXYZ. 0123456789. ABCDEFGHIJKLMNOPQRSTUVWXYZ. 0123456789. However, when you are having problems with printer. abcdefghijklmnopqrstuvwxyz. Improving the print quality If you see a white vertical line on the toner roller, try the following procedure. 1) Cut a sheet approx. 50mm x 50mm out...
... and the interface cables as shown below and follow the recommendation. Colors are installed properly. 4) Shake the toner cartridges gently. 5) Check that the transfer roller is closed properly. 3) Check that toner cartridge. *The toner ...abcdefghijklmnopqrstuvwxyz. ABCDEFGHIJKLMNOPQRSTUVWXYZ. 0123456789. ABCDEFGHIJKLMNOPQRSTUVWXYZ. 0123456789. However, when you are having problems with printer. abcdefghijklmnopqrstuvwxyz. Improving the print quality If you see a white vertical line on the toner roller, try the following procedure. 1) Cut a sheet approx. 50mm x 50mm out...
Users Manual - English
Page 152
... the control panel or the printer driver. abcdefghijklmnopqrstuvwxyz. ABCDEFGHIJKLMNOPQRSTUVWXYZ. 0123456789. abcdefghijklmnopqrstuvwxyz. Check that the recommended paper is being used. 1) Check that the transfer roller is used . Mixed color image ABCDEFGHIJKLMNOPQRSTUVWXYZ. 0123456789. Insufficient ...on thick paper Set the printer to a recommended type of poor print quality Wrinkle ABCDEFGHIJKLMNOPQRSTUVWXYZ. 0123456789. abcdefghijklmnopqrstuvwxyz. If the same problem occurs again, call your dealer or Brother Customer Service. ABCDEFGHIJKLMNOPQRSTUVWXYZ. ...
... the control panel or the printer driver. abcdefghijklmnopqrstuvwxyz. ABCDEFGHIJKLMNOPQRSTUVWXYZ. 0123456789. abcdefghijklmnopqrstuvwxyz. Check that the recommended paper is being used. 1) Check that the transfer roller is used . Mixed color image ABCDEFGHIJKLMNOPQRSTUVWXYZ. 0123456789. Insufficient ...on thick paper Set the printer to a recommended type of poor print quality Wrinkle ABCDEFGHIJKLMNOPQRSTUVWXYZ. 0123456789. abcdefghijklmnopqrstuvwxyz. If the same problem occurs again, call your dealer or Brother Customer Service. ABCDEFGHIJKLMNOPQRSTUVWXYZ. ...

Users Manual - English
Page 162
... menu 3-11 R Register your printer v Reprint 2-6 REPRINT menu 3-18 RESET MENU menu 3-17 S SECURE data 3-29 Set button 3-2, 3-3 SETUP menu 3-12 SO-DIMM 4-13 Status LED 3-5 Status Monitor 2-6 T TCP/IP 3-16 Tension release pin 5-11 Toner cartridge 5-4 Toner save mode 1-7 Transfer belt cleaner 5-16 Transfer belt cover 5-17 Transfer roller 5-18 Transfer roller lock lever 5-18 Transparency...
... menu 3-11 R Register your printer v Reprint 2-6 REPRINT menu 3-18 RESET MENU menu 3-17 S SECURE data 3-29 Set button 3-2, 3-3 SETUP menu 3-12 SO-DIMM 4-13 Status LED 3-5 Status Monitor 2-6 T TCP/IP 3-16 Tension release pin 5-11 Toner cartridge 5-4 Toner save mode 1-7 Transfer belt cleaner 5-16 Transfer belt cover 5-17 Transfer roller 5-18 Transfer roller lock lever 5-18 Transparency...


