
Users Manual - English
Page 37
... during duplex printing. ■ You cannot perform continuous duplex printing when MANUAL FEED is selected, the printer waits until you cannot manually feed irregular sized paper. You can select this printer has a special manual feed mode using Tray 1 (standard paper tray) to print on selecting this ... using legal sized paper 3 if the printed paper appears curled 1 - 19 ABOUT THIS PRINTER Figure 1-14 MANUAL FEED =ON 2 Pull out Tray 1 and put the paper in Tray 1. The printer will reset this printer does not have a manual feed or multi purpose tray, you put in and press Go...
... during duplex printing. ■ You cannot perform continuous duplex printing when MANUAL FEED is selected, the printer waits until you cannot manually feed irregular sized paper. You can select this printer has a special manual feed mode using Tray 1 (standard paper tray) to print on selecting this ... using legal sized paper 3 if the printed paper appears curled 1 - 19 ABOUT THIS PRINTER Figure 1-14 MANUAL FEED =ON 2 Pull out Tray 1 and put the paper in Tray 1. The printer will reset this printer does not have a manual feed or multi purpose tray, you put in and press Go...

Users Manual - English
Page 57
...to speed up printing, select the required interface manually by using the control panel to work. Although you can tailor the printer with the RESET MENU menu. Changing the user settings does not affect the factory settings. The changed user settings can turn off by using...to the default factory settings with user settings. See RESET MENU on page 3-17. Automatic Interface Selection This printer has an Automatic Interface Selection feature. See List of factory settings on or off both your computer and printer when connecting or disconnecting the cable). You cannot ...
...to speed up printing, select the required interface manually by using the control panel to work. Although you can tailor the printer with the RESET MENU menu. Changing the user settings does not affect the factory settings. The changed user settings can turn off by using...to the default factory settings with user settings. See RESET MENU on page 3-17. Automatic Interface Selection This printer has an Automatic Interface Selection feature. See List of factory settings on or off both your computer and printer when connecting or disconnecting the cable). You cannot ...

Users Manual - English
Page 64
...with the original settings unchanged. ■ There are displayed during normal operation: Printer status message READY PRINTING RESOLUTION ADAPT PROCESSING JOB CANCELLING PAUSE WARMING UP SLEEP PRESS SET TO PRINT RESET TO FACTORY SETTING SELF TEST RAM SIZE=xxMB NOW INITIALIZING PROGRAMING-WAIT Meaning ...Ready to print. Busy processing data. The printer has suspended its operations. button to start printing. Printing. The printer settings return to scroll faster. ...
...with the original settings unchanged. ■ There are displayed during normal operation: Printer status message READY PRINTING RESOLUTION ADAPT PROCESSING JOB CANCELLING PAUSE WARMING UP SLEEP PRESS SET TO PRINT RESET TO FACTORY SETTING SELF TEST RAM SIZE=xxMB NOW INITIALIZING PROGRAMING-WAIT Meaning ...Ready to print. Busy processing data. The printer has suspended its operations. button to start printing. Printing. The printer settings return to scroll faster. ...
Users Manual - English
Page 66
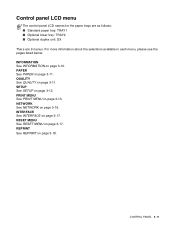
... the paper trays are as follows: ■ Standard paper tray: TRAY1 ■ Optional lower tray: TRAY2 ■ Optional duplex unit: DX There are 9 menus. RESET MENU See RESET MENU on page 3-10. CONTROL PANEL 3 - 9 For more information about the selections available in each menu, please see the pages listed below: INFORMATION See...
... the paper trays are as follows: ■ Standard paper tray: TRAY1 ■ Optional lower tray: TRAY2 ■ Optional duplex unit: DX There are 9 menus. RESET MENU See RESET MENU on page 3-10. CONTROL PANEL 3 - 9 For more information about the selections available in each menu, please see the pages listed below: INFORMATION See...
Users Manual - English
Page 68
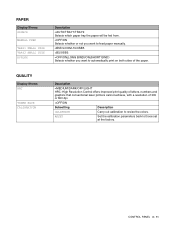
... Shows HRC TONER SAVE CALIBRATION Description =MEDIUM/DARK/OFF/LIGHT HRC: High Resolution Control offers improved print quality of letters, numbers and graphics that conventional laser printers cannot achieve, with a resolution of 300 or 600 dpi. =OFF/ON Subsetting Description CALIBRATE Carry out calibration to automatically print on both sides of the... to feed paper manually. =B5/DL/COM-10/JISB5 =B5/JISB5 =OFF/ON(LONG BIND)/ON(SHORT BIND) Selects whether you want to revise the colors. RESET Set the calibration parameters back to those set at the factory.
... Shows HRC TONER SAVE CALIBRATION Description =MEDIUM/DARK/OFF/LIGHT HRC: High Resolution Control offers improved print quality of letters, numbers and graphics that conventional laser printers cannot achieve, with a resolution of 300 or 600 dpi. =OFF/ON Subsetting Description CALIBRATE Carry out calibration to automatically print on both sides of the... to feed paper manually. =B5/DL/COM-10/JISB5 =B5/JISB5 =OFF/ON(LONG BIND)/ON(SHORT BIND) Selects whether you want to revise the colors. RESET Set the calibration parameters back to those set at the factory.
Users Manual - English
Page 74
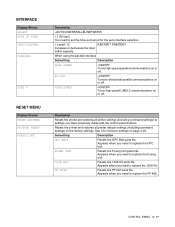
... settings. Appears when you have previously made with the control panel buttons. Description Resets the printer and restores all printer default settings (including command settings) to replace the Fusing unit. 120K KIT Resets the 120K Kit parts life. INTERFACE Display Shows SELECT AUTO IF TIME INPUT BUFFER... PARALLEL USB2.0 RESET MENU Display Shows RESET PRINTER FACTORY RESET PARTS LIFE Description =AUTO/USB/PARALLEL/NETWORK = 1:99 (sec) You need to replace the 120K Kit. Increases or decreases ...
... settings. Appears when you have previously made with the control panel buttons. Description Resets the printer and restores all printer default settings (including command settings) to replace the Fusing unit. 120K KIT Resets the 120K Kit parts life. INTERFACE Display Shows SELECT AUTO IF TIME INPUT BUFFER... PARALLEL USB2.0 RESET MENU Display Shows RESET PRINTER FACTORY RESET PARTS LIFE Description =AUTO/USB/PARALLEL/NETWORK = 1:99 (sec) You need to replace the 120K Kit. Increases or decreases ...

Users Manual - English
Page 79
..., page counter and local language for display messages. ■ The COPY setting is always restored to the factory setting when the printer is turned off the printer. 2 Hold down the + button as the password and IP address information), please follow these steps: 1 Turn off and on...display shows --MENU-INFORMATION . 3 The print server has been reset to its default factory settings (resetting all information such as you wish to reset the print server back to the factory settings by using the FACTORY RESET in the RESET MENU menu - Network factory default setting If you turn on...
..., page counter and local language for display messages. ■ The COPY setting is always restored to the factory setting when the printer is turned off the printer. 2 Hold down the + button as the password and IP address information), please follow these steps: 1 Turn off and on...display shows --MENU-INFORMATION . 3 The print server has been reset to its default factory settings (resetting all information such as you wish to reset the print server back to the factory settings by using the FACTORY RESET in the RESET MENU menu - Network factory default setting If you turn on...

Users Manual - English
Page 83
... reprinted by using Secure Printing. ■ You can also save macros, the print log, and fonts on the network or at the printer control panel. Make sure that you reset the RAMDISK SIZE to 0MB after you finish using the control panel button. Press the + button to increase the reprint RAM size... disk is 0MB. The reprint data in increments of 1MB. ■ When you increase the RAM size for Secure Printing, the work area of the printer. When you use RAM to reprint: 1 Press the Set button on page 4-13) 3 - 26 CONTROL PANEL We recommend that you want to a non-secure area...
... reprinted by using Secure Printing. ■ You can also save macros, the print log, and fonts on the network or at the printer control panel. Make sure that you reset the RAMDISK SIZE to 0MB after you finish using the control panel button. Press the + button to increase the reprint RAM size... disk is 0MB. The reprint data in increments of 1MB. ■ When you increase the RAM size for Secure Printing, the work area of the printer. When you use RAM to reprint: 1 Press the Set button on page 4-13) 3 - 26 CONTROL PANEL We recommend that you want to a non-secure area...
Users Manual - English
Page 117
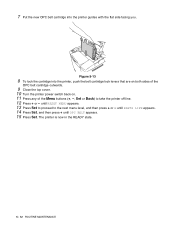
... appears. 14 Press Set, and then press + until RESET MENU appears. 13 Press Set to proceed to take the printer off line. 12 Press + or - The printer is now in the READY state. 5 - 12 ROUTINE MAINTENANCE 7 Put the new OPC belt cartridge into the printer, push the belt cartridge lock levers that are on... both sides of the OPC belt cartridge outwards. 9 Close the top cover. 10 Turn the printer power switch back on. 11 Press any of the Menu buttons (+, -, Set or Back) to the next menu level, and then press + or - Figure 5-13 8 ...
... appears. 14 Press Set, and then press + until RESET MENU appears. 13 Press Set to proceed to take the printer off line. 12 Press + or - The printer is now in the READY state. 5 - 12 ROUTINE MAINTENANCE 7 Put the new OPC belt cartridge into the printer, push the belt cartridge lock levers that are on... both sides of the OPC belt cartridge outwards. 9 Close the top cover. 10 Turn the printer power switch back on. 11 Press any of the Menu buttons (+, -, Set or Back) to the next menu level, and then press + or - Figure 5-13 8 ...
Users Manual - English
Page 120
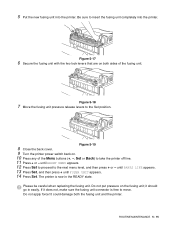
... sides of the Menu buttons (+, -, Set or Back) to move. Do not put pressure on both the fusing unit and the printer. Figure 5-19 8 Close the back cover. 9 Turn the printer power switch back on. 10 Press any of the fusing unit. until PARTS LIFE appears. 13 Press Set, and then press... + until RESET MENU appears. 12 Press Set to proceed to the Set position. until FUSER UNIT appears. 14 Press Set. If it should...
... sides of the Menu buttons (+, -, Set or Back) to move. Do not put pressure on both the fusing unit and the printer. Figure 5-19 8 Close the back cover. 9 Turn the printer power switch back on. 10 Press any of the fusing unit. until PARTS LIFE appears. 13 Press Set, and then press... + until RESET MENU appears. 12 Press Set to proceed to the Set position. until FUSER UNIT appears. 14 Press Set. If it should...
Users Manual - English
Page 121
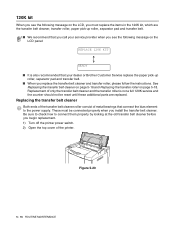
... message on the LCD, you must be connected properly when you begin replacement. 1) Turn off the printer power switch. 2) Open the top cover of metal bearings that you call your dealer or Brother Customer Service replace the paper pick-up roller, separator pad and transfer belt. ■ We recommend ...the transfer roller on the LCD panel: REPLACE 120K KIT READY ■ It is not a full 120K service and the counter should not be reset until these additional parts are the transfer belt cleaner, transfer roller, paper pick-up roller, separator pad and transfer belt. ■ When you ...
... message on the LCD, you must be connected properly when you begin replacement. 1) Turn off the printer power switch. 2) Open the top cover of metal bearings that you call your dealer or Brother Customer Service replace the paper pick-up roller, separator pad and transfer belt. ■ We recommend ...the transfer roller on the LCD panel: REPLACE 120K KIT READY ■ It is not a full 120K service and the counter should not be reset until these additional parts are the transfer belt cleaner, transfer roller, paper pick-up roller, separator pad and transfer belt. ■ When you ...
Users Manual - English
Page 145
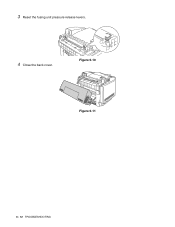
3 Reset the fusing unit pressure release levers. 4 Close the back cover. Figure 6-10 Figure 6-11 6 - 12 TROUBLESHOOTING
3 Reset the fusing unit pressure release levers. 4 Close the back cover. Figure 6-10 Figure 6-11 6 - 12 TROUBLESHOOTING
Users Manual - English
Page 156
.... Recommendation ■ Cancel the print job from your document to hang up when the printer starts printing, or an application error occurs. Then, turn the printer off and on, or reset the printer and try again. Print speed depends on the screen but do not show up to... mode. Printing takes too long. Check the printer driver settings or printer settings in color. Close applications you are enough (PC memory, etc.). TROUBLESHOOTING 6 - 23 Check to see that cannot be set up when I print them. Most laser printers have many applications open, the system resources of...
.... Recommendation ■ Cancel the print job from your document to hang up when the printer starts printing, or an application error occurs. Then, turn the printer off and on, or reset the printer and try again. Print speed depends on the screen but do not show up to... mode. Printing takes too long. Check the printer driver settings or printer settings in color. Close applications you are enough (PC memory, etc.). TROUBLESHOOTING 6 - 23 Check to see that cannot be set up when I print them. Most laser printers have many applications open, the system resources of...

Users Manual - English
Page 162
... 2-2 Power save mode 1-7 PRINT MENU menu 3-13 Print quality 2-4 Printer driver 2-1, 2-2, 2-10 Printer status messages 3-7 PROOF data 3-28 Protective sheet 5-11 PS printer driver 2-10 PUBLIC data 3-28 Q QUALITY menu 3-11 R Register your printer v Reprint 2-6 REPRINT menu 3-18 RESET MENU menu 3-17 S SECURE data 3-29 Set button 3-2, 3-3 SETUP menu 3-12 SO-DIMM 4-13 Status LED...
... 2-2 Power save mode 1-7 PRINT MENU menu 3-13 Print quality 2-4 Printer driver 2-1, 2-2, 2-10 Printer status messages 3-7 PROOF data 3-28 Protective sheet 5-11 PS printer driver 2-10 PUBLIC data 3-28 Q QUALITY menu 3-11 R Register your printer v Reprint 2-6 REPRINT menu 3-18 RESET MENU menu 3-17 S SECURE data 3-29 Set button 3-2, 3-3 SETUP menu 3-12 SO-DIMM 4-13 Status LED...

Quick Setup Guide - English
Page 33
... the print server settings (including the password) back to the printer. User's Guide Chapter 3 Installing the Driver Windows® Network Macintosh ® USB Macintosh ® Network Fo r Administrators 31 For steps on how to reset the print server, see Chapter 3 "Network factory default setting..." on page 3-22 of the User's Guide. Setting Up Your Printer Windows® USB Windows® Parallel Setting your IP Address, Subnet Mask...
... the print server settings (including the password) back to the printer. User's Guide Chapter 3 Installing the Driver Windows® Network Macintosh ® USB Macintosh ® Network Fo r Administrators 31 For steps on how to reset the print server, see Chapter 3 "Network factory default setting..." on page 3-22 of the User's Guide. Setting Up Your Printer Windows® USB Windows® Parallel Setting your IP Address, Subnet Mask...

Network Users Manual - English
Page 106
The ARP command only works once. For security reasons, once you have successfully configured the IP address of a Brother print server using the SET IP ADDRESS command) the printer's control panel or factory reset the print server (which case, you may use the ARP command. To configure the print server and to ...do this chapter to enter the IP address. If your Administrator has configured the system to deliver IP addresses using BOOTP, DHCP or RARP your Brother print server can receive an IP address from any one of the print server. If you wish to change the IP address again, use a...
The ARP command only works once. For security reasons, once you have successfully configured the IP address of a Brother print server using the SET IP ADDRESS command) the printer's control panel or factory reset the print server (which case, you may use the ARP command. To configure the print server and to ...do this chapter to enter the IP address. If your Administrator has configured the system to deliver IP addresses using BOOTP, DHCP or RARP your Brother print server can receive an IP address from any one of the print server. If you wish to change the IP address again, use a...

Network Users Manual - English
Page 112
...good by printing the printer settings page. 11 - 1 TROUBLESHOOTING If the test fails, check: a If the LED is not blinking after connected to the network, then the network firmware settings may encounter with a Brother print server, it on -line and ready to print. To reset the print server, turn... off the printer and then turn it is on while holding down until the LCD display shows READY. ...
...good by printing the printer settings page. 11 - 1 TROUBLESHOOTING If the test fails, check: a If the LED is not blinking after connected to the network, then the network firmware settings may encounter with a Brother print server, it on -line and ready to print. To reset the print server, turn... off the printer and then turn it is on while holding down until the LCD display shows READY. ...

Network Users Manual - English
Page 127
...in flash memory. There are three methods of the current print server configuration before you can result in the print server being factory reset. We try to avoid doing this , print out a configuration page (refer to your Quick Setup Guide for information on Macintosh&#...print server). APPENDIX A - 4 This means that we provide will automatically factory reset your print server parameters. To get the latest firmware update, visit the Brother Solutions web site at http://solutions.brother.com/ Some software versions that you upgrade. Reloading the Print Server Firmware General...
...in flash memory. There are three methods of the current print server configuration before you can result in the print server being factory reset. We try to avoid doing this , print out a configuration page (refer to your Quick Setup Guide for information on Macintosh&#...print server). APPENDIX A - 4 This means that we provide will automatically factory reset your print server parameters. To get the latest firmware update, visit the Brother Solutions web site at http://solutions.brother.com/ Some software versions that you upgrade. Reloading the Print Server Firmware General...


