Users Manual - English
Page 1
Please keep the CD-ROM in a convenient place for quick and easy reference at any time. Version 2 Brother Laser Printer HL-1800 series USER'S GUIDE Please read this guide from the CD-ROM at all times. You can print or view this guide thoroughly before you use the printer.
Please keep the CD-ROM in a convenient place for quick and easy reference at any time. Version 2 Brother Laser Printer HL-1800 series USER'S GUIDE Please read this guide from the CD-ROM at all times. You can print or view this guide thoroughly before you use the printer.
Users Manual - English
Page 2
... If you have any questions about our products. Laser Printer HL-1800 series USER'S GUIDE (For USA & Canada only) IMPORTANT NOTE: If you have any comments or suggestions, please write us at: In USA Printer Customer Support Brother International Corporation 15 Musick Irvine, CA 92618 In Canada Brother International Corporation (Canada), Ltd. - This is available 24 hours...
... If you have any questions about our products. Laser Printer HL-1800 series USER'S GUIDE (For USA & Canada only) IMPORTANT NOTE: If you have any comments or suggestions, please write us at: In USA Printer Customer Support Brother International Corporation 15 Musick Irvine, CA 92618 In Canada Brother International Corporation (Canada), Ltd. - This is available 24 hours...

Users Manual - English
Page 3
ii Definitions of Warnings, Cautions and Notes The following conventions are used in this User's Guide: Warning Indicates warnings that must be observed to use the printer properly or prevent damage to the printer. ✒ Note Indicates notes and useful tips to prevent possible personal injury. ! Caution Indicates cautions that must be observed to remember when using the printer.
ii Definitions of Warnings, Cautions and Notes The following conventions are used in this User's Guide: Warning Indicates warnings that must be observed to use the printer properly or prevent damage to the printer. ✒ Note Indicates notes and useful tips to prevent possible personal injury. ! Caution Indicates cautions that must be observed to remember when using the printer.

Users Manual - English
Page 4
Wait for the printer to cool down before you touch the internal parts of the printer, never touch the shaded parts shown in the following illustrations. ! iii To Use the Printer Safely Warning After you have just used the printer, some internal parts of the printer are extremely HOT! Caution After you open the covers of the printer. When you have just used the printer, some internal parts of the printer are extremely HOT!
Wait for the printer to cool down before you touch the internal parts of the printer, never touch the shaded parts shown in the following illustrations. ! iii To Use the Printer Safely Warning After you have just used the printer, some internal parts of the printer are extremely HOT! Caution After you open the covers of the printer. When you have just used the printer, some internal parts of the printer are extremely HOT!

Users Manual - English
Page 5
TABLE OF CONTENTS Definitions of Warnings, Cautions and Notes ii To Use the Printer Safely iii TABLE OF CONTENTS iv CHAPTER 1 ABOUT THIS PRINTER What Is in the Carton 1-1 Components 1-1 General View 1-3 Positioning the Printer 1-5 Power supply 1-5 Environment 1-6 What Kind of Paper Can I Use 1-7 Type and Size ...of Paper 1-7 Choose the Paper Size, Media Type and so on in the Printer Driver Settings 1-9 PCL Driver ...1-9 PS Driver ...1-10 Macintosh Driver 1-11 Printable Area 1-13 Printing from the Paper Cassette 1-14 Printing from the...
TABLE OF CONTENTS Definitions of Warnings, Cautions and Notes ii To Use the Printer Safely iii TABLE OF CONTENTS iv CHAPTER 1 ABOUT THIS PRINTER What Is in the Carton 1-1 Components 1-1 General View 1-3 Positioning the Printer 1-5 Power supply 1-5 Environment 1-6 What Kind of Paper Can I Use 1-7 Type and Size ...of Paper 1-7 Choose the Paper Size, Media Type and so on in the Printer Driver Settings 1-9 PCL Driver ...1-9 PS Driver ...1-10 Macintosh Driver 1-11 Printable Area 1-13 Printing from the Paper Cassette 1-14 Printing from the...
Users Manual - English
Page 6
... (Windows® Users Only 2-10 Details Tab 2-10 Paper Tab ...2-11 Graphics ...2-12 Device Options 2-13 Features in the PS Printer Driver (Mac OS® 8.6 to 9.2/Mac OS® X 10.1 only 2-14 Page Setup 2-14 Layout...2-15 Specific Options 2-16 Software for Networks 2-17 Software ...installation for Windows Computers 2-18 Software Installation for Macintosh Computers 2-19 Apple LaserWriter 8 Driver 2-19 PostScript Printer Description Files (PPDs 2-19 Automatic Emulation Selection 2-20 Automatic Interface Selection 2-21...
... (Windows® Users Only 2-10 Details Tab 2-10 Paper Tab ...2-11 Graphics ...2-12 Device Options 2-13 Features in the PS Printer Driver (Mac OS® 8.6 to 9.2/Mac OS® X 10.1 only 2-14 Page Setup 2-14 Layout...2-15 Specific Options 2-16 Software for Networks 2-17 Software ...installation for Windows Computers 2-18 Software Installation for Macintosh Computers 2-19 Apple LaserWriter 8 Driver 2-19 PostScript Printer Description Files (PPDs 2-19 Automatic Emulation Selection 2-20 Automatic Interface Selection 2-21...
Users Manual - English
Page 7
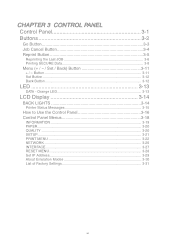
... Cancel Button 3-4 Reprint Button 3-5 Reprinting the Last JOB 3-6 Printing SECURE Data 3-8 Menu (+ / -- / Set / Back) Button 3-11 + / - Orange LED 3-13 LCD Display 3-14 BACK LIGHTS 3-14 Printer Status Messages 3-15 How to Use the Control Panel 3-16 Control Panel Menus 3-18 INFORMATION 3-19 PAPER...3-20 QUALITY ...3-20 SETUP...3-21 PRINT MENU 3-22...
... Cancel Button 3-4 Reprint Button 3-5 Reprinting the Last JOB 3-6 Printing SECURE Data 3-8 Menu (+ / -- / Set / Back) Button 3-11 + / - Orange LED 3-13 LCD Display 3-14 BACK LIGHTS 3-14 Printer Status Messages 3-15 How to Use the Control Panel 3-16 Control Panel Menus 3-18 INFORMATION 3-19 PAPER...3-20 QUALITY ...3-20 SETUP...3-21 PRINT MENU 3-22...

Users Manual - English
Page 8
CHAPTER 4 OPTIONS Optional Accessories 4-1 Lower Tray Unit (LT-500 4-2 Installing the Lower Tray Unit 4-3 Network Option NC-4100h (For HL-1850 User Only)4-5 Installing the Network Board 4-5 RAM Expansion 4-9 Installing Additional Memory 4-13 IrDA Interface (IR-1000 4-16 Optional Font Package (BS-3000 4-... LOW Message 5-4 TONER EMPTY Message 5-5 Replacing the Toner Cartridge 5-5 CHANGE DRUM SOON Message 5-11 Replacing the Drum Unit 5-11 Cleaning 5-14 Cleaning the Printer Exterior 5-14 Cleaning the Printer Interior 5-15 Cleaning the Corona Wire 5-17 Maintenance Messages 5-19 vii
CHAPTER 4 OPTIONS Optional Accessories 4-1 Lower Tray Unit (LT-500 4-2 Installing the Lower Tray Unit 4-3 Network Option NC-4100h (For HL-1850 User Only)4-5 Installing the Network Board 4-5 RAM Expansion 4-9 Installing Additional Memory 4-13 IrDA Interface (IR-1000 4-16 Optional Font Package (BS-3000 4-... LOW Message 5-4 TONER EMPTY Message 5-5 Replacing the Toner Cartridge 5-5 CHANGE DRUM SOON Message 5-11 Replacing the Drum Unit 5-11 Cleaning 5-14 Cleaning the Printer Exterior 5-14 Cleaning the Printer Interior 5-15 Cleaning the Corona Wire 5-17 Maintenance Messages 5-19 vii

Users Manual - English
Page 10
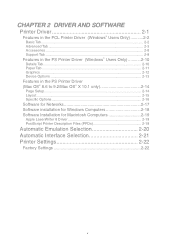
APPENDIX Printer Specifications A-1 Print Media and Size A-5 What Is Important When You Choose Paper to Use with This Printer A-8 Emulation Modes A-11 HP LaserJet Mode A-11 BR-Script 3 Mode A-11 EPSON FX-850 and IBM Proprinter XL Modes A-12 Resident Fonts A-13 66 Scalable and 12 Bitmapped Fonts A-13 HP LaserJet, EPSON FX-850 and IBM Proprinter XL Modes A-13 BR-Script 3 Mode A-15 Symbol Sets / Character Sets A-16 OCR Symbol Sets A-16 HP LaserJet Mode A-17 EPSON Mode A-18 IBM Mode A-18 Trademarks A-23 Regulations A-24 INDEX I-1 ix
APPENDIX Printer Specifications A-1 Print Media and Size A-5 What Is Important When You Choose Paper to Use with This Printer A-8 Emulation Modes A-11 HP LaserJet Mode A-11 BR-Script 3 Mode A-11 EPSON FX-850 and IBM Proprinter XL Modes A-12 Resident Fonts A-13 66 Scalable and 12 Bitmapped Fonts A-13 HP LaserJet, EPSON FX-850 and IBM Proprinter XL Modes A-13 BR-Script 3 Mode A-15 Symbol Sets / Character Sets A-16 OCR Symbol Sets A-16 HP LaserJet Mode A-17 EPSON Mode A-18 IBM Mode A-18 Trademarks A-23 Regulations A-24 INDEX I-1 ix

Users Manual - English
Page 11
Printer 5. CHAPTER 1 ABOUT THIS PRINTER CHAPTER 1 1 ABOUT THIS PRINTER What Is in the Carton Components When you unpack the printer, check to see that you have all of the following parts. 4 1 5 6 2 3 Fig. 1-1 1. Drum Unit Assembly (with Toner Cartridge) 2. Documentation 3. CD-ROM 4. Paper Cassette 1-1 AC Power Cord 6.
Printer 5. CHAPTER 1 ABOUT THIS PRINTER CHAPTER 1 1 ABOUT THIS PRINTER What Is in the Carton Components When you unpack the printer, check to see that you have all of the following parts. 4 1 5 6 2 3 Fig. 1-1 1. Drum Unit Assembly (with Toner Cartridge) 2. Documentation 3. CD-ROM 4. Paper Cassette 1-1 AC Power Cord 6.

Users Manual - English
Page 12
Do not use the USB connector on the front of your PC or on the country where you purchased the printer. • When you intend to the USB connector of your PC. Please purchase the appropriate cable for the interface you use a USB cable, make sure ...
Do not use the USB connector on the front of your PC or on the country where you purchased the printer. • When you intend to the USB connector of your PC. Please purchase the appropriate cable for the interface you use a USB cable, make sure ...

Users Manual - English
Page 13
General View CHAPTER 1 ABOUT THIS PRINTER Fig. 1-2 1 Control Panel 2 Cover Release Button 3 Paper Cassette 4 Multi-purpose Tray 5 Extension Flap 6 Front cover 7 Multi-purpose Tray Extension 8 Face Down Output Tray 1-3
General View CHAPTER 1 ABOUT THIS PRINTER Fig. 1-2 1 Control Panel 2 Cover Release Button 3 Paper Cassette 4 Multi-purpose Tray 5 Extension Flap 6 Front cover 7 Multi-purpose Tray Extension 8 Face Down Output Tray 1-3

Users Manual - English
Page 15
Power supply Use the printer within the specified power range: AC power: • AC 220-240 V 50/60 Hz or • AC 100-120 V 50/60 Hz The power cord, ... power circuit with these appliances, we recommend that you use an isolation transformer or a high-frequency noise filter. Positioning the Printer CHAPTER 1 ABOUT THIS PRINTER Please note the following before using the printer with other high-power appliances such as an air conditioner, copier, shredder and so on. If you cannot avoid using...
Power supply Use the printer within the specified power range: AC power: • AC 220-240 V 50/60 Hz or • AC 100-120 V 50/60 Hz The power cord, ... power circuit with these appliances, we recommend that you use an isolation transformer or a high-frequency noise filter. Positioning the Printer CHAPTER 1 ABOUT THIS PRINTER Please note the following before using the printer with other high-power appliances such as an air conditioner, copier, shredder and so on. If you cannot avoid using...

Users Manual - English
Page 16
...176;C (50°F to 90.5°F) 20% to open flames or salty or corrosive gases. Do not install the printer near devices that contain magnets or generate magnetic fields. Put the printer on top of approximately 100 mm (4 inches) between the air vent and the wall. 1-6 Ventilate the room in ...which you have to protect the printer from direct sunlight if you use the printer. Do not install the printer near an air conditioner. Do not expose the printer to 80% (without condensation) Do not block the air exit on the air vent. ...
...176;C (50°F to 90.5°F) 20% to open flames or salty or corrosive gases. Do not install the printer near devices that contain magnets or generate magnetic fields. Put the printer on top of approximately 100 mm (4 inches) between the air vent and the wall. 1-6 Ventilate the room in ...which you have to protect the printer from direct sunlight if you use the printer. Do not install the printer near an air conditioner. Do not expose the printer to 80% (without condensation) Do not block the air exit on the air vent. ...
Users Manual - English
Page 17
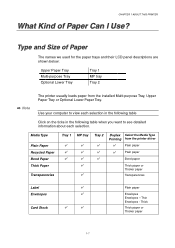
... table Click on the ticks in the following table when you want to see detailed information about each selection. CHAPTER 1 ABOUT THIS PRINTER What Kind of Paper The names we used for the paper trays and their LCD panel descriptions are shown below: Upper Paper Tray... Multi-purpose Tray Optional Lower Tray Tray 1 MP tray Tray 2 ✒ Note The printer usually loads paper from the printer driver ✔ Plain paper ✔ Plain paper Bond paper Thick paper or Thicker paper Transparencies Label Envelopes Card Stock ✔ &#...
... table Click on the ticks in the following table when you want to see detailed information about each selection. CHAPTER 1 ABOUT THIS PRINTER What Kind of Paper The names we used for the paper trays and their LCD panel descriptions are shown below: Upper Paper Tray... Multi-purpose Tray Optional Lower Tray Tray 1 MP tray Tray 2 ✒ Note The printer usually loads paper from the printer driver ✔ Plain paper ✔ Plain paper Bond paper Thick paper or Thicker paper Transparencies Label Envelopes Card Stock ✔ &#...
Users Manual - English
Page 19
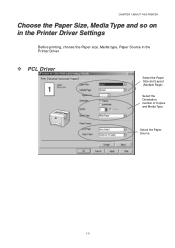
Select the Paper Source. 1-9 CHAPTER 1 ABOUT THIS PRINTER Choose the Paper Size, Media Type and so on in the Printer Driver Settings Before printing, choose the Paper size, Media type, Paper Source in the Printer Driver. ! Select the Orientation, number of Copies and Media Type. PCL Driver Select the Paper Size and Layout (Multiple Page).
Select the Paper Source. 1-9 CHAPTER 1 ABOUT THIS PRINTER Choose the Paper Size, Media Type and so on in the Printer Driver Settings Before printing, choose the Paper size, Media type, Paper Source in the Printer Driver. ! Select the Orientation, number of Copies and Media Type. PCL Driver Select the Paper Size and Layout (Multiple Page).
Users Manual - English
Page 20
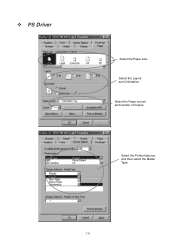
PS Driver Select the Paper size. Select the Paper source and number of Copies. Select the Printer features, and then select the Media Type. 1-10 Select the Layout and Orientation. !
PS Driver Select the Paper size. Select the Paper source and number of Copies. Select the Printer features, and then select the Media Type. 1-10 Select the Layout and Orientation. !
Users Manual - English
Page 21
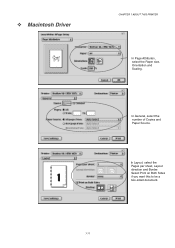
In Layout, select the Pages per sheet, Layout direction and Border. Macintosh Driver CHAPTER 1 ABOUT THIS PRINTER In Page Attributes, select the Paper size, Orientation and Scaling. Select Print on Both Sides if you want this to be a two-sided document. 1-11 In General, select the number of Copies and Paper Source. !
In Layout, select the Pages per sheet, Layout direction and Border. Macintosh Driver CHAPTER 1 ABOUT THIS PRINTER In Page Attributes, select the Paper size, Orientation and Scaling. Select Print on Both Sides if you want this to be a two-sided document. 1-11 In General, select the number of Copies and Paper Source. !

Users Manual - English
Page 22
... Champion Paper One 20 lb Hammermill Laser Paper 24 lb 3M CG 3300 Avery laser label #5160 ♦ Before buying a lot of about 5% ♦ This printer can use recycled paper that is 75 to make sure that it is suitable. ♦ Use paper that is designed for plain paper copying ♦...
... Champion Paper One 20 lb Hammermill Laser Paper 24 lb 3M CG 3300 Avery laser label #5160 ♦ Before buying a lot of about 5% ♦ This printer can use recycled paper that is 75 to make sure that it is suitable. ♦ Use paper that is designed for plain paper copying ♦...

Users Manual - English
Page 23
! Printable Area CHAPTER 1 ABOUT THIS PRINTER The figure below shows the part of the paper that will be printed on. Portrait Fig. 1-4 Letter 1 0.17 inch (4.2 mm) 2 0.25 inch (6.35 mm) 3 0.17 inch (4.2 mm) 4 0.25 inch (6.35 mm) A4 4.2 mm 6.01 mm 4.2 mm 6.01 mm Landscape Fig. 1-5 Letter 1 0.17 inch (4.2 mm) 2 0.2 inch (5.08 mm) 3 0.17 inch (4.2 mm) 4 0.2 inch (5.08 mm) A4 4.2 mm 5.0 mm 4.2 mm 5.0 mm 1-13
! Printable Area CHAPTER 1 ABOUT THIS PRINTER The figure below shows the part of the paper that will be printed on. Portrait Fig. 1-4 Letter 1 0.17 inch (4.2 mm) 2 0.25 inch (6.35 mm) 3 0.17 inch (4.2 mm) 4 0.25 inch (6.35 mm) A4 4.2 mm 6.01 mm 4.2 mm 6.01 mm Landscape Fig. 1-5 Letter 1 0.17 inch (4.2 mm) 2 0.2 inch (5.08 mm) 3 0.17 inch (4.2 mm) 4 0.2 inch (5.08 mm) A4 4.2 mm 5.0 mm 4.2 mm 5.0 mm 1-13


