Users Manual - English
Page 2
... OF CONTENTS CHAPTER 1 INTRODUCTION 1-1 ABOUT THE GUIDEBOOKS 1-1 Finding Out How to Use the Printer 1-1 ABOUT YOUR PRINTER 1-2 Printer Overview...1-2 System Requirements in Brother Printing Solution for Windows 1-3 Features...1-3 OPERATING AND STORAGE ENVIRONMENT 1-7 Power Supply...1- 7 Environment... ...3-1 Ready (Paper) Lamp ...3-1 Data (Toner) Lamp ...3-2 Drum Lamp...3- 2 Alarm Lamp...3- 2 Switch ...3-3 Other Control Features 3-3 Sleep Mode ...3-3 Test Print Mode ...3-4 CHAPTER 4 OPTIONS 4-1 SERIAL INTERFACE BOARD RS-100M (HL-1040/1050 Only 4-1 Selecting the RS-422A (Apple) or RS-232C...
... OF CONTENTS CHAPTER 1 INTRODUCTION 1-1 ABOUT THE GUIDEBOOKS 1-1 Finding Out How to Use the Printer 1-1 ABOUT YOUR PRINTER 1-2 Printer Overview...1-2 System Requirements in Brother Printing Solution for Windows 1-3 Features...1-3 OPERATING AND STORAGE ENVIRONMENT 1-7 Power Supply...1- 7 Environment... ...3-1 Ready (Paper) Lamp ...3-1 Data (Toner) Lamp ...3-2 Drum Lamp...3- 2 Alarm Lamp...3- 2 Switch ...3-3 Other Control Features 3-3 Sleep Mode ...3-3 Test Print Mode ...3-4 CHAPTER 4 OPTIONS 4-1 SERIAL INTERFACE BOARD RS-100M (HL-1040/1050 Only 4-1 Selecting the RS-422A (Apple) or RS-232C...
Users Manual - English
Page 3
... TONER CARTRIDGE 5-1 REPLACING THE DRUM UNIT 5-7 CLEANING THE PRINTER 5-11 Cleaning the Printer Exterior 5-11 Cleaning the Printer Interior and Drum Unit 5-12 RE-PACKING THE PRINTER 5-15 CHAPTER 6 TROUBLESHOOTING 6-1 ALARM INDICATIONS AT A GLANCE 6-1 Operator Calls...6-1 Service Calls ...6-4 PAPER JAMS...6-5 Q & A ...6-8 Setting Up the Printer Hardware 6-8 Setting Up the Printer for Windows 6-8 Setting Up the Printer for DOS 6-10 Setting...
... TONER CARTRIDGE 5-1 REPLACING THE DRUM UNIT 5-7 CLEANING THE PRINTER 5-11 Cleaning the Printer Exterior 5-11 Cleaning the Printer Interior and Drum Unit 5-12 RE-PACKING THE PRINTER 5-15 CHAPTER 6 TROUBLESHOOTING 6-1 ALARM INDICATIONS AT A GLANCE 6-1 Operator Calls...6-1 Service Calls ...6-4 PAPER JAMS...6-5 Q & A ...6-8 Setting Up the Printer Hardware 6-8 Setting Up the Printer for Windows 6-8 Setting Up the Printer for DOS 6-10 Setting...
Users Manual - English
Page 5
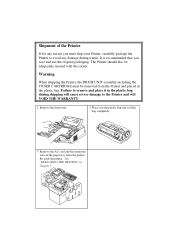
... the plastic bag and seal the bag completely. 3 Remove the AC cord and the extention wire of the Printer If for any reason you save and use the original packaging. It is recommended that you must be adequately insured with the carrier. ...in Chapter 5. Re-pack the printer. Shipment of the paper tray from the Printer and placed in the plastic bag. Warning When shipping the Printer, the DRUM UNIT assembly including the TONER CARTRIDGE must ship your Printer, carefully package the Printer to the Printer and will VOID THE WARRANTY. 1 Remove the drum unit. 2 Place it in the...
... the plastic bag and seal the bag completely. 3 Remove the AC cord and the extention wire of the Printer If for any reason you save and use the original packaging. It is recommended that you must be adequately insured with the carrier. ...in Chapter 5. Re-pack the printer. Shipment of the paper tray from the Printer and placed in the plastic bag. Warning When shipping the Printer, the DRUM UNIT assembly including the TONER CARTRIDGE must ship your Printer, carefully package the Printer to the Printer and will VOID THE WARRANTY. 1 Remove the drum unit. 2 Place it in the...
Users Manual - English
Page 12
... less than 13 W when in sleep mode. Sleep Mode (Power Save Mode) When the printer is not used for proof-reading. You can select from the drum unit, you need to obtain draft copies for a certain amount of print job. 1-6 Low Running Cost Since the toner cartridge is cost... are supplied with a starter toner cartridge which is separate from two economy modes-25% toner saving and 50% toner saving-through the Windows printer driver supplied with each toner cartridge may vary depending on your average type of time, sleep mode automatically reduces power consumption. It is useful ...
... less than 13 W when in sleep mode. Sleep Mode (Power Save Mode) When the printer is not used for proof-reading. You can select from the drum unit, you need to obtain draft copies for a certain amount of print job. 1-6 Low Running Cost Since the toner cartridge is cost... are supplied with a starter toner cartridge which is separate from two economy modes-25% toner saving and 50% toner saving-through the Windows printer driver supplied with each toner cartridge may vary depending on your average type of time, sleep mode automatically reduces power consumption. It is useful ...
Users Manual - English
Page 16
... paper to avoid any damage to select the appropriate media type in the printer driver for optimum printing. Make sure to the printer drum unit. We recommend you are designed for use recycled paper in laser printers. 2-2 You can use in this printer before purchasing large quantities. Avoid using coated paper, such as vinyl coated...
... paper to avoid any damage to select the appropriate media type in the printer driver for optimum printing. Make sure to the printer drum unit. We recommend you are designed for use recycled paper in laser printers. 2-2 You can use in this printer before purchasing large quantities. Avoid using coated paper, such as vinyl coated...

Users Manual - English
Page 26
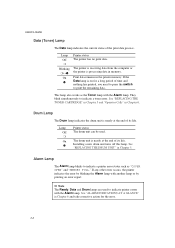
... lamp indicates the current status of the printer. Drum Alarm PaRpeeardy ToDnaetra Fig. 3-1 Lamps and Switch on the printer control panel. If the printer is in sleep mode, it will wake up . (Blinking at 1 second intervals) Blinking On The printer is cooling down and stops printing until the printers internal temperature lowers. (Blinking at 2 seconds intervals) The...
... lamp indicates the current status of the printer. Drum Alarm PaRpeeardy ToDnaetra Fig. 3-1 Lamps and Switch on the printer control panel. If the printer is in sleep mode, it will wake up . (Blinking at 1 second intervals) Blinking On The printer is cooling down and stops printing until the printers internal temperature lowers. (Blinking at 2 seconds intervals) The...
Users Manual - English
Page 27
...the end of its life. Alarm Lamp The Alarm lamp blinks to indicate printer errors with the Alarm lamp. Drum Lamp The Drum lamp indicates the drum unit is on for the error. 3-2 Note The Ready, Data and Drum lamps are used . They blink simultaneously to indicate a toner error. ... works as "COVER OPEN" and "MEMORY FULL." See "REPLACING THE DRUM UNIT" in the printer memory. See "ALARM INDICATIONS AT A GLANCE" in Chapter 6. Lamp Off Printer status The drum unit can be used to indicate a printer error status such as the Toner lamp with another lamp or by printing...
...the end of its life. Alarm Lamp The Alarm lamp blinks to indicate printer errors with the Alarm lamp. Drum Lamp The Drum lamp indicates the drum unit is on for the error. 3-2 Note The Ready, Data and Drum lamps are used . They blink simultaneously to indicate a toner error. ... works as "COVER OPEN" and "MEMORY FULL." See "REPLACING THE DRUM UNIT" in the printer memory. See "ALARM INDICATIONS AT A GLANCE" in Chapter 6. Lamp Off Printer status The drum unit can be used to indicate a printer error status such as the Toner lamp with another lamp or by printing...
Users Manual - English
Page 29
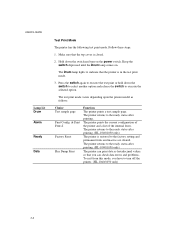
.... To exit from this mode, you have to the ready status after printing. (HL-1040/1050 only) The printer is closed. 2. Keep the switch depressed until the Drum lamp comes on the power switch. The printer prints the current configuration of the printer and a list of the internal fonts. The test print mode varies depending upon the...
.... To exit from this mode, you have to the ready status after printing. (HL-1040/1050 only) The printer is closed. 2. Keep the switch depressed until the Drum lamp comes on the power switch. The printer prints the current configuration of the printer and a list of the internal fonts. The test print mode varies depending upon the...

Users Manual - English
Page 39
...MAINTENANCE REPLACING THE TONER CARTRIDGE The printer can print approximately 2,400 pages (5%...not discard used toner cartridge according to indicate toner low. See "CLEANING THE PRINTER" in this indication appears, your average document type. (i.e.: standard letter, detailed...Be sure to indicate that the toner is recommended that you clean the printer when you get the toner low warning. When the toner cartridge is recommended... Both Alarm and Data (Toner) lamps will vary depending on your printer cannot resume printing until you are supplied with a starter toner cartridge which ...
...MAINTENANCE REPLACING THE TONER CARTRIDGE The printer can print approximately 2,400 pages (5%...not discard used toner cartridge according to indicate toner low. See "CLEANING THE PRINTER" in this indication appears, your average document type. (i.e.: standard letter, detailed...Be sure to indicate that the toner is recommended that you clean the printer when you get the toner low warning. When the toner cartridge is recommended... Both Alarm and Data (Toner) lamps will vary depending on your printer cannot resume printing until you are supplied with a starter toner cartridge which ...

Users Manual - English
Page 42
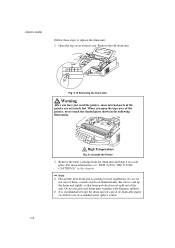
... are left unpacked for a long period of toner cartridge could void your hands or clothes, wipe or wash it into the printer. If toner scatters on your printer's warranty. Fig. 5-5 Removing the Old Toner Cartridge ! Caution Only unpack the toner cartridge immediately before installing it off with ... the new toner cartridge, gently shake it out gently. You can only use a Brother genuine toner cartridge (TN-300 series) which is shortened. USER'S GUIDE 3. Remove the old toner cartridge from the drum unit by pulling it five or six times and then remove the protective part. !...
... are left unpacked for a long period of toner cartridge could void your hands or clothes, wipe or wash it into the printer. If toner scatters on your printer's warranty. Fig. 5-5 Removing the Old Toner Cartridge ! Caution Only unpack the toner cartridge immediately before installing it off with ... the new toner cartridge, gently shake it out gently. You can only use a Brother genuine toner cartridge (TN-300 series) which is shortened. USER'S GUIDE 3. Remove the old toner cartridge from the drum unit by pulling it five or six times and then remove the protective part. !...
Users Manual - English
Page 44
Home Position ( ) Fig. 5-9 Cleaning the Primary Corona Wire 9. Clean the primary corona wire inside the drum unit by gently sliding the blue tab to the right and left several times. Fig. 5-10 Close the top cover 5-6 Re-install the drum unit into the printer and close the top cover. USER'S GUIDE 8.
Home Position ( ) Fig. 5-9 Cleaning the Primary Corona Wire 9. Clean the primary corona wire inside the drum unit by gently sliding the blue tab to the right and left several times. Fig. 5-10 Close the top cover 5-6 Re-install the drum unit into the printer and close the top cover. USER'S GUIDE 8.
Users Manual - English
Page 45
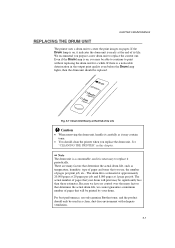
...have no control over the many factors that determine the actual drum life, such as it may be able to continue to replace the current one. For best performance, use only genuine Brother toner, and the product should clean the printer when you use, the number of paper and toner that your... drum. The actual number of its Life ! Even if the Drum lamp is estimated at approximately 20,000 pages at 20 pages ...
...have no control over the many factors that determine the actual drum life, such as it may be able to continue to replace the current one. For best performance, use only genuine Brother toner, and the product should clean the printer when you use, the number of paper and toner that your... drum. The actual number of its Life ! Even if the Drum lamp is estimated at approximately 20,000 pages at 20 pages ...
Users Manual - English
Page 46
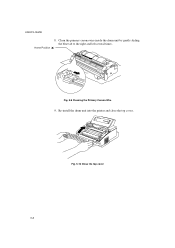
.... Open the top cover towards you are extremely hot. When you have just used the printer, some internal parts of the printer are not sure of them, consult your local dealer/retailer. If you . Fig. 5-12 Removing the Drum Unit Warning After you open the top cover of accidental toner spill or scatter. 5-8 Remove...
.... Open the top cover towards you are extremely hot. When you have just used the printer, some internal parts of the printer are not sure of them, consult your local dealer/retailer. If you . Fig. 5-12 Removing the Drum Unit Warning After you open the top cover of accidental toner spill or scatter. 5-8 Remove...

Users Manual - English
Page 47
...as it five or six times horizontally. Fig. 5-15 Shaking the Drum Unit ! Unpack the drum unit and gently shake it contains toner. If toner scatters and your hands or clothes get dirty, wipe or wash it into the printer. CHAPTER 5 MAINTENANCE Fig. 5-14 Removing the Toner Cartridge 3. ...Starter Sheet Fig. 5-16 Do Not Remove the Starter Sheet Only unpack a drum unit immediately before installing it off with cold water immediately. 5-9
...as it five or six times horizontally. Fig. 5-15 Shaking the Drum Unit ! Unpack the drum unit and gently shake it contains toner. If toner scatters and your hands or clothes get dirty, wipe or wash it into the printer. CHAPTER 5 MAINTENANCE Fig. 5-14 Removing the Toner Cartridge 3. ...Starter Sheet Fig. 5-16 Do Not Remove the Starter Sheet Only unpack a drum unit immediately before installing it off with cold water immediately. 5-9
Users Manual - English
Page 48
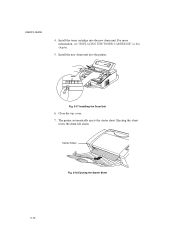
Install the toner cartridge into the printer. USER'S GUIDE 4. Fig. 5-17 Installing the Drum Unit 6. The printer automatically ejects the starter sheet. Close the top cover. 7. Install the new drum unit into the new drum unit. Ejecting this chapter. 5. For more information, see "REPLACING THE TONER CARTRIDGE" in this sheet resets the drum life alarm. Starter Sheet Fig. 5-18 Ejecting the Starter Sheet 5-10
Install the toner cartridge into the printer. USER'S GUIDE 4. Fig. 5-17 Installing the Drum Unit 6. The printer automatically ejects the starter sheet. Close the top cover. 7. Install the new drum unit into the new drum unit. Ejecting this chapter. 5. For more information, see "REPLACING THE TONER CARTRIDGE" in this sheet resets the drum life alarm. Starter Sheet Fig. 5-18 Ejecting the Starter Sheet 5-10

Users Manual - English
Page 49
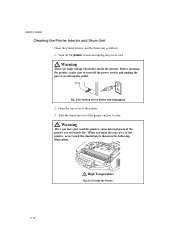
.... 5-11 Warning There are high voltage electrodes inside the printer. Use a damp cloth for cleaning. Cleaning with toner, clean the printer interior and drum unit. CLEANING THE PRINTER CHAPTER 5 MAINTENANCE Clean the printer exterior and interior periodically. Turn off the Switch and Unplugging 2. Before cleaning the printer, make sure to turn off the power switch and...
.... 5-11 Warning There are high voltage electrodes inside the printer. Use a damp cloth for cleaning. Cleaning with toner, clean the printer interior and drum unit. CLEANING THE PRINTER CHAPTER 5 MAINTENANCE Clean the printer exterior and interior periodically. Turn off the Switch and Unplugging 2. Before cleaning the printer, make sure to turn off the power switch and...
Users Manual - English
Page 50
... the power cord from the outlet. High Temperature Fig. 5-21 Inside the Printer 5-12 USER'S GUIDE Cleaning the Printer Interior and Drum Unit Clean the printer interior and the drum unit as follows: 1. When you have just used the printer, some internal parts of the printer, never touch the shaded parts shown in the following illustration. Open the...
... the power cord from the outlet. High Temperature Fig. 5-21 Inside the Printer 5-12 USER'S GUIDE Cleaning the Printer Interior and Drum Unit Clean the printer interior and the drum unit as follows: 1. When you have just used the printer, some internal parts of the printer, never touch the shaded parts shown in the following illustration. Open the...
Users Manual - English
Page 52
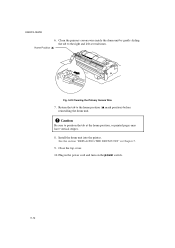
Close the top cover. 10. Home Position ( ) Fig. 5-23 Cleaning the Primary Corona Wire 7. USER'S GUIDE 6. Return the tab to the right and left several times. Install the drum unit into the printer. See the section "REPLACING THE DRUM UNIT" in the power cord and turn on the power switch. 5-14 Clean the primary corona wire inside the drum unit by gently sliding the tab to the home position ( mark position) before reinstalling the drum unit. ! Plug in Chapter 5. 9. Caution Be sure to position the tab at the home position, or printed pages may have vertical stripes. 8.
Close the top cover. 10. Home Position ( ) Fig. 5-23 Cleaning the Primary Corona Wire 7. USER'S GUIDE 6. Return the tab to the right and left several times. Install the drum unit into the printer. See the section "REPLACING THE DRUM UNIT" in the power cord and turn on the power switch. 5-14 Clean the primary corona wire inside the drum unit by gently sliding the tab to the home position ( mark position) before reinstalling the drum unit. ! Plug in Chapter 5. 9. Caution Be sure to position the tab at the home position, or printed pages may have vertical stripes. 8.

Users Manual - English
Page 53
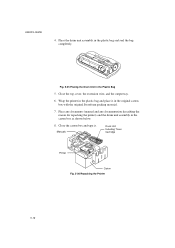
... paper tray from the AC outlet. Open the top cover. 3. Caution Whenever you transport the printer, use the packing materials which will void the printer's warranty. 1. Remove the drum unit assembly, referring to re-pack the printer, or the printer may be damaged which are provided with the toner cartridge included. Turn off the power...
... paper tray from the AC outlet. Open the top cover. 3. Caution Whenever you transport the printer, use the packing materials which will void the printer's warranty. 1. Remove the drum unit assembly, referring to re-pack the printer, or the printer may be damaged which are provided with the toner cartridge included. Turn off the power...
Users Manual - English
Page 54
... extension wire, and the output tray. 6. Manuals Drum Unit Including Toner Cartridge Printer Carton Fig. 5-26 Repacking the Printer 5-16 Place any documents (manual and any documentation describing the reason for repacking the printer) and the drum unit assembly in the original carton box with the ...original Styrofoam packing material. 7. USER'S GUIDE 4. Fig. 5-25 Placing the Drum Unit in the plastic bag and seal the bag completely...
... extension wire, and the output tray. 6. Manuals Drum Unit Including Toner Cartridge Printer Carton Fig. 5-26 Repacking the Printer 5-16 Place any documents (manual and any documentation describing the reason for repacking the printer) and the drum unit assembly in the original carton box with the ...original Styrofoam packing material. 7. USER'S GUIDE 4. Fig. 5-25 Placing the Drum Unit in the plastic bag and seal the bag completely...


