
Accessory Catalog
Page 2
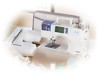
... of straw hats Contents 02 FZ2-B1 Brother Sewing Machine Lineup 03-04 Brother General Sewing Accessories 05-16 Brother Embellishment Feet 17-24 Brother Quilting Feet 25-28 Brother Embroidery Accessories 29-66 Brother Sewing Machine Attachments for PQ Series 0637-0740 Brother Serger/Overlock Feet 71-74 Brother Cover Stitch Feet 75-78 More From Brother 79 Index 80 You can always find...
... of straw hats Contents 02 FZ2-B1 Brother Sewing Machine Lineup 03-04 Brother General Sewing Accessories 05-16 Brother Embellishment Feet 17-24 Brother Quilting Feet 25-28 Brother Embroidery Accessories 29-66 Brother Sewing Machine Attachments for PQ Series 0637-0740 Brother Serger/Overlock Feet 71-74 Brother Cover Stitch Feet 75-78 More From Brother 79 Index 80 You can always find...

Accessory Catalog
Page 3
... the corresponding illustration. Please note the correct SA accessory number. Innov-is 80, 40 Sewing Machines Quality results are compatible with features that enables easy sewing and embroidery. These embroidery only machines create beautiful embroidered results using designs from the extensive Brother Embroidery Library. * Brother embroidery accessories are easily created from the models shown below. SA accessory number Models for...
... the corresponding illustration. Please note the correct SA accessory number. Innov-is 80, 40 Sewing Machines Quality results are compatible with features that enables easy sewing and embroidery. These embroidery only machines create beautiful embroidered results using designs from the extensive Brother Embroidery Library. * Brother embroidery accessories are easily created from the models shown below. SA accessory number Models for...

Accessory Catalog
Page 33
... x 130 mm (approx. 7 x 5 inches) SA441 * Compatible with limited machines. Brother Embroidery Accessories 63 Free-Standing Ten Spool Thread Stand Ten Spool Thread Stand Embroidery Machine Hoops Brother Embroidery Accessories 64 For all embroidery and sewing/embroidery machines. For Quattro™ 6000D: • Extra-large: 300 x 200 mm (...) SA446 • Medium: 100 x 100 mm (approx. 4 x 4 inches) SA438 For Duetta™ 4500D/Innov-is 500 series, SE-270D, HE-120 series, PE-300S, PE-400D: • Large: 172 x 100 mm (approx. 6-3/4 x 4 inches) • Medium: 100 x 100 mm (approx...
... x 130 mm (approx. 7 x 5 inches) SA441 * Compatible with limited machines. Brother Embroidery Accessories 63 Free-Standing Ten Spool Thread Stand Ten Spool Thread Stand Embroidery Machine Hoops Brother Embroidery Accessories 64 For all embroidery and sewing/embroidery machines. For Quattro™ 6000D: • Extra-large: 300 x 200 mm (...) SA446 • Medium: 100 x 100 mm (approx. 4 x 4 inches) SA438 For Duetta™ 4500D/Innov-is 500 series, SE-270D, HE-120 series, PE-300S, PE-400D: • Large: 172 x 100 mm (approx. 6-3/4 x 4 inches) • Medium: 100 x 100 mm (approx...

Accessory Catalog
Page 34
... colors (sold in a 5-pack sleeve). 300 meters (328 yards) of needle and stabilizer types. Brother Embroidery Accessories PacesetterTM Polyester Threads 65 Brother Country Yarn Embroidery Threads Metallic Threads For the best embroidery results, use these embroidery threads especially designed for Brother sewing and embroidering machines. 61 Color Thread Set with Wooden Rack ETKSP999 PacesetterTM Polyester Threads (61 Color Thread...
... colors (sold in a 5-pack sleeve). 300 meters (328 yards) of needle and stabilizer types. Brother Embroidery Accessories PacesetterTM Polyester Threads 65 Brother Country Yarn Embroidery Threads Metallic Threads For the best embroidery results, use these embroidery threads especially designed for Brother sewing and embroidering machines. 61 Color Thread Set with Wooden Rack ETKSP999 PacesetterTM Polyester Threads (61 Color Thread...

Users Manual - English
Page 3
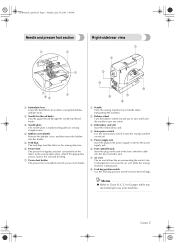
... cassette compartment Insert a thread cassette into the thread cassette compartment. f Arm Plug in the connector for the embroidery unit. h Flap Use the flap to start the sewing machine and raise and lower the needle. (page Cover D) k Operation panel Select a stitch from those that appear... Use the bobbin winder when winding the bobbin. Before using the sewing machine, carefully read these descriptions to adjust the tension of the machine parts. g Embroidery unit connector slot Plug in the connector for this sewing machine in order to cut them. i Sliding leg Pull out the ...
... cassette compartment Insert a thread cassette into the thread cassette compartment. f Arm Plug in the connector for the embroidery unit. h Flap Use the flap to start the sewing machine and raise and lower the needle. (page Cover D) k Operation panel Select a stitch from those that appear... Use the bobbin winder when winding the bobbin. Before using the sewing machine, carefully read these descriptions to adjust the tension of the machine parts. g Embroidery unit connector slot Plug in the connector for this sewing machine in order to cut them. i Sliding leg Pull out the ...
Users Manual - English
Page 4
... lower the needle to turn the sewing machine on the power supply cord into the power supply jack. Attach the appropriate presser foot for sewing straight seams. d Bobbin cover/Shuttle Remove the bobbin cover, and then insert the bobbin into the foot controller jack. c Embroidery card slot Insert the embroidery card. f Foot controller jack Insert...
... lower the needle to turn the sewing machine on the power supply cord into the power supply jack. Attach the appropriate presser foot for sewing straight seams. d Bobbin cover/Shuttle Remove the bobbin cover, and then insert the bobbin into the foot controller jack. c Embroidery card slot Insert the embroidery card. f Foot controller jack Insert...

Users Manual - English
Page 6
... keys displayed on the LCD to "LCD (liquid crystal display) operation" (page 14). For details, refer to perform operations. h Sewing machine help key Press to the initial embroidery screen. Cover E d Next page key Displays the next screen when there are items that are not displayed on the LCD. and ...when it is in embroidery, returns to get help on using the sewing machine. g Memory key Press to set the needle stop position, the buzzer sound, and more. e Menu key Select pattern group...
... keys displayed on the LCD to "LCD (liquid crystal display) operation" (page 14). For details, refer to perform operations. h Sewing machine help key Press to the initial embroidery screen. Cover E d Next page key Displays the next screen when there are items that are not displayed on the LCD. and ...when it is in embroidery, returns to get help on using the sewing machine. g Memory key Press to set the needle stop position, the buzzer sound, and more. e Menu key Select pattern group...

Users Manual - English
Page 9
... thread cassette into the thread cassette. Sewing Machine Features 1 2 3 5 4 6 a Thread cassette Easily thread the upper thread by loading a spool of the various functions. In addition, after sewing. (page 60) f Embroidery You can embroider built-in embroidery patterns, characters, framed decorations, and ...d One-touch lower threading You can start sewing without pulling up the bobbin thread. (page 21) e Automatic thread cutting The thread can be cut automatically after you for future reference. Before using this sewing machine, carefully read the "Important Safety Instructions" ...
... thread cassette into the thread cassette. Sewing Machine Features 1 2 3 5 4 6 a Thread cassette Easily thread the upper thread by loading a spool of the various functions. In addition, after sewing. (page 60) f Embroidery You can embroider built-in embroidery patterns, characters, framed decorations, and ...d One-touch lower threading You can start sewing without pulling up the bobbin thread. (page 21) e Automatic thread cutting The thread can be cut automatically after you for future reference. Before using this sewing machine, carefully read the "Important Safety Instructions" ...

Users Manual - English
Page 20
...displayed on the LCD (liquid crystal display) on the LCD. When an animation is attached. Memo z A different screen is displayed when the embroidery unit is displayed, the screen above will be displayed if you touch the LCD with your finger. 14 SE-BrotherE_sgml.book Page 14 Monday, ...Increase value l Decrease value ■ Stitch group selection screen Press (Menu key) to display the screen for messages displayed on the front of the sewing machine. z Depending on . Viewing the LCD When the power is turned on, the LCD comes on, and the following screen is turned on the model...
...displayed on the LCD (liquid crystal display) on the LCD. When an animation is attached. Memo z A different screen is displayed when the embroidery unit is displayed, the screen above will be displayed if you touch the LCD with your finger. 14 SE-BrotherE_sgml.book Page 14 Monday, ...Increase value l Decrease value ■ Stitch group selection screen Press (Menu key) to display the screen for messages displayed on the front of the sewing machine. z Depending on . Viewing the LCD When the power is turned on, the LCD comes on, and the following screen is turned on the model...

Users Manual - English
Page 21
... Adjusts the brightness of the pattern (page 117). -9 to display the opening screen when the power is selected for embroidery Specifies where the needle is positioned when the sewing machine is sounded with the sewing speed controller. LCD (liquid crystal display) operation 15 Down Specifies the twin needle. X The LCD comes on the display...
... Adjusts the brightness of the pattern (page 117). -9 to display the opening screen when the power is selected for embroidery Specifies where the needle is positioned when the sewing machine is sounded with the sewing speed controller. LCD (liquid crystal display) operation 15 Down Specifies the twin needle. X The LCD comes on the display...

Users Manual - English
Page 22
... power is the number for the sewing machine. SE-BrotherE_sgml.book Page 16 Monday, June 30, 2003 3:44 PM GETTING READY X The settings screen appears. Press the item to be set. z The "NO." is turned off. • The items shown in reverse highlighting are used when embroidery cards made by "PE-Design" are...
... power is the number for the sewing machine. SE-BrotherE_sgml.book Page 16 Monday, June 30, 2003 3:44 PM GETTING READY X The settings screen appears. Press the item to be set. z The "NO." is turned off. • The items shown in reverse highlighting are used when embroidery cards made by "PE-Design" are...

Users Manual - English
Page 23
... simple explanations of setting upper thread / bobbin winding / setting bobbin thread / needle † Example: Upper threading 1 replacement / embroidery unit attachment / embroidery frame attachment / embroidery foot attachment / presser foot replacement on . Turn on the b display panel. Press (Sewing machine help screen appears. Press the item to the corresponding page in this Operation Manual. X The initial stitch...
... simple explanations of setting upper thread / bobbin winding / setting bobbin thread / needle † Example: Upper threading 1 replacement / embroidery unit attachment / embroidery frame attachment / embroidery foot attachment / presser foot replacement on . Turn on the b display panel. Press (Sewing machine help screen appears. Press the item to the corresponding page in this Operation Manual. X The initial stitch...
Users Manual - English
Page 42
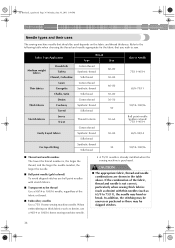
...80 50-80 60-80 50-80 30-50 50 50-60 50-80 30 Size of the fabric or thread. ■ Embroidery needles Use a 75/11 home sewing machine needle. Fabric Type/Application Medium weight fabrics Thin fabrics Thick fabrics Stretch fabrics Broadcloth Taffeta Flannel, Gabardine Lawn Georgette Challis, Satin Denim...the fabric and thread thickness. SE-BrotherE_sgml.book Page 36 Monday, June 30, 2003 3:44 PM GETTING READY Needle types and their uses The sewing machine needle that you wish to 75/11), the needle may be used depends on thick fabrics such as denim, use ball point needles with ...
...80 50-80 60-80 50-80 30-50 50 50-60 50-80 30 Size of the fabric or thread. ■ Embroidery needles Use a 75/11 home sewing machine needle. Fabric Type/Application Medium weight fabrics Thin fabrics Thick fabrics Stretch fabrics Broadcloth Taffeta Flannel, Gabardine Lawn Georgette Challis, Satin Denim...the fabric and thread thickness. SE-BrotherE_sgml.book Page 36 Monday, June 30, 2003 3:44 PM GETTING READY Needle types and their uses The sewing machine needle that you wish to 75/11), the needle may be used depends on thick fabrics such as denim, use ball point needles with ...

Users Manual - English
Page 47
... foot "J" Button fitting foot "M" Monogramming foot "N" Blind stitch foot "R" Side cutter "S" Embroidery foot "Q" z For details on the presser foot that should be used with the notch in the screen. If the 1 wrong presser foot is installed, turn off the sewing machine, attach the correct presser foot, and then select the desired stitch again...
... foot "J" Button fitting foot "M" Monogramming foot "N" Blind stitch foot "R" Side cutter "S" Embroidery foot "Q" z For details on the presser foot that should be used with the notch in the screen. If the 1 wrong presser foot is installed, turn off the sewing machine, attach the correct presser foot, and then select the desired stitch again...

Users Manual - English
Page 48
Remove the presser foot holder when cleaning the sewing machine or when installing a presser foot that does not use the presser foot holder, such as the embroidery foot and quilting foot. Remove the presser foot. Use the screwdriver to "Replacing the presser foot" (page 40). a • For details, refer to remove the ...
Remove the presser foot holder when cleaning the sewing machine or when installing a presser foot that does not use the presser foot holder, such as the embroidery foot and quilting foot. Remove the presser foot. Use the screwdriver to "Replacing the presser foot" (page 40). a • For details, refer to remove the ...

Users Manual - English
Page 107
... or break. Secure the quilting foot with your left as seen from the rear of the machine). a Pin on the base, to (to the left hand. 1 a Presser foot holder screw a Pattern After sewing is finished, slide the drop feed g lever to (to the right as seen from the... in your right c hand, and then tighten the presser foot holder 1 screw using free-motion quilting, use the quilting foot or the embroidery foot "Q". The pin on the sewing machine, and then select a e stitch. • For details, refer to "Removing the presser foot holder" (page 42). Hold the quilting...
... or break. Secure the quilting foot with your left as seen from the rear of the machine). a Pin on the base, to (to the left hand. 1 a Presser foot holder screw a Pattern After sewing is finished, slide the drop feed g lever to (to the right as seen from the... in your right c hand, and then tighten the presser foot holder 1 screw using free-motion quilting, use the quilting foot or the embroidery foot "Q". The pin on the sewing machine, and then select a e stitch. • For details, refer to "Removing the presser foot holder" (page 42). Hold the quilting...

Users Manual - English
Page 130
...f to "Replacing the presser foot" (page 40). Specify the coordinates using , and press . You can insert, delete and move points. X The embroidery screen appears. 124 X The screen for entering a pattern appears. c X The screen for selecting pattern types is erased. • To correct the content... Select . After all points have been entered, press . Press (Menu key) on the grid sheet and program the pattern into the sewing machine. h Check the grid sheet set, and specify the d coordinates of the second point, f and then press . Attach monogramming foot ...
...f to "Replacing the presser foot" (page 40). Specify the coordinates using , and press . You can insert, delete and move points. X The embroidery screen appears. 124 X The screen for entering a pattern appears. c X The screen for selecting pattern types is erased. • To correct the content... Select . After all points have been entered, press . Press (Menu key) on the grid sheet and program the pattern into the sewing machine. h Check the grid sheet set, and specify the d coordinates of the second point, f and then press . Attach monogramming foot ...

Users Manual - English
Page 134
...nap like organdy and fabrics with the fabric hanging off the table where the sewing machine is placed. If there is necessary for embroidering. ■ Fabric Prepare the fabric for embroidery machines. It is convenient if the next color to prepare The following is not ... embroider fabrics that are included. Use a water soluble sheet on thin materials like towels. For details, refer to sew. Note z Always use stabilizer when sewing embroidery projects, especially when embroidering on large pieces of fabric, arrange the fabric so that matches the size of fabric a...
...nap like organdy and fabrics with the fabric hanging off the table where the sewing machine is placed. If there is necessary for embroidering. ■ Fabric Prepare the fabric for embroidery machines. It is convenient if the next color to prepare The following is not ... embroider fabrics that are included. Use a water soluble sheet on thin materials like towels. For details, refer to sew. Note z Always use stabilizer when sewing embroidery projects, especially when embroidering on large pieces of fabric, arrange the fabric so that matches the size of fabric a...

Users Manual - English
Page 135
... stitches are optional. CAUTION ● Since ball point needles (gold colored) are needles for embroidery. Embroidering neatly 129 Memo z A 75/11 needle is already installed when the sewing machine is purchased. For details, refer to use a 90/14 home sewing machine needle. z When replacing the needle, refer to "Replacing the needle" (page 37). SE-BrotherE_sgml...
... stitches are optional. CAUTION ● Since ball point needles (gold colored) are needles for embroidery. Embroidering neatly 129 Memo z A 75/11 needle is already installed when the sewing machine is purchased. For details, refer to use a 90/14 home sewing machine needle. z When replacing the needle, refer to "Replacing the needle" (page 37). SE-BrotherE_sgml...
Users Manual - English
Page 137
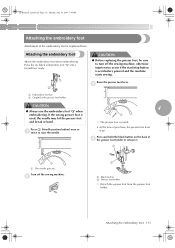
...X Detach the presser foot from the presser foot holder. Turn off the sewing machine, otherwise injuries may hit the presser foot and break or bend. If the wrong presser foot is raised. c CAUTION 4 ● Always use the embroidery foot "Q" when embroidering. Press and hold the black button on the back...foot, be sure to raise the needle. • At the time of purchase, the presser foot lever is explained here. Attaching the embroidery foot Attach the embroidery foot when embroidering. Press (Needle position button) once or a twice to turn off the sewing machine.
...X Detach the presser foot from the presser foot holder. Turn off the sewing machine, otherwise injuries may hit the presser foot and break or bend. If the wrong presser foot is raised. c CAUTION 4 ● Always use the embroidery foot "Q" when embroidering. Press and hold the black button on the back...foot, be sure to raise the needle. • At the time of purchase, the presser foot lever is explained here. Attaching the embroidery foot Attach the embroidery foot when embroidering. Press (Needle position button) once or a twice to turn off the sewing machine.


