
Users Manual - English
Page 8
... Failure to remove the Toner Cartridge (and Toner Drum Unit on applicable models) during shipping. Internet support: support@brother.ca or browse Brother's Web Site: www.brother.com Brother International Corporation (Canada) Ltd. 1 Rue Hôtel de Ville Dollard-Des-Ormeaux, QC H9B 3H6 vi LIMITED WARRANTY...operate properly. This Limited Warranty gives you specific legal rights and you . Within Montreal, please call 1-877-BROTHER. This Limited Warranty does not include cleaning, consumables (including, without the ink cartridges will VOID your warranty. (Refer to you may not apply to...
... Failure to remove the Toner Cartridge (and Toner Drum Unit on applicable models) during shipping. Internet support: support@brother.ca or browse Brother's Web Site: www.brother.com Brother International Corporation (Canada) Ltd. 1 Rue Hôtel de Ville Dollard-Des-Ormeaux, QC H9B 3H6 vi LIMITED WARRANTY...operate properly. This Limited Warranty gives you specific legal rights and you . Within Montreal, please call 1-877-BROTHER. This Limited Warranty does not include cleaning, consumables (including, without the ink cartridges will VOID your warranty. (Refer to you may not apply to...
Users Manual - English
Page 9
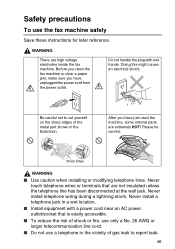
... wiring during a lightning storm. WARNING There are not insulated unless the telephone line has been disconnected at the wall jack. Before you clean the fax machine or clear a paper jam, make sure you have unplugged the power cord from the power outlet. Do not handle the plug with... WARNING ■ Use caution when installing or modifying telephone lines. vii Please be careful. After you have just used the machine, some internal parts are extremely HOT! Never install a telephone jack in the illustration. Be careful not to cut yourself on the sharp edges of gas...
... wiring during a lightning storm. WARNING There are not insulated unless the telephone line has been disconnected at the wall jack. Before you clean the fax machine or clear a paper jam, make sure you have unplugged the power cord from the power outlet. Do not handle the plug with... WARNING ■ Use caution when installing or modifying telephone lines. vii Please be careful. After you have just used the machine, some internal parts are extremely HOT! Never install a telephone jack in the illustration. Be careful not to cut yourself on the sharp edges of gas...

Users Manual - English
Page 17
... Jam or Paper Jam 12-3 Original Jam 12-3 Paper Jam 12-4 If you are having difficulty with the fax machine ....... 12-6 How to improve print quality 12-8 Cleaning the print head 12-8 Clean the print head when you want to improve the print quality and also as part of your routine maintenance... 12-8 Packing and shipping the fax machine 12-10 Routine maintenance 12-11 Cleaning the scanner 12-11 Changing the ribbon ...
... Jam or Paper Jam 12-3 Original Jam 12-3 Paper Jam 12-4 If you are having difficulty with the fax machine ....... 12-6 How to improve print quality 12-8 Cleaning the print head 12-8 Clean the print head when you want to improve the print quality and also as part of your routine maintenance... 12-8 Packing and shipping the fax machine 12-10 Routine maintenance 12-11 Cleaning the scanner 12-11 Changing the ribbon ...

Users Manual - English
Page 117
The openings should be operated from the type of the product and to protect it from the wall outlet before cleaning. This plug will block received faxes. Use a damp cloth for ventilation; If you are not sure of the type of power available, call your electrician to insert the plug ... be placed near water. 6 Do not place this product on the products plugged into only a grounding-type power outlet. If you are provided for cleaning. 5 Do not use liquid or aerosol cleaners. This is provided. 8 This product should never be blocked by placing the product on the label. ...
The openings should be operated from the type of the product and to protect it from the wall outlet before cleaning. This plug will block received faxes. Use a damp cloth for ventilation; If you are not sure of the type of power available, call your electrician to insert the plug ... be placed near water. 6 Do not place this product on the products plugged into only a grounding-type power outlet. If you are provided for cleaning. 5 Do not use liquid or aerosol cleaners. This is provided. 8 This product should never be blocked by placing the product on the label. ...

Users Manual - English
Page 126
...to make sure the curled handset cord is not in FAX/TEL mode The fax machine knows the incoming call is not a fax so it is signaling you have answered the fax machine handset, press Fax Start and hang up immediately. Pick up . Brother's ECM feature should help overcome this problem by turning Easy... Stop/Exit if you are at an extension phone, press your business, we recommend a separate phone line with the fax machine, it is 51). Wait to FINE or S.FINE. Clean the scanner's white roller and the glass strip under the roller using isopropyl alcohol and a lint-free cloth. (See...
...to make sure the curled handset cord is not in FAX/TEL mode The fax machine knows the incoming call is not a fax so it is signaling you have answered the fax machine handset, press Fax Start and hang up immediately. Pick up . Brother's ECM feature should help overcome this problem by turning Easy... Stop/Exit if you are at an extension phone, press your business, we recommend a separate phone line with the fax machine, it is 51). Wait to FINE or S.FINE. Clean the scanner's white roller and the glass strip under the roller using isopropyl alcohol and a lint-free cloth. (See...

Users Manual - English
Page 127
Sharp Edge TROUBLESHOOTING AND ROUTINE MAINTENANCE 12 - 8 So please be careful. Be careful not to improve the print quality and also as part of your routine maintenance. 1 Unplug the power cord for safety. 2 Open the top cover by lifting the lever on the sharp edges of the metal part shown in the illustration. How to improve print quality Cleaning the print head Clean the print head when you have just used the machine, some internal parts of the machine are extremely HOT! WARNING After you want to cut yourself on the right side of the top cover.
Sharp Edge TROUBLESHOOTING AND ROUTINE MAINTENANCE 12 - 8 So please be careful. Be careful not to improve the print quality and also as part of your routine maintenance. 1 Unplug the power cord for safety. 2 Open the top cover by lifting the lever on the sharp edges of the metal part shown in the illustration. How to improve print quality Cleaning the print head Clean the print head when you have just used the machine, some internal parts of the machine are extremely HOT! WARNING After you want to cut yourself on the right side of the top cover.

Users Manual - English
Page 128
3 Take out the printing cartridge. 4 To clean your machine's print head, wipe the print head with a lint-free cloth that is dry or lightly moistened with isopropyl alcohol. 5 Wait until the alcohol on the print head is totally dried. 6 Install the printing cartridge. (See Changing the ribbon on both sides of the top cover until it clicks. 12 - 9 TROUBLESHOOTING AND ROUTINE MAINTENANCE Press down on page 12-12.) 7 Close the top cover.
3 Take out the printing cartridge. 4 To clean your machine's print head, wipe the print head with a lint-free cloth that is dry or lightly moistened with isopropyl alcohol. 5 Wait until the alcohol on the print head is totally dried. 6 Install the printing cartridge. (See Changing the ribbon on both sides of the top cover until it clicks. 12 - 9 TROUBLESHOOTING AND ROUTINE MAINTENANCE Press down on page 12-12.) 7 Close the top cover.

Users Manual - English
Page 130
Routine maintenance Cleaning the scanner 1 Unplug the power cord for safety. 2 Open the top cover by lifting the lever on a lint-free cloth. Be careful not to bend the spring plate or drop anything into your fax machine. White Bar Glass Strip 4 Close the top cover. Press down on both sides of the top cover. 3 Clean the white bar and the glass strip under the bar with isopropyl alcohol on the right side of the top cover until it clicks. 12 - 11 TROUBLESHOOTING AND ROUTINE MAINTENANCE
Routine maintenance Cleaning the scanner 1 Unplug the power cord for safety. 2 Open the top cover by lifting the lever on a lint-free cloth. Be careful not to bend the spring plate or drop anything into your fax machine. White Bar Glass Strip 4 Close the top cover. Press down on both sides of the top cover. 3 Clean the white bar and the glass strip under the bar with isopropyl alcohol on the right side of the top cover until it clicks. 12 - 11 TROUBLESHOOTING AND ROUTINE MAINTENANCE

Users Manual - English
Page 141
... 6-3 Answering machine (TAD) 1-11, 5-1 Automatic dialing 7-6 fax receive 5-1 fax redial 6-7 transmission 6-3 B Broadcasting 6-12 setting up Groups 7-5 Brother accessories and supplies .....ii Brother numbers i Customer Service i fax back system ii frequently asked questions (FAQs i product support i...ID (printing Log) ......5-16 Caller ID (viewing Log) ......5-16 Canceling a scheduled fax job ...........6-8 Fax Forwarding 8-6 Paging 8-6 while scanning a fax .........6-8 Cleaning 12-8 scanner 12-11 Connecting external TAD 1-11 external telephone ..........1-10 Control panel,...
... 6-3 Answering machine (TAD) 1-11, 5-1 Automatic dialing 7-6 fax receive 5-1 fax redial 6-7 transmission 6-3 B Broadcasting 6-12 setting up Groups 7-5 Brother accessories and supplies .....ii Brother numbers i Customer Service i fax back system ii frequently asked questions (FAQs i product support i...ID (printing Log) ......5-16 Caller ID (viewing Log) ......5-16 Canceling a scheduled fax job ...........6-8 Fax Forwarding 8-6 Paging 8-6 while scanning a fax .........6-8 Cleaning 12-8 scanner 12-11 Connecting external TAD 1-11 external telephone ..........1-10 Control panel,...

Users Manual - English
Page 143
... TAD (answering machine) 1-11 triplex adapter 1-14 Jams 12-3 L LCD (Liquid Crystal Display) 1-5, 3-1 M Maintenance, routine ...... 12-11 changing the ribbon ...... 12-12 cleaning scanner .......... 12-11 Manual dialing 7-6 receive 5-1 transmission 6-4 Memory Status List 9-3 Memory Storage ..........3-1, 4-8 Menu Selection Table 3-1, 3-4 to 3-7 N Navigation keys 3-2 O One-Touch...11 Power failure 3-1 Print Caller ID Log 5-16 Cover Page 6-11 difficulties 12-6 fax from memory 5-10 improving quality 12-8 jams 12-3 Q Quick-Dial List 9-3 Quick-Dial numbers 7-1 R Receive Mode 5-2...
... TAD (answering machine) 1-11 triplex adapter 1-14 Jams 12-3 L LCD (Liquid Crystal Display) 1-5, 3-1 M Maintenance, routine ...... 12-11 changing the ribbon ...... 12-12 cleaning scanner .......... 12-11 Manual dialing 7-6 receive 5-1 transmission 6-4 Memory Status List 9-3 Memory Storage ..........3-1, 4-8 Menu Selection Table 3-1, 3-4 to 3-7 N Navigation keys 3-2 O One-Touch...11 Power failure 3-1 Print Caller ID Log 5-16 Cover Page 6-11 difficulties 12-6 fax from memory 5-10 improving quality 12-8 jams 12-3 Q Quick-Dial List 9-3 Quick-Dial numbers 7-1 R Receive Mode 5-2...


