
Users Manual - English
Page 37
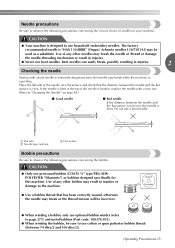
... dangerous since the needle may break the needle or thread or damage the needle-threading mechanism or result in injuries. 2 Checking the needle Sewing with a new one. (Refer to use bent needles. COATS L Polyester ● When winding a bobbin, only use optional bobbin winder (refer to use prewound bobbin (COATS "L" type/TRU...
... dangerous since the needle may break the needle or thread or damage the needle-threading mechanism or result in injuries. 2 Checking the needle Sewing with a new one. (Refer to use bent needles. COATS L Polyester ● When winding a bobbin, only use optional bobbin winder (refer to use prewound bobbin (COATS "L" type/TRU...
Users Manual - English
Page 42
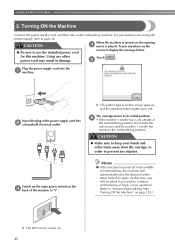
... power supply cord into 2 a household electrical outlet. Insert the plug of embroidering, the machine will be asked if you wish to continue embroidering or begin a new operation. (Refer to "Resume Embroidering After Turning Off the Machine" on page 120.) X The LCD screen comes on the ● Be sure to use the...
... power supply cord into 2 a household electrical outlet. Insert the plug of embroidering, the machine will be asked if you wish to continue embroidering or begin a new operation. (Refer to "Resume Embroidering After Turning Off the Machine" on page 120.) X The LCD screen comes on the ● Be sure to use the...
Users Manual - English
Page 65
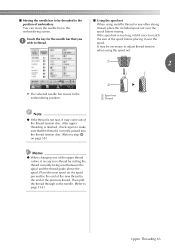
.... If the spool net is correctly passed into the thread tension disc. (Refer to step 6 on the spool pin and tie the end of the new thread to the end of the previous thread. After upper threading is easy to re-thread by cutting the thread currently being used between the... over the spool. Note ● If the thread is not taut, it may be threaded to the position of the spool before sewing. Place the new spool on page 58.) Memo ● When changing one of the thread tension disc. Then pull the thread through to the needle. (Refer to the...
.... If the spool net is correctly passed into the thread tension disc. (Refer to step 6 on the spool pin and tie the end of the new thread to the end of the previous thread. After upper threading is easy to re-thread by cutting the thread currently being used between the... over the spool. Note ● If the thread is not taut, it may be threaded to the position of the spool before sewing. Place the new spool on page 58.) Memo ● When changing one of the thread tension disc. Then pull the thread through to the needle. (Refer to the...
Users Manual - English
Page 68
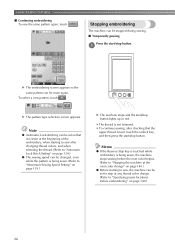
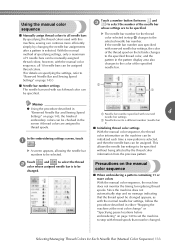
... is sewn at any thread color change " on page 140.) ● Before starting to "Specifying pause locations before embroidering" on page 140.) 66 To select a new pattern, touch . X The pattern type selection screen appears. Memo ● If the Reserve Stop key is touched while embroidery is being sewn. (Refer to "Maximum...
... is sewn at any thread color change " on page 140.) ● Before starting to "Specifying pause locations before embroidering" on page 140.) 66 To select a new pattern, touch . X The pattern type selection screen appears. Memo ● If the Reserve Stop key is touched while embroidery is being sewn. (Refer to "Maximum...
Users Manual - English
Page 90
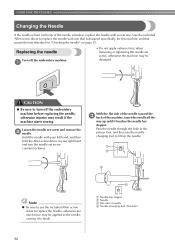
... bar stopper. OTHER BASIC PROCEDURES Changing the Needle If the needle is bent or the tip of the needle is broken, replace the needle with a new one that is designed specifically for this machine and that passes the test described in "Checking the needle" on page 35. Pass the needle through...
... bar stopper. OTHER BASIC PROCEDURES Changing the Needle If the needle is bent or the tip of the needle is broken, replace the needle with a new one that is designed specifically for this machine and that passes the test described in "Checking the needle" on page 35. Pass the needle through...

Users Manual - English
Page 109
Then, touch again. 3 Touch . 9 Touch , and then press the start/ 0 stop button to start embroidering. Touch . 8 Note ● If the following error message appears, touch , remove the embroidery positioning sticker, and then affix it within the embroidering area. Note ● After all of the included embroidery positioning stickers have been used, new ones can be purchased separately. Aligning the Embroidering Position 107 When purchasing new ones, check "Optional accessories" on page 24 for the part code, and then contact your nearest authorized Brother dealer.
Then, touch again. 3 Touch . 9 Touch , and then press the start/ 0 stop button to start embroidering. Touch . 8 Note ● If the following error message appears, touch , remove the embroidery positioning sticker, and then affix it within the embroidering area. Note ● After all of the included embroidery positioning stickers have been used, new ones can be purchased separately. Aligning the Embroidering Position 107 When purchasing new ones, check "Optional accessories" on page 24 for the part code, and then contact your nearest authorized Brother dealer.
Users Manual - English
Page 112
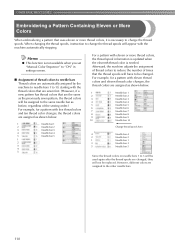
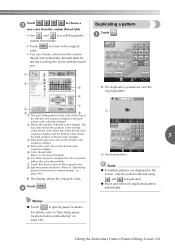
... as shown below. 1 Needle bar 1 2 Needle bar 2 3 Needle bar 3 4 Needle bar 4 5 Needle bar 5 1 2 3 4 5 For a pattern with the thread colors that are sewn first. (However, if a new pattern has thread colors that are the same as the previously sewn pattern, the thread colors will be assigned to the same needle bar as...
... as shown below. 1 Needle bar 1 2 Needle bar 2 3 Needle bar 3 4 Needle bar 4 5 Needle bar 5 1 2 3 4 5 For a pattern with the thread colors that are sewn first. (However, if a new pattern has thread colors that are the same as the previously sewn pattern, the thread colors will be assigned to the same needle bar as...
Users Manual - English
Page 115
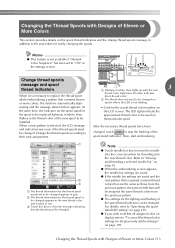
...the thread spools according to stop the flashing of the spool stand indicator. After the necessary thread spools have been changed, touch to their new assignments. When a new pattern is necessary to "Specifying the spool stand LED setting" on page 230. ● If you if the thread spools must be ... the spool thread indicator can be assigned the same thread colors from the previous pattern. ● The settings for threading into the new thread color. The LED lights indicate the approximate thread color to be used on spools where the LED is opened contains thread colors ...
...the thread spools according to stop the flashing of the spool stand indicator. After the necessary thread spools have been changed, touch to their new assignments. When a new pattern is necessary to "Specifying the spool stand LED setting" on page 230. ● If you if the thread spools must be ... the spool thread indicator can be assigned the same thread colors from the previous pattern. ● The settings for threading into the new thread color. The LED lights indicate the approximate thread color to be used on spools where the LED is opened contains thread colors ...
Users Manual - English
Page 116
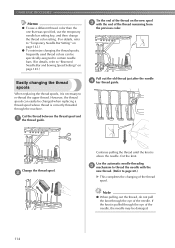
... the temporary needle bar setting key, and then change the thread color setting. (For details, refer to "Temporary Needle Bar Setting" on the new spool 3 with the new thread. (Refer to re-thread the upper thread. Easily changing the thread spools When replacing the thread spools, it is above the needle. Pull...
... the temporary needle bar setting key, and then change the thread color setting. (For details, refer to "Temporary Needle Bar Setting" on the new spool 3 with the new thread. (Refer to re-thread the upper thread. Easily changing the thread spools When replacing the thread spools, it is above the needle. Pull...

Users Manual - English
Page 122
... power switch to "I" to turn off appears. Touch . 3 1 2 1 Touch to cancel embroidering and display the pattern type selection screen to select a new pattern. 2 Touch to continue embroidering or start a new operation. 120 OTHER BASIC PROCEDURES Resume Embroidering After Turning Off the Machine In either of the following cases, the remaining stitches of...
... power switch to "I" to turn off appears. Touch . 3 1 2 1 Touch to cancel embroidering and display the pattern type selection screen to select a new pattern. 2 Touch to continue embroidering or start a new operation. 120 OTHER BASIC PROCEDURES Resume Embroidering After Turning Off the Machine In either of the following cases, the remaining stitches of...
Users Manual - English
Page 135
... not monitor the timing for replacing thread spools. color information on page 145.) ■ Needle bar number settings The needle bar used with each time a new pattern is to be changed . Touch a number button (between and 3 ) to select the number of the needle bar whose assigned needle bar is selected, and...
... not monitor the timing for replacing thread spools. color information on page 145.) ■ Needle bar number settings The needle bar used with each time a new pattern is to be changed . Touch a number button (between and 3 ) to select the number of the needle bar whose assigned needle bar is selected, and...

Users Manual - English
Page 137
... the next time that the machine is selected. 3 Touch this key to close this screen. Touch . 1 ■ Specifying the starting position Touch the key for a new setting is purchased, both the starting 2 position setting. Starting/Ending Position Settings The machine can be used to repeatedly sew a pattern along a diagonal. Those are...
... the next time that the machine is selected. 3 Touch this key to close this screen. Touch . 1 ■ Specifying the starting position Touch the key for a new setting is purchased, both the starting 2 position setting. Starting/Ending Position Settings The machine can be used to repeatedly sew a pattern along a diagonal. Those are...
Users Manual - English
Page 141
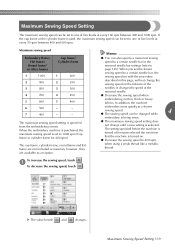
... is specified from the embroidering screen. In addition, the machine embroiders more quietly at every 50 spm between 400 and 1000 spm. X The value beside and changes. If the cap frame or the cylinder frame is used, the maximum sewing... are available as an option. When you set the slower sewing speed to a certain needle bar, the sewing speed set to 1000 spm (Cap frame or cylinder frame for 400 spm). To increase the sewing speed, touch . 1 To decrease the sewing speed... a maximum sewing speed to a certain needle bar in this page, will not change until a new setting is selected.
... is specified from the embroidering screen. In addition, the machine embroiders more quietly at every 50 spm between 400 and 1000 spm. X The value beside and changes. If the cap frame or the cylinder frame is used, the maximum sewing... are available as an option. When you set the slower sewing speed to a certain needle bar, the sewing speed set to 1000 spm (Cap frame or cylinder frame for 400 spm). To increase the sewing speed, touch . 1 To decrease the sewing speed... a maximum sewing speed to a certain needle bar in this page, will not change until a new setting is selected.
Users Manual - English
Page 142
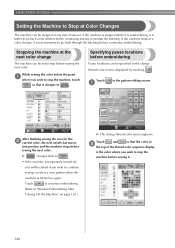
... pause locations before continuing sewing to go back a few stitches before embroidering Pause locations can be asked if you wish to continue sewing or select a new pattern when the machine is better to go back through the stitching before the point 1 where you wish to "Resume Embroidering After Turning Off the...
... pause locations before continuing sewing to go back a few stitches before embroidering Pause locations can be asked if you wish to continue sewing or select a new pattern when the machine is better to go back through the stitching before the point 1 where you wish to "Resume Embroidering After Turning Off the...
Users Manual - English
Page 143
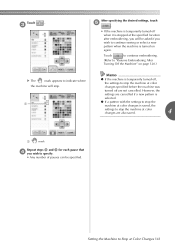
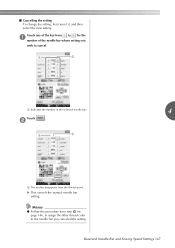
...Machine to Stop at color changes are also saved. 4 1 mark Repeat steps 2 and 3 for each pause that 4 you wish to continue sewing or select a new pattern when the machine is turned on page 120.) X The mark appears to indicate where the machine will stop. 1 Memo ● If the machine is... saved, the settings to stop the machine at color changes specified before the machine was turned off are cancelled if a new pattern is selected. ● If a pattern with the settings to stop the machine at color changes is temporarily turned off when it is stopped ...
...Machine to Stop at color changes are also saved. 4 1 mark Repeat steps 2 and 3 for each pause that 4 you wish to continue sewing or select a new pattern when the machine is turned on page 120.) X The mark appears to indicate where the machine will stop. 1 Memo ● If the machine is... saved, the settings to stop the machine at color changes specified before the machine was turned off are cancelled if a new pattern is selected. ● If a pattern with the settings to stop the machine at color changes is temporarily turned off when it is stopped ...
Users Manual - English
Page 149
Memo ● Follow the procedure from the thread spool. ■ Cancelling the setting To change the setting, first cancel it, and then select the new setting. X This cancels the manual needle bar setting. Reserved Needle Bar and Sewing Speed Settings 147 Touch any of the key from to for the 1 number of the selected needle bar 4 Touch . 2 1 1 The anchor disappears from step 3 on page 146, to assign the other thread color to cancel. 1 1 Indicates the number of the needle bar whose setting you wish to the needle bar you canceled the setting.
Memo ● Follow the procedure from the thread spool. ■ Cancelling the setting To change the setting, first cancel it, and then select the new setting. X This cancels the manual needle bar setting. Reserved Needle Bar and Sewing Speed Settings 147 Touch any of the key from to for the 1 number of the selected needle bar 4 Touch . 2 1 1 The anchor disappears from step 3 on page 146, to assign the other thread color to cancel. 1 1 Indicates the number of the needle bar whose setting you wish to the needle bar you canceled the setting.
Users Manual - English
Page 159
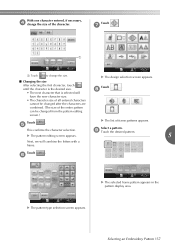
... an Embroidery Pattern 157 X The list of frame patterns appears. 5 This confirms the character selection. X The pattern editing screen appears. 5 Next, we will have the new character size. • The character size of all entered characters cannot be changed after the characters are combined. (The size of the entire pattern can...
... an Embroidery Pattern 157 X The list of frame patterns appears. 5 This confirms the character selection. X The pattern editing screen appears. 5 Next, we will have the new character size. • The character size of all entered characters cannot be changed after the characters are combined. (The size of the entire pattern can...
Users Manual - English
Page 162
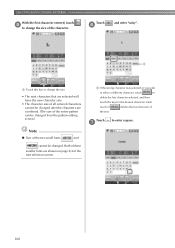
... changed . SELECTING/EDITING/SAVING PATTERNS With the first character entered, touch 5 to change the size. • The next characters that are selected will have the new character size. • The character size of the font selection screen. 1 If the wrong character was selected or you wish to select a different character, touch...
... changed . SELECTING/EDITING/SAVING PATTERNS With the first character entered, touch 5 to change the size. • The next characters that are selected will have the new character size. • The character size of the font selection screen. 1 If the wrong character was selected or you wish to select a different character, touch...
Users Manual - English
Page 193
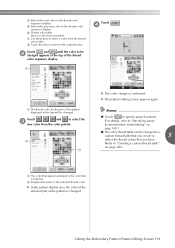
... at the top will be changed to a custom thread table that you create to 5 reflect the thread colors that you have. (Refer to select the 3 new color from the thread color table. 8 Touch this key to return to "Specifying pause locations before embroidering" on page 140.) ● The color thread table...
... at the top will be changed to a custom thread table that you create to 5 reflect the thread colors that you have. (Refer to select the 3 new color from the thread color table. 8 Touch this key to return to "Specifying pause locations before embroidering" on page 140.) ● The color thread table...
Users Manual - English
Page 205
For details, refer to "Specifying pause locations before embroidering" on page 140. Memo ● Touch to specify pause locations. Touch 3 to choose a new color from the custom thread table. • Use and to scroll through the custom thread table. • Touch to return to the original color. • ...
For details, refer to "Specifying pause locations before embroidering" on page 140. Memo ● Touch to specify pause locations. Touch 3 to choose a new color from the custom thread table. • Use and to scroll through the custom thread table. • Touch to return to the original color. • ...


