Users Manual - English
Page 1
KNOWING YOUR SEWING MACHINE SEWING BASICS UTILITY STITCHES APPENDIX Computerized Sewing Machine Operation Manual
KNOWING YOUR SEWING MACHINE SEWING BASICS UTILITY STITCHES APPENDIX Computerized Sewing Machine Operation Manual
Users Manual - English
Page 2
... fabric while stitching. SAVE THESE INSTRUCTIONS This machine is not intended for household use by or near children. 2. DANGER - Always unplug the machine from the electrical...needle area, such as described in . This sewing machine is intended for use . Never operate the machine with this machine. 18. Do not operate where aerosol (...machine and foot control free from the accumulation of electric shock: 1. Use this machine only for examination, repair, electrical or mechanical adjustment. 4. Return the machine to break. 12. If the Light unit is required around the machine...
... fabric while stitching. SAVE THESE INSTRUCTIONS This machine is not intended for household use by or near children. 2. DANGER - Always unplug the machine from the electrical...needle area, such as described in . This sewing machine is intended for use . Never operate the machine with this machine. 18. Do not operate where aerosol (...machine and foot control free from the accumulation of electric shock: 1. Use this machine only for examination, repair, electrical or mechanical adjustment. 4. Return the machine to break. 12. If the Light unit is required around the machine...
Users Manual - English
Page 4
... not store anything on the needle while sewing. When storing this manual and specifications of the most advanced computerized household sewing machines. Be sure to assure correct installation. Do not use or store the machine near a space heater, iron, halogen lamp, or other parts to keep your local authorized Brother dealer. For additional product information and...
... not store anything on the needle while sewing. When storing this manual and specifications of the most advanced computerized household sewing machines. Be sure to assure correct installation. Do not use or store the machine near a space heater, iron, halogen lamp, or other parts to keep your local authorized Brother dealer. For additional product information and...
Users Manual - English
Page 5
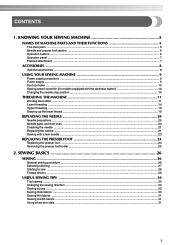
SEWING BASICS 26 SEWING ...26 General sewing procedure ...26 Selecting stitching ...27 Starting to sew ...28 Thread tension ...29 USEFUL SEWING TIPS ...30 Trial sewing ...30 Changing the sewing direction ...30 Sewing curves ...30 Sewing thick fabrics ...30 Sewing thin fabrics ...31 Sewing stretch fabrics ...31 Using a free-arm style ...31 3 KNOWING YOUR SEWING MACHINE 5 NAMES OF MACHINE PARTS AND THEIR FUNCTIONS 5 The main parts ...5 Needle and presser foot...
SEWING BASICS 26 SEWING ...26 General sewing procedure ...26 Selecting stitching ...27 Starting to sew ...28 Thread tension ...29 USEFUL SEWING TIPS ...30 Trial sewing ...30 Changing the sewing direction ...30 Sewing curves ...30 Sewing thick fabrics ...30 Sewing thin fabrics ...31 Sewing stretch fabrics ...31 Using a free-arm style ...31 3 KNOWING YOUR SEWING MACHINE 5 NAMES OF MACHINE PARTS AND THEIR FUNCTIONS 5 The main parts ...5 Needle and presser foot...
Users Manual - English
Page 7
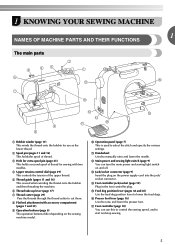
... manually raise and lower the needle. j Operation panel (page 7) This is used to select the stitch and specify the various settings. 1 KNOWING YOUR SEWING MACHINE 1 NAMES OF MACHINE PARTS AND THEIR FUNCTIONS The main parts a Bobbin winder (page 11) This winds the thread onto the bobbin for use... this to control the sewing speed, and to start and stop sewing. 5 c Hole for extra spool pin (page 23)...
... manually raise and lower the needle. j Operation panel (page 7) This is used to select the stitch and specify the various settings. 1 KNOWING YOUR SEWING MACHINE 1 NAMES OF MACHINE PARTS AND THEIR FUNCTIONS The main parts a Bobbin winder (page 11) This winds the thread onto the bobbin for use... this to control the sewing speed, and to start and stop sewing. 5 c Hole for extra spool pin (page 23)...
Users Manual - English
Page 8
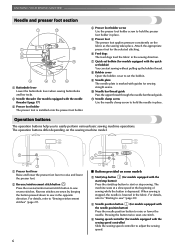
... direction. k Needle clamp screw Use the needle clamp screw to sew reverse stitches. Pressing the button twice sews one stitch. e Presser foot The presser foot applies pressure consistently on the sewing machine model. Attach the appropriate presser foot for models equipped with the ... foot holder. b Reverse/reinforcement stitch button Press the reverse/reinforcement stitch button to hold the presser foot holder in place. KNOWING YOUR SEWING MACHINE Needle and presser foot section a Buttonhole lever Lower the buttonhole lever when sewing buttonholes and bar tacks. f ...
... direction. k Needle clamp screw Use the needle clamp screw to sew reverse stitches. Pressing the button twice sews one stitch. e Presser foot The presser foot applies pressure consistently on the sewing machine model. Attach the appropriate presser foot for models equipped with the ... foot holder. b Reverse/reinforcement stitch button Press the reverse/reinforcement stitch button to hold the presser foot holder in place. KNOWING YOUR SEWING MACHINE Needle and presser foot section a Buttonhole lever Lower the buttonhole lever when sewing buttonholes and bar tacks. f ...
Users Manual - English
Page 9
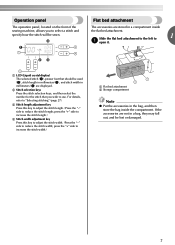
press the "+" side to increase the stitch length.) d Stitch width adjustment key Press this key to adjust the stitch length. (Press the "-" side to reduce the stitch length; b Stitch selection keys Press the stitch selection keys, and then select the number for the stitch that should be used (2), stitch length in millimeters (3), and stitch width in millimeters (4) are not in... store the bag inside the flat bed attachment. For details, refer to 1 a open it. Operation panel The operation panel, located on the front of the sewing machine, allows you wish to use.
press the "+" side to increase the stitch length.) d Stitch width adjustment key Press this key to adjust the stitch length. (Press the "-" side to reduce the stitch length; b Stitch selection keys Press the stitch selection keys, and then select the number for the stitch that should be used (2), stitch length in millimeters (3), and stitch width in millimeters (4) are not in... store the bag inside the flat bed attachment. For details, refer to 1 a open it. Operation panel The operation panel, located on the front of the sewing machine, allows you wish to use.
Users Manual - English
Page 10
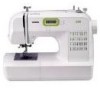
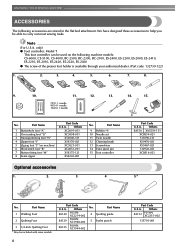
only) ● Foot controller: Model T This foot controller can be used on machine) 6 Blind stitch foot "R" 7 Button fitting foot "M" 8 Seam ripper Part Code U.S.A. Part Name 9 Bobbin (4) 10 Needle set 11 Twin needle 12 Cleaning brush 13 Screwdriver 14 Extra... X54243-001 No. Part Name 1 Walking Foot 2 Quilting Foot 3 1/4-Inch Quilting Foot * May be able to carry out most sewing tasks. Note (For U.S.A. Part Code U.S.A. KNOWING YOUR SEWING MACHINE ACCESSORIES The following machine models: CS-6000, CS-5100, CS-4000, BC-2500, BC-2300, BC-2100, ES-2400, ES-2200, ES-2000, ...
only) ● Foot controller: Model T This foot controller can be used on machine) 6 Blind stitch foot "R" 7 Button fitting foot "M" 8 Seam ripper Part Code U.S.A. Part Name 9 Bobbin (4) 10 Needle set 11 Twin needle 12 Cleaning brush 13 Screwdriver 14 Extra... X54243-001 No. Part Name 1 Walking Foot 2 Quilting Foot 3 1/4-Inch Quilting Foot * May be able to carry out most sewing tasks. Note (For U.S.A. Part Code U.S.A. KNOWING YOUR SEWING MACHINE ACCESSORIES The following machine models: CS-6000, CS-5100, CS-4000, BC-2500, BC-2300, BC-2100, ES-2400, ES-2200, ES-2000, ...
Users Manual - English
Page 11
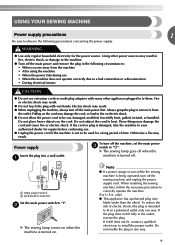
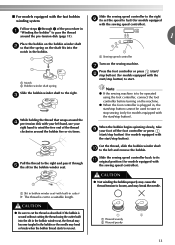
... grasp the plug to correctly operate the machine. (For U.S.A. If the cord or plug is intended to "I". X The sewing lamp goes off when the machine is being operated, turn off the sewing machine and unplug the power supply cord. When restarting the sewing machine, follow the necessary procedure to remove it... sure to install the proper outlet. Power supply Insert the plug into a wall outlet. Note ● If a power outage occurs while the sewing machine is turned off the main power first. If the plug does not fit fully in any way. 9 Fire or electric shock may result. &#...
... grasp the plug to correctly operate the machine. (For U.S.A. If the cord or plug is intended to "I". X The sewing lamp goes off when the machine is being operated, turn off the sewing machine and unplug the power supply cord. When restarting the sewing machine, follow the necessary procedure to remove it... sure to install the proper outlet. Power supply Insert the plug into a wall outlet. Note ● If a power outage occurs while the sewing machine is turned off the main power first. If the plug does not fit fully in any way. 9 Fire or electric shock may result. &#...
Users Manual - English
Page 12
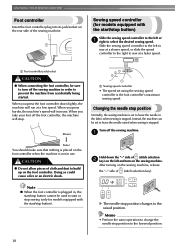
... the start /stop . Turn off the sewing machine in the fabric when sewing is stopped. Sewing speed controller (for models equipped with the start /stop position Normally, the sewing machine is set to prevent the machine from accidentally being started. After turning on the sewing machine, release the "-" side of (stitch selection b key) on the sewing machine. Doing so could cause a fire...
... the start /stop . Turn off the sewing machine in the fabric when sewing is stopped. Sewing speed controller (for models equipped with the start /stop position Normally, the sewing machine is set to prevent the machine from accidentally being started. After turning on the sewing machine, release the "-" side of (stitch selection b key) on the sewing machine. Doing so could cause a fire...

Users Manual - English
Page 13
... not work properly. b CAUTION ● If the spool of the thread through the hole on c the bobbin from other bobbins may tangle on the sewing machine. a Pre-tension disk b Bobbin winder shaft c Bobbin CAUTION ● Only use bobbins from the inside of the bobbin Turn on the spool pin. If... you use bobbins (part code: SA156, SFB: XA5539-151) that comes with this sewing machine. Turn the bobbin clockwise, by hand, until the spring on the shaft slides into the groove of the bobbin. 1 2 a Spring on the shaft b ...
... not work properly. b CAUTION ● If the spool of the thread through the hole on c the bobbin from other bobbins may tangle on the sewing machine. a Pre-tension disk b Bobbin winder shaft c Bobbin CAUTION ● Only use bobbins from the inside of the bobbin Turn on the spool pin. If... you use bobbins (part code: SA156, SFB: XA5539-151) that comes with this sewing machine. Turn the bobbin clockwise, by hand, until the spring on the shaft slides into the groove of the bobbin. 1 2 a Spring on the shaft b ...
Users Manual - English
Page 14
...needle to wind the thread around the bobbin a few times. Cut the thread, slide the bobbin winder shaft k to the right. KNOWING YOUR SEWING MACHINE While holding the end of the thread, gently f press the foot controller or press (start/ stop button) (for models equipped with the ...start . Then stop the machine. Slide the sewing speed controller to the right h (to set the speed to fast). (For models equipped with the sewing speed controller.) Memo ● When the sewing machine is started or the handwheel is not a malfunction. ● The ...
...needle to wind the thread around the bobbin a few times. Cut the thread, slide the bobbin winder shaft k to the right. KNOWING YOUR SEWING MACHINE While holding the end of the thread, gently f press the foot controller or press (start/ stop button) (for models equipped with the ...start . Then stop the machine. Slide the sewing speed controller to the right h (to set the speed to fast). (For models equipped with the sewing speed controller.) Memo ● When the sewing machine is started or the handwheel is not a malfunction. ● The ...
Users Manual - English
Page 15
... the right f (to set the speed to fast) (for models equipped with the start/stop button). c While holding the thread that the spring on the sewing machine. g Press the foot controller or press (start/ h stop button) to start. Cut the thread, slide the bobbin winder shaft j to its k original position (for ... When the foot controller is plugged in the bobbin or the needle may break the needle. CAUTION ● Be sure to cut to wind the free end of the procedure in the bobbin. a Slit in bobbin winder seat (with your left and remove the bobbin. When the bobbin begins spinning ...
... the right f (to set the speed to fast) (for models equipped with the start/stop button). c While holding the thread that the spring on the sewing machine. g Press the foot controller or press (start/ h stop button) to start. Cut the thread, slide the bobbin winder shaft j to its k original position (for ... When the foot controller is plugged in the bobbin or the needle may break the needle. CAUTION ● Be sure to cut to wind the free end of the procedure in the bobbin. a Slit in bobbin winder seat (with your left and remove the bobbin. When the bobbin begins spinning ...

Users Manual - English
Page 16
... ● Winding the bobbin improperly may cause the thread tension to be used , the machine will make a clicking sound; KNOWING YOUR SEWING MACHINE Memo ● When the sewing machine is started or the handwheel is not inserted, reinsert the thread. this sewing machine. If the thread unrolls in the right direction. Actual size 11.5 mm (7/16 inch...
... ● Winding the bobbin improperly may cause the thread tension to be used , the machine will make a clicking sound; KNOWING YOUR SEWING MACHINE Memo ● When the sewing machine is started or the handwheel is not inserted, reinsert the thread. this sewing machine. If the thread unrolls in the right direction. Actual size 11.5 mm (7/16 inch...
Users Manual - English
Page 18
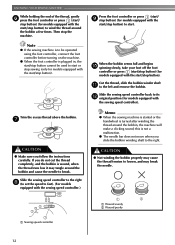
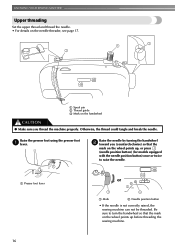
... could tangle and break the needle. a Presser foot lever or a Mark b Needle position button • If the needle is not correctly raised, the sewing machine can not be threaded. KNOWING YOUR SEWING MACHINE Upper threading Set the upper thread and thread the needle. • For details on the wheel points up before threading the...
... could tangle and break the needle. a Presser foot lever or a Mark b Needle position button • If the needle is not correctly raised, the sewing machine can not be threaded. KNOWING YOUR SEWING MACHINE Upper threading Set the upper thread and thread the needle. • For details on the wheel points up before threading the...

Users Manual - English
Page 19
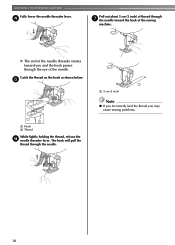
... back and pull g out about 5 cm (2 inch) of thread. Check the table on page 20 for models equipped with home sewing machine needles size 75/11100/16. Make sure the main power switch is off when threading the needle by holding the thread in your left . a 5 cm (2 ... far as shown in the figure d on the previous page. Note ● If the thread take-up lever is set incorrectly, the thread may cause sewing problems. ■ Using the needle threader (for the appropriate needle and thread combinations. Lower the presser foot lever. If you are using decorative threads or...
... back and pull g out about 5 cm (2 inch) of thread. Check the table on page 20 for models equipped with home sewing machine needles size 75/11100/16. Make sure the main power switch is off when threading the needle by holding the thread in your left . a 5 cm (2 ... far as shown in the figure d on the previous page. Note ● If the thread take-up lever is set incorrectly, the thread may cause sewing problems. ■ Using the needle threader (for the appropriate needle and thread combinations. Lower the presser foot lever. If you are using decorative threads or...
Users Manual - English
Page 20
e a Hook b Thread While lightly holding the thread, release the f needle threader lever. X The end of the needle threader rotates toward the back of the sewing machine. d Pull out about 5 cm (2 inch) of the needle. KNOWING YOUR SEWING MACHINE Fully lower the needle threader lever. The hook will pull the thread through the eye of thread through g the needle toward you may cause sewing problems. 18 a 5 cm (2 inch) Note ● If you incorrectly feed the thread you and the hook passes through the needle. Catch the thread on the hook as shown below.
e a Hook b Thread While lightly holding the thread, release the f needle threader lever. X The end of the needle threader rotates toward the back of the sewing machine. d Pull out about 5 cm (2 inch) of the needle. KNOWING YOUR SEWING MACHINE Fully lower the needle threader lever. The hook will pull the thread through the eye of thread through g the needle toward you may cause sewing problems. 18 a 5 cm (2 inch) Note ● If you incorrectly feed the thread you and the hook passes through the needle. Catch the thread on the hook as shown below.
Users Manual - English
Page 22
...; A 75/11 needle is already installed when the sewing machine is extremely dangerous. Fabric Type/Application Medium weight fabrics Thin fabrics Thick fabrics Stretch fabrics Broadcloth Taffeta Flannel, Gabardine Lawn Georgette Challis, Satin Denim Corduroy Tweed Jersey Tricot Easily frayed fabrics For top-stitching Thread Type Cotton thread Synthetic thread Size 60-80...
...; A 75/11 needle is already installed when the sewing machine is extremely dangerous. Fabric Type/Application Medium weight fabrics Thin fabrics Thick fabrics Stretch fabrics Broadcloth Taffeta Flannel, Gabardine Lawn Georgette Challis, Satin Denim Corduroy Tweed Jersey Tricot Easily frayed fabrics For top-stitching Thread Type Cotton thread Synthetic thread Size 60-80...

Users Manual - English
Page 23
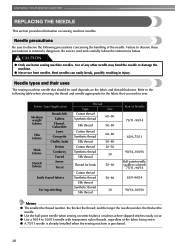
...Before replacing the needle, be sure to turn off the sewing machine. If the combination of the or needle on the previous page. Checking the needle Replacing the needle Replace the needle as described below. In addition, the stitching may be uneven or puckered or there may be straight according... to 75/11), the needle may occur if the foot controller or the start/ stop button is accidentally pressed and the machine starts sewing. b a Flat side b Needle type marking...
...Before replacing the needle, be sure to turn off the sewing machine. If the combination of the or needle on the previous page. Checking the needle Replacing the needle Replace the needle as described below. In addition, the stitching may be uneven or puckered or there may be straight according... to 75/11), the needle may occur if the foot controller or the start/ stop button is accidentally pressed and the machine starts sewing. b a Flat side b Needle type marking...

Users Manual - English
Page 24
...may be removed by turning it clockwise. CAUTION ● Be sure to insert the needle until it touches the needle stopper. KNOWING YOUR SEWING MACHINE Hold the needle with your left hand, and then d use the screwdriver to tighten the needle clamp screw by simply loosening the needle clamp... screw about one turn the needle clamp screw counterclockwise to the needle bar. With the flat side of the needle toward the e rear of the sewing machine may result. ■ Installing the needle clamp If the needle clamp is at the bottom. a Needle stopper a Needle clamp screw b Needle bar ...
...may be removed by turning it clockwise. CAUTION ● Be sure to insert the needle until it touches the needle stopper. KNOWING YOUR SEWING MACHINE Hold the needle with your left hand, and then d use the screwdriver to tighten the needle clamp screw by simply loosening the needle clamp... screw about one turn the needle clamp screw counterclockwise to the needle bar. With the flat side of the needle toward the e rear of the sewing machine may result. ■ Installing the needle clamp If the needle clamp is at the bottom. a Needle stopper a Needle clamp screw b Needle bar ...


