Users Manual - English
Page 2
... for household use the proper needle plate. The wrong plate can cause the needle to the symbol "{" position which represents off, then remove plug from outlet. 9. Do not pull or push fabric while stitching. It may deflect the needle causing it to be taken, including the following: Read all moving parts. SAVE THESE INSTRUCTIONS This machine is intended for use as threading needle, changing needle, threading bobbin, or changing presser foot, and the...
... for household use the proper needle plate. The wrong plate can cause the needle to the symbol "{" position which represents off, then remove plug from outlet. 9. Do not pull or push fabric while stitching. It may deflect the needle causing it to be taken, including the following: Read all moving parts. SAVE THESE INSTRUCTIONS This machine is intended for use as threading needle, changing needle, threading bobbin, or changing presser foot, and the...
Users Manual - English
Page 4
...; Operation is completed • Replacing or removing the needle or any assemblies, the presser feet, needle, or other moving parts. 2. When storing this product are subject to clean the case. Benzene, thinner, and scouring powders can damage the case and machine, and should never be used. 3. Be sure to inspect and adjust the machine yourself. Always consult the operation manual when replacing or installing any other hot objects. 2. For repair or adjustment...
...; Operation is completed • Replacing or removing the needle or any assemblies, the presser feet, needle, or other moving parts. 2. When storing this product are subject to clean the case. Benzene, thinner, and scouring powders can damage the case and machine, and should never be used. 3. Be sure to inspect and adjust the machine yourself. Always consult the operation manual when replacing or installing any other hot objects. 2. For repair or adjustment...
Users Manual - English
Page 5
... SEWING MACHINE 9 Power supply precautions ...9 Power supply ...9 Foot controller ...10 Sewing speed controller (for models equipped with the start/stop button 10 Changing the needle stop position ...10 THREADING THE MACHINE 11 Winding the bobbin ...11 Lower threading ...14 Upper threading ...16 Drawing up the lower thread ...19 REPLACING THE NEEDLE 20 Needle precautions ...20 Needle types and their uses ...20 Checking the needle ...21 Replacing the needle ...21 Sewing with a twin needle ...23 REPLACING THE PRESSER FOOT 24 Replacing the presser foot ...24 Removing the presser foot holder...
... SEWING MACHINE 9 Power supply precautions ...9 Power supply ...9 Foot controller ...10 Sewing speed controller (for models equipped with the start/stop button 10 Changing the needle stop position ...10 THREADING THE MACHINE 11 Winding the bobbin ...11 Lower threading ...14 Upper threading ...16 Drawing up the lower thread ...19 REPLACING THE NEEDLE 20 Needle precautions ...20 Needle types and their uses ...20 Checking the needle ...21 Replacing the needle ...21 Sewing with a twin needle ...23 REPLACING THE PRESSER FOOT 24 Replacing the presser foot ...24 Removing the presser foot holder...
Users Manual - English
Page 6
UTILITY STITCHES 32 OVERCASTING STITCHES 32 BASIC STITCHING ...33 Basic stitching ...33 BLIND HEM STITCHING 34 BUTTONHOLE SEWING 35 Button sewing ...38 ZIPPER INSERTION ...40 SEWING STRETCH FABRICS AND ELASTIC TAPE 41 Stretch stitching ...41 Elastic attaching ...41 APPLIQUÉ, PATCHWORK AND QUILT STITCHING 42 Appliqués ...42 Patchwork (crazy quilt) stitching ...43 Piecing ...43 Quilting ...44 Free-motion quilting ...45 REINFORCEMENT STITCHING 46 Triple stretch stitching ...46 Bar tack stitching ...46 DECORATIVE STITCHING 48 Fagoting ...49 Scallop stitching ...49 Smocking ......
UTILITY STITCHES 32 OVERCASTING STITCHES 32 BASIC STITCHING ...33 Basic stitching ...33 BLIND HEM STITCHING 34 BUTTONHOLE SEWING 35 Button sewing ...38 ZIPPER INSERTION ...40 SEWING STRETCH FABRICS AND ELASTIC TAPE 41 Stretch stitching ...41 Elastic attaching ...41 APPLIQUÉ, PATCHWORK AND QUILT STITCHING 42 Appliqués ...42 Patchwork (crazy quilt) stitching ...43 Piecing ...43 Quilting ...44 Free-motion quilting ...45 REINFORCEMENT STITCHING 46 Triple stretch stitching ...46 Bar tack stitching ...46 DECORATIVE STITCHING 48 Fagoting ...49 Scallop stitching ...49 Smocking ......
Users Manual - English
Page 7
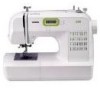
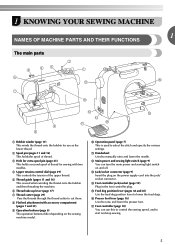
... main power and sewing light switch on the sewing machine model. 1 KNOWING YOUR SEWING MACHINE 1 NAMES OF MACHINE PARTS AND THEIR FUNCTIONS The main parts a Bobbin winder (page 11) This winds the thread onto the bobbin for sewing with accessory compartment (pages 7 and 31) i Operation buttons (page 6) The operation buttons differ depending on and off. d Upper tension-control dial (page 29) This controls the tension of thread. c Hole for extra spool pin (page 23) This holds a second spool of thread for use this to control the sewing speed, and...
... main power and sewing light switch on the sewing machine model. 1 KNOWING YOUR SEWING MACHINE 1 NAMES OF MACHINE PARTS AND THEIR FUNCTIONS The main parts a Bobbin winder (page 11) This winds the thread onto the bobbin for sewing with accessory compartment (pages 7 and 31) i Operation buttons (page 6) The operation buttons differ depending on and off. d Upper tension-control dial (page 29) This controls the tension of thread. c Hole for extra spool pin (page 23) This holds a second spool of thread for use this to control the sewing speed, and...
Users Manual - English
Page 8
... Slide the sewing speed controller to sew reverse stitches. For details, refer to "Starting to sew in the opposite direction. b Needle threader (for models equipped with guides for sewing straight seams. j Needle bar thread guide Pass the upper thread through the needle bar thread guide. k Needle clamp screw Use the needle clamp screw to set bobbin (for the selected stitching. When sewing is stopped, the needle is installed onto the presser foot holder. Pressing the button twice sews one stitch. h Bobbin cover Open the bobbin cover to hold the presser foot holder in the...
... Slide the sewing speed controller to sew reverse stitches. For details, refer to "Starting to sew in the opposite direction. b Needle threader (for models equipped with guides for sewing straight seams. j Needle bar thread guide Pass the upper thread through the needle bar thread guide. k Needle clamp screw Use the needle clamp screw to set bobbin (for the selected stitching. When sewing is stopped, the needle is installed onto the presser foot holder. Pressing the button twice sews one stitch. h Bobbin cover Open the bobbin cover to hold the presser foot holder in the...
Users Manual - English
Page 10
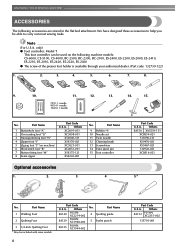
only) ● Foot controller: Model T This foot controller can be able to help you be used on machine) 6 Blind stitch foot "R" 7 Button fitting foot "M" 8 Seam ripper Part Code U.S.A. Part Name 9 Bobbin (4) 10 Needle set 11 Twin needle 12 Cleaning brush 13 Screwdriver 14 Extra spool pin 15 Foot controller Optional accessories 1. 2. 3. 4 Part Code U.S.A. We have designed these accessories to carry out most sewing tasks. Note (For U.S.A. Part Name 1 Buttonhole foot "A" 2 Overcasting foot "G" 3 Monogramming foot "N" 4 Zipper foot "I" 5 Zigzag foot "J" (on the...
only) ● Foot controller: Model T This foot controller can be able to help you be used on machine) 6 Blind stitch foot "R" 7 Button fitting foot "M" 8 Seam ripper Part Code U.S.A. Part Name 9 Bobbin (4) 10 Needle set 11 Twin needle 12 Cleaning brush 13 Screwdriver 14 Extra spool pin 15 Foot controller Optional accessories 1. 2. 3. 4 Part Code U.S.A. We have designed these accessories to carry out most sewing tasks. Note (For U.S.A. Part Name 1 Buttonhole foot "A" 2 Overcasting foot "G" 3 Monogramming foot "N" 4 Zipper foot "I" 5 Zigzag foot "J" (on the...
Users Manual - English
Page 12
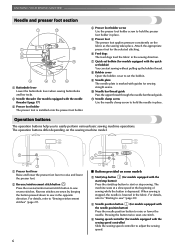
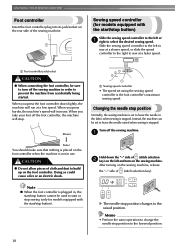
... the machine from accidentally being started. When you press harder, the machine's speed will run at a faster speed. Memo • Perform the same operation to change the needle stop position Normally, the sewing machine is set using the sewing speed controller is the foot controller's maximum sewing speed. Doing so could cause a fire or an electric shock. Hold down lightly, the machine will increase. Sewing speed controller (for models equipped with the start /stop button) Slide the sewing speed controller to...
... the machine from accidentally being started. When you press harder, the machine's speed will run at a faster speed. Memo • Perform the same operation to change the needle stop position Normally, the sewing machine is set using the sewing speed controller is the foot controller's maximum sewing speed. Doing so could cause a fire or an electric shock. Hold down lightly, the machine will increase. Sewing speed controller (for models equipped with the start /stop button) Slide the sewing speed controller to...
Users Manual - English
Page 15
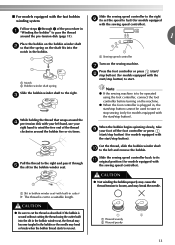
... spring on the sewing machine. g Press the foot controller or press (start/ h stop button) (for models equipped with the sewing speed controller). Cut the thread, slide the bobbin winder shaft j to the left hand, use your foot off the foot controller or press (start/stop button) (for models equipped with the start . Slide the sewing speed controller back to its k original position (for models equipped with the start/stop button). CAUTION ● Not winding the bobbin properly may break the needle. a Slit in bobbin winder...
... spring on the sewing machine. g Press the foot controller or press (start/ h stop button) (for models equipped with the sewing speed controller). Cut the thread, slide the bobbin winder shaft j to the left hand, use your foot off the foot controller or press (start/stop button) (for models equipped with the start . Slide the sewing speed controller back to its k original position (for models equipped with the start/stop button). CAUTION ● Not winding the bobbin properly may break the needle. a Slit in bobbin winder...

Users Manual - English
Page 16
... thread is correctly inserted through the tension-adjusting spring of the same type (part code: SA156, SFB: XA5539-151). Slide the button and open the cover. Put the left tab in the right direction. this machine. If bobbins from other models are used with thread. • For more details on the foot controller and the machine starts to loosen, breaking the needle and resulting in the wrong direction, it is not a malfunction. ● The needle bar...
... thread is correctly inserted through the tension-adjusting spring of the same type (part code: SA156, SFB: XA5539-151). Slide the button and open the cover. Put the left tab in the right direction. this machine. If bobbins from other models are used with thread. • For more details on the foot controller and the machine starts to loosen, breaking the needle and resulting in the wrong direction, it is not a malfunction. ● The needle bar...
Users Manual - English
Page 17
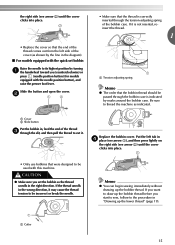
... the bobbin case. the right side (see arrow b) until the cover clicks into place. • Only use bobbins that were designed to thread the machine as shown by the line in the diagram). ■ For models equipped with the quick-set the bobbin so the thread unrolls in , feed the end of the thread c through the tension-adjusting spring of the cover (as indicated. a Cover b Slide button Put the bobbin in the right direction...
... the bobbin case. the right side (see arrow b) until the cover clicks into place. • Only use bobbins that were designed to thread the machine as shown by the line in the diagram). ■ For models equipped with the quick-set the bobbin so the thread unrolls in , feed the end of the thread c through the tension-adjusting spring of the cover (as indicated. a Cover b Slide button Put the bobbin in the right direction...

Users Manual - English
Page 19
... used with the needle threader) CAUTION a Thread take -up 1 lever before you feed the upper thread. ● If you incorrectly feed the thread you guide the thread through 6 of thread on this pin. Check the table on page 20 for models equipped with home sewing machine needles size 75/11100/16. Make sure the main power switch is set incorrectly, the thread may cause sewing problems. ■ Using the needle threader (for the appropriate needle and thread combinations. b While lowering the needle threader lever, c hook the thread...
... used with the needle threader) CAUTION a Thread take -up 1 lever before you feed the upper thread. ● If you incorrectly feed the thread you guide the thread through 6 of thread on this pin. Check the table on page 20 for models equipped with home sewing machine needles size 75/11100/16. Make sure the main power switch is set incorrectly, the thread may cause sewing problems. ■ Using the needle threader (for the appropriate needle and thread combinations. b While lowering the needle threader lever, c hook the thread...

Users Manual - English
Page 23
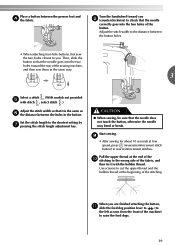
... fabric, thread and needle is even. 1 2 a Mark b Needle position button Turn off the sewing machine, otherwise injuries may break while the machine is being operated. CAUTION ● Before replacing the needle, be sure to turn off the sewing machine. Lower the presser foot lever. c 1 a Flat surface a Presser foot lever 21 Checking the needle Replacing the needle Replace the needle as denim) with a bent needle is extremely dangerous since the needle may occur if the foot controller or the start/ stop button is bent. Use...
... fabric, thread and needle is even. 1 2 a Mark b Needle position button Turn off the sewing machine, otherwise injuries may break while the machine is being operated. CAUTION ● Before replacing the needle, be sure to turn off the sewing machine. Lower the presser foot lever. c 1 a Flat surface a Presser foot lever 21 Checking the needle Replacing the needle Replace the needle as denim) with a bent needle is extremely dangerous since the needle may occur if the foot controller or the start/ stop button is bent. Use...
Users Manual - English
Page 35
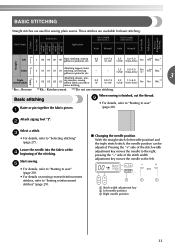
...needle position) and the triple stretch stitch, the needle position can be adjusted. Application Stitch Width [mm (inch.)] Stitch Length [mm (inch.)] Auto Manual Auto Manual Straight Pattern Presser Foot 70 stitches model 60 stitches model 50 stitches model 40 stitches model Twin Needle Walking Foot Reverse/ Reinforcement Stitching Left J 00 00 00 00 Basic stitching, sewing gathers or pintucks, etc. 0.0 (0) 0.0-7.0 (0-1/4) 2.5 (3/32) 0.2-5.0 (1/64-3/16) No Ye*s** Rev.* Center Triple stretch stitch Attaching zippers, basic J 01 01 01 01 stitching, and sewing - Attaching...
...needle position) and the triple stretch stitch, the needle position can be adjusted. Application Stitch Width [mm (inch.)] Stitch Length [mm (inch.)] Auto Manual Auto Manual Straight Pattern Presser Foot 70 stitches model 60 stitches model 50 stitches model 40 stitches model Twin Needle Walking Foot Reverse/ Reinforcement Stitching Left J 00 00 00 00 Basic stitching, sewing gathers or pintucks, etc. 0.0 (0) 0.0-7.0 (0-1/4) 2.5 (3/32) 0.2-5.0 (1/64-3/16) No Ye*s** Rev.* Center Triple stretch stitch Attaching zippers, basic J 01 01 01 01 stitching, and sewing - Attaching...
Users Manual - English
Page 40
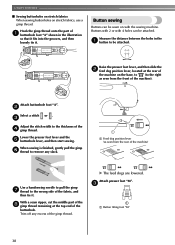
...presser foot lever and the e buttonhole lever, and then start sewing. Raise the presser foot lever, and then slide the b feed dog position lever, located at the top end of a buttonhole foot "A" shown in the a button to remove any excess of the d gimp thread. c Adjust the stitch width to the wrong side of the machine). Attach buttonhole foot "A". Hook the gimp thread onto the part of the buttonhole. Attach presser foot "M". UTILITY STITCHES ■ Sewing buttonholes on stretch fabrics When sewing buttonholes on with 4 holes can be sewn on stretch fabrics, use...
...presser foot lever and the e buttonhole lever, and then start sewing. Raise the presser foot lever, and then slide the b feed dog position lever, located at the top end of a buttonhole foot "A" shown in the a button to remove any excess of the d gimp thread. c Adjust the stitch width to the wrong side of the machine). Attach buttonhole foot "A". Hook the gimp thread onto the part of the buttonhole. Attach presser foot "M". UTILITY STITCHES ■ Sewing buttonholes on stretch fabrics When sewing buttonholes on with 4 holes can be sewn on stretch fabrics, use...
Users Manual - English
Page 41
... finished attaching the button, k slide the feed dog position lever to (to sew reinforcement stitches. Turn the handwheel toward you . Pull the upper thread at low speed, press (reverse/reinforcement stitch button) to the left as f the distance between the presser foot and d the fabric. Use scissors to cut the upper thread and the bobbin thread at the beginning of the machine) to the shortest setting by g pressing the stitch length adjustment key. Place a button between the holes in...
... finished attaching the button, k slide the feed dog position lever to (to sew reinforcement stitches. Turn the handwheel toward you . Pull the upper thread at low speed, press (reverse/reinforcement stitch button) to the left as f the distance between the presser foot and d the fabric. Use scissors to cut the upper thread and the bobbin thread at the beginning of the machine) to the shortest setting by g pressing the stitch length adjustment key. Place a button between the holes in...
Users Manual - English
Page 62
... fabric. You have not inserted the needle properly. Choose a thread and needle that has been designed for this machine. Replace the needle. Adjust the tension of thread and needle for the type of the upper thread. page 11 page 11 - page 20 page 21 page 31 page 29 60 Replace the presser foot. The bobbin case is incorrect. You have not fitted the spool properly. You have not used a bobbin that are sewing thin fabric, the stitch...
... fabric. You have not inserted the needle properly. Choose a thread and needle that has been designed for this machine. Replace the needle. Adjust the tension of thread and needle for the type of the upper thread. page 11 page 11 - page 20 page 21 page 31 page 29 60 Replace the presser foot. The bobbin case is incorrect. You have not fitted the spool properly. You have not used a bobbin that are sewing thin fabric, the stitch...
Users Manual - English
Page 63
... The sewing light bulb does not The sewing lamp is tangled, for the type of fabric, thread and needle. You have not inserted the needle properly. You have not threaded the upper thread properly. Incorrect bobbins will not work properly. The stitch is tangled in the bobbin case. If the thread is too fine. Slide the feed dog position lever to its highest position. The thread tension is not correct for example, in the bobbin case, clean the bobbin case. Replace the bobbin case...
... The sewing light bulb does not The sewing lamp is tangled, for the type of fabric, thread and needle. You have not inserted the needle properly. You have not threaded the upper thread properly. Incorrect bobbins will not work properly. The stitch is tangled in the bobbin case. If the thread is too fine. Slide the feed dog position lever to its highest position. The thread tension is not correct for example, in the bobbin case, clean the bobbin case. Replace the bobbin case...

Users Manual - English
Page 64
... bobbin winder shaft to check for four seconds and the machine automatically stops. Remove the tangled thread before continuing the operation. Operation beep (for models equipped with the operation beep) Each time a key is pressed you will hear one beep. Lower the buttonhole lever before continuing the operation. Otherwise, operate the machine by using the foot controller. The reverse/reinforcement stitch button or needle position button was pressed if the foot controller is not connected) while the buttonhole lever is lowered...
... bobbin winder shaft to check for four seconds and the machine automatically stops. Remove the tangled thread before continuing the operation. Operation beep (for models equipped with the operation beep) Each time a key is pressed you will hear one beep. Lower the buttonhole lever before continuing the operation. Otherwise, operate the machine by using the foot controller. The reverse/reinforcement stitch button or needle position button was pressed if the foot controller is not connected) while the buttonhole lever is lowered...
Users Manual - English
Page 65
...6 needle clamp screw 6, 22 needle plate 6 needle plate cover 57 needle position 33 needle position button 6 needle threader 17 O buttonhole foot 36 openings 46 buttonhole lever 6, 37, 47 buttonhole sewing 35 operation beep 62 operation buttons 6 4 operation panel 7 C crazy quilt stitching 43 optional accessories 8 overcasting stitches 32 D Darning 32, 41 E elastic tape 41 error messages 62 extra spool pin 23 eyelet punch 37 F fagoting 49 fast bobbin winding 12 feed dog position lever 45 feed dogs 6, 45 flat bed attachment 7, 31 foot controller 8, 28 free-arm...
...6 needle clamp screw 6, 22 needle plate 6 needle plate cover 57 needle position 33 needle position button 6 needle threader 17 O buttonhole foot 36 openings 46 buttonhole lever 6, 37, 47 buttonhole sewing 35 operation beep 62 operation buttons 6 4 operation panel 7 C crazy quilt stitching 43 optional accessories 8 overcasting stitches 32 D Darning 32, 41 E elastic tape 41 error messages 62 extra spool pin 23 eyelet punch 37 F fagoting 49 fast bobbin winding 12 feed dog position lever 45 feed dogs 6, 45 flat bed attachment 7, 31 foot controller 8, 28 free-arm...


