
Users Manual - English
Page 2
... accessories recommended by the manufacturer as described in . Never operate this manual. To unplug, grasp the plug, not the cord, and carefully remove from all instructions before cleaning. Do not unplug by or near children. 2. DANGER - Never drop or insert any object into water. SAVE THESE INSTRUCTIONS This machine is being used or where oxygen is intended for examination, repair, electrical or mechanical adjustment...
... accessories recommended by the manufacturer as described in . Never operate this manual. To unplug, grasp the plug, not the cord, and carefully remove from all instructions before cleaning. Do not unplug by or near children. 2. DANGER - Never drop or insert any object into water. SAVE THESE INSTRUCTIONS This machine is being used or where oxygen is intended for examination, repair, electrical or mechanical adjustment...
Users Manual - English
Page 4
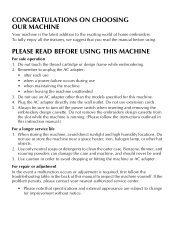
... a power failure occurs during use extension cords. 5. If the problem persists, please contact your nearest authorized service center. • Please note that you read the manual before using. Do not remove the embroidery design cassette from the slot while the machine is running. (Please follow the troubleshooting table in the back of home embroidery. Do not touch the thread cartridge or design frame while embroidering. 2. PLEASE READ BEFORE USING...
... a power failure occurs during use extension cords. 5. If the problem persists, please contact your nearest authorized service center. • Please note that you read the manual before using. Do not remove the embroidery design cassette from the slot while the machine is running. (Please follow the troubleshooting table in the back of home embroidery. Do not touch the thread cartridge or design frame while embroidering. 2. PLEASE READ BEFORE USING...
Users Manual - English
Page 5
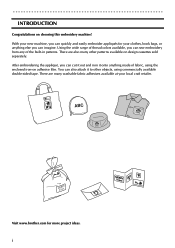
... choosing this embroidery machine! After embroidering the appliqué, you can sew embroidery from any of fabric, using commercially available double-sided tape. There are also many washable fabric adhesives available at your clothes, book bags, or anything made of the built-in patterns. Visit www.brother.com for your local craft retailer. i Using the wide range of thread colors available, you can also attach it...
... choosing this embroidery machine! After embroidering the appliqué, you can sew embroidery from any of fabric, using commercially available double-sided tape. There are also many washable fabric adhesives available at your clothes, book bags, or anything made of the built-in patterns. Visit www.brother.com for your local craft retailer. i Using the wide range of thread colors available, you can also attach it...
Users Manual - English
Page 10
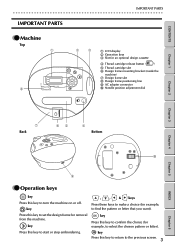
...keys Press these keys to make a choice (for example, to start or stop embroidering. CONTENTS IMPORTANT PARTS G G G G G G G G G G G G G G G G G G G G G G G G G G G G G G G G G G G G G G G G G G G G G G G G G G G G G G G G G IMPORTANT PARTS GG Machine Top 1 6 2 3 1 LCD display 2 Operation keys 3 Slot for an optional design cassette 4 Thread cartridge release button ( ) 5 Thread cartridge slot 6 Design frame mounting bracket (inside the machine) 7 Design frame slot 8 Design frame positioning line 9 AC adapter connector 0 Needle position adjustment dial Chapter 1 Chapter 2 Chapter...
...keys Press these keys to make a choice (for example, to start or stop embroidering. CONTENTS IMPORTANT PARTS G G G G G G G G G G G G G G G G G G G G G G G G G G G G G G G G G G G G G G G G G G G G G G G G G G G G G G G G G IMPORTANT PARTS GG Machine Top 1 6 2 3 1 LCD display 2 Operation keys 3 Slot for an optional design cassette 4 Thread cartridge release button ( ) 5 Thread cartridge slot 6 Design frame mounting bracket (inside the machine) 7 Design frame slot 8 Design frame positioning line 9 AC adapter connector 0 Needle position adjustment dial Chapter 1 Chapter 2 Chapter...
Users Manual - English
Page 11
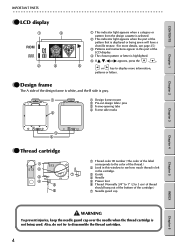
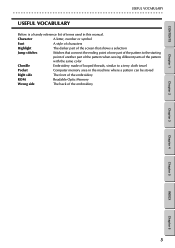
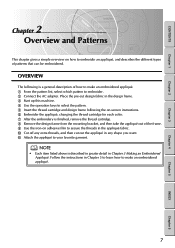
... more details, see page 25.) 3 Patterns and instructions appear in this window to see how much thread is not being used. GG Design frame The A side of the design frame is white, and the B side is gray. 1 1 Design frame mount 2 Pre-cut design fabric pins 3 Frame-opening tabs 4 Frame side marks 2 3 4 GG Thread cartridge 1 2 7 3 4 5 6 1 Thread color ID number (The color of the label corresponds...
... more details, see page 25.) 3 Patterns and instructions appear in this window to see how much thread is not being used. GG Design frame The A side of the design frame is white, and the B side is gray. 1 1 Design frame mount 2 Pre-cut design fabric pins 3 Frame-opening tabs 4 Frame side marks 2 3 4 GG Thread cartridge 1 2 7 3 4 5 6 1 Thread color ID number (The color of the label corresponds...
Users Manual - English
Page 12
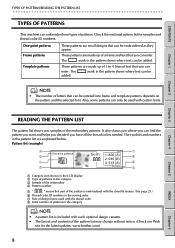
... Jump stitches Stitches that connect the ending point of one part of the pattern to the starting point of another part of the pattern when sewing different parts of the pattern with the same color Chenille Embroidery made of the embroidery Chapter 1 Chapter 2 Chapter 3 Chapter 4 Chapter 5 INDEX Chapter 6 5 CONTENTS USEFUL VOCABULARY G G G G G G G G G G G G G G G G G G G G G G G G G G G G G G G G G G G G G G G G G G G G G G G G G G G G G G G G G USEFUL VOCABULARY Below is a handy reference list of terms used in the machine where a pattern can be...
... Jump stitches Stitches that connect the ending point of one part of the pattern to the starting point of another part of the pattern when sewing different parts of the pattern with the same color Chenille Embroidery made of the embroidery Chapter 1 Chapter 2 Chapter 3 Chapter 4 Chapter 5 INDEX Chapter 6 5 CONTENTS USEFUL VOCABULARY G G G G G G G G G G G G G G G G G G G G G G G G G G G G G G G G G G G G G G G G G G G G G G G G G G G G G G G G G USEFUL VOCABULARY Below is a handy reference list of terms used in the machine where a pattern can be...
Users Manual - English
Page 14
... design frame. 3 Start up this machine. 4 Use the operation keys to select the pattern. 5 Insert the thread cartridge and design frame following is a general description of patterns that can be embroidered. NOTE • Each item listed above is finished, remove the thread cartridge. 8 Remove the design frame from the mounting bracket, and then take the appliqué out of the frame. 9 Use the iron-on -screen instructions. 6 Embroider the appliqué, changing...
... design frame. 3 Start up this machine. 4 Use the operation keys to select the pattern. 5 Insert the thread cartridge and design frame following is a general description of patterns that can be embroidered. NOTE • Each item listed above is finished, remove the thread cartridge. 8 Remove the design frame from the mounting bracket, and then take the appliqué out of the frame. 9 Use the iron-on -screen instructions. 6 Embroider the appliqué, changing...
Users Manual - English
Page 15
... 4 Pattern number 5" " means that part of the pattern is included with the chenille texture. (See page 25.) 6 Thread color ID numbers in the category NOTE • A pattern list is embroidered with each optional design cassette. • The layout and contents of the embroidery patterns. CONTENTS Chapter 1 TYPES OF PATTERNS/READING THE PATTERN LIST G G G G G G G G G G G G G G G G G G G G G G G G G G G G G G G G G G G G G G G G G G G G G G G G G G G G G G G G G TYPES OF PATTERNS This machine can be added. Check the enclosed pattern list for the latest updates: www.brother...
... 4 Pattern number 5" " means that part of the pattern is included with the chenille texture. (See page 25.) 6 Thread color ID numbers in the category NOTE • A pattern list is embroidered with each optional design cassette. • The layout and contents of the embroidery patterns. CONTENTS Chapter 1 TYPES OF PATTERNS/READING THE PATTERN LIST G G G G G G G G G G G G G G G G G G G G G G G G G G G G G G G G G G G G G G G G G G G G G G G G G G G G G G G G G TYPES OF PATTERNS This machine can be added. Check the enclosed pattern list for the latest updates: www.brother...
Users Manual - English
Page 24
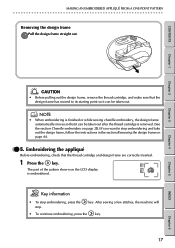
..., follow the instructions in the section Removing the design frame on the LCD display is finished or while sewing chenille embroidery, the design frame automatically moves so that the thread cartridge and design frame are correctly inserted. 1 Press the key. MAKING AN EMBROIDERED APPLIQUÉ FROM A ONE-POINT PATTERN G G G G G G G G G G G G G G G G G G G G G G G G G G G G G G G G G G G G G G G G G G G G G G G G G G G G G G G G G Removing the design frame 1Pull the design frame straight out. After sewing a few stitches, the machine will • To continue embroidering, press the...
..., follow the instructions in the section Removing the design frame on the LCD display is finished or while sewing chenille embroidery, the design frame automatically moves so that the thread cartridge and design frame are correctly inserted. 1 Press the key. MAKING AN EMBROIDERED APPLIQUÉ FROM A ONE-POINT PATTERN G G G G G G G G G G G G G G G G G G G G G G G G G G G G G G G G G G G G G G G G G G G G G G G G G G G G G G G G G Removing the design frame 1Pull the design frame straight out. After sewing a few stitches, the machine will • To continue embroidering, press the...
Users Manual - English
Page 25
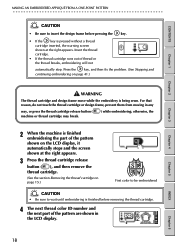
... finished before removing the thread cartridge. 4 The next thread color ID number and the next part of the pattern are shown in any way, or press the thread cartridge release button ( machine or thread cartridge may break. ) while embroidering; Press the key, and then fix the problem. (See Stopping and continuing embroidering on page 41.) WARNING The thread cartridge and design frame move while the embroidery is being...
... finished before removing the thread cartridge. 4 The next thread color ID number and the next part of the pattern are shown in any way, or press the thread cartridge release button ( machine or thread cartridge may break. ) while embroidering; Press the key, and then fix the problem. (See Stopping and continuing embroidering on page 41.) WARNING The thread cartridge and design frame move while the embroidery is being...
Users Manual - English
Page 27
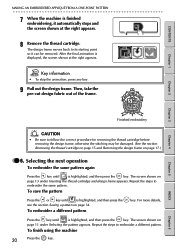
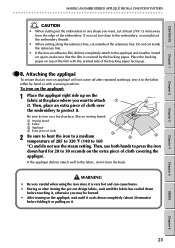
... finish using the machine 20 Press the key. Chapter 1 Chapter 2 Chapter 3 Chapter 4 Chapter 5 Finished embroidery CAUTION • Be sure to its starting point so it automatically stops and the screen shown at the right appears. To embroider a different pattern key. For more details, Press the key until is displayed, the screen shown at the right appears. 8 Remove the thread...
... finish using the machine 20 Press the key. Chapter 1 Chapter 2 Chapter 3 Chapter 4 Chapter 5 Finished embroidery CAUTION • Be sure to its starting point so it automatically stops and the screen shown at the right appears. To embroider a different pattern key. For more details, Press the key until is displayed, the screen shown at the right appears. 8 Remove the thread...
Users Manual - English
Page 28
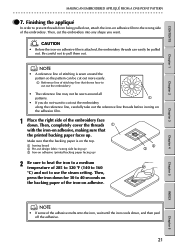
.... Then, completely cover the threads 1 with the iron-on adhesive, making sure that the backing paper is on the top. 1 Ironing board 2 Pre-cut design fabric (wrong side facing up) 3 Iron-on the adhesive film. 1 Place the right side of the embroidery face down. Then, cut out the embroidery along the reference ...on adhesive film to the wrong side of stitching (line that shows how to use the steam setting. Then, press the iron down , and then peel off the adhesive. 21 Finishing the appliqué In order to prevent threads from being pulled out, attach the iron-on the backing paper of ...
.... Then, completely cover the threads 1 with the iron-on adhesive, making sure that the backing paper is on the top. 1 Ironing board 2 Pre-cut design fabric (wrong side facing up) 3 Iron-on the adhesive film. 1 Place the right side of the embroidery face down. Then, cut out the embroidery along the reference ...on adhesive film to the wrong side of stitching (line that shows how to use the steam setting. Then, press the iron down , and then peel off the adhesive. 21 Finishing the appliqué In order to prevent threads from being pulled out, attach the iron-on the backing paper of ...
Users Manual - English
Page 30
... ЊC) and do not use both hands to 30 seconds on appliqué will not come off after ironing the pre-cut outside of the film with a sewing machine. If you cut too close to the embroidery, you might cut the embroidery threads. • When cutting along the reference line, cut design fabric, wait until the fabric has cooled down before...
... ЊC) and do not use both hands to 30 seconds on appliqué will not come off after ironing the pre-cut outside of the film with a sewing machine. If you cut too close to the embroidery, you might cut the embroidery threads. • When cutting along the reference line, cut design fabric, wait until the fabric has cooled down before...
Users Manual - English
Page 32
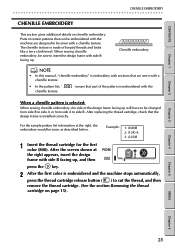
... installed correctly. " means that are designed to be embroidered with the machine are sewn with a chenille texture. • In the pattern list, " chenille texture. Chenille embroidery NOTE • In this manual, "chenille embroidery" is embroidery with sections that part of the design frame facing up will have to be changed from side B to side A or from side A to cut the thread, and then remove the thread...
... installed correctly. " means that are designed to be embroidered with the machine are sewn with a chenille texture. • In the pattern list, " chenille texture. Chenille embroidery NOTE • In this manual, "chenille embroidery" is embroidery with sections that part of the design frame facing up will have to be changed from side B to side A or from side A to cut the thread, and then remove the thread...
Users Manual - English
Page 33
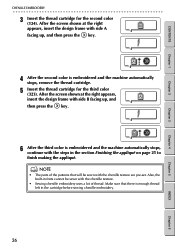
... color is embroidered and the machine automatically stops, remove the thread cartridge. 5 Insert the thread cartridge for the second color (124). Also, the built-in fonts cannot be sewn with the chenille texture. • Sewing chenille embroidery uses a lot of the patterns that there is enough thread left in the section Finishing the appliqué on page 21 to finish making the appliqué. Make sure...
... color is embroidered and the machine automatically stops, remove the thread cartridge. 5 Insert the thread cartridge for the second color (124). Also, the built-in fonts cannot be sewn with the chenille texture. • Sewing chenille embroidery uses a lot of the patterns that there is enough thread left in the section Finishing the appliqué on page 21 to finish making the appliqué. Make sure...
Users Manual - English
Page 48
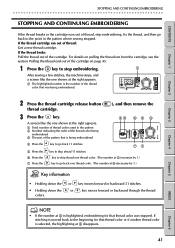
... to skip ahead 11 stitches. CONTENTS Chapter 1 Chapter 2 Chapter 3 STOPPING AND CONTINUING EMBROIDERING G G G G G G G G G G G G G G G G G G G G G G G G G G G G G G G G G G G G G G G G G G G G G G G G G G G G G G G G G STOPPING AND CONTINUING EMBROIDERING If the thread breaks or the cartridge runs out of thread, stop embroidering. 1 After sewing a few stitches, the machine stops, and a screen like the one shown at the right appears. 1 Total number of thread colors used in the pattern where sewing stopped. If the thread cartridge ran out of...
... to skip ahead 11 stitches. CONTENTS Chapter 1 Chapter 2 Chapter 3 STOPPING AND CONTINUING EMBROIDERING G G G G G G G G G G G G G G G G G G G G G G G G G G G G G G G G G G G G G G G G G G G G G G G G G G G G G G G G G STOPPING AND CONTINUING EMBROIDERING If the thread breaks or the cartridge runs out of thread, stop embroidering. 1 After sewing a few stitches, the machine stops, and a screen like the one shown at the right appears. 1 Total number of thread colors used in the pattern where sewing stopped. If the thread cartridge ran out of...

Users Manual - English
Page 49
... the stitches will overlap a little. Align the hole in the thread cartridge slot (shown by the arrow at the right appears, the thread cartridge was not removed. Key information • If you wish to remove the design frame, press the key, and then pull it out. (See the section Removing the design frame on page 44.) Before continuing embroidering, be used...
... the stitches will overlap a little. Align the hole in the thread cartridge slot (shown by the arrow at the right appears, the thread cartridge was not removed. Key information • If you wish to remove the design frame, press the key, and then pull it out. (See the section Removing the design frame on page 44.) Before continuing embroidering, be used...
Users Manual - English
Page 56
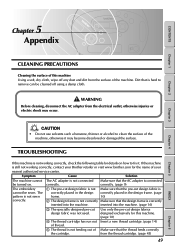
... pattern is not sewn correctly. 1 The pre-cut design fabric is not Make sure that the pre-cut design fabric was not used. TROUBLESHOOTING If this machine. (page 10) 4 The thread cartridge has run out Insert a new thread cartridge. (page 14) of thread. 5 The thread is not correctly Make sure that the thread feeds correctly the cartridge. Symptom Cause Solution The machine cannot The AC adapter is not working correctly...
... pattern is not sewn correctly. 1 The pre-cut design fabric is not Make sure that the pre-cut design fabric was not used. TROUBLESHOOTING If this machine. (page 10) 4 The thread cartridge has run out Insert a new thread cartridge. (page 14) of thread. 5 The thread is not correctly Make sure that the thread feeds correctly the cartridge. Symptom Cause Solution The machine cannot The AC adapter is not working correctly...
Users Manual - English
Page 57
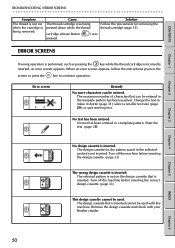
... text size (page 28), or quit entering text. Error screen Remedy No more characters can be used . No text has been entered in the template pattern has been reached. Remove the design cassette and check with this machine. The maximum number of characters that can be used with your Brother retailer. CONTENTS Chapter 1 Chapter 2 Chapter 3 ETRROOURBLSECSRHEOENOSTING / ERROR SCREENS G G G G G G G G G G G G G G G G G G G G G G G G G G G G G G G G G G G G G G G G G G G G G G G G G G G G G G G G G Symptom The thread is...
... text size (page 28), or quit entering text. Error screen Remedy No more characters can be used . No text has been entered in the template pattern has been reached. Remove the design cassette and check with this machine. The maximum number of characters that can be used with your Brother retailer. CONTENTS Chapter 1 Chapter 2 Chapter 3 ETRROOURBLSECSRHEOENOSTING / ERROR SCREENS G G G G G G G G G G G G G G G G G G G G G G G G G G G G G G G G G G G G G G G G G G G G G G G G G G G G G G G G G Symptom The thread is...
Users Manual - English
Page 60
... error screens 50 F finishing 21 fonts 27 frame patterns 8 frame-opening tabs 4 G groove 14 guide 4, 14 H highlighting 4 I inserting design cassette 33 design frame 16 pre-cut design fabric 10 thread cartridge 14 iron-on adhesive 1, 21 K keys 3 N needle position adjustment dial 3, 48 O OK key 3 On/off key 3 one-point patterns 8 operation keys 3 P parts 3 pattern categories 8, 11 pattern list 8 pattern number 8, 12 pattern types 8 patterns 11 power key 3 pre-cut design fabric 1, 10 pre-cut design fabric pins 4, 10 R reference line 21 removing design...
... error screens 50 F finishing 21 fonts 27 frame patterns 8 frame-opening tabs 4 G groove 14 guide 4, 14 H highlighting 4 I inserting design cassette 33 design frame 16 pre-cut design fabric 10 thread cartridge 14 iron-on adhesive 1, 21 K keys 3 N needle position adjustment dial 3, 48 O OK key 3 On/off key 3 one-point patterns 8 operation keys 3 P parts 3 pattern categories 8, 11 pattern list 8 pattern number 8, 12 pattern types 8 patterns 11 power key 3 pre-cut design fabric 1, 10 pre-cut design fabric pins 4, 10 R reference line 21 removing design...


