
Users Manual - English
Page 4
... CHOOSING OUR MACHINE Your machine is the latest addition to the exciting world of this manual to clean the outer case. Do not touch the thread cartridge or design frame while embroidering. 2. When storing this machine, avoid direct sunlight and high humidity locations.
... CHOOSING OUR MACHINE Your machine is the latest addition to the exciting world of this manual to clean the outer case. Do not touch the thread cartridge or design frame while embroidering. 2. When storing this machine, avoid direct sunlight and high humidity locations.
Users Manual - English
Page 6
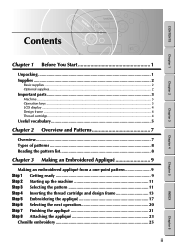
...Before You Start 1 Unpacking 1 Supplies ...2 Basic supplies ...2 Optional supplies...2 Important parts 3 Machine ...3 Operation keys ...3 LCD display ...4 Design frame ...4 Thread cartridge...4 Useful vocabulary 5 Chapter 2 Overview and Patterns 7 Overview 7 Types of patterns 8 Reading the pattern list 8 Chapter 3 Making an Embroidered Appliqu 9 ...1 Getting ready 9 Step 2 Starting up the machine 11 Step 3 Selecting the pattern 11 Step 4 Inserting the thread cartridge and design frame 13 Step 5 Embroidering the appliqu 17 Step 6 Selecting the next operation 20 Step 7 Finishing the ...
...Before You Start 1 Unpacking 1 Supplies ...2 Basic supplies ...2 Optional supplies...2 Important parts 3 Machine ...3 Operation keys ...3 LCD display ...4 Design frame ...4 Thread cartridge...4 Useful vocabulary 5 Chapter 2 Overview and Patterns 7 Overview 7 Types of patterns 8 Reading the pattern list 8 Chapter 3 Making an Embroidered Appliqu 9 ...1 Getting ready 9 Step 2 Starting up the machine 11 Step 3 Selecting the pattern 11 Step 4 Inserting the thread cartridge and design frame 13 Step 5 Embroidering the appliqu 17 Step 6 Selecting the next operation 20 Step 7 Finishing the ...
Users Manual - English
Page 8
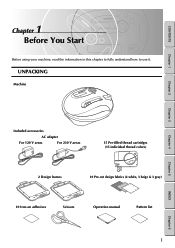
UNPACKING Machine Chapter 2 Chapter 3 Chapter 4 Chapter 5 Included accessories AC adapter For 120 V areas For 230 V areas 15 Pre-filled thread cartridges (15 individual thread colors) 2 Design frames 10 Pre-cut design fabrics (4 white, 3 beige & 3 gray) 10 Iron-on adhesives Scissors Operation manual Pattern list 1 INDEX Chapter 6 CONTENTS Chapter 1 1 Chapter 1Before You Start Before using your machine, read the information in this chapter to fully understand how to use it.
UNPACKING Machine Chapter 2 Chapter 3 Chapter 4 Chapter 5 Included accessories AC adapter For 120 V areas For 230 V areas 15 Pre-filled thread cartridges (15 individual thread colors) 2 Design frames 10 Pre-cut design fabrics (4 white, 3 beige & 3 gray) 10 Iron-on adhesives Scissors Operation manual Pattern list 1 INDEX Chapter 6 CONTENTS Chapter 1 1 Chapter 1Before You Start Before using your machine, read the information in this chapter to fully understand how to use it.
Users Manual - English
Page 9
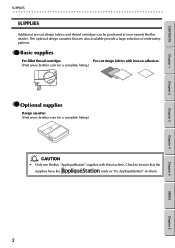
GG Basic supplies Pre-filled thread cartridges Pre-cut design fabrics and thread cartridges can be sure that are also available provide a large selection of embroidery patterns. The optional design cassettes that the supplies have the mark or "for a complete listing.) CAUTION • Only use Brother "AppliquéStation" supplies with iron-on adhesives (Visit www...
GG Basic supplies Pre-filled thread cartridges Pre-cut design fabrics and thread cartridges can be sure that are also available provide a large selection of embroidery patterns. The optional design cassettes that the supplies have the mark or "for a complete listing.) CAUTION • Only use Brother "AppliquéStation" supplies with iron-on adhesives (Visit www...
Users Manual - English
Page 10
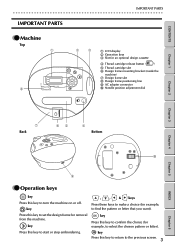
... turn the machine on or off. CONTENTS IMPORTANT PARTS G G G G G G G G G G G G G G G G G G G G G G G G G G G G G G G G G G G G G G G G G G G G G G G G G G G G G G G G G IMPORTANT PARTS GG Machine Top 1 6 2 3 1 LCD display 2 Operation keys 3 Slot for an optional design cassette 4 Thread cartridge release button ( ) 5 Thread cartridge slot 6 Design frame mounting bracket (inside the machine) 7 Design frame slot 8 Design frame positioning line 9 AC adapter connector 0 Needle position adjustment dial Chapter 1 Chapter...
... turn the machine on or off. CONTENTS IMPORTANT PARTS G G G G G G G G G G G G G G G G G G G G G G G G G G G G G G G G G G G G G G G G G G G G G G G G G G G G G G G G G IMPORTANT PARTS GG Machine Top 1 6 2 3 1 LCD display 2 Operation keys 3 Slot for an optional design cassette 4 Thread cartridge release button ( ) 5 Thread cartridge slot 6 Design frame mounting bracket (inside the machine) 7 Design frame slot 8 Design frame positioning line 9 AC adapter connector 0 Needle position adjustment dial Chapter 1 Chapter...
Users Manual - English
Page 11
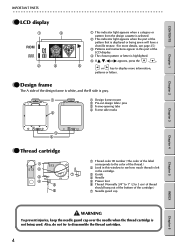
...5 INDEX Chapter 6 WARNING To prevent injuries, keep the needle guard cap over the needle when the thread cartridge is not being sewn will have a chenille texture. (For more information, patterns or letters. Also, ... 25.) 3 Patterns and instructions appear in this part of the pattern that is highlighted. 5 If or ᮣ appears, press the , , 5 or key to disassemble the thread cartridges. 4 CONTENTS Chapter 1 Chapter 2 IMPORTANT PARTS G G G G G G G G G G G G G G G G G G G G G G G G G G G G G G G G G G G G G G G G G G G G G G G G G G G G G G G G G GG LCD display 1 3 2 4 1...
...5 INDEX Chapter 6 WARNING To prevent injuries, keep the needle guard cap over the needle when the thread cartridge is not being sewn will have a chenille texture. (For more information, patterns or letters. Also, ... 25.) 3 Patterns and instructions appear in this part of the pattern that is highlighted. 5 If or ᮣ appears, press the , , 5 or key to disassemble the thread cartridges. 4 CONTENTS Chapter 1 Chapter 2 IMPORTANT PARTS G G G G G G G G G G G G G G G G G G G G G G G G G G G G G G G G G G G G G G G G G G G G G G G G G G G G G G G G G GG LCD display 1 3 2 4 1...
Users Manual - English
Page 14
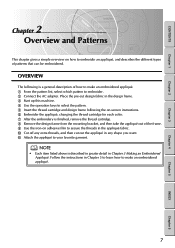
OVERVIEW The following the on-screen instructions. 6 Embroider the appliqué, changing the thread cartridge for each color. 7 After the embroidery is a general description of the frame. 9 Use the iron-on how to embroider an appliqué, and describes ...in greater detail in the design frame. 3 Start up this machine. 4 Use the operation keys to select the pattern. 5 Insert the thread cartridge and design frame following is finished, remove the thread cartridge. 8 Remove the design frame from the mounting bracket, and then take the appliqué out of how to make an embroidered...
OVERVIEW The following the on-screen instructions. 6 Embroider the appliqué, changing the thread cartridge for each color. 7 After the embroidery is a general description of the frame. 9 Use the iron-on how to embroider an appliqué, and describes ...in greater detail in the design frame. 3 Start up this machine. 4 Use the operation keys to select the pattern. 5 Insert the thread cartridge and design frame following is finished, remove the thread cartridge. 8 Remove the design frame from the mounting bracket, and then take the appliqué out of how to make an embroidered...
Users Manual - English
Page 20
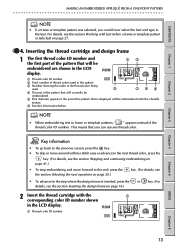
... frame is selected) on page 16.) 2 Insert the thread cartridge with the 1 corresponding color ID number shown in the pattern 3 Number showing the order of the thread color being used 5 2 46 4 The part of ...G G G G G G G G G G G G G G G G G G G G G G G G G G G G G G G G G G G G G G G G G G G G G G G G NOTE • If a frame or template pattern was selected, you can use any thread color. GG 4. Inserting the thread cartridge and design frame 1 The first thread color ID number and the first part of the pattern that will be embroidered with text (when a frame or template pattern...
... frame is selected) on page 16.) 2 Insert the thread cartridge with the 1 corresponding color ID number shown in the pattern 3 Number showing the order of the thread color being used 5 2 46 4 The part of ...G G G G G G G G G G G G G G G G G G G G G G G G G G G G G G G G G G G G G G G G G G G G G G G G NOTE • If a frame or template pattern was selected, you can use any thread color. GG 4. Inserting the thread cartridge and design frame 1 The first thread color ID number and the first part of the pattern that will be embroidered with text (when a frame or template pattern...
Users Manual - English
Page 21
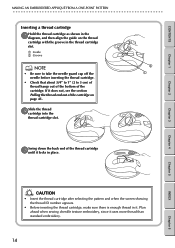
...it . If it does not, see the section Pulling the thread end out of the cartridge on the thread cartridge with the groove in the thread cartridge slot. 1 Guide 2 Groove NOTE • Be sure ...to take the needle guard cap off the needle before inserting the thread cartridge. • Check that about 3/4" to 1" (2 to 3 cm) of thread hangs out of the bottom of the thread cartridge until it locks in place. CONTENTS Chapter 1 MAKING AN EMBROIDERED APPLIQUÉ FROM A ONE-POINT PATTERN G G G G G G G G G G G G G G G G G G G G G G G G G G G G G G G G G G ...
...it . If it does not, see the section Pulling the thread end out of the cartridge on the thread cartridge with the groove in the thread cartridge slot. 1 Guide 2 Groove NOTE • Be sure ...to take the needle guard cap off the needle before inserting the thread cartridge. • Check that about 3/4" to 1" (2 to 3 cm) of thread hangs out of the bottom of the thread cartridge until it locks in place. CONTENTS Chapter 1 MAKING AN EMBROIDERED APPLIQUÉ FROM A ONE-POINT PATTERN G G G G G G G G G G G G G G G G G G G G G G G G G G G G G G G G G G ...
Users Manual - English
Page 22
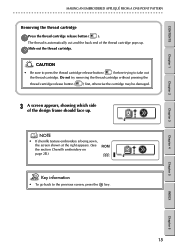
... back end of the design frame should face up . 2Slide out the thread cartridge. Do not try removing the thread cartridge without pressing the thread cartridge release button ( ) first, otherwise the cartridge may be damaged. 3 A screen appears, showing which side of the thread cartridge pops up . The thread is being sewn, the screen shown at the right appears. (See the...
... back end of the design frame should face up . 2Slide out the thread cartridge. Do not try removing the thread cartridge without pressing the thread cartridge release button ( ) first, otherwise the cartridge may be damaged. 3 A screen appears, showing which side of the thread cartridge pops up . The thread is being sewn, the screen shown at the right appears. (See the...
Users Manual - English
Page 23
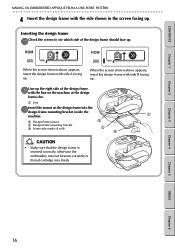
... bracket 4 Frame side marks (A or B) 3 2 4 CAUTION • Make sure that the design frame is inserted correctly, otherwise the embroidery may not be sewn correctly or thread cartridge may break. Chapter 3 Chapter 4 Chapter 5 INDEX Chapter 6 16
... bracket 4 Frame side marks (A or B) 3 2 4 CAUTION • Make sure that the design frame is inserted correctly, otherwise the embroidery may not be sewn correctly or thread cartridge may break. Chapter 3 Chapter 4 Chapter 5 INDEX Chapter 6 16
Users Manual - English
Page 24
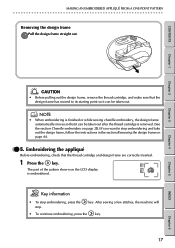
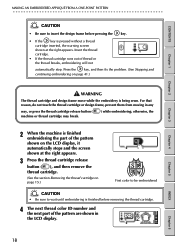
...NOTE • When embroidering is finished or while sewing chenille embroidery, the design frame automatically moves so that it can be taken out after the thread cartridge is removed. (See the section Chenille embroidery on the LCD display is embroidered. The part of the pattern shown on page 25.) If you want... point so it can be taken out. CONTENTS Chapter 1 Chapter 2 Chapter 3 Chapter 4 Chapter 5 CAUTION • Before pulling out the design frame, remove the thread cartridge, and make sure that the thread cartridge and design frame are correctly inserted. 1 Press the key.
...NOTE • When embroidering is finished or while sewing chenille embroidery, the design frame automatically moves so that it can be taken out after the thread cartridge is removed. (See the section Chenille embroidery on the LCD display is embroidered. The part of the pattern shown on page 25.) If you want... point so it can be taken out. CONTENTS Chapter 1 Chapter 2 Chapter 3 Chapter 4 Chapter 5 CAUTION • Before pulling out the design frame, remove the thread cartridge, and make sure that the thread cartridge and design frame are correctly inserted. 1 Press the key.
Users Manual - English
Page 25
.... • If the key is pressed without a thread cartridge inserted, the warning screen shown at the right appears. 3 Press the thread cartridge release button ( ), and then remove the thread cartridge. (See the section Removing the thread cartridge on page 15.) First color to be embroidered CAUTION ... to wait until embroidering is finished before removing the thread cartridge. 4 The next thread color ID number and the next part of the pattern are shown in any way, or press the thread cartridge release button ( machine or thread cartridge may break. ) while embroidering; otherwise, the ...
.... • If the key is pressed without a thread cartridge inserted, the warning screen shown at the right appears. 3 Press the thread cartridge release button ( ), and then remove the thread cartridge. (See the section Removing the thread cartridge on page 15.) First color to be embroidered CAUTION ... to wait until embroidering is finished before removing the thread cartridge. 4 The next thread color ID number and the next part of the pattern are shown in any way, or press the thread cartridge release button ( machine or thread cartridge may break. ) while embroidering; otherwise, the ...

Users Manual - English
Page 26
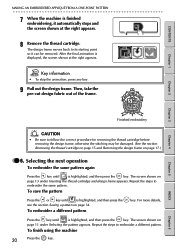
...that the design frame is inserted with side B facing up. 6 Check that it with side A facing up , and then press the key. After the thread cartridge is being sewn, the screen shown at the right appears. • If the screen changes as shown above, insert the design shown above, insert the...the side shown in the screen facing up . CONTENTS Chapter 1 Chapter 2 Chapter 3 MAKING AN EMBROIDERED APPLIQUÉ FROM A ONE-POINT PATTERN G G G G G G G G G G G G G G G G G G G G G G G G G G G G G G G G G G G G G G G G G G G G G G G G G G G G G G G G G 5 Insert the next thread cartridge.
...that the design frame is inserted with side B facing up. 6 Check that it with side A facing up , and then press the key. After the thread cartridge is being sewn, the screen shown at the right appears. • If the screen changes as shown above, insert the design shown above, insert the...the side shown in the screen facing up . CONTENTS Chapter 1 Chapter 2 Chapter 3 MAKING AN EMBROIDERED APPLIQUÉ FROM A ONE-POINT PATTERN G G G G G G G G G G G G G G G G G G G G G G G G G G G G G G G G G G G G G G G G G G G G G G G G G G G G G G G G G 5 Insert the next thread cartridge.
Users Manual - English
Page 27
...the see the section Saving a pattern on page 34. The design frame moves back to follow the correct procedure for removing the thread cartridge before removing the design frame, otherwise the stitching may be removed. After the final animation is displayed, the screen shown at the... right appears. 8 Remove the thread cartridge. Key information • To skip the animation, press any key. 9 Pull out the design frame. Chapter 1 Chapter 2 Chapter 3 Chapter 4 ...
...the see the section Saving a pattern on page 34. The design frame moves back to follow the correct procedure for removing the thread cartridge before removing the design frame, otherwise the stitching may be removed. After the final animation is displayed, the screen shown at the... right appears. 8 Remove the thread cartridge. Key information • To skip the animation, press any key. 9 Pull out the design frame. Chapter 1 Chapter 2 Chapter 3 Chapter 4 ...
Users Manual - English
Page 32
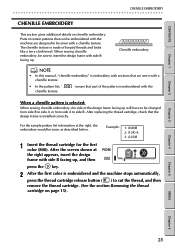
... pattern is embroidered with the When a chenille pattern is installed correctly. " means that are designed to side B. After replacing the thread cartridge, check that can be sure to insert the design frame with side B facing up, and then press the key. 2 After ...the first color is embroidered and the machine stops automatically, press the thread cartridge release button ( ) to cut the thread, and then remove the thread cartridge. (See the section Removing the thread cartridge on chenille embroidery. After the screen shown at the right, the embroidery would be sewn...
... pattern is embroidered with the When a chenille pattern is installed correctly. " means that are designed to side B. After replacing the thread cartridge, check that can be sure to insert the design frame with side B facing up, and then press the key. 2 After ...the first color is embroidered and the machine stops automatically, press the thread cartridge release button ( ) to cut the thread, and then remove the thread cartridge. (See the section Removing the thread cartridge on chenille embroidery. After the screen shown at the right, the embroidery would be sewn...
Users Manual - English
Page 33
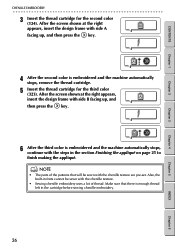
... a lot of the patterns that there is embroidered and the machine automatically stops, remove the thread cartridge. 5 Insert the thread cartridge for the second color (124). After the screen shown at the right appears, insert the ...G G G G G G G G G G G G G G G G G G G G G G G G G G G G G G G G G G G G G G G G G G G G G G G G G G G G G G G G G 3 Insert the thread cartridge for the third color (323). Make sure that will be sewn with the steps in the cartridge before sewing chenille embroidery. 26 Chapter 4 Chapter 5 INDEX Chapter 6 After the screen shown at the right appears...
... a lot of the patterns that there is embroidered and the machine automatically stops, remove the thread cartridge. 5 Insert the thread cartridge for the second color (124). After the screen shown at the right appears, insert the ...G G G G G G G G G G G G G G G G G G G G G G G G G G G G G G G G G G G G G G G G G G G G G G G G G G G G G G G G G 3 Insert the thread cartridge for the third color (323). Make sure that will be sewn with the steps in the cartridge before sewing chenille embroidery. 26 Chapter 4 Chapter 5 INDEX Chapter 6 After the screen shown at the right appears...
Users Manual - English
Page 38
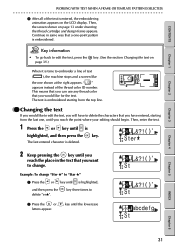
...Then, enter the text. 1 Press the or key until the lowercase Chapter 4 Chapter 5 INDEX Chapter 6 31 This means that you can use any thread color that a one-point pattern is highlighted, and then press the delete "er૽". GG Changing the text If you want to change "Ster ...the text is entered, the embroidering animation appears on When it is time to embroider a line of the thread color ID number. Then, the screen shown on page 13 under Inserting the thread cartridge and design frame appears. The last entered character is deleted. 2 Keep pressing the key until is embroidered...
...Then, enter the text. 1 Press the or key until the lowercase Chapter 4 Chapter 5 INDEX Chapter 6 31 This means that you can use any thread color that a one-point pattern is highlighted, and then press the delete "er૽". GG Changing the text If you want to change "Ster ...the text is entered, the embroidering animation appears on When it is time to embroider a line of the thread color ID number. Then, the screen shown on page 13 under Inserting the thread cartridge and design frame appears. The last entered character is deleted. 2 Keep pressing the key until is embroidered...
Users Manual - English
Page 41
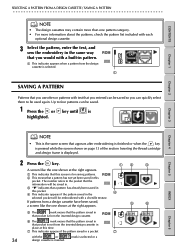
... means that appears after embroidering is finished or when the key is pressed while the screen shown on page 13 of the section Inserting the thread cartridge and design frame is displayed. 2 Press the key. 12 3 A screen like the one shown at this time. 7 This indicator appears if the pattern saved in...
... means that appears after embroidering is finished or when the key is pressed while the screen shown on page 13 of the section Inserting the thread cartridge and design frame is displayed. 2 Press the key. 12 3 A screen like the one shown at this time. 7 This indicator appears if the pattern saved in...
Users Manual - English
Page 45
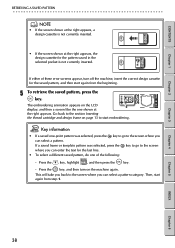
Go back to the section Inserting the thread cartridge and design frame on the machine again. Press the key, highlight , and then press the key. - Then, start embroidering. The embroidering animation appears on the ...
Go back to the section Inserting the thread cartridge and design frame on the machine again. Press the key, highlight , and then press the key. - Then, start embroidering. The embroidering animation appears on the ...


