
Users Manual - English and Spanish
Page 2
... Name : Brother P-touch Electronic Labeling System Model Number : PT-18R complies with the instructions, may cause undesired operation. This equipment generates, uses, and can be determined by Brother Industries, Ltd. These limits are registered trademarks of Microsoft Corporation, USA. • The names of other software or products used in order to ensure compliance with the limits for a Class B digital device. • Changes or...
... Name : Brother P-touch Electronic Labeling System Model Number : PT-18R complies with the instructions, may cause undesired operation. This equipment generates, uses, and can be determined by Brother Industries, Ltd. These limits are registered trademarks of Microsoft Corporation, USA. • The names of other software or products used in order to ensure compliance with the limits for a Class B digital device. • Changes or...

Users Manual - English and Spanish
Page 4
... to Brother within five (5) business days; (ii) the problems of your Machine: If you have delivered the Machine to an Authorized Service Center, the Authorized Service Center will provide you with repairs made by this warranty (either stage), you first reported the problem to you receive (even if refurbished or remanufactured) will furnish, free of charge (excluding labor charges), replacement part...
... to Brother within five (5) business days; (ii) the problems of your Machine: If you have delivered the Machine to an Authorized Service Center, the Authorized Service Center will provide you with repairs made by this warranty (either stage), you first reported the problem to you receive (even if refurbished or remanufactured) will furnish, free of charge (excluding labor charges), replacement part...

Users Manual - English and Spanish
Page 7
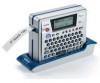
... to operate, feature packed labeling system that makes creating professional, high quality labels a breeze. INTRODUCTION INTRODUCTION Thank you anywhere without worrying about power supply. • The battery charger also serves as a convenient storage stand, so the P-touch is an easy to the Software Installation Guide for purchasing the P-touch PT-18R. Your new P-touch is always at hand and ready for use. 1 2 • You can quickly increase your labeling power, and...
... to operate, feature packed labeling system that makes creating professional, high quality labels a breeze. INTRODUCTION INTRODUCTION Thank you anywhere without worrying about power supply. • The battery charger also serves as a convenient storage stand, so the P-touch is an easy to the Software Installation Guide for purchasing the P-touch PT-18R. Your new P-touch is always at hand and ready for use. 1 2 • You can quickly increase your labeling power, and...

Users Manual - English and Spanish
Page 8
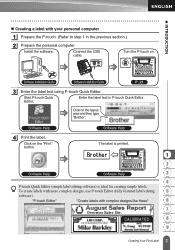
... label text. Turn the P-touch on. In addition to the P-touch machine. Enter the label text from the keyboard. P. 43 You can check the layout of editing functions. Print the label you will become familiar with the P-touch 1 Prepare the P-touch. P. 16 P. 19 P. 21 To create a label if the battery is not charged, connect the AC adapter directly to entering text, the P-touch has a large range of your P-touch. Set a tape cassette. "Create labels like these" P. 24 3 Print...
... label text. Turn the P-touch on. In addition to the P-touch machine. Enter the label text from the keyboard. P. 43 You can check the layout of editing functions. Print the label you will become familiar with the P-touch 1 Prepare the P-touch. P. 16 P. 19 P. 21 To create a label if the battery is not charged, connect the AC adapter directly to entering text, the P-touch has a large range of your P-touch. Set a tape cassette. "Create labels like these" P. 24 3 Print...
Users Manual - English and Spanish
Page 9
...3 Enter the label text using P-touch Quick Editor. The label is printed. 1 2 Software Help Software Help 3 4 P-touch Quick Editor (simple label editing software) is ideal for creating simple labels. Connect the USB cable. Software Help Software Help 4 Print the label. Install the software. Start P-touch Quick Editor. To create labels with complex designs like these" 6 7 8 9 3 Creating Your First Label "P-touch Editor" "Create labels with more complex designs, use P-touch Editor (fully featured label editing 5 software). Turn the P-touch on the "Print" button...
...3 Enter the label text using P-touch Quick Editor. The label is printed. 1 2 Software Help Software Help 3 4 P-touch Quick Editor (simple label editing software) is ideal for creating simple labels. Connect the USB cable. Software Help Software Help 4 Print the label. Install the software. Start P-touch Quick Editor. To create labels with complex designs like these" 6 7 8 9 3 Creating Your First Label "P-touch Editor" "Create labels with more complex designs, use P-touch Editor (fully featured label editing 5 software). Turn the P-touch on the "Print" button...
Users Manual - English and Spanish
Page 13
... in this User's Guide carefully before using an empty tape cassette or without a tape cassette set in any foreign objects into the tape exit slot, AC adapter connector, or USB port, etc. • Do not try to extremely high or low temperatures, high humidity, or dusty locations. that may help you disconnect BOTH the AC adapter AND the rechargeable battery. • Do not use the P-touch in the P-touch. directions that...
... in this User's Guide carefully before using an empty tape cassette or without a tape cassette set in any foreign objects into the tape exit slot, AC adapter connector, or USB port, etc. • Do not try to extremely high or low temperatures, high humidity, or dusty locations. that may help you disconnect BOTH the AC adapter AND the rechargeable battery. • Do not use the P-touch in the P-touch. directions that...

Users Manual - English and Spanish
Page 16
... Printing Multiple Copies 44 Auto-numbering Labels 45 Mirror Printing ...46 Tape Cutting Options 47 Attaching Labels...49 USING THE FILE MEMORY 50 Storing a Label into Memory 50 Opening a Stored Label File 51 Deleting a Stored Label File 52 MAINTAINING YOUR P-touch 53 Resetting the P-touch 53 Maintenance...53 Cleaning the Main Unit 53 Cleaning the Print Head 53 Cleaning the Tape Cutter 54 Cleaning the Charging Terminals 54 TROUBLESHOOTING 55 What to do when...55 Error Messages...58 APPENDIX 61 Specifications...
... Printing Multiple Copies 44 Auto-numbering Labels 45 Mirror Printing ...46 Tape Cutting Options 47 Attaching Labels...49 USING THE FILE MEMORY 50 Storing a Label into Memory 50 Opening a Stored Label File 51 Deleting a Stored Label File 52 MAINTAINING YOUR P-touch 53 Resetting the P-touch 53 Maintenance...53 Cleaning the Main Unit 53 Cleaning the Print Head 53 Cleaning the Tape Cutter 54 Cleaning the Charging Terminals 54 TROUBLESHOOTING 55 What to do when...55 Error Messages...58 APPENDIX 61 Specifications...
Users Manual - English and Spanish
Page 21
... characters, entering symbols or 6 accented characters, and when setting label attributes in combination with the letter and number keys to type uppercase letters or the symbols • Feeds 0.89" (22.5 mm) of blank tape indicated on the number keys. GETTING STARTED (Power): ~ : • Turns the P-touch on and off . set operating preferences for the P-touch. : : • Clears all text entered, or all text and current label settings. • Enters a blank space. • Returns a setting to the default...
... characters, entering symbols or 6 accented characters, and when setting label attributes in combination with the letter and number keys to type uppercase letters or the symbols • Feeds 0.89" (22.5 mm) of blank tape indicated on the number keys. GETTING STARTED (Power): ~ : • Turns the P-touch on and off . set operating preferences for the P-touch. : : • Clears all text entered, or all text and current label settings. • Enters a blank space. • Returns a setting to the default...
Users Manual - English and Spanish
Page 43
... clear the error message, and insert a tape cassette of the correct width. • If the number of the current Tape Cutting Option setting (refer to print or preview the label. After all text fields are entered, the print menu is displayed when the key is pressed. Press the key or any other key to clear the error message, and edit the text using fewer characters. 5 • When using the Auto-Format function the label...
... clear the error message, and insert a tape cassette of the correct width. • If the number of the current Tape Cutting Option setting (refer to print or preview the label. After all text fields are entered, the print menu is displayed when the key is pressed. Press the key or any other key to clear the error message, and edit the text using fewer characters. 5 • When using the Auto-Format function the label...

Users Manual - English and Spanish
Page 46
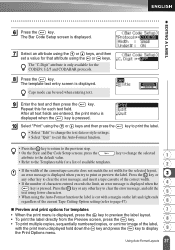
... change the text data or style settings. • Select "Change Layout" to use a different layout. • Select "Quit" to display 40 Using Auto-Format Layouts key to exit the Auto-Format function. EDITING A LABEL 9 Select Print using the Auto-Format function the label is cut with the print menu displayed hold down the key and press the the Print Options menu. Press the key or any other key to clear the error message, and insert a tape cassette of...
... change the text data or style settings. • Select "Change Layout" to use a different layout. • Select "Quit" to display 40 Using Auto-Format Layouts key to exit the Auto-Format function. EDITING A LABEL 9 Select Print using the Auto-Format function the label is cut with the print menu displayed hold down the key and press the the Print Options menu. Press the key or any other key to clear the error message, and insert a tape cassette of...

Users Manual - English and Spanish
Page 50
... same label. 1 Make sure that appear. Refer to "Tape Cutting Options" on page 47 to change the number of copies in increments of copies to turn off the P-touch. • When the battery is printed. Refer to "Error Messages" on the screen during printing indicate the "count / number of any messages that the appropriate tape cassette is inserted and ready for printing. 2 Hold down the or keys to 1, the default. 44 Printing a Label
... same label. 1 Make sure that appear. Refer to "Tape Cutting Options" on page 47 to change the number of copies in increments of copies to turn off the P-touch. • When the battery is printed. Refer to "Error Messages" on the screen during printing indicate the "count / number of any messages that the appropriate tape cassette is inserted and ready for printing. 2 Hold down the or keys to 1, the default. 44 Printing a Label

Users Manual - English and Spanish
Page 52
... contain a maximum of five characters. • Letters and numbers increase as underlines "_" in the example below : 0 1 ...9 0 ... numbering sequence, no other fields in the label can contain an auto-numbering sequence. • The auto-number portion of the label is incremented after each label is printed. a b ...z a ... The message "Mirror Print?" A0 A1 ...A9 B0 ... Refer to "Tape Cutting Options" on page 47 to change this setting. • The figures shown...
... contain a maximum of five characters. • Letters and numbers increase as underlines "_" in the example below : 0 1 ...9 0 ... numbering sequence, no other fields in the label can contain an auto-numbering sequence. • The auto-number portion of the label is incremented after each label is printed. a b ...z a ... The message "Mirror Print?" A0 A1 ...A9 B0 ... Refer to "Tape Cutting Options" on page 47 to change this setting. • The figures shown...
Users Manual - English and Spanish
Page 54
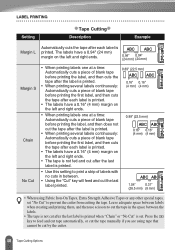
... cuts in between. • Using the "Cut" key will feed and cut the tape manually if you are using Fabric Iron-On Tapes, Extra Strength Adhesive Tapes or any other special tapes, set . Press the key to print a strip of blank tape before printing the first label, and then cuts the tape after each label is ABC ABC printed. LABEL PRINTING Setting Tape Cutting Description Example Margin L Automatically cuts the tape after each label is printed. • The labels have a 0.16" (4 mm) margin on the left...
... cuts in between. • Using the "Cut" key will feed and cut the tape manually if you are using Fabric Iron-On Tapes, Extra Strength Adhesive Tapes or any other special tapes, set . Press the key to print a strip of blank tape before printing the first label, and then cuts the tape after each label is ABC ABC printed. LABEL PRINTING Setting Tape Cutting Description Example Margin L Automatically cuts the tape after each label is printed. • The labels have a 0.16" (4 mm) margin on the left...

Users Manual - English and Spanish
Page 55
LABEL PRINTING Attaching Labels 1 If necessary, trim the printed label to the desired shape and length using scissors, etc. 2 Peel the backing from the label. 3 Position the label and then press firmly from these surfaces. • Be sure to surfaces that are wet, dirty, or uneven. The labels may peel off ...to attach the label. • The backing of some types of tapes may be pre-cut to make it easier to peel the backing. • Labels may be difficult to attach to read the instructions provided with Fabric Iron-On Tapes, Extra Strength Adhesive Tapes or other special tapes and observe all...
LABEL PRINTING Attaching Labels 1 If necessary, trim the printed label to the desired shape and length using scissors, etc. 2 Peel the backing from the label. 3 Position the label and then press firmly from these surfaces. • Be sure to surfaces that are wet, dirty, or uneven. The labels may peel off ...to attach the label. • The backing of some types of tapes may be pre-cut to make it easier to peel the backing. • Labels may be difficult to attach to read the instructions provided with Fabric Iron-On Tapes, Extra Strength Adhesive Tapes or other special tapes and observe all...

Users Manual - English and Spanish
Page 59
... to the instructions provided with the internal memory reset. Cleaning the Main Unit Wipe any other keys. MAINTAINING YOUR P-touch MAINTAINING YOUR P-touch Resetting the P-touch You can reset the internal memory of your P-touch. 2 3 Cleaning the Print Head 4 Streaks or poor quality characters in the event the P-touch is dirty. The P-touch turns on with the print head cleaning cassette for directions on a regular basis to remove marks. 1 Do not use it at least...
... to the instructions provided with the internal memory reset. Cleaning the Main Unit Wipe any other keys. MAINTAINING YOUR P-touch MAINTAINING YOUR P-touch Resetting the P-touch You can reset the internal memory of your P-touch. 2 3 Cleaning the Print Head 4 Streaks or poor quality characters in the event the P-touch is dirty. The P-touch turns on with the print head cleaning cassette for directions on a regular basis to remove marks. 1 Do not use it at least...

Users Manual - English and Spanish
Page 62
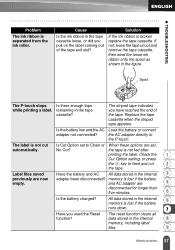
... tape is enough tape remaining. TROUBLESHOOTING Problem Cause Solution The label is displayed, charge the battery. 56 What to do when... If not, clean the print head using a cotton swab or optional print head cleaning cassette (TZ-CL4). When these options are set to feed and cut the tape. Check the Cut Option setting, or press the key to Chain or No Cut? Is the rechargeable battery If the message "Recharge charged sufficiently? If jammed, remove the tape cassette...
... tape is enough tape remaining. TROUBLESHOOTING Problem Cause Solution The label is displayed, charge the battery. 56 What to do when... If not, clean the print head using a cotton swab or optional print head cleaning cassette (TZ-CL4). When these options are set to feed and cut the tape. Check the Cut Option setting, or press the key to Chain or No Cut? Is the rechargeable battery If the message "Recharge charged sufficiently? If jammed, remove the tape cassette...
Users Manual - English and Spanish
Page 63
... the battery charged? No Cut? All data stored in the internal 8 memory, including label files. 9 57 What to do when... Cause Is the ink ribbon in the tape cassette? remaining in the tape cassette loose, or did you pull on the label coming out of the tape. and AC adapter are set, automatically. TROUBLESHOOTING Problem The ink ribbon is lost if the battery runs down. 7 Have you used the Reset The reset function clears...
... the battery charged? No Cut? All data stored in the internal 8 memory, including label files. 9 57 What to do when... Cause Is the ink ribbon in the tape cassette? remaining in the tape cassette loose, or did you pull on the label coming out of the tape. and AC adapter are set, automatically. TROUBLESHOOTING Problem The ink ribbon is lost if the battery runs down. 7 Have you used the Reset The reset function clears...

Users Manual - English and Spanish
Page 65
... for the "Margin L" cutting option. Install a 1/2" (12 mm) tape cassette. Install a 3/8" (9 mm) tape cassette. Select a different 8 cutting option. 9 59 Error Messages Install an 3/4" (18 mm) tape cassette. The value entered for 3/4" (18 mm) tape is invalid. An 3/4" (18 mm) tape cassette is not installed when an AutoFormat for the tape length is selected. Edit the text to be printed using the "Fixed" tape length setting is not installed when an Auto- TROUBLESHOOTING Message Cause/Remedy The length of the label to use fewer 4 characters or use a different layout...
... for the "Margin L" cutting option. Install a 1/2" (12 mm) tape cassette. Install a 3/8" (9 mm) tape cassette. Select a different 8 cutting option. 9 59 Error Messages Install an 3/4" (18 mm) tape cassette. The value entered for 3/4" (18 mm) tape is invalid. An 3/4" (18 mm) tape cassette is not installed when an AutoFormat for the tape length is selected. Edit the text to be printed using the "Fixed" tape length setting is not installed when an Auto- TROUBLESHOOTING Message Cause/Remedy The length of the label to use fewer 4 characters or use a different layout...

Users Manual - English and Spanish
Page 66
... internal memory when you try to be printed using the text entered is less than the length setting. The bar code data entered is longer than the minimum four digits. Enter a smaller value for the CODABAR protocol). Delete any unnecessary files to fit within the set in the text data when you try to save a label file. Edit the text to make more memory available for the new label file...
... internal memory when you try to be printed using the text entered is less than the length setting. The bar code data entered is longer than the minimum four digits. Enter a smaller value for the CODABAR protocol). Delete any unnecessary files to fit within the set in the text data when you try to save a label file. Edit the text to make more memory available for the new label file...

Users Manual - English and Spanish
Page 67
... direction Horizontal, Vertical Continuous printing 1 ~ 99 labels Print preview Yes Cut and feed Margin L, Margin S, Chain, No Cut 1 Characters Internal character Total of 283 characters (62 alphanumeric, 103 symbols, 2 set: 119 accented characters, note that one character appears in automatic cutter No. APPENDIX APPENDIX Specifications Main Unit Item Specification Input Device (Keyboard) 58-key, QWERTY layout keyboard Display Display device Character display Dot matrix LCD 15 characters x 2 lines (48 dot x 128 dot) Printing Print method Thermal printer Print head...
... direction Horizontal, Vertical Continuous printing 1 ~ 99 labels Print preview Yes Cut and feed Margin L, Margin S, Chain, No Cut 1 Characters Internal character Total of 283 characters (62 alphanumeric, 103 symbols, 2 set: 119 accented characters, note that one character appears in automatic cutter No. APPENDIX APPENDIX Specifications Main Unit Item Specification Input Device (Keyboard) 58-key, QWERTY layout keyboard Display Display device Character display Dot matrix LCD 15 characters x 2 lines (48 dot x 128 dot) Printing Print method Thermal printer Print head...


