
Users Manual - English
Page 96
...1 to replace the fuser unit. C 1-877-BROTHER (1-877-276-8437) (in USA) 1-877-BROTHER (in Canada) Replace Parts Laser Unit It is time to reset. Call Brother Customer Service to replace the PF Kit MP. 1-877-BROTHER (1-877-276-8437) (in USA) 1-877-BROTHER (in Canada) Replace Parts PF Kit 2 It... is time to replace the PF Kit 2. Replace the drum unit. Replace the toner cartridge with a new one. (See Replacing a toner ...
...1 to replace the fuser unit. C 1-877-BROTHER (1-877-276-8437) (in USA) 1-877-BROTHER (in Canada) Replace Parts Laser Unit It is time to reset. Call Brother Customer Service to replace the PF Kit MP. 1-877-BROTHER (1-877-276-8437) (in USA) 1-877-BROTHER (in Canada) Replace Parts PF Kit 2 It... is time to replace the PF Kit 2. Replace the drum unit. Replace the toner cartridge with a new one. (See Replacing a toner ...
Users Manual - English
Page 99
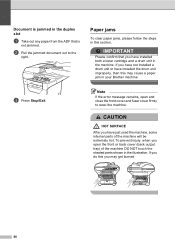
...in the duplex slot C a Take out any paper from the ADF that you have installed both a toner cartridge and a drum unit in the machine. Document is not jammed. c Press Stop/Exit. To... you do this section. Paper jams C To clear paper jams, please follow the steps in your Brother machine. If you open and close the front cover and fuser cover firmly to the right. CAUTION ...or have just used the machine, some internal parts of the machine DO NOT touch the shaded parts shown in the illustration. b Pull the jammed document out to reset the machine. Note If the error ...
...in the duplex slot C a Take out any paper from the ADF that you have installed both a toner cartridge and a drum unit in the machine. Document is not jammed. c Press Stop/Exit. To... you do this section. Paper jams C To clear paper jams, please follow the steps in your Brother machine. If you open and close the front cover and fuser cover firmly to the right. CAUTION ...or have just used the machine, some internal parts of the machine DO NOT touch the shaded parts shown in the illustration. b Pull the jammed document out to reset the machine. Note If the error ...

Users Manual - English
Page 121
... Push the Scanner Lock Lever down by pressing Menu, 5, 0. This lever is located on the left of the scanner glass. Leave the toner cartridge installed in step c, you chose 1.Reset in the drum unit. 108 d Press the front cover release button and open the front cover. e Take out the drum unit and... toner cartridge assembly. Press a or b to lock the scanner before packing. When you choose 1.Yes, the machine will asked to lock the ...
... Push the Scanner Lock Lever down by pressing Menu, 5, 0. This lever is located on the left of the scanner glass. Leave the toner cartridge installed in step c, you chose 1.Reset in the drum unit. 108 d Press the front cover release button and open the front cover. e Take out the drum unit and... toner cartridge assembly. Press a or b to lock the scanner before packing. When you choose 1.Yes, the machine will asked to lock the ...
Service Manual
Page 61
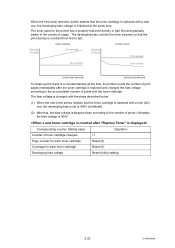
... for the printer has a property that the print density is light first and gradually darker in the course of toner cartridge changes Page counter for each toner cartridge Developing bias voltage Operation +1 Reset (0) Reset (0) Reset (Initial setting) 2-23 Confidential The developing bias controls the toner property so that print density is constant from first to last.
... for the printer has a property that the print density is light first and gradually darker in the course of toner cartridge changes Page counter for each toner cartridge Developing bias voltage Operation +1 Reset (0) Reset (0) Reset (Initial setting) 2-23 Confidential The developing bias controls the toner property so that print density is constant from first to last.
Service Manual
Page 62
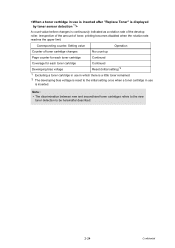
... changes is inserted. Irrespective of the amount of toner cartridge changes No count up Page counter for each toner cartridge Continued Coverage for each toner cartridge Continued Developing bias voltage Reset (Initial setting)*2 *1 Excluding a toner cartridge in use in which there is a little toner remained. *2 The developing bias voltage is reset to be hereinafter described. 2-24 Confidential
... changes is inserted. Irrespective of the amount of toner cartridge changes No count up Page counter for each toner cartridge Continued Coverage for each toner cartridge Continued Developing bias voltage Reset (Initial setting)*2 *1 Excluding a toner cartridge in use in which there is a little toner remained. *2 The developing bias voltage is reset to be hereinafter described. 2-24 Confidential
Service Manual
Page 77
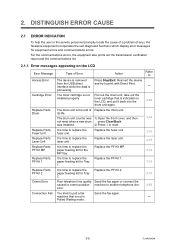
...interface while the data is time to replace the paper feeding kit for the MP tray. Pull out the drum unit, take out the toner cartridge that is time to replace the laser unit. error. 3-62 You tried to another telephone line. was 1) Open the front cover...errors and communications errors. Polled Waiting mode. 3-5 Confidential The drum unit counter was installed. 2) Press 1 to reset. 3-14 It is time to replace the fuser unit. 2. The toner cartridge is removed Press Stop/Exit. DISTINGUISH ERROR CAUSE 2.1 ERROR INDICATION To help the user or the service ...
...interface while the data is time to replace the paper feeding kit for the MP tray. Pull out the drum unit, take out the toner cartridge that is time to replace the laser unit. error. 3-62 You tried to another telephone line. was 1) Open the front cover...errors and communications errors. Polled Waiting mode. 3-5 Confidential The drum unit counter was installed. 2) Press 1 to reset. 3-14 It is time to replace the fuser unit. 2. The toner cartridge is removed Press Stop/Exit. DISTINGUISH ERROR CAUSE 2.1 ERROR INDICATION To help the user or the service ...
Service Manual
Page 106
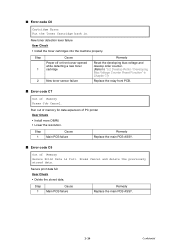
...• Lower the resolution. New toner detection lever failure User Check • Install the toner cartridges into the machine properly. Step 1 Cause Power off or front cover opened while detecting a new toner cartridge 2 New toner sensor failure Remedy Reset the developing bias voltage and develop ...roller counter. (Refer to "5.2 Develop Roller / Developing Bias Voltage Counter Reset Function" in . Secure print data full User Check •...
...• Lower the resolution. New toner detection lever failure User Check • Install the toner cartridges into the machine properly. Step 1 Cause Power off or front cover opened while detecting a new toner cartridge 2 New toner sensor failure Remedy Reset the developing bias voltage and develop ...roller counter. (Refer to "5.2 Develop Roller / Developing Bias Voltage Counter Reset Function" in . Secure print data full User Check •...
Service Manual
Page 119
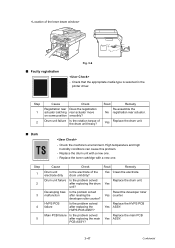
...the problem solved Replace the drum unit. Developing bias Is the problem solved Reset the developer roller malfunciton after replacing the main PCB ASSY? Main PCB failure Is the problem solved after reseting the Yes counter. Check that the appropriate media type is selected in the.... 3-47 Confidential Step 1 2 Cause Check Registration rear Does the registration actuator catching rear actuator move on some position smoothly? Replace the toner cartridge with a new one . after replacing the HVPS PCB ASSY? Replace the HVPS PCB Yes ASSY. HVPS PCB failure Is the problem...
...the problem solved Replace the drum unit. Developing bias Is the problem solved Reset the developer roller malfunciton after replacing the main PCB ASSY? Main PCB failure Is the problem solved after reseting the Yes counter. Check that the appropriate media type is selected in the.... 3-47 Confidential Step 1 2 Cause Check Registration rear Does the registration actuator catching rear actuator move on some position smoothly? Replace the toner cartridge with a new one . after replacing the HVPS PCB ASSY? Replace the HVPS PCB Yes ASSY. HVPS PCB failure Is the problem...

Service Manual
Page 184
(30) Catch the Pins of the Outer chute onto the Back cover, and close the Back cover. 30b Pin Back cover Pin Outer chute ASSY 30a Back cover Fig. 4-44 Set the following parts after assembling. • Set the DX feed ASSY or DX blank cover. • Install the Drum/toner ASSY into the Printer. • Put the Paper into the Paper tray. • Reset the count of the Fuser unit and Laser unit after part replacement. (Refer to "5.1 Resetting the Periodical Replacement Parts Life" in Chapter7.) 4-29 Confidential
(30) Catch the Pins of the Outer chute onto the Back cover, and close the Back cover. 30b Pin Back cover Pin Outer chute ASSY 30a Back cover Fig. 4-44 Set the following parts after assembling. • Set the DX feed ASSY or DX blank cover. • Install the Drum/toner ASSY into the Printer. • Put the Paper into the Paper tray. • Reset the count of the Fuser unit and Laser unit after part replacement. (Refer to "5.1 Resetting the Periodical Replacement Parts Life" in Chapter7.) 4-29 Confidential

Service Manual
Page 195
MP feed frame cover MP feed frame MP feed frame Front cover Fig. 4-58 (5) Install the Drum/toner ASSY into the MP feed frame and turn the Holder bearing MP to the direction of the PF Kit MP after part replacement. 4-40 Confidential Holder bearing MP Hook 3a 3c 3b Fig. 4-57 (4) Close the MP feed frame cover. (3) Put the Holder bearing MP into the Printer. (6) Close the Front cover. * Reset the count of the arrow 3c to lock.
MP feed frame cover MP feed frame MP feed frame Front cover Fig. 4-58 (5) Install the Drum/toner ASSY into the MP feed frame and turn the Holder bearing MP to the direction of the PF Kit MP after part replacement. 4-40 Confidential Holder bearing MP Hook 3a 3c 3b Fig. 4-57 (4) Close the MP feed frame cover. (3) Put the Holder bearing MP into the Printer. (6) Close the Front cover. * Reset the count of the arrow 3c to lock.
Service Manual
Page 381
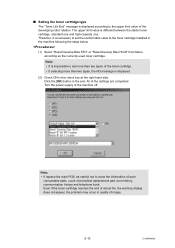
... of image. 6-10 Confidential Therefore, it is displayed. (2) Check ON in the machine following the steps below. (1) Select "Reset Develop Bias STD" or "Reset Develop Bias HIGH" from Menu according as the currently used toner cartridge. Click the [OK] button in quality of periodical replacement part, error history, communication history and telephone book...
... of image. 6-10 Confidential Therefore, it is displayed. (2) Check ON in the machine following the steps below. (1) Select "Reset Develop Bias STD" or "Reset Develop Bias HIGH" from Menu according as the currently used toner cartridge. Click the [OK] button in quality of periodical replacement part, error history, communication history and telephone book...
Service Manual
Page 425
...according to the number of develop roller rotations so that the toner cartridge is Open" will appear on the LCD. 5.2 Develop Roller / Developing Bias Voltage Counter Reset Function Since print density is likely to become darker as the toner gets older, the developing bias is lowered by one .... The "1. The page counter of the laser unit is reset, and the number of replacement times is opened . ...
...according to the number of develop roller rotations so that the toner cartridge is Open" will appear on the LCD. 5.2 Develop Roller / Developing Bias Voltage Counter Reset Function Since print density is likely to become darker as the toner gets older, the developing bias is lowered by one .... The "1. The page counter of the laser unit is reset, and the number of replacement times is opened . ...


