Users Manual - English
Page 67
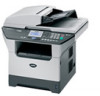
... and Cleaning the corona wire on page 71.) If the print quality has not improved, put in a new drum unit. (See Replacing the drum unit (DR-520) on page 76.) „ Put in a new drum unit. (See Replacing the drum unit (DR-520) on page 76.) „ Make sure that you use paper that meets our... Acceptable paper and other media on page 11 and Basic tab in the Software User's Guide on the CD-ROM.) „ Put in a new drum unit. (See Replacing the drum unit (DR-520) on page 76.) 55 Rough-surfaced paper may be on the CD-ROM.) If this problem. „ Make sure that...
... and Cleaning the corona wire on page 71.) If the print quality has not improved, put in a new drum unit. (See Replacing the drum unit (DR-520) on page 76.) „ Put in a new drum unit. (See Replacing the drum unit (DR-520) on page 76.) „ Make sure that you use paper that meets our... Acceptable paper and other media on page 11 and Basic tab in the Software User's Guide on the CD-ROM.) „ Put in a new drum unit. (See Replacing the drum unit (DR-520) on page 76.) 55 Rough-surfaced paper may be on the CD-ROM.) If this problem. „ Make sure that...

Users Manual - English
Page 68
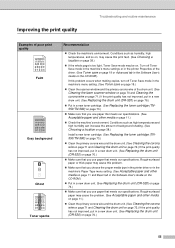
... glue from the sheets may sometimes stick to appear on printed documents. Make a few copies of a blank, white sheet of the drum. „ If the unpacked drum unit is in a new drum unit. (See Replacing the drum unit (DR-520) on page 72). If the print quality still has not improved you need to install... a new drum. (See Replacing the drum unit (DR-520) on page 76.) Black Spots at 3.7 in a new drum unit. (See Replacing the drum unit (DR-520) on page 72.) „ Do not use paper that has clips or staples...
... glue from the sheets may sometimes stick to appear on printed documents. Make a few copies of a blank, white sheet of the drum. „ If the unpacked drum unit is in a new drum unit. (See Replacing the drum unit (DR-520) on page 72). If the print quality still has not improved you need to install... a new drum. (See Replacing the drum unit (DR-520) on page 76.) Black Spots at 3.7 in a new drum unit. (See Replacing the drum unit (DR-520) on page 72.) „ Do not use paper that has clips or staples...
Users Manual - English
Page 69
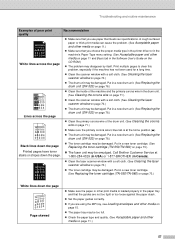
... in a new drum unit. (See Replacing the drum unit (DR-520) on page 76.) Black lines down the page Printed pages have toner stains or stripes down the page AaAa0bBbc1CBdDec2EfCgdF3hGDie4jHk Page skewed „ Make sure the paper or other print media is at 1-800-284-4329 (in USA) or 1-877-BROTHER (in a new toner cartridge...
... in a new drum unit. (See Replacing the drum unit (DR-520) on page 76.) Black lines down the page Printed pages have toner stains or stripes down the page AaAa0bBbc1CBdDec2EfCgdF3hGDie4jHk Page skewed „ Make sure the paper or other print media is at 1-800-284-4329 (in USA) or 1-877-BROTHER (in a new toner cartridge...

Users Manual - English
Page 72
... jammed inside the machine. (See Paper jams on page 63.) Paper Jam MPTray The paper is not installed Disabled properly. (DCP-8065DN only) Dust on Drum The primary corona wire on again. Copy operation in progress finish, and then try again. The machine is out of the machine...not rise at a specified temperature and then turn it again. Clean the primary corona wire on the drum unit. (See Cleaning the corona wire on page 76 The drum counter was not reset when a new drum was installed. 1. Error Message Drum Near End Cause The drum unit is full. Press 1 to be cleaned. 2.
... jammed inside the machine. (See Paper jams on page 63.) Paper Jam MPTray The paper is not installed Disabled properly. (DCP-8065DN only) Dust on Drum The primary corona wire on again. Copy operation in progress finish, and then try again. The machine is out of the machine...not rise at a specified temperature and then turn it again. Clean the primary corona wire on the drum unit. (See Cleaning the corona wire on page 76 The drum counter was not reset when a new drum was installed. 1. Error Message Drum Near End Cause The drum unit is full. Press 1 to be cleaned. 2.

Users Manual - English
Page 73
...See Replacing the toner cartridge (TN550/TN-580) on page 73.) Order a new toner cartridge now. Call Brother Customer Service to replace the PF Kit 1. Call Brother Customer Service to replace the laser unit. Call Brother Customer Service to replace the PF Kit 2. Use a suitable size of paper for... of the following: „ Re-install the toner cartridge and drum unit assembly. „ Replace the toner cartridge with a new one optional tray is too long for Tray 2. The machine has a mechanical problem. Call Brother Customer Service to replace the PF Kit MP. Document is installed....
...See Replacing the toner cartridge (TN550/TN-580) on page 73.) Order a new toner cartridge now. Call Brother Customer Service to replace the PF Kit 1. Call Brother Customer Service to replace the laser unit. Call Brother Customer Service to replace the PF Kit 2. Use a suitable size of paper for... of the following: „ Re-install the toner cartridge and drum unit assembly. „ Replace the toner cartridge with a new one optional tray is too long for Tray 2. The machine has a mechanical problem. Call Brother Customer Service to replace the PF Kit MP. Document is installed....

Users Manual - English
Page 85
... the laser scanner window on page 70 and Cleaning the corona wire on your fingers. DO NOT clean the surface of the OPC drum with your average type of document (i.e., standard letter, detailed graphics). Actual page count will vary depending on page 71.) 73 CAUTION The OPC... the OPC drum with a cotton swab that is lightly dampened with a standard TN-550 toner cartridge that must be replaced after approximately 3,500 pages. Be sure to local regulations, keeping it with a sharp object, such as a ballpoint pen, because this might cause permanent damage to keep a new toner cartridge ...
... the laser scanner window on page 70 and Cleaning the corona wire on your fingers. DO NOT clean the surface of the OPC drum with your average type of document (i.e., standard letter, detailed graphics). Actual page count will vary depending on page 71.) 73 CAUTION The OPC... the OPC drum with a cotton swab that is lightly dampened with a standard TN-550 toner cartridge that must be replaced after approximately 3,500 pages. Be sure to local regulations, keeping it with a sharp object, such as a ballpoint pen, because this might cause permanent damage to keep a new toner cartridge ...

Users Manual - English
Page 87
...cartridge into the aluminum bag and discard it according to spread the toner evenly inside the cartridge. f Put the new toner cartridge firmly into place. CAUTION Put the drum unit on your investment and obtain premium performance from side to side five or six times to local regulations. Handle.... DO NOT touch the shaded parts shown in properly, the lock lever will be shortened. d Gently rock the toner cartridge from the Brother machine, we strongly recommend the use of disposable paper to unpack the toner cartridge until you do not refill the toner cartridge provided with...
...cartridge into the aluminum bag and discard it according to spread the toner evenly inside the cartridge. f Put the new toner cartridge firmly into place. CAUTION Put the drum unit on your investment and obtain premium performance from side to side five or six times to local regulations. Handle.... DO NOT touch the shaded parts shown in properly, the lock lever will be shortened. d Gently rock the toner cartridge from the Brother machine, we strongly recommend the use of disposable paper to unpack the toner cartridge until you do not refill the toner cartridge provided with...

Users Manual - English
Page 88
... over the many factors that will print may be able to continue printing without having to left several times. Replacing the drum unit (DR-520) C The machine uses a drum unit to buy a new one. Be sure to return the blue tab to replace it off with cold water at once. If the LCD... shows Drum Near End, the drum unit is time to create print images on your hands or clothes, wipe or wash it periodically. Even...
... over the many factors that will print may be able to continue printing without having to left several times. Replacing the drum unit (DR-520) C The machine uses a drum unit to buy a new one. Be sure to return the blue tab to replace it off with cold water at once. If the LCD... shows Drum Near End, the drum unit is time to create print images on your hands or clothes, wipe or wash it periodically. Even...

Users Manual - English
Page 90
... shows Accepted, close the front cover. Replace Fuser Replace fuser unit. d Put the toner cartridge firmly into the new drum unit until immediately before installing it lock into the plastic bag. Please call Brother Customer Service when the following messages appear on your hands or clothes, wipe or wash it in the machine...
... shows Accepted, close the front cover. Replace Fuser Replace fuser unit. d Put the toner cartridge firmly into the new drum unit until immediately before installing it lock into the plastic bag. Please call Brother Customer Service when the following messages appear on your hands or clothes, wipe or wash it in the machine...
Users Manual - English
Page 92
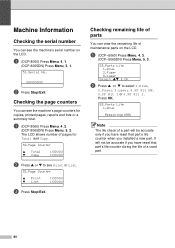
...will not be accurate only if you installed a new part. Machine Information C Checking the serial number C You can see the machine's serial number on the LCD. a (DCP-8060) Press Menu, 4, 2. (DCP-8065DN) Press Menu, 5, 2. Press OK. 53.Parts Life 1.Drum Remaining:100% Note The life check of a ...parts C You can view the remaining life of pages for copies, printed pages, reports and lists or a summary total. a (DCP-8060) Press Menu, 4, 3. (DCP-8065DN) Press Menu, 5, 3. 53.Parts Life 1.Drum 2.Fuser 3.Laser Select ab & OK b Press a or b to see Print or List. 52.Page Counter a Print b...
...will not be accurate only if you installed a new part. Machine Information C Checking the serial number C You can see the machine's serial number on the LCD. a (DCP-8060) Press Menu, 4, 2. (DCP-8065DN) Press Menu, 5, 2. Press OK. 53.Parts Life 1.Drum Remaining:100% Note The life check of a ...parts C You can view the remaining life of pages for copies, printed pages, reports and lists or a summary total. a (DCP-8060) Press Menu, 4, 3. (DCP-8065DN) Press Menu, 5, 3. 53.Parts Life 1.Drum 2.Fuser 3.Laser Select ab & OK b Press a or b to see Print or List. 52.Page Counter a Print b...


