Quick Setup Guide - English
Page 2
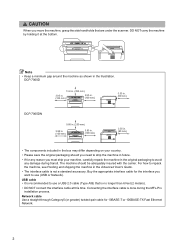
... shipping the machine in the illustration. DO NOT carry the machine by holding it at this time. DCP-7060D 13.8 in. (350 mm) 3.95 in. (100 mm) 3.95 in. (100 mm) 3.55 in. (90 mm) DCP-7065DN 9.85 in. (250 mm) 3.95 in. (100 mm) 3.95 in. (100 mm) 3.55 in. (90 mm... Network). Buy the appropriate interface cable for 10BASE-T or 100BASE-TX Fast Ethernet Network. 2 For how to use a USB 2.0 cable (Type A/B) that are under the scanner.
... shipping the machine in the illustration. DO NOT carry the machine by holding it at this time. DCP-7060D 13.8 in. (350 mm) 3.95 in. (100 mm) 3.95 in. (100 mm) 3.55 in. (90 mm) DCP-7065DN 9.85 in. (250 mm) 3.95 in. (100 mm) 3.95 in. (100 mm) 3.55 in. (90 mm... Network). Buy the appropriate interface cable for 10BASE-T or 100BASE-TX Fast Ethernet Network. 2 For how to use a USB 2.0 cable (Type A/B) that are under the scanner.
Quick Setup Guide - English
Page 3
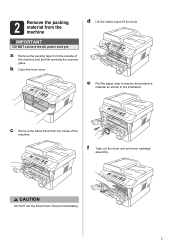
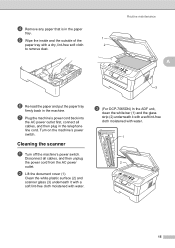
b Open the front cover. Discard immediately. 3 f Take out the drum unit and toner cartridge assembly. 2 Remove the packing material from the inside of the machine and the film covering the scanner glass. e Pull the paper strip to remove the protective material as shown in the illustration. c Remove the Silica Pack from the machine IMPORTANT DO NOT connect the AC power cord yet. CCAAUUTTIOINON DO NOT eat the Silica Pack. d Lift the elastic band off the drum. a Remove the packing tape from the outside of the machine.
b Open the front cover. Discard immediately. 3 f Take out the drum unit and toner cartridge assembly. 2 Remove the packing material from the inside of the machine and the film covering the scanner glass. e Pull the paper strip to remove the protective material as shown in the illustration. c Remove the Silica Pack from the machine IMPORTANT DO NOT connect the AC power cord yet. CCAAUUTTIOINON DO NOT eat the Silica Pack. d Lift the elastic band off the drum. a Remove the packing tape from the outside of the machine.

Advanced Users Manual - English
Page 3
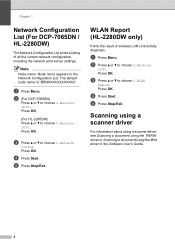
...Toner Settings ...2 Toner Setting (Continue Mode 2 LCD Contrast ...3 User Settings List 3 Network Configuration List (DCP-7065DN / HL-2280DW 4 WLAN Report (HL-2280DW only 4 Scanning using a scanner driver 4 2 Making copies 5 Copy settings ...5 Stop copying...5 Using the Options key 6 Improving copy ...quality 8 Sorting copies using the ADF (For DCP-7065DN 8 Enlarging or reducing the image copied 8 Adjusting Contrast and...
...Toner Settings ...2 Toner Setting (Continue Mode 2 LCD Contrast ...3 User Settings List 3 Network Configuration List (DCP-7065DN / HL-2280DW 4 WLAN Report (HL-2280DW only 4 Scanning using a scanner driver 4 2 Making copies 5 Copy settings ...5 Stop copying...5 Using the Options key 6 Improving copy ...quality 8 Sorting copies using the ADF (For DCP-7065DN 8 Enlarging or reducing the image copied 8 Adjusting Contrast and...
Advanced Users Manual - English
Page 8
...". Press OK. e Press Stop/Exit. Press OK. e Press Stop/Exit. Scanning using a scanner driver 1 For information about using a scanner driver, see Scanning a document using the TWAIN driver or Scanning a document using the WIA driver in the Network Configuration List. b (For DCP-7065DN) Press a or b to choose 5.WLAN Report. Press OK. c Press a or b to choose...
...". Press OK. e Press Stop/Exit. Press OK. e Press Stop/Exit. Scanning using a scanner driver 1 For information about using a scanner driver, see Scanning a document using the TWAIN driver or Scanning a document using the WIA driver in the Network Configuration List. b (For DCP-7065DN) Press a or b to choose 5.WLAN Report. Press OK. c Press a or b to choose...
Advanced Users Manual - English
Page 14
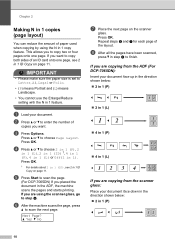
...8226; (P) means Portrait and (L) means Landscape. • You cannot use the Enlarge/Reduce setting with the N in 1 feature. e Press Start to scan the page. (For DCP-7065DN) If you are using the N in 1 copy feature. Press OK. 1 For details about 2 in 1 (ID), see 2 in 1 ID Copy on page 11. Next ...Making N in 1 copies (page layout) 2 You can reduce the amount of paper used when copying by using the scanner glass, go to enter the number of copies you are copying from the ADF (For DCP-7065DN): 2 Insert your document face up in the direction shown below : 2 in 1 (P) 10 c Press ...
...8226; (P) means Portrait and (L) means Landscape. • You cannot use the Enlarge/Reduce setting with the N in 1 feature. e Press Start to scan the page. (For DCP-7065DN) If you are using the N in 1 copy feature. Press OK. 1 For details about 2 in 1 (ID), see 2 in 1 ID Copy on page 11. Next ...Making N in 1 copies (page layout) 2 You can reduce the amount of paper used when copying by using the scanner glass, go to enter the number of copies you are copying from the ADF (For DCP-7065DN): 2 Insert your document face up in the direction shown below : 2 in 1 (P) 10 c Press ...
Advanced Users Manual - English
Page 15
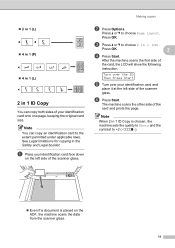
... b Press Options. Turn over the ID Then Press Start e Turn over your identification card and place it at the left side of the scanner glass. The machine scans the other side of the card, the LCD will show the following instruction. a Place your identification card onto one page... machine scans the first side of the card and prints the page. Note When 2 in 1 ID Copy is placed on the left side of the scanner glass. 2 in 1 (L) 4 in 1 (P) 4 in 1 (L) 2 in 1 ID Copy 2 You can copy an identification card to +2 (-nnnno+). Even if a ...
... b Press Options. Turn over the ID Then Press Start e Turn over your identification card and place it at the left side of the scanner glass. The machine scans the other side of the card, the LCD will show the following instruction. a Place your identification card onto one page... machine scans the first side of the card and prints the page. Note When 2 in 1 ID Copy is placed on the left side of the scanner glass. 2 in 1 (L) 4 in 1 (P) 4 in 1 (L) 2 in 1 ID Copy 2 You can copy an identification card to +2 (-nnnno+). Even if a ...
Advanced Users Manual - English
Page 16
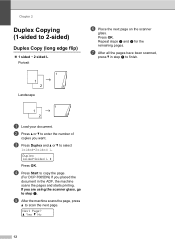
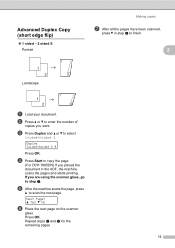
d Press Start to copy the page. (For DCP-7065DN) If you placed the document in step e to finish. 12 a Yes b No f Place the next page on the scanner glass. Next Page? Repeat steps e and f for the remaining pages. Chapter 2 Duplex Copying (1-sided to select 1sidedi2sided L. Duplex 1sidedi2sided L e Press OK. Press OK. c Press Duplex ... the ADF, the machine scans the pages and starts printing. If you want. b Press a or b to enter the number of copies you are using the scanner glass, go to scan the next page.
d Press Start to copy the page. (For DCP-7065DN) If you placed the document in step e to finish. 12 a Yes b No f Place the next page on the scanner glass. Next Page? Repeat steps e and f for the remaining pages. Chapter 2 Duplex Copying (1-sided to select 1sidedi2sided L. Duplex 1sidedi2sided L e Press OK. Press OK. c Press Duplex ... the ADF, the machine scans the pages and starts printing. If you want. b Press a or b to enter the number of copies you are using the scanner glass, go to scan the next page.
Advanced Users Manual - English
Page 17
... scan the next page. d Press Start to copy the page. (For DCP-7065DN) If you want. e After the machine scans the page, press a to select 1sidedi2sided S. a Yes b No f Place the next page on the scanner glass. If you are using the scanner glass, go to enter the number of copies you placed the document...
... scan the next page. d Press Start to copy the page. (For DCP-7065DN) If you want. e After the machine scans the page, press a to select 1sidedi2sided S. a Yes b No f Place the next page on the scanner glass. If you are using the scanner glass, go to enter the number of copies you placed the document...
Advanced Users Manual - English
Page 19
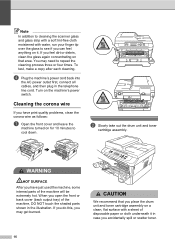
... power outlet. b Lift the document cover (1). c (For DCP-7065DN) In the ADF unit, clean the white bar (1) and the glass strip (2) underneath it with a soft lint-free cloth moistened with water. Clean the white plastic surface (2) and scanner glass (3) underneath it with a soft lint-free cloth moistened ...tray. Turn on the machine's power switch. e Wipe the inside and the outside of the 1 paper tray with water. 1 2 15 Cleaning the scanner A a Turn off the machine's power switch. d Remove any paper that is in the machine. Disconnect all cables, and then plug in the telephone...
... power outlet. b Lift the document cover (1). c (For DCP-7065DN) In the ADF unit, clean the white bar (1) and the glass strip (2) underneath it with a soft lint-free cloth moistened with water. Clean the white plastic surface (2) and scanner glass (3) underneath it with a soft lint-free cloth moistened ...tray. Turn on the machine's power switch. e Wipe the inside and the outside of the 1 paper tray with water. 1 2 15 Cleaning the scanner A a Turn off the machine's power switch. d Remove any paper that is in the machine. Disconnect all cables, and then plug in the telephone...
Advanced Users Manual - English
Page 20
..., and then plug in the telephone line cord. Turn on the machine's power switch. WARNING HOT SURFACE After you have just used the machine, some internal parts of the machine will be extremely hot. b Slowly take out the drum unit and toner cartridge assembly. CAUTION We recommend that area. You may... or back cover (back output tray) of the machine, DO NOT touch the shaded parts shown in the illustration. Note In addition to cleaning the scanner glass and glass strip with a soft lint-free cloth moistened with water, run your finger tip over the glass to see if you can feel...
..., and then plug in the telephone line cord. Turn on the machine's power switch. WARNING HOT SURFACE After you have just used the machine, some internal parts of the machine will be extremely hot. b Slowly take out the drum unit and toner cartridge assembly. CAUTION We recommend that area. You may... or back cover (back output tray) of the machine, DO NOT touch the shaded parts shown in the illustration. Note In addition to cleaning the scanner glass and glass strip with a soft lint-free cloth moistened with water, run your finger tip over the glass to see if you can feel...
Advanced Users Manual - English
Page 32
... 2 in 1 ID Copy 11 brightness 9 contrast 9 Enlarge/Reduce 8 keys 5 N in 1 (page layout 10 Options key 6 quality 8 sort (ADF only 8 temporary settings 5 using ADF 8, 10 using scanner glass 10 D Deep Sleep mode 2 Drum unit checking (remaining life 24 cleaning 16, 17 Duplex copy 12 E Enlarge/Reduce 8 L LCD (liquid crystal display) contrast 3 M Machine...
... 2 in 1 ID Copy 11 brightness 9 contrast 9 Enlarge/Reduce 8 keys 5 N in 1 (page layout 10 Options key 6 quality 8 sort (ADF only 8 temporary settings 5 using ADF 8, 10 using scanner glass 10 D Deep Sleep mode 2 Drum unit checking (remaining life 24 cleaning 16, 17 Duplex copy 12 E Enlarge/Reduce 8 L LCD (liquid crystal display) contrast 3 M Machine...
Users Manual - English
Page 11
...used in the documentation 1 Accessing the Advanced User's Guide, Software User's Guide and Network User's Guide 2 Viewing Documentation 2 Accessing Brother Support (Windows 4 Accessing Brother Support (Macintosh 5 Control panel overview 6 2 Loading paper 8 Loading paper and print media 8 Loading paper in the standard paper tray...using special paper 18 3 Loading documents 21 How to load documents 21 Using the automatic document feeder (ADF) (For DCP-7065DN 21 Using the scanner glass 22 4 Making copies 24 How to copy ...24 Stop copying 24 Copy settings 24 5 How to print from...
...used in the documentation 1 Accessing the Advanced User's Guide, Software User's Guide and Network User's Guide 2 Viewing Documentation 2 Accessing Brother Support (Windows 4 Accessing Brother Support (Macintosh 5 Control panel overview 6 2 Loading paper 8 Loading paper and print media 8 Loading paper in the standard paper tray...using special paper 18 3 Loading documents 21 How to load documents 21 Using the automatic document feeder (ADF) (For DCP-7065DN 21 Using the scanner glass 22 4 Making copies 24 How to copy ...24 Stop copying 24 Copy settings 24 5 How to print from...
Users Manual - English
Page 12
... is jammed in the top of the ADF unit (For DCP-7065DN 43 Document is jammed under the document cover (For DCP-7065DN) ..........43 Removing small documents jammed in the ADF (For DCP-7065DN 44 Document is jammed at the output tray (For DCP-7065DN 44 Paper Jams...45 Paper is jammed in the standard paper...keys ...70 How to access the menu mode 71 Menu table ...72 D Specifications 82 General ...82 Document Size ...84 Print media...85 Copy ...86 Scanner ...87 Printer ...88 Interfaces ...89 Computer requirements 90 Consumable items 92 Network (LAN) (DCP-7065DN / HL-2280DW 93 E Index 94 x
... is jammed in the top of the ADF unit (For DCP-7065DN 43 Document is jammed under the document cover (For DCP-7065DN) ..........43 Removing small documents jammed in the ADF (For DCP-7065DN 44 Document is jammed at the output tray (For DCP-7065DN 44 Paper Jams...45 Paper is jammed in the standard paper...keys ...70 How to access the menu mode 71 Menu table ...72 D Specifications 82 General ...82 Document Size ...84 Print media...85 Copy ...86 Scanner ...87 Printer ...88 Interfaces ...89 Computer requirements 90 Consumable items 92 Network (LAN) (DCP-7065DN / HL-2280DW 93 E Index 94 x
Users Manual - English
Page 13
You can view the Advanced User's Guide on the Documentation CD-ROM. 1 General Setup Memory storage Ecology features Toner Settings LCD Contrast User Settings List Network Configuration List (DCP-7065DN / HL-2280DW) WLAN Report (HL-2280DW only) Scanning using a scanner driver 2 Making copies Copy settings Duplex Copying (1-sided to 2-sided) A Routine maintenance Cleaning the machine Checking the machine Packing and shipping the machine B Glossary C Index xi Table of Contents (ADVANCED USER'S GUIDE) The Advanced User's Guide explains the following features and operations.
You can view the Advanced User's Guide on the Documentation CD-ROM. 1 General Setup Memory storage Ecology features Toner Settings LCD Contrast User Settings List Network Configuration List (DCP-7065DN / HL-2280DW) WLAN Report (HL-2280DW only) Scanning using a scanner driver 2 Making copies Copy settings Duplex Copying (1-sided to 2-sided) A Routine maintenance Cleaning the machine Checking the machine Packing and shipping the machine B Glossary C Index xi Table of Contents (ADVANCED USER'S GUIDE) The Advanced User's Guide explains the following features and operations.

Users Manual - English
Page 16
...and then double-click index.html. d Point to your computer. When you want to use the advanced features for Copy, Printer, Scanner and Network (for DCP-7065DN and HL-2280DW) that are on your language, point to View Guide, and then click the guide you are ready to learn ... information about the machine such as how to read the Advanced User's Guide, Software User's Guide, Network Glossary, and Network User's Guide (for DCP-7065DN and HL-2280DW). Insert the Documentation CD-ROM into your country. Chapter 1 Accessing the Advanced User's Guide, Software User's Guide and Network User's...
...and then double-click index.html. d Point to your computer. When you want to use the advanced features for Copy, Printer, Scanner and Network (for DCP-7065DN and HL-2280DW) that are on your language, point to View Guide, and then click the guide you are ready to learn ... information about the machine such as how to read the Advanced User's Guide, Software User's Guide, Network Glossary, and Network User's Guide (for DCP-7065DN and HL-2280DW). Insert the Documentation CD-ROM into your country. Chapter 1 Accessing the Advanced User's Guide, Software User's Guide and Network User's...
Users Manual - English
Page 27
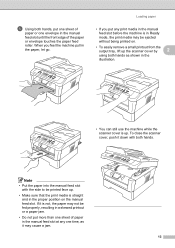
... may cause a jam. 13 Loading paper • If you feel the machine pull in the illustration. • You can still use the machine while the scanner cover is up. Note • Put the paper into the manual feed slot with both hands as shown in the paper, let go. When you... not, the paper may not be fed properly, resulting in the proper position on the manual feed slot. To close the scanner cover, push it may be printed face up the scanner cover by 2 using both hands. If it is straight and in a skewed printout or a paper jam. • Do not put...
... may cause a jam. 13 Loading paper • If you feel the machine pull in the illustration. • You can still use the machine while the scanner cover is up. Note • Put the paper into the manual feed slot with both hands as shown in the paper, let go. When you... not, the paper may not be fed properly, resulting in the proper position on the manual feed slot. To close the scanner cover, push it may be printed face up the scanner cover by 2 using both hands. If it is straight and in a skewed printout or a paper jam. • Do not put...
Users Manual - English
Page 35
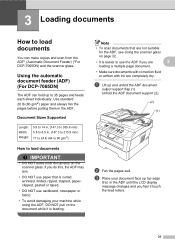
... ADF can make copies and scan from the ADF* (Automatic Document Feeder) (*For DCP-7065DN) and the scanner glass. Note • To scan documents that are completely dry. Unfold the ADF document support (2). (2) (1) b Fan the pages well. c Place your machine while using the... 3 loading a multiple page document. • Make sure documents with correction fluid or written with ink are not suitable for the ADF, see Using the scanner glass on the scanner glass. 3 Loading documents 3 How to load documents 3 You can hold up to 35 pages and feeds each sheet individually.
... ADF can make copies and scan from the ADF* (Automatic Document Feeder) (*For DCP-7065DN) and the scanner glass. Note • To scan documents that are completely dry. Unfold the ADF document support (2). (2) (1) b Fan the pages well. c Place your machine while using the... 3 loading a multiple page document. • Make sure documents with correction fluid or written with ink are not suitable for the ADF, see Using the scanner glass on the scanner glass. 3 Loading documents 3 How to load documents 3 You can hold up to 35 pages and feeds each sheet individually.

Users Manual - English
Page 36
... 3 You can use the scanner glass, the ADF must be empty. b Using the document guidelines on page 22. Document Sizes Supported 3 Length: ...document face down in . (215.9 mm) Up to 4.4 lb (2.0 kg) How to load documents 3 Note To use the scanner glass to fit the width of your machine while using the ADF, DO NOT pull on the document while it is feeding. &#...8226; To scan non-standard documents, see Using the scanner glass on the left corner of a book one page at a time. a Lift the document cover. 22 Chapter 3 d Adjust ...
... 3 You can use the scanner glass, the ADF must be empty. b Using the document guidelines on page 22. Document Sizes Supported 3 Length: ...document face down in . (215.9 mm) Up to 4.4 lb (2.0 kg) How to load documents 3 Note To use the scanner glass to fit the width of your machine while using the ADF, DO NOT pull on the document while it is feeding. &#...8226; To scan non-standard documents, see Using the scanner glass on the left corner of a book one page at a time. a Lift the document cover. 22 Chapter 3 d Adjust ...
Users Manual - English
Page 38
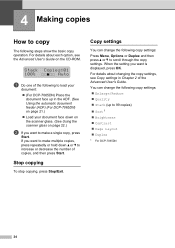
... When the setting you want to make multiple copies, press repeatedly or hold down on the scanner glass. (See Using the scanner glass on page 21.) Load your document: (For DCP-7065DN) Place the document face up to make a single copy, press Start. For details about changing the copy settings, see the...
... When the setting you want to make multiple copies, press repeatedly or hold down on the scanner glass. (See Using the scanner glass on page 21.) Load your document: (For DCP-7065DN) Place the document face up to make a single copy, press Start. For details about changing the copy settings, see the...

Users Manual - English
Page 40
...from http://nj.newsoft.com.tw/download/brother/ PM9SEInstaller_BR_multilang.dmg d (For DCP-7065DN and HL-2280DW network users) Choose the computer you download and install Presto! a To use the (SCAN) key on the machine or the scanner drivers on page 21.) (DCP-7065DN) Use the ADF to scan multiple ...pages of the following: To scan using a scanner driver at a time. e Press Start to Scanning using the scan key 6 For...
...from http://nj.newsoft.com.tw/download/brother/ PM9SEInstaller_BR_multilang.dmg d (For DCP-7065DN and HL-2280DW network users) Choose the computer you download and install Presto! a To use the (SCAN) key on the machine or the scanner drivers on page 21.) (DCP-7065DN) Use the ADF to scan multiple ...pages of the following: To scan using a scanner driver at a time. e Press Start to Scanning using the scan key 6 For...


