
Accessory Catalog
Page 7
... fabric through the presser foot as needed. 3. Sew the stitches keeping a certain seam allowance. Adjust the distance and place the right edge of the fabric against the presser foot. Stitch Guide Foot The scale in the presser foot can be used for the Side Cutter allows you to your fabric consistently. SA160 ABCDEFGHJKLMNO Straight Stitch Foot Straight Stitch Foot and Straight Stitch Needle Plate Vertical Stitching Alignment Foot Brother General Sewing Accessories 12 Straight Stitch Foot For precise straight stitching on thin fabrics or on selected machines. The side extension...
... fabric through the presser foot as needed. 3. Sew the stitches keeping a certain seam allowance. Adjust the distance and place the right edge of the fabric against the presser foot. Stitch Guide Foot The scale in the presser foot can be used for the Side Cutter allows you to your fabric consistently. SA160 ABCDEFGHJKLMNO Straight Stitch Foot Straight Stitch Foot and Straight Stitch Needle Plate Vertical Stitching Alignment Foot Brother General Sewing Accessories 12 Straight Stitch Foot For precise straight stitching on thin fabrics or on selected machines. The side extension...

Accessory Catalog
Page 11
.... Attach the presser foot and select a stitch from the right of the presser foot, and place each cord into each hole on the presser foot over the desired seams or pattern markings. 3. Insert cords or threads into each guide (to fit the width of the guide back and forth to use single cord, use sewing machines Clear-view Foot Use this presser foot where visibility of the braid. 6. Line up the cords, and select zigzag stitch with brother sewing machines of 7 mm feed...
.... Attach the presser foot and select a stitch from the right of the presser foot, and place each cord into each hole on the presser foot over the desired seams or pattern markings. 3. Insert cords or threads into each guide (to fit the width of the guide back and forth to use single cord, use sewing machines Clear-view Foot Use this presser foot where visibility of the braid. 6. Line up the cords, and select zigzag stitch with brother sewing machines of 7 mm feed...

Accessory Catalog
Page 12
... Foot Gathering Foot SA142 All Brother home-use sewing machines SA120 All Brother home-use sewing machines Fringe Foot Used to mark construction details by creating tailor tacks. Create 3-D loops and fringe with dense stitches. Mark construction details by creating tailor tacks. Making loops or fringes: 1. Works best on a drawn pattern line and sew (cut the center of the presser foot to the seam or pattern line and sew. Increase the upper thread tension. 3. Increase the upper thread tension...
... Foot Gathering Foot SA142 All Brother home-use sewing machines SA120 All Brother home-use sewing machines Fringe Foot Used to mark construction details by creating tailor tacks. Create 3-D loops and fringe with dense stitches. Mark construction details by creating tailor tacks. Making loops or fringes: 1. Works best on a drawn pattern line and sew (cut the center of the presser foot to the seam or pattern line and sew. Increase the upper thread tension. 3. Increase the upper thread tension...

Accessory Catalog
Page 13
... IP This presser foot does not include the bobbin cover. Use a stiff card to get started. Move fabric about 1" (2.5 cm) past the needle to slide the fabric from left into gathers or tucks. Install and manually thread a twin needle. 2. Draw a reference line to guide your first row of stitching and use that to sew the first row in one of the grooves. 4. SA143 AFJKM Ruffler Foot Makes ruffles with this presser foot. 1. The ruffling...
... IP This presser foot does not include the bobbin cover. Use a stiff card to get started. Move fabric about 1" (2.5 cm) past the needle to slide the fabric from left into gathers or tucks. Install and manually thread a twin needle. 2. Draw a reference line to guide your first row of stitching and use that to sew the first row in one of the grooves. 4. SA143 AFJKM Ruffler Foot Makes ruffles with this presser foot. 1. The ruffling...

Accessory Catalog
Page 15
... I Open Toe Walking Foot SA188 ABCDEFJKMN www.brother.com Gently holding the upper and bobbin threads sew about four locking stitches and finish the thread ends. Guide the fabric with the needle to allow fabric to be easily sewn. Quilting Foot For darning, quilting, or free-motion. Lower the feed dogs. 2. Use for ULT series, PC-6500, PC-8200 and PC-8500 sewing machines. Lower the feed dogs. 3. Set the machine for thick layers of the foot gives you wide visibility in length. Select a straight stitch...
... I Open Toe Walking Foot SA188 ABCDEFJKMN www.brother.com Gently holding the upper and bobbin threads sew about four locking stitches and finish the thread ends. Guide the fabric with the needle to allow fabric to be easily sewn. Quilting Foot For darning, quilting, or free-motion. Lower the feed dogs. 2. Use for ULT series, PC-6500, PC-8200 and PC-8500 sewing machines. Lower the feed dogs. 3. Set the machine for thick layers of the foot gives you wide visibility in length. Select a straight stitch...

Accessory Catalog
Page 17
Brother Embroidery Accessories 31 QuattroTM 6000D Embroidery Card Reader QuattroTM 6000D Border Frame Innov-is 4000D Premium Package SAECR1 Only compatible with QuattroTM 6000D SABF6000D QuattroTM 6000D SAVR4000D Innov-is 4000D machines that come with the QuattroTM 6000D. The Border Frame enables you superior stitch quality when stitching over differing fabric thicknesses. - Includes three new free-motion presser feet: Free-motion quilting foot "C" for the Innov-is 4000D sewing and embroidery machine. * Requires...
Brother Embroidery Accessories 31 QuattroTM 6000D Embroidery Card Reader QuattroTM 6000D Border Frame Innov-is 4000D Premium Package SAECR1 Only compatible with QuattroTM 6000D SABF6000D QuattroTM 6000D SAVR4000D Innov-is 4000D machines that come with the QuattroTM 6000D. The Border Frame enables you superior stitch quality when stitching over differing fabric thicknesses. - Includes three new free-motion presser feet: Free-motion quilting foot "C" for the Innov-is 4000D sewing and embroidery machine. * Requires...

Accessory Catalog
Page 33
... 10 spools of your threads in the storage slots. Ask your machine. Spend less time changing threads, and more on our website for your selected dealer or check on creating. SA539 DuettaTM4500D,Innov-is 4000D/2500D/1500D SA560 QuattroTM 6000D Embroidery Machine Hoops Select hoops appropriate for details, www.brother.com. Brother Embroidery Accessories 63 Free-Standing Ten Spool Thread Stand Ten Spool Thread Stand Embroidery Machine Hoops Brother Embroidery Accessories 64 For all embroidery and sewing/embroidery machines.
... 10 spools of your threads in the storage slots. Ask your machine. Spend less time changing threads, and more on our website for your selected dealer or check on creating. SA539 DuettaTM4500D,Innov-is 4000D/2500D/1500D SA560 QuattroTM 6000D Embroidery Machine Hoops Select hoops appropriate for details, www.brother.com. Brother Embroidery Accessories 63 Free-Standing Ten Spool Thread Stand Ten Spool Thread Stand Embroidery Machine Hoops Brother Embroidery Accessories 64 For all embroidery and sewing/embroidery machines.

Accessory Catalog
Page 34
... the embroidery is Project Book (See page 33 for details.) www.brother.com Brother Embroidery Accessories PacesetterTM Polyester Threads 65 Brother Country Yarn Embroidery Threads Metallic Threads For the best embroidery results, use these embroidery threads especially designed for Brother sewing and embroidering machines. 61 Color Thread Set with Wooden Rack ETKSP999 PacesetterTM Polyester Threads (61 Color Thread Set with other sewing and embroidery machine brands. For best results, use of fabrics. SA520 Water Soluble Stabilizer 11" x 3.3 yds SA540 Light Weight...
... the embroidery is Project Book (See page 33 for details.) www.brother.com Brother Embroidery Accessories PacesetterTM Polyester Threads 65 Brother Country Yarn Embroidery Threads Metallic Threads For the best embroidery results, use these embroidery threads especially designed for Brother sewing and embroidering machines. 61 Color Thread Set with Wooden Rack ETKSP999 PacesetterTM Polyester Threads (61 Color Thread Set with other sewing and embroidery machine brands. For best results, use of fabrics. SA520 Water Soluble Stabilizer 11" x 3.3 yds SA540 Light Weight...

Accessory Catalog
Page 40
.../T2 presser foot. 2. SA224CV SA221CV Hemming Set Finishes hems easily and quickly. The stitches are always smooth. 1. Set up your machine for a cover stitch, with a tweezers. Attach the hem positioning plate A/B to the hemming attachment, and attach it into the front cover slot. 3. Brother Cover Stitch Feet 77 Bias Tape Binding Set Hemming Set Bias Tape Binding Set Attaches 6 or 12 mm (approx. 1/4 to 1/2 inch) bias tapes as holding the fabric lightly with the LC1 presser foot included in the machine. 2. Sew. Align the fabric...
.../T2 presser foot. 2. SA224CV SA221CV Hemming Set Finishes hems easily and quickly. The stitches are always smooth. 1. Set up your machine for a cover stitch, with a tweezers. Attach the hem positioning plate A/B to the hemming attachment, and attach it into the front cover slot. 3. Brother Cover Stitch Feet 77 Bias Tape Binding Set Hemming Set Bias Tape Binding Set Attaches 6 or 12 mm (approx. 1/4 to 1/2 inch) bias tapes as holding the fabric lightly with the LC1 presser foot included in the machine. 2. Sew. Align the fabric...
Users Manual - English
Page 4
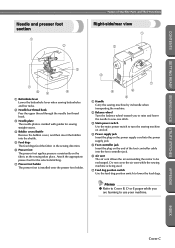
...cord into the power supply jack. 5 Foot controller jack Insert the plug on the end of Machine Parts and Their Functions Needle and presser foot section 1 2 Right-side/rear view 1 2 3 7 65 4 1 Buttonhole lever Lower the buttonhole lever when sewing buttonholes and bar tacks. 2 Needle bar thread hook Pass the upper thread through the needle bar thread hook. 3 Needle plate The needle plate is marked with guides for the selected stitching. 7 Presser foot holder The presser foot is being used. 7 Feed dog position switch Use the feed dog position switch to lower the feed dogs. Do not cover...
...cord into the power supply jack. 5 Foot controller jack Insert the plug on the end of Machine Parts and Their Functions Needle and presser foot section 1 2 Right-side/rear view 1 2 3 7 65 4 1 Buttonhole lever Lower the buttonhole lever when sewing buttonholes and bar tacks. 2 Needle bar thread hook Pass the upper thread through the needle bar thread hook. 3 Needle plate The needle plate is marked with guides for the selected stitching. 7 Presser foot holder The presser foot is being used. 7 Feed dog position switch Use the feed dog position switch to lower the feed dogs. Do not cover...

Users Manual - English
Page 9
... Winding the bobbin ...18 Installing the bobbin ...22 Upper Threading ...24 About the spool of thread ...24 Loading the spool into the thread cassette ...25 Threading the needle ...28 Using the extra spool pin ...30 Thread the needle manually (without using the needle threader 31 Using the twin needle ...32 Pulling up the bobbin thread ...35 Replacing the Needle ...36 Needle precautions ...36 Needle types and their uses ...36 Checking the needle ...37 Replacing the needle ...38 Replacing the Presser Foot 41 Presser foot precautions ...41 Replacing the presser foot ...41 Removing the presser...
... Winding the bobbin ...18 Installing the bobbin ...22 Upper Threading ...24 About the spool of thread ...24 Loading the spool into the thread cassette ...25 Threading the needle ...28 Using the extra spool pin ...30 Thread the needle manually (without using the needle threader 31 Using the twin needle ...32 Pulling up the bobbin thread ...35 Replacing the Needle ...36 Needle precautions ...36 Needle types and their uses ...36 Checking the needle ...37 Replacing the needle ...38 Replacing the Presser Foot 41 Presser foot precautions ...41 Replacing the presser foot ...41 Removing the presser...
Users Manual - English
Page 63
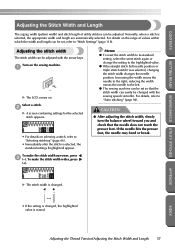
... check that the stitch width can be adjusted. Normally, when a stitch is erased. Turn on the sewing machine. 1 X The LCD comes on. If the needle hits the presser foot, the needle may bend or break. Memo ● To reset the stitch width to its standard setting, select the same stitch again or change the setting to "Stitch Settings" (page 118). APPENDIX INDEX Adjusting the Thread Tension/Adjusting the Stitch Width and Length 57 reducing the...
... check that the stitch width can be adjusted. Normally, when a stitch is erased. Turn on the sewing machine. 1 X The LCD comes on. If the needle hits the presser foot, the needle may bend or break. Memo ● To reset the stitch width to its standard setting, select the same stitch again or change the setting to "Stitch Settings" (page 118). APPENDIX INDEX Adjusting the Thread Tension/Adjusting the Stitch Width and Length 57 reducing the...
Users Manual - English
Page 84
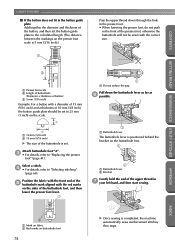
... buttonhole foot 78 X Once sewing is positioned behind the bracket on the buttonhole foot. 1 2 1 Buttonhole lever 2 Bracket Gently hold the end of the upper thread in 7 your left hand, and then start sewing. Attach buttonhole foot "A". 3 • For details, refer to "Selecting stitching" (page 66). Position the fabric with the front end of the 5 buttonhole mark aligned with the correct size. Pull down through the hole in the presser foot. • When lowering the presser foot...
... buttonhole foot 78 X Once sewing is positioned behind the bracket on the buttonhole foot. 1 2 1 Buttonhole lever 2 Bracket Gently hold the end of the upper thread in 7 your left hand, and then start sewing. Attach buttonhole foot "A". 3 • For details, refer to "Selecting stitching" (page 66). Position the fabric with the front end of the 5 buttonhole mark aligned with the correct size. Pull down through the hole in the presser foot. • When lowering the presser foot...
Users Manual - English
Page 86
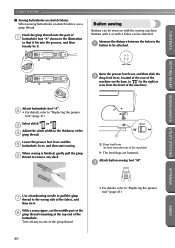
... be attached. Lower the presser foot lever and the 5 buttonhole lever, and then start sewing. Trim off any slack. 1 1 Drop feed lever (as seen from the rear of the 4 gimp thread. Button sewing Buttons can be sewn on stretch fabrics, use a gimp thread. Measure the distance between the holes in the illustration so that it fits into the grooves, and then loosely tie it . Select stitch 46 or 47 . 3 Adjust the stitch width to "Replacing the presser foot...
... be attached. Lower the presser foot lever and the 5 buttonhole lever, and then start sewing. Trim off any slack. 1 1 Drop feed lever (as seen from the rear of the 4 gimp thread. Button sewing Buttons can be sewn on stretch fabrics, use a gimp thread. Measure the distance between the holes in the illustration so that it fits into the grooves, and then loosely tie it . Select stitch 46 or 47 . 3 Adjust the stitch width to "Replacing the presser foot...

Users Manual - English
Page 87
... the needle correctly goes into the two holes toward you . APPENDIX INDEX Buttonhole Stitching 81 Pull the upper thread at the beginning of the fabric, and then tie it is needed to secure the button, perform the button-sewing operation twice. • Do not press the thread cutter button. Select stitch 55 . 5 • For details, refer to the distance between the holes in the same way. Start sewing. 8 X The sewing machine automatically...
... the needle correctly goes into the two holes toward you . APPENDIX INDEX Buttonhole Stitching 81 Pull the upper thread at the beginning of the fabric, and then tie it is needed to secure the button, perform the button-sewing operation twice. • Do not press the thread cutter button. Select stitch 55 . 5 • For details, refer to the distance between the holes in the same way. Start sewing. 8 X The sewing machine automatically...
Users Manual - English
Page 114
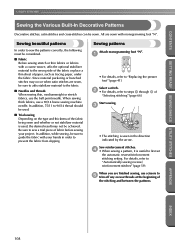
... 4 through 9 of the stitching and between the patterns. Start sewing. 3 • The stitching is used, the desired result may occur when satin stitches are sewn, be considered. ■ Fabric Before sewing stretch or thin fabrics or fabrics with a coarse weave, affix the optional stabilizer material to the fabric. ■ Needles and threads When sewing thin, mediumweight or stretch fabrics, use a 90/14 home sewing machine needle. Be sure to "Automatically sewing reverse/ reinforcement stitches" (page 59). For...
... 4 through 9 of the stitching and between the patterns. Start sewing. 3 • The stitching is used, the desired result may occur when satin stitches are sewn, be considered. ■ Fabric Before sewing stretch or thin fabrics or fabrics with a coarse weave, affix the optional stabilizer material to the fabric. ■ Needles and threads When sewing thin, mediumweight or stretch fabrics, use a 90/14 home sewing machine needle. Be sure to "Automatically sewing reverse/ reinforcement stitches" (page 59). For...

Users Manual - English
Page 132
... it. Lower the presser foot lever. Do not use the start/stop button was pressed, even though the foot controller is scratched, or has a burr on . The combination of stitch that priate for the type of fabric being sewn. wish to firmly tighten the screw. Replace the needle plate. A bobbin designed specifically for this machine is scratched, or has a burr on the machine. Loosen the upper thread tension. Lightly guide the fabric. The area around the hole in...
... it. Lower the presser foot lever. Do not use the start/stop button was pressed, even though the foot controller is scratched, or has a burr on . The combination of stitch that priate for the type of fabric being sewn. wish to firmly tighten the screw. Replace the needle plate. A bobbin designed specifically for this machine is scratched, or has a burr on the machine. Loosen the upper thread tension. Lightly guide the fabric. The area around the hole in...

Users Manual - English
Page 133
...Only use a bobbin designed specifically for the type of the needle bar thread hook). Correct the upper threading. The upper thread breaks. The area around the hole in the presser foot is bent or blunt. authorized service center. Replace the presser foot. Correctly install the bobbin thread. page 18 page 22 - for this machine is tangled, for the thread being used . The thread is not used . Replace the needle plate. Replace the shuttle. A bobbin designed specifically for this machine. Incorrect bobbins will not work properly. If the thread is...
...Only use a bobbin designed specifically for the type of the needle bar thread hook). Correct the upper threading. The upper thread breaks. The area around the hole in the presser foot is bent or blunt. authorized service center. Replace the presser foot. Correctly install the bobbin thread. page 18 page 22 - for this machine is tangled, for the thread being used . The thread is not used . Replace the needle plate. Replace the shuttle. A bobbin designed specifically for this machine. Incorrect bobbins will not work properly. If the thread is...
Users Manual - English
Page 139
... 11 error messages 130 even seam allowance 63 eyelet 99 eyelet punch Cover A, 79, 99 F fagoting 101 features 2 feed dog position switch Cover C, 93 feed dogs Cover C, 92 flipping 112 foot controller Cover A, 51 foot controller jack Cover C free-motion quilting 92 front view Cover B H handle Cover C hard case Cover A heirloom stitching 105 J joining 104 joining stitch 88 L language 17 LCD Cover E, 12, 131 brightness 16, 131 lower threading 22 M main power switch Cover C, 11 maintenance 124 N needle 36 needle bar thread hook Cover C needle clamp screw 38 needle plate...
... 11 error messages 130 even seam allowance 63 eyelet 99 eyelet punch Cover A, 79, 99 F fagoting 101 features 2 feed dog position switch Cover C, 93 feed dogs Cover C, 92 flipping 112 foot controller Cover A, 51 foot controller jack Cover C free-motion quilting 92 front view Cover B H handle Cover C hard case Cover A heirloom stitching 105 J joining 104 joining stitch 88 L language 17 LCD Cover E, 12, 131 brightness 16, 131 lower threading 22 M main power switch Cover C, 11 maintenance 124 N needle 36 needle bar thread hook Cover C needle clamp screw 38 needle plate...

Users Manual - English
Page 140
...length 58 stitch selection key Cover E stitch settings 118 stitch width 57 controlling 94 storing patterns 113 straight stitch 72 stretch fabrics 63 T thick fabrics 62 thin fabrics 63 thread cutter Cover B thread cutter button Cover D, 55 thread guide cover Cover B thread guide for bobbin winding Cover B thread guide plate Cover B thread tension 56 thread tension dial Cover B, 56 trial sewing 61 triple stretch stitch 95 troubleshooting 126 twin needle Cover A, 32, 39 U upper thread 24 upper thread tension 56 V vertical spool pin Cover A W walking foot 44, 91 wide table...
...length 58 stitch selection key Cover E stitch settings 118 stitch width 57 controlling 94 storing patterns 113 straight stitch 72 stretch fabrics 63 T thick fabrics 62 thin fabrics 63 thread cutter Cover B thread cutter button Cover D, 55 thread guide cover Cover B thread guide for bobbin winding Cover B thread guide plate Cover B thread tension 56 thread tension dial Cover B, 56 trial sewing 61 triple stretch stitch 95 troubleshooting 126 twin needle Cover A, 32, 39 U upper thread 24 upper thread tension 56 V vertical spool pin Cover A W walking foot 44, 91 wide table...


