
Accessory Catalog
Page 4
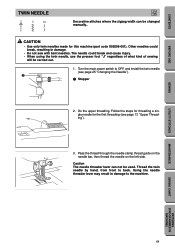
... 4. Check the needle does not hit the presser foot, and then tighten the clamp screw with just right pressure. 1. SA161 All Brother home-use sewing machines www.brother.com Position the presser foot over the long feed dogs on the presser foot and select a straight stitch (left or right. 3. ... Brother General Sewing Accessories 06 Adjustable Zipper & Piping Foot Attaches zippers and pipings easily. Loosen the clamp screw at the back of the presser foot and slide the presser foot so that the needle fits on the opening on the edge of zipper/piping, avoiding the non-flat parts ...
... 4. Check the needle does not hit the presser foot, and then tighten the clamp screw with just right pressure. 1. SA161 All Brother home-use sewing machines www.brother.com Position the presser foot over the long feed dogs on the presser foot and select a straight stitch (left or right. 3. ... Brother General Sewing Accessories 06 Adjustable Zipper & Piping Foot Attaches zippers and pipings easily. Loosen the clamp screw at the back of the presser foot and slide the presser foot so that the needle fits on the opening on the edge of zipper/piping, avoiding the non-flat parts ...

Accessory Catalog
Page 6
... into the curled part of the foot. 6. Non Stick Foot Designed for consistent feeding with the wrong side facing up under the presser foot. 2. Lower the presser foot so that the foot guide is Project Book (See page 53 for details.) www.brother.com SA164 ABCDEFJKMN ... only. Lower the needle into the fabric approximately 1/8" from fraying. 1. Slowly sew 2-3 stitches, making sure the fabric is rolling around the curled part of the fabric. Select a desired stitch and sew. Increase upper thread tension. 2. Continue to sew to the end of the foot. 7. Attach...
... into the curled part of the foot. 6. Non Stick Foot Designed for consistent feeding with the wrong side facing up under the presser foot. 2. Lower the presser foot so that the foot guide is Project Book (See page 53 for details.) www.brother.com SA164 ABCDEFJKMN ... only. Lower the needle into the fabric approximately 1/8" from fraying. 1. Slowly sew 2-3 stitches, making sure the fabric is rolling around the curled part of the fabric. Select a desired stitch and sew. Increase upper thread tension. 2. Continue to sew to the end of the foot. 7. Attach...
Users Manual - English
Page 2
... from the electrical outlet immediately after using and before using this machine, basic safety precautions should always be taken, including the following: Read all moving parts. Always unplug the machine from all instructions before cleaning. 2. Never operate this machine if it has a damaged cord or plug, if it to break. 14...
... from the electrical outlet immediately after using and before using this machine, basic safety precautions should always be taken, including the following: Read all moving parts. Always unplug the machine from all instructions before cleaning. 2. Never operate this machine if it has a damaged cord or plug, if it to break. 14...
Users Manual - English
Page 4
... Use only neutral soaps or detergents to assure correct installation. Do not drop or hit the machine. 4. Be sure to keep your local authorized Brother dealer. Do not touch the balance wheel, thread take-up, needle, or other hot objects. 2. Plug the machine directly into the wall.... • Leaving the machine unattended. 3. Do not use or store the machine near a space heater, iron, halogen lamp, or other moving parts. 2. CONGRATULATIONS ON CHOOSING OUR MACHINE Your machine is required, first follow the troubleshooting table in the back of the operation manual to inspect and ...
... Use only neutral soaps or detergents to assure correct installation. Do not drop or hit the machine. 4. Be sure to keep your local authorized Brother dealer. Do not touch the balance wheel, thread take-up, needle, or other hot objects. 2. Plug the machine directly into the wall.... • Leaving the machine unattended. 3. Do not use or store the machine near a space heater, iron, halogen lamp, or other moving parts. 2. CONGRATULATIONS ON CHOOSING OUR MACHINE Your machine is required, first follow the troubleshooting table in the back of the operation manual to inspect and ...
Users Manual - English
Page 5
CONTENTS BEFORE USE SEWING UTILITY STITCHES CONTENTS CHAPTER 1 BEFORE USE 4 PART NAMES 4 STANDARD ACCESSORIES 6 OPTIONAL ACCESSORIES 6 OPERATION PANEL 7 OPERATION BUTTONS 8 Using the operation buttons 8 POWER SUPPLY 9 BOBBIN WINDING / BOBBIN THREAD SETTING 10 Winding the bobbin and ...
CONTENTS BEFORE USE SEWING UTILITY STITCHES CONTENTS CHAPTER 1 BEFORE USE 4 PART NAMES 4 STANDARD ACCESSORIES 6 OPTIONAL ACCESSORIES 6 OPERATION PANEL 7 OPERATION BUTTONS 8 Using the operation buttons 8 POWER SUPPLY 9 BOBBIN WINDING / BOBBIN THREAD SETTING 10 Winding the bobbin and ...
Users Manual - English
Page 7
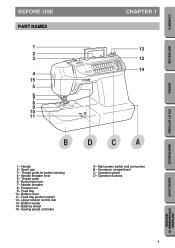
... dial 13- Bobbin winder 14- Bobbin cover 11- Thread guide for bobbin winding 4- Needle threader 8- Operation panel D- CONTENTS BEFORE USE SEWING UTILITY STITCHES BEFORE USE PART NAMES 1 2 3 4 15 5 6 7 8 9 10 11 CHAPTER 1 13 12 14 BDCA 1-
... dial 13- Bobbin winder 14- Bobbin cover 11- Thread guide for bobbin winding 4- Needle threader 8- Operation panel D- CONTENTS BEFORE USE SEWING UTILITY STITCHES BEFORE USE PART NAMES 1 2 3 4 15 5 6 7 8 9 10 11 CHAPTER 1 13 12 14 BDCA 1-
Users Manual - English
Page 8
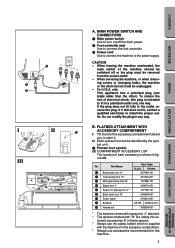
... POWER SWITCH AND CONNECTORS 1 Main power switch Use to turn on it still does not fit, contact a qualified electrician to the power supply. CAUTION - For U.S.A. Part Name 1 Buttonhole foot "A" Part Code U.S.A. II Each presser foot can be unplugged. - If the plug does not fit fully in any way.
... POWER SWITCH AND CONNECTORS 1 Main power switch Use to turn on it still does not fit, contact a qualified electrician to the power supply. CAUTION - For U.S.A. Part Name 1 Buttonhole foot "A" Part Code U.S.A. II Each presser foot can be unplugged. - If the plug does not fit fully in any way.
Users Manual - English
Page 9
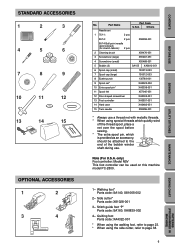
Note (For U.S.A. Walking foot* Parts code: SA140, X81065-002 2- Quilting foot Parts code: XA4322-001 * When using the walking foot, refer to page 23. * When using special threads which quickly wind off the thread spool, place a net ... N5V This foot controller can be attached to page 38. 6 PATTERNS (PROGRAMMED IN MACHINE) SEWING CHART MAINTENANCE UTILITY STITCHES SEWING BEFORE USE CONTENTS Side cutter* Parts code: X81028-001 3- Part Name Needle set Part Code U.S.A. Stitch guide foot "P" Parts code: SA160, XA8839-002 4-
Note (For U.S.A. Walking foot* Parts code: SA140, X81065-002 2- Quilting foot Parts code: XA4322-001 * When using the walking foot, refer to page 23. * When using special threads which quickly wind off the thread spool, place a net ... N5V This foot controller can be attached to page 38. 6 PATTERNS (PROGRAMMED IN MACHINE) SEWING CHART MAINTENANCE UTILITY STITCHES SEWING BEFORE USE CONTENTS Side cutter* Parts code: X81028-001 3- Part Name Needle set Part Code U.S.A. Stitch guide foot "P" Parts code: SA160, XA8839-002 4-
Users Manual - English
Page 19
... 4 Spool cap 23 4 Depending on the model, the net may be available as it so that the thread winds off from twisting as an optional part. Net If using special threads which wind quickly off the spool pin. Install the spool felt and the thread spool in that order, and then...
... 4 Spool cap 23 4 Depending on the model, the net may be available as it so that the thread winds off from twisting as an optional part. Net If using special threads which wind quickly off the spool pin. Install the spool felt and the thread spool in that order, and then...

Users Manual - English
Page 29
... stitches when sewing decorative stitches, we recommend using the ballpoint needle (golden colored). • A home sewing machine needle 75/11 is probably the most important part of needle 75/11 - 90/14 65/9 - 75/11 90/14 - 100/16 Ball point needle (golden colored) 75/11 - 90/14 65/9-90/14...
... stitches when sewing decorative stitches, we recommend using the ballpoint needle (golden colored). • A home sewing machine needle 75/11 is probably the most important part of needle 75/11 - 90/14 65/9 - 75/11 90/14 - 100/16 Ball point needle (golden colored) 75/11 - 90/14 65/9-90/14...
Users Manual - English
Page 30
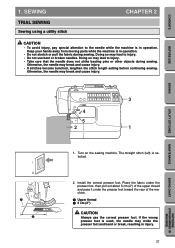
... the correct presser foot. If the wrong presser foot is in injury. 27 SEWING CHART PATTERNS (PROGRAMMED IN MACHINE) Keep your hands away from moving parts while the machine is selected. 2. BEFORE USE SEWING UTILITY STITCHES MAINTENANCE 1 2 3 4 5 2 1 1. Place the fabric under the presser foot, then pull out about 5 cm (2") of the...
... the correct presser foot. If the wrong presser foot is in injury. 27 SEWING CHART PATTERNS (PROGRAMMED IN MACHINE) Keep your hands away from moving parts while the machine is selected. 2. BEFORE USE SEWING UTILITY STITCHES MAINTENANCE 1 2 3 4 5 2 1 1. Place the fabric under the presser foot, then pull out about 5 cm (2") of the...
Users Manual - English
Page 45
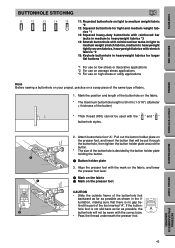
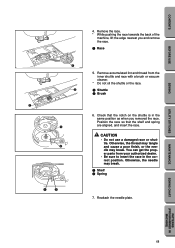
Pull out the button holder plate on the presser foot, and insert the button that there is no gap behind the part of the foot marked "A". hole foot is not slid back as far as shown in the illustration, making sure that will not be put through 5 ...
Pull out the button holder plate on the presser foot, and insert the button that there is no gap behind the part of the foot marked "A". hole foot is not slid back as far as shown in the illustration, making sure that will not be put through 5 ...
Users Manual - English
Page 57
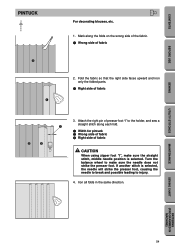
Fold the fabric so that the right side faces upward and iron only the folded parts. 1 Right side of fabric 2. UTILITY STITCHES MAINTENANCE SEWING CHART PATTERNS (PROGRAMMED IN MACHINE) 54 Attach the right pin of presser foot "I" to the holder, and ...
Fold the fabric so that the right side faces upward and iron only the folded parts. 1 Right side of fabric 2. UTILITY STITCHES MAINTENANCE SEWING CHART PATTERNS (PROGRAMMED IN MACHINE) 54 Attach the right pin of presser foot "I" to the holder, and ...
Users Manual - English
Page 65
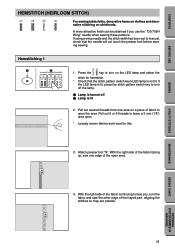
... the presser foot before starting sewing. A more attractive finish can be obtained if you , turn the fabric and sew the other edge of the frayed part, aligning the stitches so they are parallel. If the LED lamp is lit, press the stitch pattern switch key to turn on the LED lamp...
... the presser foot before starting sewing. A more attractive finish can be obtained if you , turn the fabric and sew the other edge of the frayed part, aligning the stitches so they are parallel. If the LED lamp is lit, press the stitch pattern switch key to turn on the LED lamp...
Users Manual - English
Page 67
... the needle threader lever may result in damage. • Do not sew with bent needles. Follow the steps for threading a single needle for this machine (part code X59296-001). Turn the main power switch to OFF, and install the twin needle (see page 13 "Upper Threading"). 3. UTILITY STITCHES MAINTENANCE SEWING CHART...
... the needle threader lever may result in damage. • Do not sew with bent needles. Follow the steps for threading a single needle for this machine (part code X59296-001). Turn the main power switch to OFF, and install the twin needle (see page 13 "Upper Threading"). 3. UTILITY STITCHES MAINTENANCE SEWING CHART...
Users Manual - English
Page 71
You can get the proper parts from the inner shuttle and race with a brush or vacuum cleaner. * Do not oil the shuttle or the race. 1 Shuttle 2 Brush 6. Check that the shelf ...
You can get the proper parts from the inner shuttle and race with a brush or vacuum cleaner. * Do not oil the shuttle or the race. 1 Shuttle 2 Brush 6. Check that the shelf ...
Users Manual - English
Page 72
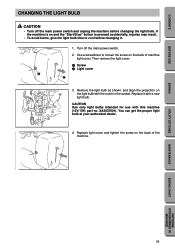
... intended for use with a new light bulb. Turn off the main power switch and unplug the machine before changing it with this machine (12V/ 5W: part no. Then remove the light cover. 1 Screw 2 Light cover 1 2 3. Remove the light bulb as shown, and align the projection on and the "Start/Stop" button...
... intended for use with a new light bulb. Turn off the main power switch and unplug the machine before changing it with this machine (12V/ 5W: part no. Then remove the light cover. 1 Screw 2 Light cover 1 2 3. Remove the light bulb as shown, and align the projection on and the "Start/Stop" button...


