
Accessory Catalog
Page 13
...For seven grooves: SA179 ABCDEJ For five grooves: SA162 IP This presser foot does not include the bobbin cover. Use a stiff card to sew the first row in one of the grooves. 4. Brother Embellishment Feet 23 Bed Runner & Pillowcase Innov-is Project Book (See pages 16 and 17 for most...tuck setting and depth setting. 2. Adjust the amount of tuck or gather by placing the completed row in the center position. 3. www.brother.com A specially designed bobbin cover is moved forward, its teeth catch a fabric and force it forward into the slot, and stitch slowly. 3. SA143 AFJKM Ruffler Foot ...
...For seven grooves: SA179 ABCDEJ For five grooves: SA162 IP This presser foot does not include the bobbin cover. Use a stiff card to sew the first row in one of the grooves. 4. Brother Embellishment Feet 23 Bed Runner & Pillowcase Innov-is Project Book (See pages 16 and 17 for most...tuck setting and depth setting. 2. Adjust the amount of tuck or gather by placing the completed row in the center position. 3. www.brother.com A specially designed bobbin cover is moved forward, its teeth catch a fabric and force it forward into the slot, and stitch slowly. 3. SA143 AFJKM Ruffler Foot ...
Users Manual - English
Page 2
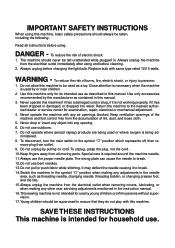
...insert any object into water. To disconnect, turn the main switch to break. 12.Do not use as threading needle, changing needle, threading bobbin, or changing presser foot, and the like. 15.Always unplug the machine from the accumulation of burns, fire, electric shock, or injury... required around the machine needle. 11.Always use . Keep ventilation openings of the machine and foot control free from the electrical outlet when removing covers, lubricating, or when making any adjustments in the needle area, such as described in . ministered. 8. Do not unplug by the manufacturer as...
...insert any object into water. To disconnect, turn the main switch to break. 12.Do not use as threading needle, changing needle, threading bobbin, or changing presser foot, and the like. 15.Always unplug the machine from the accumulation of burns, fire, electric shock, or injury... required around the machine needle. 11.Always use . Keep ventilation openings of the machine and foot control free from the electrical outlet when removing covers, lubricating, or when making any adjustments in the needle area, such as described in . ministered. 8. Do not unplug by the manufacturer as...
Users Manual - English
Page 7
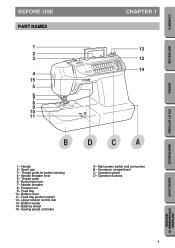
... C- Presser foot 9- Upper tension control dial 13- CONTENTS BEFORE USE SEWING UTILITY STITCHES BEFORE USE PART NAMES 1 2 3 4 15 5 6 7 8 9 10 11 CHAPTER 1 13 12 14 BDCA 1- Bobbin cover 11- Operation buttons MAINTENANCE SEWING CHART PATTERNS (PROGRAMMED IN MACHINE) 4 Needle threader lever 5- Needle threader 8- Sewing speed controller A- Thread guide for...
... C- Presser foot 9- Upper tension control dial 13- CONTENTS BEFORE USE SEWING UTILITY STITCHES BEFORE USE PART NAMES 1 2 3 4 15 5 6 7 8 9 10 11 CHAPTER 1 13 12 14 BDCA 1- Bobbin cover 11- Operation buttons MAINTENANCE SEWING CHART PATTERNS (PROGRAMMED IN MACHINE) 4 Needle threader lever 5- Needle threader 8- Sewing speed controller A- Thread guide for...
Users Manual - English
Page 8
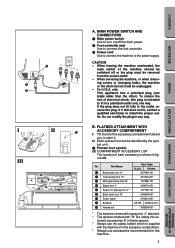
...the proper outlet. Part Name 1 Buttonhole foot "A" Part Code U.S.A. For U.S.A. No. No en- When servicing the machine, or when removing covers or changing bulbs, the machine or the electrical set X58358-001 * The machine comes with zigzag foot "J" attached. * The spaces marked ...ACCESSORY COMPARTMENT I " X59370-051 5 Space for Zigzag foot "J" * 137748-101 6 Blind stitch foot "R" X56409-001 7 Seam ripper X54243-001 8 Bobbins SA155 XA3812-051 9 Needle set must be unplugged. - MAIN POWER SWITCH AND CONNECTORS 1 Main power switch Use to turn on it still does not...
...the proper outlet. Part Name 1 Buttonhole foot "A" Part Code U.S.A. For U.S.A. No. No en- When servicing the machine, or when removing covers or changing bulbs, the machine or the electrical set X58358-001 * The machine comes with zigzag foot "J" attached. * The spaces marked ...ACCESSORY COMPARTMENT I " X59370-051 5 Space for Zigzag foot "J" * 137748-101 6 Blind stitch foot "R" X56409-001 7 Seam ripper X54243-001 8 Bobbins SA155 XA3812-051 9 Needle set must be unplugged. - MAIN POWER SWITCH AND CONNECTORS 1 Main power switch Use to turn on it still does not...
Users Manual - English
Page 15
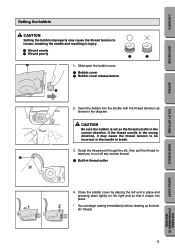
...the right end so that it may cause the thread tension to loosen, breaking the needle and resulting in the diagram. Close the bobbin cover by placing the left end in the wrong direction, it snaps into the shuttle with the thread direction as shown in injury. 1... Wound evenly 2 Wound poorly 1 2 1 1. Slide open the bobbin cover. 1 Bobbin cover 2 Bobbin cover release button 2 2. CAUTION Be sure the bobbin is set so the thread unrolls in thread cutter 4. bin thread. Guide the thread end through the slit, then pull the ...
...the right end so that it may cause the thread tension to loosen, breaking the needle and resulting in the diagram. Close the bobbin cover by placing the left end in the wrong direction, it snaps into the shuttle with the thread direction as shown in injury. 1... Wound evenly 2 Wound poorly 1 2 1 1. Slide open the bobbin cover. 1 Bobbin cover 2 Bobbin cover release button 2 2. CAUTION Be sure the bobbin is set so the thread unrolls in thread cutter 4. bin thread. Guide the thread end through the slit, then pull the ...
Users Manual - English
Page 28
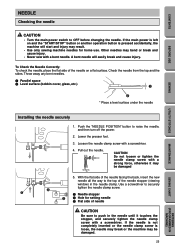
... facing the back, insert the new needle all the way to push in the needle clamp. Throw away any bent needles. 1 Parallel space 2 Level surface (bobbin cover, glass, etc.) 1 2 * Place a level surface under the needle SEWING UTILITY STITCHES MAINTENANCE SEWING CHART Installing the needle securely 1. If the needle is not completely inserted...
... facing the back, insert the new needle all the way to push in the needle clamp. Throw away any bent needles. 1 Parallel space 2 Level surface (bobbin cover, glass, etc.) 1 2 * Place a level surface under the needle SEWING UTILITY STITCHES MAINTENANCE SEWING CHART Installing the needle securely 1. If the needle is not completely inserted...
Users Manual - English
Page 56
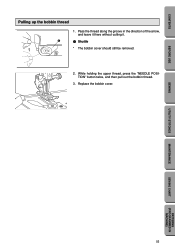
CONTENTS BEFORE USE Pulling up the bobbin thread 1. While holding the upper thread, press the "NEEDLE POSI- TION" button twice, and then pull out the bobbin thread. 3. SEWING UTILITY STITCHES MAINTENANCE SEWING CHART PATTERNS (PROGRAMMED IN MACHINE) 53 Replace the bobbin cover. Pass the thread along the groove in the direction of the arrow, and leave it there without cutting it. 1 1 Shuttle * The bobbin cover should still be removed. 6 2.
CONTENTS BEFORE USE Pulling up the bobbin thread 1. While holding the upper thread, press the "NEEDLE POSI- TION" button twice, and then pull out the bobbin thread. 3. SEWING UTILITY STITCHES MAINTENANCE SEWING CHART PATTERNS (PROGRAMMED IN MACHINE) 53 Replace the bobbin cover. Pass the thread along the groove in the direction of the arrow, and leave it there without cutting it. 1 1 Shuttle * The bobbin cover should still be removed. 6 2.


