Brother International CE4400 Support and Manuals
Get Help and Manuals for this Brother International item
View All Support Options Below
Free Brother International CE4400 manuals!
Problems with Brother International CE4400?
Ask a Question
Free Brother International CE4400 manuals!
Problems with Brother International CE4400?
Ask a Question
Popular Brother International CE4400 Manual Pages
Operation Manual - Page 1

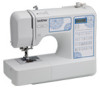
Computerized Sewing Machine
Operation Manual
Product Code:885-V60/V61/V62/V63/V64/V65
KNOWING YOUR SEWING MACHINE
SEWING BASICS
UTILITY STITCHES
APPENDIX
Please visit us at http://solutions.brother.com where you can get product support and answers to frequently asked questions (FAQs).
Operation Manual - Page 3
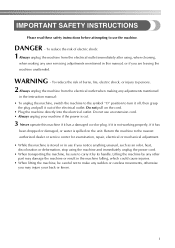
...the machine unattended. Return the machine to the nearest authorized dealer or service center for examination, repair, electrical or mechanical adjustment. • While the machine is stored ... IMPORTANT SAFETY INSTRUCTIONS
Please read these safety instructions before attempting to carry it by any other part may injure your machine if the power is cut.
3 Never operate this manual, or if...
Operation Manual - Page 4
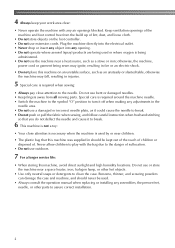
...manual when replacing or installing any opening. • Do not operate where aerosol (spray) products are being used by or near a space heater, iron, halogen lamp, or other parts to break. • Do not push or pull the fabric when sewing, and follow careful instruction.... • Do not use outdoors.
7 For a longer service life:
• When storing this machine on the foot controller...
Operation Manual - Page 5
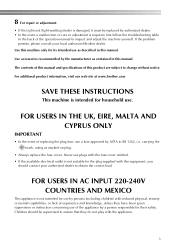
... have been given supervision or instruction concerning use as marked on plug.
• Always replace the fuse cover. Use this machine only for the plug supplied with this manual. Use accessories recommended by a person responsible for use by persons (including children) with the appliance.
3 The contents of this manual and specifications of the appliance by...
Operation Manual - Page 8
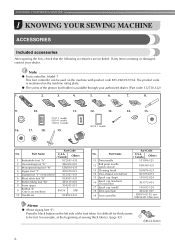
...9679; Foot controller: Model T This foot controller can be fed, for thick seams to be used on machine)
17 Spool cap (small)
18 Extra spool pin
19 Foot controller
Part Code
U.S.A. / Canada
...ripper
X54243-051
9
Bobbin (4) (One is mentioned on machine.)
SA156
SFB
10 Needle set
XC8834-021
No. Part Name
11 Twin needle
12
Ball point needle (gold colored)
13 Cleaning brush
14 Disc...
Operation Manual - Page 10
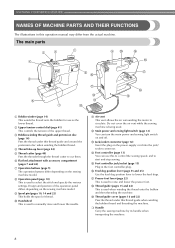
... manually raise and lower the needle. p Feed dog position lever (page 55 and 65) Use the feed dog position lever to select the stitch and specify the various settings. r Thread guide ...model.
KNOWING YOUR SEWING MACHINE
NAMES OF MACHINE PARTS AND THEIR FUNCTIONS
The illustrations in the foot controller plug. s Thread guide cover (pages 16 and 22) Pass the thread under this operation manual...
Operation Manual - Page 11
...
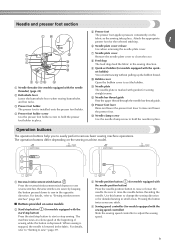
g Needle plate cover
Remove the needle plate cover to set the bobbin.
a Needle threader (for models equipped with guides for models equipped with the needle position button) Press the needle position ...appropriate presser foot for models equipped with the quick- j Bobbin cover
Open the bobbin cover to clean the race. k Needle plate The needle plate is installed onto the presser ...
Operation Manual - Page 12
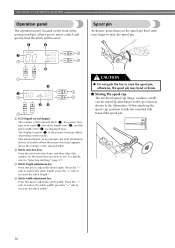
...your finger to reduce the stitch width; Spool pin
As shown, press down on the model.
KNOWING YOUR SEWING MACHINE
Operation panel
The operation panel, located on the front of the.... When attaching the spool cap, position it to be sewn. This manual shows, as an example, the LCD (illustration above) of models where the presser foot type appears above the number of the selected stitch...
Operation Manual - Page 20
...needle.
Slide the sewing speed controller to the right f (to set the speed to its k original position (for models equipped
with
the sewing speed controller). a Sewing speed controller
Turn ...is cut the thread as described.
Slide the sewing speed controller back to fast) (for models equipped with the sewing speed controller). When the bobbin begins spinning slowly, take i your ...
Operation Manual - Page 34
...SETTINGS" (page 73).
j • For details on starting to sew, refer to "Starting
to step a through l of thread and fabric that the upper thread for the right side in the fabric, otherwise the needle may break or the machine may be damaged.
32 Attach zigzag foot "J".
Note
Models... needle bar thread guide, manually thread the
right ...be sure to "Replacing the presser foot" ...
Operation Manual - Page 49
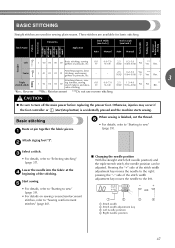
...; For details, refer to turn off the main power before replacing the presser foot. Stitch Name
Pattern No. Application
Stitch Width [mm (inch.)]
Stitch Length [mm (inch.)]
Auto Manual Auto Manual
Straight Pattern
Presser Foot 70 stitches
model 60 stitches
model 50 stitches
model 40 stitches
model Twin Needle Walking Foot
Reverse/ Reinforcement
Stitching
Left
J
00
00...
Operation Manual - Page 68
...
0.0-7.0 (0-1/4)
2.5 (3/32)
1.5-4.0 (1/16-3/16)
No
No
* Rfc.
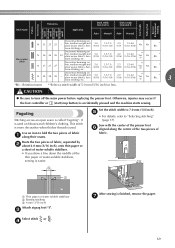
a Set the button guide plate on the presser foot scale is 5 mm (3/16 inch).)
1
Select stitch...be subject to turn off the main power before replacing the presser foot. b
Start sewing. Bar tack...(inch.)]
Stitch Length [mm (inch.)]
Auto Manual Auto Manual
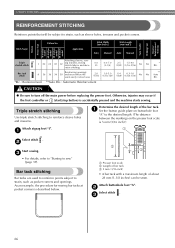
Triple stretch stitch
Attaching sleeves, sew-
Triple stretch...
Operation Manual - Page 71
...easier. Set the stitch width to turn off the main power before replacing the presser...". Application
Stitch Width [mm (inch.)]
Stitch Length [mm (inch.)]
Auto Manual Auto Manual
Decorative stitch
Decorative hemming on thin, medium weight and 5.0 plain weave fabrics,...Pattern Presser Foot 70 stitches model 60 stitches model 50 stitches model 40 stitches model Twin Needle Walking Foot
Reverse...
Operation Manual - Page 75

4 APPENDIX
STITCH SETTINGS
Applications, stitch lengths and widths and whether the twin needle can be...[mm (inch.)]
Stitch Length [mm (inch.)]
4
Stitch Name
Application
Auto Manual Auto Manual
Straight Pattern
Presser Foot 70 stitches
model 60 stitches
model 50 stitches
model 40 stitches
model Twin Needle Walking Foot
Reverse/ Reinforcement
Stitching
Left
Center
Triple stretch stitch
Stretch...
Operation Manual - Page 97
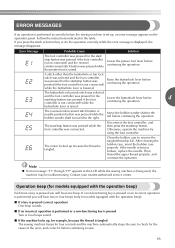
.... ERROR MESSAGES
If an operation is performed incorrectly before the sewing machine is set up...be malfunctioning. Contact your nearest authorized service center. The buttonhole or bar tack ...and continue the operation. Follow the instructions indicated in the LCD while the ... models equipped with the operation beep)
Each...while the error message is bent or broken, replace the needle.
Raise ...
Brother International CE4400 Reviews
We have not received any reviews for Brother International yet.