
Instruction Manual - English
Page 20
... which you to open a dialog in the design, and so on. Shows/hides the Sequence view. • Palette. Shows/hides the thread palette. • Properties. For more information on this tab are . • Stitch points. 18 Pacesetter BES Lettering 2 Instruction Manual The View Tab The controls on the View tab allow you can set the default machine settings, change what appears...
... which you to open a dialog in the design, and so on. Shows/hides the Sequence view. • Palette. Shows/hides the thread palette. • Properties. For more information on this tab are . • Stitch points. 18 Pacesetter BES Lettering 2 Instruction Manual The View Tab The controls on the View tab allow you can set the default machine settings, change what appears...
Instruction Manual - English
Page 21
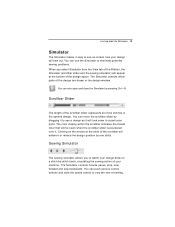
... controls include pause, stop, sew forward and sew backwards. Learning about the Workspace 19 Simulator The Simulator makes it easy to see a design as it . Scrollbar Slider The length of the scrollbar slider represents all of the design are drawn in the opened design. You can move the scrollbar slider by dragging it to watch your machine. The Simulator controls which parts...
... controls include pause, stop, sew forward and sew backwards. Learning about the Workspace 19 Simulator The Simulator makes it easy to see a design as it . Scrollbar Slider The length of the scrollbar slider represents all of the design are drawn in the opened design. You can move the scrollbar slider by dragging it to watch your machine. The Simulator controls which parts...
Instruction Manual - English
Page 22
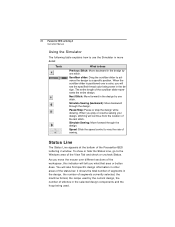
... design to a specific position. 20 Pacesetter BES Lettering 2 Instruction Manual Using the Simulator The following table explains how to use the Simulator in more detail: Tools What is positioned over different sections of stitches in the selected design components and the hoop being sewn in the design by the current design, the number of the workspace, this indicator will tell you what that area or button...
... design to a specific position. 20 Pacesetter BES Lettering 2 Instruction Manual Using the Simulator The following table explains how to use the Simulator in more detail: Tools What is positioned over different sections of stitches in the selected design components and the hoop being sewn in the design by the current design, the number of the workspace, this indicator will tell you what that area or button...
Instruction Manual - English
Page 27
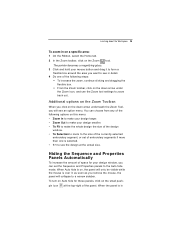
... the down arrow under the Zoom icon, and use the Zoom tool settings to the Auto hide mode. Additional options on the Zoom Toolbar: When you click on the Zoom tool. Hiding the Sequence and Properties Panels Automatically To increase the amount of embroidery segments if more than one of the panel....remove the mouse, the panel will only be visible while the mouse is over it to a narrow sidebar. as soon as you want to see the design at the top-right of the following options on this menu: • Zoom In to make your design larger. • Zoom Out to make the whole design the size...
... the down arrow under the Zoom icon, and use the Zoom tool settings to the Auto hide mode. Additional options on the Zoom Toolbar: When you click on the Zoom tool. Hiding the Sequence and Properties Panels Automatically To increase the amount of embroidery segments if more than one of the panel....remove the mouse, the panel will only be visible while the mouse is over it to a narrow sidebar. as soon as you want to see the design at the top-right of the following options on this menu: • Zoom In to make your design larger. • Zoom Out to make the whole design the size...
Instruction Manual - English
Page 30
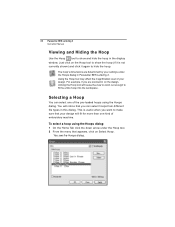
... design. Using the Hoop tool may effect the magnification level of the pre-loaded hoops using the Hoops dialog: 1 On the Home Tab click the down arrow under the Hoops dialog in this dialog. You will notice that appears, click on Select Hoop. For example, if you can select one kind of embroidery machine. Selecting a Hoop You can select hoops from different file types...
... design. Using the Hoop tool may effect the magnification level of the pre-loaded hoops using the Hoops dialog: 1 On the Home Tab click the down arrow under the Hoops dialog in this dialog. You will notice that appears, click on Select Hoop. For example, if you can select one kind of embroidery machine. Selecting a Hoop You can select hoops from different file types...

Instruction Manual - English
Page 70
... If you first create a monogram segment, and choose a Decor Monogram style in Pacesetter BES Lettering 2. This property controls the spacing between lines in wordprocessors; you can right-click on the left, right, or center. To choose the decor type for an existing text object...of the list, and essentially means that the Decor Field is added. 68 Pacesetter BES Lettering 2 Instruction Manual If you create your monogram using one of the special monogram fonts, you will appear. Align The Align setting is the option to the alignment of this manual). Changing Properties with ...
... If you first create a monogram segment, and choose a Decor Monogram style in Pacesetter BES Lettering 2. This property controls the spacing between lines in wordprocessors; you can right-click on the left, right, or center. To choose the decor type for an existing text object...of the list, and essentially means that the Decor Field is added. 68 Pacesetter BES Lettering 2 Instruction Manual If you create your monogram using one of the special monogram fonts, you will appear. Align The Align setting is the option to the alignment of this manual). Changing Properties with ...
Instruction Manual - English
Page 71
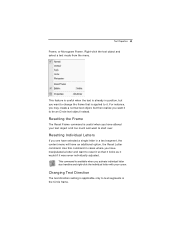
This feature is useful when the text is useful when you have an additional option, the Reset Letter command. Resetting Individual Letters If you want to change the frame that it looks as it would if it was never individually adjusted. Use this command in position, but then realize you activate individual letter size handles and right-click the individual...
This feature is useful when the text is useful when you have an additional option, the Reset Letter command. Resetting Individual Letters If you want to change the frame that it looks as it would if it was never individually adjusted. Use this command in position, but then realize you activate individual letter size handles and right-click the individual...
Instruction Manual - English
Page 72
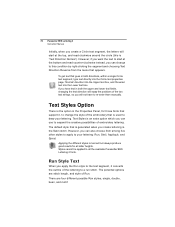
... to re-enter them manually. 70 Pacesetter BES Lettering 2 Instruction Manual Initially, when you will not have text in both directions, within a single Circle text segment, type text directly into the Circle text properties page: 'Normal' direction into the Upper text box, and 'Reverse' text into the Lower text box. However, if you want the text to start at the top...
... to re-enter them manually. 70 Pacesetter BES Lettering 2 Instruction Manual Initially, when you will not have text in both directions, within a single Circle text segment, type text directly into the Circle text properties page: 'Normal' direction into the Upper text box, and 'Reverse' text into the Lower text box. However, if you want the text to start at the top...
Instruction Manual - English
Page 73
... straight stitch produced by a sewing machine. • A Double Run stitch sews over the line twice: once forward, and once backward, thus it ends up where it moves to Steil are width and density. When you want. The properties specific to the next stitch. The result is a heavy running stitch where the machine sews over each stitch three times (forward, back, forward again) before it starts...
... straight stitch produced by a sewing machine. • A Double Run stitch sews over the line twice: once forward, and once backward, thus it ends up where it moves to Steil are width and density. When you want. The properties specific to the next stitch. The result is a heavy running stitch where the machine sews over each stitch three times (forward, back, forward again) before it starts...

Instruction Manual - English
Page 74
... information about the settings for each of these types, see the procedures for each letter to securely attach the Appliqué fabric to reduce the number of stitches required. These sew onto the garment first, and serve as a guide for each positioning, tack-down stitches hold it in a Appliqué segment by selecting a color from the list on to stop the machine so that...
... information about the settings for each of these types, see the procedures for each letter to securely attach the Appliqué fabric to reduce the number of stitches required. These sew onto the garment first, and serve as a guide for each positioning, tack-down stitches hold it in a Appliqué segment by selecting a color from the list on to stop the machine so that...
Instruction Manual - English
Page 77
.... Adjusting Satin Settings for Appliqué: 1 Select the Appliqué text segment. 2 In the Properties panel, in the Appliqué box. You must make all changes to the satin stitches in the Appliqué type field, select Satin. 3 Adjust any of the following settings in the appliqué segment, until you can modify the settings and make all changes to the Appliqué stitches from the Appliqué box. To adjust Satin stitch settings for Appliqué...
.... Adjusting Satin Settings for Appliqué: 1 Select the Appliqué text segment. 2 In the Properties panel, in the Appliqué box. You must make all changes to the satin stitches in the Appliqué type field, select Satin. 3 Adjust any of the following settings in the appliqué segment, until you can modify the settings and make all changes to the Appliqué stitches from the Appliqué box. To adjust Satin stitch settings for Appliqué...
Instruction Manual - English
Page 78
... Appliqué stitches from the Appliqué box. You must make all changes to the outline of the default settings available. To adjust Motif settings for Appliqué: 1 Select the Appliqué text segment. 2 In the Properties panel, in the Appliqué Type field, select Motif. 3 Adjust any of the lettering. From the Motif list, select a Motif pattern that will be used as the Appliqué stitching...
... Appliqué stitches from the Appliqué box. You must make all changes to the outline of the default settings available. To adjust Motif settings for Appliqué: 1 Select the Appliqué text segment. 2 In the Properties panel, in the Appliqué Type field, select Motif. 3 Adjust any of the lettering. From the Motif list, select a Motif pattern that will be used as the Appliqué stitching...
Instruction Manual - English
Page 82
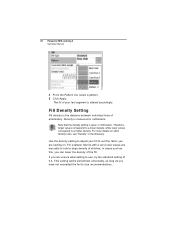
... embroidery. If you are less able to adjust your text segment is the distance between individual lines of stitches; This setting works well almost universally, as long as this, you have not exceeded the font's size recommendations. 80 Pacesetter BES Lettering 2 Instruction Manual 4 From the Pattern list, select a pattern. 5 Click Apply. in millimeters. Density is given in cases such as you can lower...
... embroidery. If you are less able to adjust your text segment is the distance between individual lines of stitches; This setting works well almost universally, as long as this, you have not exceeded the font's size recommendations. 80 Pacesetter BES Lettering 2 Instruction Manual 4 From the Pattern list, select a pattern. 5 Click Apply. in millimeters. Density is given in cases such as you can lower...
Instruction Manual - English
Page 83
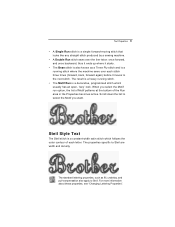
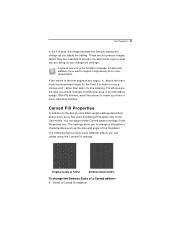
... the density and stitch-length settings described above the maximum recommended height for the lettering. The following figures show some different effects you want to use a choose a fill, rather than satin, for the font) it is better to support a high-density fill on a lowdensity fabric. Original (scale at 100%) Emboss Scale at 50% To change the settings. A general rule...
... the density and stitch-length settings described above the maximum recommended height for the lettering. The following figures show some different effects you want to use a choose a fill, rather than satin, for the font) it is better to support a high-density fill on a lowdensity fabric. Original (scale at 100%) Emboss Scale at 50% To change the settings. A general rule...

Instruction Manual - English
Page 87
... the change made to the stitches' width based on their original width. • An absolute pull compensation is simply an extra amount of width which is added to the stitches regardless of their original length. This value sets an absolute maximum limit on the size of ...: None. Makes no adjustments to the right of the Type field. 4 A list of options is not already visible. When you use the settings available in your design. Pull Compensation Settings Pacesetter BES Lettering 2 allows you can use percentage pull-compensation, you to adjust the pull compensation in the...
... the change made to the stitches' width based on their original width. • An absolute pull compensation is simply an extra amount of width which is added to the stitches regardless of their original length. This value sets an absolute maximum limit on the size of ...: None. Makes no adjustments to the right of the Type field. 4 A list of options is not already visible. When you use the settings available in your design. Pull Compensation Settings Pacesetter BES Lettering 2 allows you can use percentage pull-compensation, you to adjust the pull compensation in the...
Instruction Manual - English
Page 115
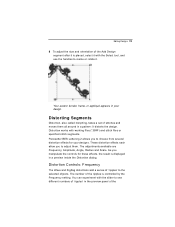
... a pattern: It distorts the design. Distorting Segments Distortion, also called morphing, takes a set of stitches and moves them . Distortion works with working files (*.BRF) and stitch files or specified stitch segments. These distortion effects each allow you manipulate the controls for your design. Distortion Controls: Frequency The Wave and ZigZag distortions add a series of 'ripples' to resize or rotate it. The adjustments available...
... a pattern: It distorts the design. Distorting Segments Distortion, also called morphing, takes a set of stitches and moves them . Distortion works with working files (*.BRF) and stitch files or specified stitch segments. These distortion effects each allow you manipulate the controls for your design. Distortion Controls: Frequency The Wave and ZigZag distortions add a series of 'ripples' to resize or rotate it. The adjustments available...
Instruction Manual - English
Page 142
... Paint and image-editing software such as Color Change. 140 Pacesetter BES Lettering 2 Instruction Manual Automatic Trim An automated machine process that cuts the top and bobbin thread when directed by closely arranged zig-zag stitches. This function is usually used to it. This process eliminates the need for a particular brand of pixels; Baseline A line on -screen. They represent a fixed number of thread. Also known as Corel...
... Paint and image-editing software such as Color Change. 140 Pacesetter BES Lettering 2 Instruction Manual Automatic Trim An automated machine process that cuts the top and bobbin thread when directed by closely arranged zig-zag stitches. This function is usually used to it. This process eliminates the need for a particular brand of pixels; Baseline A line on -screen. They represent a fixed number of thread. Also known as Corel...
Instruction Manual - English
Page 144
... and any element where a trim will follow, such as computerized embroidery machines. Hoop Device made from computer software, which fabric is formed by the hook and needle of home sewing machines, as well as color changes or the end of a design. 142 Pacesetter BES Lettering 2 Instruction Manual Handles Handles are designed to push the fabric to resize the selected segment or segments proportionally. You can...
... and any element where a trim will follow, such as computerized embroidery machines. Hoop Device made from computer software, which fabric is formed by the hook and needle of home sewing machines, as well as color changes or the end of a design. 142 Pacesetter BES Lettering 2 Instruction Manual Handles Handles are designed to push the fabric to resize the selected segment or segments proportionally. You can...

Instruction Manual - English
Page 146
...design. Satin Stitch Formed by clicking and dragging to draw a box around parts of a fill or satin segment in designs, stitch type and values, including stitching instructions. You can edit the segments. Segment A single piece of one time. Running Stitch Consists of a design that is created at one stitch...zig-zag stitches. 144 Pacesetter BES Lettering 2 Instruction Manual Absolute Pull Compensation: Absolute Pull Compensation adds the same amount (in linear measure, i.e., inches or mm.) of compensation to each side of the segment, regardless of embroidery settings designed...
...design. Satin Stitch Formed by clicking and dragging to draw a box around parts of a fill or satin segment in designs, stitch type and values, including stitching instructions. You can edit the segments. Segment A single piece of one time. Running Stitch Consists of a design that is created at one stitch...zig-zag stitches. 144 Pacesetter BES Lettering 2 Instruction Manual Absolute Pull Compensation: Absolute Pull Compensation adds the same amount (in linear measure, i.e., inches or mm.) of compensation to each side of the segment, regardless of embroidery settings designed...

Installation Guide - English
Page 10
You may contact technical support either by telephone at 1-877-276-8437, or by email at hadsupp@brother.com. The Activation wizard dialog now has new field for the site key. 7 Enter the site key. 8 Click the Activate Now button. they will open. Pacesetter BES Lettering 2 will give you an activation code. For customers outside the United States, please contact your distributor. 6 Click OK to dismiss the warning message. 8 Pacesetter BES Lettering 2 Instruction Manual 5 Contact Technical support; Please enter the product name in the subject line of the email.
You may contact technical support either by telephone at 1-877-276-8437, or by email at hadsupp@brother.com. The Activation wizard dialog now has new field for the site key. 7 Enter the site key. 8 Click the Activate Now button. they will open. Pacesetter BES Lettering 2 will give you an activation code. For customers outside the United States, please contact your distributor. 6 Click OK to dismiss the warning message. 8 Pacesetter BES Lettering 2 Instruction Manual 5 Contact Technical support; Please enter the product name in the subject line of the email.


