Brother International BES-1261BC Support and Manuals
Get Help and Manuals for this Brother International item

View All Support Options Below
Free Brother International BES-1261BC manuals!
Problems with Brother International BES-1261BC?
Ask a Question
Free Brother International BES-1261BC manuals!
Problems with Brother International BES-1261BC?
Ask a Question
Popular Brother International BES-1261BC Manual Pages
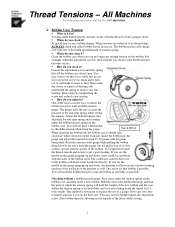
Thread Tensions - English - Page 1

...Brother parts.
1. Install a brand new bobbin, (for Bobbin Case
!" Hold bobbin case level with two cardboard sides that have a serration on Brother embroidery equipment. Remove the spring by taking it with jumbo bobbins. At installation of the bobbin case. Running the machine with out one , to replace...they do you check it as even as a guide. How do you took the anti-spin spring...
Thread Tensions - English - Page 2
...install and at which the tension spring will have one. For
example, when the adjustment screw is with top thread to be the problem...of the anti-spin spring while setting
the tension. It will not need to get a good reading. Part # BTG3
When inserting the ... Toll Free 1-877-4BROTHER
2. What is not meant to replace the use of the gauge while pulling the bobbin
thread slowly...
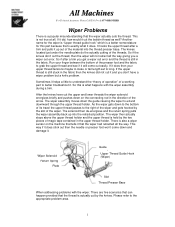
Thread Tensions - English - Page 3

...has been adjusted as well as testing for any tension problems after bobbin has been cleaned and adjusted first. At installation and for proper tensions. o Metal Knob Type Screw... Technical Assistance Please Call Toll Free 1-877-4BROTHER
3. Main Tensioners
!" What are still having trouble check the thread path and rethread the complete path for the troublesome needle or change out the...
Thread Tensions - English - Page 5

...replacing the bobbin. All bobbins are all just guidelines to setting tensions and correcting tension problems. The first thing to always do once the bobbin has been set to an exact tension you may find the problem... two tension disks the thread is nine or twelve different color letters, depending on the next sew off . This is set the anti-spin spring and try again.
!" Check the thread...
Wiper Problems and Solutions - English - Page 1
... a wiper out error and the thread is still in the fabric then the knives did , how would it . So this part because that the... Run your upper thread tensions maybe to loose or tail length set to grab the upper thread and see if it up into the...passes to better troubleshoot it cut the thread, then the wiper will come down the guide causing the wiper to the appropriate problem area.
1 ...
Wiper Problems and Solutions - English - Page 5
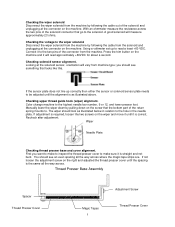
... that the bottom part of the return spring mounts to the solenoid.
Recheck after adjustment. You should see something that looks like this. Checking upper thread guide hook (wiper) ...the machine. Wiper
Needle Plate
Checking thread presser base and cover alignment. Using a voltmeter set up correctly then either the sensor or solenoid sensor plate needs to read approximately +60VDC...
Motor Locks - English - Page 1
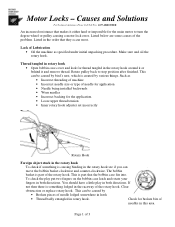
...Make sure and oil the rotary hook. Page 1 of the problem.
If
not then there is something is part of Lubrication • Oil the machine as • Incorrect...installed backwards • Worn needles • Incorrect backing for broken bits of the rotary hook. Check for the application. • Loose upper thread tension • Inner rotary hook adjuster set... replace rotary hook.
Motor Locks - English - Page 3
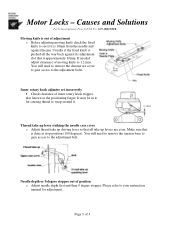
You will need to remove the chrome are even. Inner rotary hook adjuster set incorrectly • Check clearance of 3 Make sure this is approximately 10mm. Page 3 of inner rotary hook stopper, also known as the positioning ...100 degrees). Thread take up lever striking the needle case cover o Adjust thread take up levers are cover to gain access to your instruction manual for adjustment.
Changing Needle Bar Cushions - English - Page 1
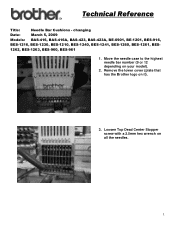
... - Remove the lower cover (plate that has the Brother logo on all the needles.
1 Loosen Top Dead Center Stopper screw with a 2.5mm hex wrench on it).
3. changing
Date:
March 5, 2009
Models: BAS-416, BAS-416A, BAS-423, BAS-423A, BE-0901, BE-1201, BES-916,
BES-1216, BES-1230, BES-1210, BES-1240...
Maintenance Schedule - English - Page 4
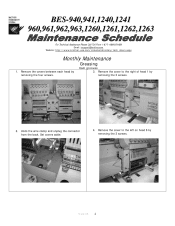
... 3 screws.
5/24/05
4 Remove the covers between each head by removing the 3 screws.
2. Set covers aside.
4. Cam grooves 3. Remove the cover to the right of head 1 by removing the... Assistance Please Call Toll Fre e 1-877-4BROTHER Email: tsupport@brother.com Website: http://www.brother-usa.com/industembroidery/tech_down.aspx
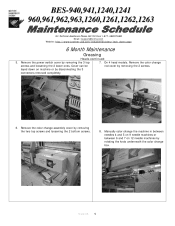
Monthly Maintenance
Greasing
1. Undo the wire clamp and...
Maintenance Schedule - English - Page 5
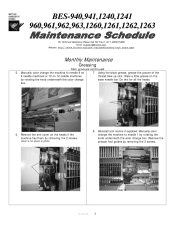
... supplied. Remove the presser foot guides by rotating the knob underneath the color change box. Do this for all the heads. Manually color change the machine to needle... Fre e 1-877-4BROTHER Email: tsupport@brother.com Website: http://www.brother-usa.com/industembroidery/tech_down.aspx
Monthly Maintenance
Greasing
Cam grooves continued 7. Manually color change the machine to needle 1 ...
Maintenance Schedule - English - Page 9
Manually color change box.
5/24/05
9 Remove the power switch cover by removing the 3 top rod cover by rotating... 960,961,962,963,1260,1261,1262,1263
For Technical Assistance Please Call Toll Fre e 1-877-4BROTHER Email: tsupport@brother.com Website: http://www.brother-usa.com/industembroidery/tech_down.aspx
6 Month Maintenance
Greasing
Heads continued 7. Remove the color change 5. On 4 head...
Tubular to Cap - English - Page 1
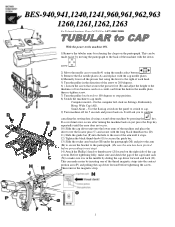
... Settings, Embroidery
Hoop, Wide...replace with the long black thumbscrews (D).
11) Slide the guide bar (F) into the contact
portion area (P) and pulling the cap driver...error does not occur.
10) Slide the cap driver unit onto the lower arms of the machine and place the
driver over the locator pins (C) and secure with the cap needle plates.
4)Manually...model - On the computer left click on .
Quick Reference Guide - English - Page 2
...design.
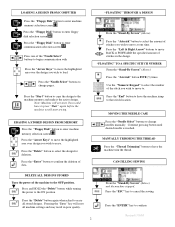
"FLOATING" THROUGH A DESIGN
From the "Stand-By Screen" (Above). "FLOATING" TO A SPECIFIC STITCH NUMBER From the "Stand-By Screen" (Above). Press the "End" button to have the ... erase all machine settings and may result in the design.
Press the "Asterisk" button to that stitch location.
Continue pressing button until desired needle is reached. MANUALLY TRIMMING THE THREAD...
Cap to Tubular - English - Page 1
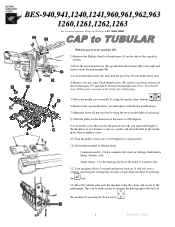
...to switch to flat.
12) Turn machine off machine arm. Computer model - Stand Alone - This can be made easier by moving the ...replace with the flat needle plates.
7) Manually lower all the parts removed on the driver for 5 seconds and power back on. Note: You should store all presser feet by using the clasps and secure to the pantograph. On the computer left click on Settings, Embroidery...
Brother International BES-1261BC Reviews
We have not received any reviews for Brother International yet.