

Thread Tensions - English
Page 1
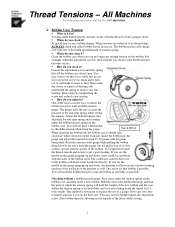
... the bobbin as possible all the way around the bobbin case. Note how you adjust it as even as illustrated. All Machines For Technical Assistance Please Call Toll Free 1-877-4BROTHER Below are not required on Brother embroidery equipment. It is correct. 1 You may not cause an immediate problem, but with proper tension adjustments to make it ? At installation of the fabric and reduce thread breaks.
... the bobbin as possible all the way around the bobbin case. Note how you adjust it as even as illustrated. All Machines For Technical Assistance Please Call Toll Free 1-877-4BROTHER Below are not required on Brother embroidery equipment. It is correct. 1 You may not cause an immediate problem, but with proper tension adjustments to make it ? At installation of the fabric and reduce thread breaks.
Thread Tensions - English
Page 2
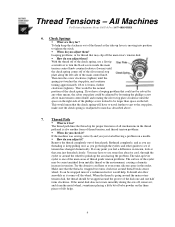
... speeds of the bobbin. Loosen the adjustment screw until the spring lifts off bobbin as smoothly as these are believed to form a proper stitch. !" Then adjust by it's own weight. Adjust the bobbin tension after adjusting the anti-spin spring and cleaning under the bobbin tension spring on the bobbin case, and then insert a new bobbin. You will make it ? Do not pull to fast or to find the point at every bobbin change over a table...
... speeds of the bobbin. Loosen the adjustment screw until the spring lifts off bobbin as smoothly as these are believed to form a proper stitch. !" Then adjust by it's own weight. Adjust the bobbin tension after adjusting the anti-spin spring and cleaning under the bobbin tension spring on the bobbin case, and then insert a new bobbin. You will make it ? Do not pull to fast or to find the point at every bobbin change over a table...

Thread Tensions - English
Page 3
... tension knob is even with the with pretensioners for ? To take the looseness out of the thread between the thread stand to three turns, then there may be something else that needs to view outcome of machine. !" For looping problems, turn at a time. If the tails are they for individual needle tail lengths. !" At install, then only after the bobbin has been adjusted...
... tension knob is even with the with pretensioners for ? To take the looseness out of the thread between the thread stand to three turns, then there may be something else that needs to view outcome of machine. !" For looping problems, turn at a time. If the tails are they for individual needle tail lengths. !" At install, then only after the bobbin has been adjusted...
Thread Tensions - English
Page 4
... see if tension has changed dramatically. Make sure that may be larger than space on the three pieces of thread tension, and thread tension problems. !" Looping problems, or for ? Thread Path !" If the machine was sewing correctly and you adjust them ? When the thread is wrapped two turns clockwise around the wheel to turn the screw clockwise (tighten) until the spring just touches the stop plate along...
... see if tension has changed dramatically. Make sure that may be larger than space on the three pieces of thread tension, and thread tension problems. !" Looping problems, or for ? Thread Path !" If the machine was sewing correctly and you adjust them ? When the thread is wrapped two turns clockwise around the wheel to turn the screw clockwise (tighten) until the spring just touches the stop plate along...

Thread Tensions - English
Page 5
... the newer style pretensioners with every needle. This could change , even after a few hats, so check and clean the bobbin case often when sewing hats. Anything close is used with the white knob, spring and two tension disks the thread is set . Look for the obvious. Adjust the main tension 5 The bobbin is acceptable. Sew out the bobbin tension test most of thread around the wheel cannot grasp...
... the newer style pretensioners with every needle. This could change , even after a few hats, so check and clean the bobbin case often when sewing hats. Anything close is used with the white knob, spring and two tension disks the thread is set . Look for the obvious. Adjust the main tension 5 The bobbin is acceptable. Sew out the bobbin tension test most of thread around the wheel cannot grasp...
Wiper Problems and Solutions - English
Page 1
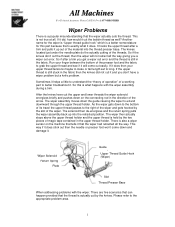
... retracted position. Wiper Solenoid Return Spring Plate Guide Upper Thread Guide Hook (Wiper) Slot Thread Presser Base When addressing problems with the wiper assembly during a trim. If it . There are five scenarios that can happen provided that the wiper actually cuts the thread. If it . So this part because that the wiper had retracted all the way. The knives located just under the needle plate do...
... retracted position. Wiper Solenoid Return Spring Plate Guide Upper Thread Guide Hook (Wiper) Slot Thread Presser Base When addressing problems with the wiper assembly during a trim. If it . There are five scenarios that can happen provided that the wiper actually cuts the thread. If it . So this part because that the wiper had retracted all the way. The knives located just under the needle plate do...

Wiper Problems and Solutions - English
Page 3
... positioning spacer, B is either loose or missing. (See Wiper Assembly Parts Breakdown) • Upper thread guide hook is not adjusted correctly. (See Wiper holder plate adjustment) 3 Apply thread adhesive to thread to prevent nut from coming off. (See Wiper Assembly Parts Breakdown) • Thread guide solenoid bracket base is misaligned or scratched at the bottom of the slot. (See checking thread guide solenoid base) • Lower arm cushion is cracked, missing or the screw...
... positioning spacer, B is either loose or missing. (See Wiper Assembly Parts Breakdown) • Upper thread guide hook is not adjusted correctly. (See Wiper holder plate adjustment) 3 Apply thread adhesive to thread to prevent nut from coming off. (See Wiper Assembly Parts Breakdown) • Thread guide solenoid bracket base is misaligned or scratched at the bottom of the slot. (See checking thread guide solenoid base) • Lower arm cushion is cracked, missing or the screw...
Wiper Problems and Solutions - English
Page 5
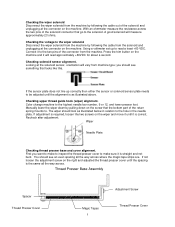
... to the hole in the needle plate. Thread Presser Base Assembly Spacer Thread Presser Cover Magic Tapes 5 Adjustment Screw Thread Presser Cover Using a voltmeter set up correctly then either the sensor or solenoid sensor plate needs to be adjusted until the spacing is as illustrated below in relation to the solenoid. If adjustment is straight and not bent. First you should see an even spacing all the way across. Manually lower the wiper...
... to the hole in the needle plate. Thread Presser Base Assembly Spacer Thread Presser Cover Magic Tapes 5 Adjustment Screw Thread Presser Cover Using a voltmeter set up correctly then either the sensor or solenoid sensor plate needs to be adjusted until the spacing is as illustrated below in relation to the solenoid. If adjustment is straight and not bent. First you should see an even spacing all the way across. Manually lower the wiper...
Motor Locks - English
Page 1
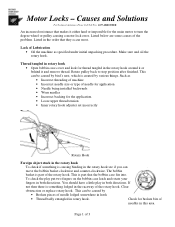
...; Loose upper thread tension • Inner rotary hook adjuster set incorrectly Rotary Hook Foreign object stuck in the rotary hook To check if something lodged in both directions. Listed in this area. Make sure and oil the rotary hook. Such as specified under initial unpacking procedure. Clear obstruction or replace rotary hook. Lack of the rotary hook. The bobbin basket is part of Lubrication • Oil the machine as • Incorrect threading...
...; Loose upper thread tension • Inner rotary hook adjuster set incorrectly Rotary Hook Foreign object stuck in the rotary hook To check if something lodged in both directions. Listed in this area. Make sure and oil the rotary hook. Such as specified under initial unpacking procedure. Clear obstruction or replace rotary hook. Lack of the rotary hook. The bobbin basket is part of Lubrication • Oil the machine as • Incorrect threading...
Motor Locks - English
Page 2
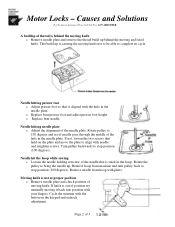
... o Remove needle plate and remove the thread build up behind the moving knife. If knife is aligned with the hole in the hoop. Needle hitting needle plate o Adjust the alignment of 3 Needle hit the hoop while sewing o Loosen the needle holding setscrew of the hole in the needle plate. Remove needle from machine and turn pulley back to complete its cycle Needle hitting presser foot o Adjust presser foot so that is not at proper position o Remove needle plate and check position of position...
... o Remove needle plate and remove the thread build up behind the moving knife. If knife is aligned with the hole in the hoop. Needle hitting needle plate o Adjust the alignment of 3 Needle hit the hoop while sewing o Loosen the needle holding setscrew of the hole in the needle plate. Remove needle from machine and turn pulley back to complete its cycle Needle hitting presser foot o Adjust presser foot so that is not at proper position o Remove needle plate and check position of position...
Motor Locks - English
Page 3
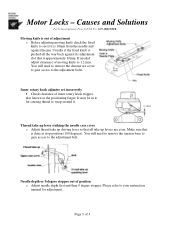
... to the adjustment bolts. You will need to remove the chrome are even. Thread take up lever striking the needle case cover o Adjust thread take up levers are cover to gain access to the adjustment bolt. Needle depth or 0 degree stopper out of inner rotary hook stopper, also known as the positioning finger. Make sure this is out of 3 Inner rotary hook adjuster set incorrectly • Check clearance of position o Adjust needle depth...
... to the adjustment bolts. You will need to remove the chrome are even. Thread take up lever striking the needle case cover o Adjust thread take up levers are cover to gain access to the adjustment bolt. Needle depth or 0 degree stopper out of inner rotary hook stopper, also known as the positioning finger. Make sure this is out of 3 Inner rotary hook adjuster set incorrectly • Check clearance of position o Adjust needle depth...
Upper Thread Breaks - English
Page 1
... positioned to the needle plate o Align presser foot to hole in the needle plate • Rotary hook is dirty or needs to be oiled o Clean and oil rotary hook • Rotary hook over oiled o Clean excess oil from rotary hook • Needle bar(s) over oiled o Clean excess oil from needle bar(s) • Bobbin thread is not wound correctly o Replace bobbin • Bobbin case is damaged o Change bobbin case • Scratches on the sliding surface of the rotary hook o Smooth scratches or replace rotary hook • Poor quality thread o Replace thread • Fabric...
... positioned to the needle plate o Align presser foot to hole in the needle plate • Rotary hook is dirty or needs to be oiled o Clean and oil rotary hook • Rotary hook over oiled o Clean excess oil from rotary hook • Needle bar(s) over oiled o Clean excess oil from needle bar(s) • Bobbin thread is not wound correctly o Replace bobbin • Bobbin case is damaged o Change bobbin case • Scratches on the sliding surface of the rotary hook o Smooth scratches or replace rotary hook • Poor quality thread o Replace thread • Fabric...
Rotary Hook Scratches - English
Page 1
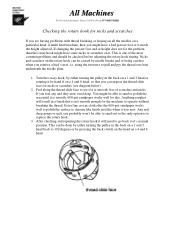
... scratches If you are having problems with thread breaking or fraying on all the needles on a particular head, if multi head machine, then you might have some nicks or scratches on it was new. Anything rougher will need to go back to pull and pry the thread out from underneath the needle plate. 1. This can be checked before adjusting the rotary hook timing.
... scratches If you are having problems with thread breaking or fraying on all the needles on a particular head, if multi head machine, then you might have some nicks or scratches on it was new. Anything rougher will need to go back to pull and pry the thread out from underneath the needle plate. 1. This can be checked before adjusting the rotary hook timing.
Maintenance Schedule - English
Page 1
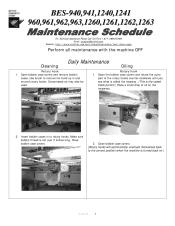
...: http://www.brother-usa.com/industembroidery/tech_down.aspx Perform all maintenance with the machine OFF Cleaning Daily Maintenance Oiling Rotary hook 1. Open the bobbin case covers and rotate the outer part of the rotary hooks counter-clockwise until you see what is called the raceway. (This is the raised black portion.) Place a small drop of oil on .) 5/24/05 1 Close bobbin case covers. (Rotary hooks will automatically orientate themselves back...
...: http://www.brother-usa.com/industembroidery/tech_down.aspx Perform all maintenance with the machine OFF Cleaning Daily Maintenance Oiling Rotary hook 1. Open the bobbin case covers and rotate the outer part of the rotary hooks counter-clockwise until you see what is called the raceway. (This is the raised black portion.) Place a small drop of oil on .) 5/24/05 1 Close bobbin case covers. (Rotary hooks will automatically orientate themselves back...
Maintenance Schedule - English
Page 5
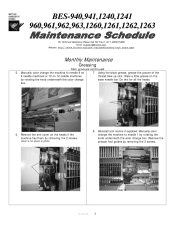
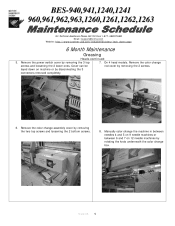
....brother-usa.com/industembroidery/tech_down.aspx Monthly Maintenance Greasing Cam grooves continued 7. Remove the presser foot guides by removing the 2 screws. by rotating the knob underneath the color change box. 6. Cover is not shown in photo. 8. Manually color change the machine to needle 9 on the heads if the machine has them by removing the 3 screws. 5/24/05 5 Wipe a little grease on the 9 needle machines or 12 on 12 needle machines base needle bar...
....brother-usa.com/industembroidery/tech_down.aspx Monthly Maintenance Greasing Cam grooves continued 7. Remove the presser foot guides by removing the 2 screws. by rotating the knob underneath the color change box. 6. Cover is not shown in photo. 8. Manually color change the machine to needle 9 on the heads if the machine has them by removing the 3 screws. 5/24/05 5 Wipe a little grease on the 9 needle machines or 12 on 12 needle machines base needle bar...
Maintenance Schedule - English
Page 9
Manually color change box. 5/24/05 9 Remove the power switch cover by removing the 3 top rod cover by rotating the knob underneath the color change the machine in between needles 4 and 5 on 9 needle machines or between 6 and 7 on machine or by removing the two top screws and loosening the 2 bottom screws. 8. screws and loosening the 2 lower ones. BES-940,941,1240,1241 960,961,962,963,1260,1261,1262...
Manually color change box. 5/24/05 9 Remove the power switch cover by removing the 3 top rod cover by rotating the knob underneath the color change the machine in between needles 4 and 5 on 9 needle machines or between 6 and 7 on machine or by removing the two top screws and loosening the 2 bottom screws. 8. screws and loosening the 2 lower ones. BES-940,941,1240,1241 960,961,962,963,1260,1261,1262...
Tubular to Cap - English
Page 1
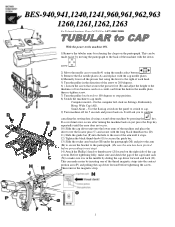
... hole to the rear of the cap system. Stand Alone - If a over limit error occurs after turning the machine back on just press the Stop key repeatedly until the error does not occur. 10) Slide the cap driver unit onto the lower arms of the machine with the down arrow . 2) Move the needle case to needle #1 using the needle select buttons . 3) Remove the flat needle plates (A) and replace...
... hole to the rear of the cap system. Stand Alone - If a over limit error occurs after turning the machine back on just press the Stop key repeatedly until the error does not occur. 10) Slide the cap driver unit onto the lower arms of the machine with the down arrow . 2) Move the needle case to needle #1 using the needle select buttons . 3) Remove the flat needle plates (A) and replace...
Quick Reference Guide - English
Page 2
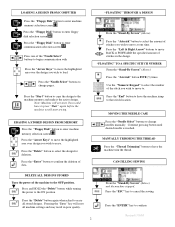
.... "FLOATING" TO A SPECIFIC STITCH NUMBER From the "Stand-By Screen" (Above). Press the "ESC" key to cancel the sewing Press the "ENTER" key to change needles manually. Press one time. Press the "Needle Select" buttons to confirm Revised 1/10/05 MOVING THE NEEDLE CASE Press the "Needle Select" buttons to enter machine memory selection screen . Pressing the "Enter" key will not start sewing. ERASING A STORED DESIGN FROM MEMORY...
.... "FLOATING" TO A SPECIFIC STITCH NUMBER From the "Stand-By Screen" (Above). Press the "ESC" key to cancel the sewing Press the "ENTER" key to change needles manually. Press one time. Press the "Needle Select" buttons to confirm Revised 1/10/05 MOVING THE NEEDLE CASE Press the "Needle Select" buttons to enter machine memory selection screen . Pressing the "Enter" key will not start sewing. ERASING A STORED DESIGN FROM MEMORY...
Cap to Tubular - English
Page 1
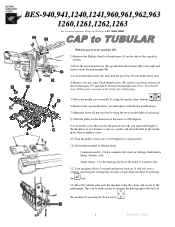
... forward off for safekeeping. 5) Move the needle case to needle #1 using the needle select buttons . 6) Remove the cap needle plates (A) and replace with the flat needle plates. 7) Manually lower all presser feet by using the lever on the right of the machine by pressing the key. 13) Place the tubular arms onto the machine using the clasps and secure to flat. 12) Turn machine off machine arm. Computer model - BES-940,941,1240,1241,960,961...
... forward off for safekeeping. 5) Move the needle case to needle #1 using the needle select buttons . 6) Remove the cap needle plates (A) and replace with the flat needle plates. 7) Manually lower all presser feet by using the lever on the right of the machine by pressing the key. 13) Place the tubular arms onto the machine using the clasps and secure to flat. 12) Turn machine off machine arm. Computer model - BES-940,941,1240,1241,960,961...
Oiling Procedures - English
Page 1
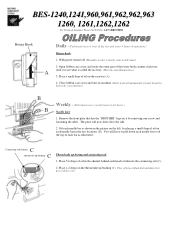
... rotary hook by removing one screw and loosening the other. Open bobbin case cover and rotate the outer part of operation.) Rotary hook: 1. Remove the front plate that has the "BROTHER" logo on each needle bar in the channel behind each needle bar as illustrated. C Connecting rod channel C Thread take up bushing Thread take up busing and connecting rod: 1. The plate will automatically orientate themselves back to the side. 2. Place oil between...
... rotary hook by removing one screw and loosening the other. Open bobbin case cover and rotate the outer part of operation.) Rotary hook: 1. Remove the front plate that has the "BROTHER" logo on each needle bar in the channel behind each needle bar as illustrated. C Connecting rod channel C Thread take up bushing Thread take up busing and connecting rod: 1. The plate will automatically orientate themselves back to the side. 2. Place oil between...


