

Thread Tensions - English
Page 1
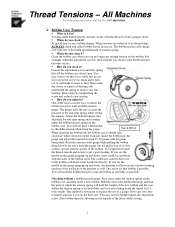
... machine and at every bobbin change. !" They are needed in properly one may say they do make a difference. What is used to bend the spring in two places so that the spring will only go back in these types of machines with proper tension adjustments to make a difference and are listed in the Brother bobbin case assembly p/n#S35584001. !" At installation of the fabric and reduce thread breaks. You may need to keep the bobbin...
... machine and at every bobbin change. !" They are needed in properly one may say they do make a difference. What is used to bend the spring in two places so that the spring will only go back in these types of machines with proper tension adjustments to make a difference and are listed in the Brother bobbin case assembly p/n#S35584001. !" At installation of the fabric and reduce thread breaks. You may need to keep the bobbin...
Thread Tensions - English
Page 2
... may need a full bobbin to remove any lint buildup. Read the tension of the bobbin. Discard or fix that bobbin if possible. Part # BTG3 When inserting the bobbin into the bobbin case it ? Adjust the bobbin tension after adjusting the anti-spin spring and cleaning under thread tension constant, works with a bobbin tension gauge. If you clean it 's own weight. Loosen the adjustment screw until the spring lifts off bobbin as smoothly as these are not realistic speeds of...
... may need a full bobbin to remove any lint buildup. Read the tension of the bobbin. Discard or fix that bobbin if possible. Part # BTG3 When inserting the bobbin into the bobbin case it ? Adjust the bobbin tension after adjusting the anti-spin spring and cleaning under thread tension constant, works with a bobbin tension gauge. If you clean it 's own weight. Loosen the adjustment screw until the spring lifts off bobbin as smoothly as these are not realistic speeds of...

Thread Tensions - English
Page 3
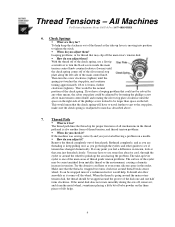
... Tensioners !" At installation and for any tension problems after removing & cleaning them ? Pre-tensioners !" o Plastic Knob Type Adjust by turning the knob until the top of the silver screw inside the knob, is flush with pretensioners for individual needle tail lengths during trims. !" When do you adjust them ? How do you adjust them ? All Machines For Technical Assistance Please Call Toll Free 1-877-4BROTHER 3. Main upper thread tension control of...
... Tensioners !" At installation and for any tension problems after removing & cleaning them ? Pre-tensioners !" o Plastic Knob Type Adjust by turning the knob until the top of the silver screw inside the knob, is flush with pretensioners for individual needle tail lengths during trims. !" When do you adjust them ? How do you adjust them ? All Machines For Technical Assistance Please Call Toll Free 1-877-4BROTHER 3. Main upper thread tension control of...
Thread Tensions - English
Page 4
... of the eyelet may be adjusted by loosening the phillips screw above . 7. Make sure that the thread is also another form of the silver metal stop plate along the left . If the metal disk does not rotate smoothly during the sew off, remove it comes off of thread tension, and thread tension problems. !" This would help keep pulling on a needle. !" What is going around the...
... of the eyelet may be adjusted by loosening the phillips screw above . 7. Make sure that the thread is also another form of the silver metal stop plate along the left . If the metal disk does not rotate smoothly during the sew off, remove it comes off of thread tension, and thread tension problems. !" This would help keep pulling on a needle. !" What is going around the...

Thread Tensions - English
Page 5
... set the anti-spin spring and try again. !" Check the pretensioners Step 5. Ideally, you should have changed your machine. You may want to always do is to be wide. Now that the thread is not picture perfect adjust to determine proper tensions. Sew out the bobbin tension test most of thread 1/3, 1/3, 1/3. On rotary thread break sensors; On the newer style pretensioners with every needle...
... set the anti-spin spring and try again. !" Check the pretensioners Step 5. Ideally, you should have changed your machine. You may want to always do is to be wide. Now that the thread is not picture perfect adjust to determine proper tensions. Sew out the bobbin tension test most of thread 1/3, 1/3, 1/3. On rotary thread break sensors; On the newer style pretensioners with every needle...
Motor Locks - English
Page 1
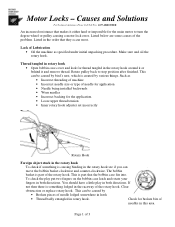
... then there is something is part of needle lodged somewhere in hook • Thread badly entangled in this area. Such as specified under initial unpacking procedure. Page 1 of the problem. Listed below are some causes of 3 Thread tangled in rotary hook • Open bobbin case cover and look for the application. • Loose upper thread tension • Inner rotary hook adjuster set incorrectly Rotary Hook Foreign object stuck in the...
... then there is something is part of needle lodged somewhere in hook • Thread badly entangled in this area. Such as specified under initial unpacking procedure. Page 1 of the problem. Listed below are some causes of 3 Thread tangled in rotary hook • Open bobbin case cover and look for the application. • Loose upper thread tension • Inner rotary hook adjuster set incorrectly Rotary Hook Foreign object stuck in the...

Upper Thread Breaks - English
Page 1
... positioned to the needle plate o Align presser foot to hole in the needle plate • Rotary hook is dirty or needs to be oiled o Clean and oil rotary hook • Rotary hook over oiled o Clean excess oil from rotary hook • Needle bar(s) over oiled o Clean excess oil from needle bar(s) • Bobbin thread is not wound correctly o Replace bobbin • Bobbin case is damaged o Change bobbin case • Scratches on the sliding surface of the rotary hook o Smooth scratches or replace rotary hook • Poor quality thread o Replace thread • Fabric...
... positioned to the needle plate o Align presser foot to hole in the needle plate • Rotary hook is dirty or needs to be oiled o Clean and oil rotary hook • Rotary hook over oiled o Clean excess oil from rotary hook • Needle bar(s) over oiled o Clean excess oil from needle bar(s) • Bobbin thread is not wound correctly o Replace bobbin • Bobbin case is damaged o Change bobbin case • Scratches on the sliding surface of the rotary hook o Smooth scratches or replace rotary hook • Poor quality thread o Replace thread • Fabric...
Rotary Hook Scratches - English
Page 1
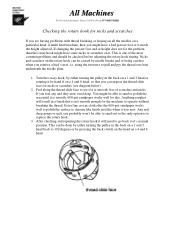
... scratches on it. using the tweezers to operate without breaking the thread. Turn the rotary hook, by either turning the pulley in the back on a 4 and 6 head. You might have a bad presser foot or it needs the height adjusted. This is smooth. 600 grit sandpaper works well for the machine to pull and pry the thread out from underneath the needle plate. 1. Nicks and...
... scratches on it. using the tweezers to operate without breaking the thread. Turn the rotary hook, by either turning the pulley in the back on a 4 and 6 head. You might have a bad presser foot or it needs the height adjusted. This is smooth. 600 grit sandpaper works well for the machine to pull and pry the thread out from underneath the needle plate. 1. Nicks and...
Instruction Manual - English
Page 5
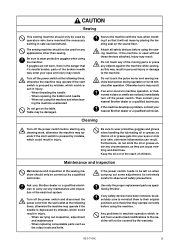
... oil or grease under any safety devices have received the necessary training in injury. • When carrying out inspection, adjustment and maintenance • When replacing consumable parts such as specified by Brother. CAUTION Sewing This sewing machine should only be used by operators who have been removed, be absolutely sure to re-install them to their original positions and check that they can result. Table...
... oil or grease under any safety devices have received the necessary training in injury. • When carrying out inspection, adjustment and maintenance • When replacing consumable parts such as specified by Brother. CAUTION Sewing This sewing machine should only be used by operators who have been removed, be absolutely sure to re-install them to their original positions and check that they can result. Table...
Instruction Manual - English
Page 9
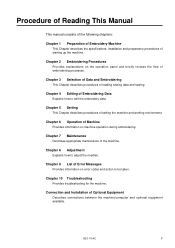
... adjust the needles. Connection and Installation of the machine. Chapter 8 Adjustment Explains how to be taken. Procedure of Reading This Manual This manual consists of the following chapters: Chapter 1 Preparation of Embroidery Machine This Chapter describes the specifications, installation and preparatory procedures of setting the machine and working environment. Chapter 10 Troubleshooting Provides troubleshooting for the machine. Chapter 5 Setting This Chapter describes procedures of starting up the machine. Chapter 6 Operation of embroidering...
... adjust the needles. Connection and Installation of the machine. Chapter 8 Adjustment Explains how to be taken. Procedure of Reading This Manual This manual consists of the following chapters: Chapter 1 Preparation of Embroidery Machine This Chapter describes the specifications, installation and preparatory procedures of setting the machine and working environment. Chapter 10 Troubleshooting Provides troubleshooting for the machine. Chapter 5 Setting This Chapter describes procedures of starting up the machine. Chapter 6 Operation of embroidering...

Instruction Manual - English
Page 12
Specifications 16 2. Installation 18 3-1 Transportation of Machine 18 3-2 Installation of Machine 18 3-3 Installation of Operation Panel 19 3-4 Attaching the tead guide bar and the thread guide 19 3-5 Mounting of Embroidery Data from Floppy Disk 45 10 BES-116AC Preparation for Embroidering 23 4-1 Upper Threading 23 4-2 Replacement of Bobbin 24 4-3 Replacing and Selecting Needle 25 4-4 Connection to Power Source 26 4-5 Preparation of Machine for Operation 26 4-6 Attachment of Embroidery Hoop and Frame 29 4-7 Adjustment of Thread Tension 33 Chapter 2 Embroidering Procedures ...
Specifications 16 2. Installation 18 3-1 Transportation of Machine 18 3-2 Installation of Machine 18 3-3 Installation of Operation Panel 19 3-4 Attaching the tead guide bar and the thread guide 19 3-5 Mounting of Embroidery Data from Floppy Disk 45 10 BES-116AC Preparation for Embroidering 23 4-1 Upper Threading 23 4-2 Replacement of Bobbin 24 4-3 Replacing and Selecting Needle 25 4-4 Connection to Power Source 26 4-5 Preparation of Machine for Operation 26 4-6 Attachment of Embroidery Hoop and Frame 29 4-7 Adjustment of Thread Tension 33 Chapter 2 Embroidering Procedures ...

Instruction Manual - English
Page 15
... 126 2. Adjustment of Presser Foot Height 131 4. Adjustment of Timing Between Needle and Rotary Hook 130 3. Adjustment of Optional Equipment Attaching Bobbin Winder (Using the 9-spool cotton stand 148 BES-116AC 13 Adjusting the Belt Tension 133 Chapter 9 Error code list Chapter 10 Troubleshooting Mechanical Section 140 Electrical Section 142 Connection and Installation of Thread Trimmer 132 5. Chapter 7 Maintenance 1. Oiling ...122 2-1 Head ...122 Chapter 8 Adjustment 1. Cleaning 120 1-1 Cleaning and Lubrication of Rotary Hook 120 1-2 Cleaning of Needle Plate 121...
... 126 2. Adjustment of Presser Foot Height 131 4. Adjustment of Timing Between Needle and Rotary Hook 130 3. Adjustment of Optional Equipment Attaching Bobbin Winder (Using the 9-spool cotton stand 148 BES-116AC 13 Adjusting the Belt Tension 133 Chapter 9 Error code list Chapter 10 Troubleshooting Mechanical Section 140 Electrical Section 142 Connection and Installation of Thread Trimmer 132 5. Chapter 7 Maintenance 1. Oiling ...122 2-1 Head ...122 Chapter 8 Adjustment 1. Cleaning 120 1-1 Cleaning and Lubrication of Rotary Hook 120 1-2 Cleaning of Needle Plate 121...
Instruction Manual - English
Page 18
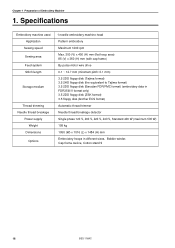
Specifications Embroidery machine used Application Sewing speed Sewing area Feed system Stitch length Storage medium Thread trimming Needle thread breakage Power supply Weight Dimensions Options 1 needle embroidery machine head Pattern embroidery Maximum 1200 rpm Max. 300 (V) x 450 (H) mm (flat hoop area) 85 (V) x 360 (H) mm (with cap frame) By pulse motor...brother ECS format) Automatic thread trimmer Needle thread breakage detector Single phase 120 V, 200 V, 220 V, 240 V, Standard 400 W (maximum 500 W) 195 kg 1050 (W) x 1016 (L) x 1484 (H) mm Embroidery hoops in different sizes, Bobbin winder...
Specifications Embroidery machine used Application Sewing speed Sewing area Feed system Stitch length Storage medium Thread trimming Needle thread breakage Power supply Weight Dimensions Options 1 needle embroidery machine head Pattern embroidery Maximum 1200 rpm Max. 300 (V) x 450 (H) mm (flat hoop area) 85 (V) x 360 (H) mm (with cap frame) By pulse motor...brother ECS format) Automatic thread trimmer Needle thread breakage detector Single phase 120 V, 200 V, 220 V, 240 V, Standard 400 W (maximum 500 W) 195 kg 1050 (W) x 1016 (L) x 1484 (H) mm Embroidery hoops in different sizes, Bobbin winder...
Instruction Manual - English
Page 24
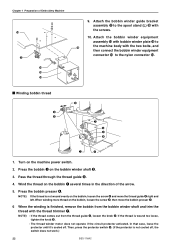
... bobbin presser r. Attach the bobbin winder equipment assembly !3 with bobbin winder plate !2 to the nylon connector !4. Turn on the bobbin winder shaft w. 3. Pass the thread through the thread guide e. 4. In that case, leave the protector until it's cooled off , the switch does not work.) 22 BES-116AC When winding more thread on the bobbin, loosen the screw y, then move the thread guide e right and left. If the thread is finished, remove the bobbin from the thread guide...
... bobbin presser r. Attach the bobbin winder equipment assembly !3 with bobbin winder plate !2 to the nylon connector !4. Turn on the bobbin winder shaft w. 3. Pass the thread through the thread guide e. 4. In that case, leave the protector until it's cooled off , the switch does not work.) 22 BES-116AC When winding more thread on the bobbin, loosen the screw y, then move the thread guide e right and left. If the thread is finished, remove the bobbin from the thread guide...
Instruction Manual - English
Page 26
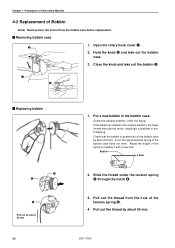
... of the bobbin case by about 50 mm. Bobbin 0.5mm 2. Check that the bobbin is inserted in the reverse direction, the lower thread may slip too much, resultingin a problem in the bobbin case. Removing bobbin case 1. Adjust the height of the bobbin case does not work. Slide the thread under the tension spring t through the notch r. 3. w 2. Open the rotary hook cover q. Chapter 1 Preparation of Embroidery Machine 4-2 Replacement of Bobbin Note) Remove dust, lint and oil from the hole of the tension spring t. 4. Pull out...
... of the bobbin case by about 50 mm. Bobbin 0.5mm 2. Check that the bobbin is inserted in the reverse direction, the lower thread may slip too much, resultingin a problem in the bobbin case. Removing bobbin case 1. Adjust the height of the bobbin case does not work. Slide the thread under the tension spring t through the notch r. 3. w 2. Open the rotary hook cover q. Chapter 1 Preparation of Embroidery Machine 4-2 Replacement of Bobbin Note) Remove dust, lint and oil from the hole of the tension spring t. 4. Pull out...
Instruction Manual - English
Page 32
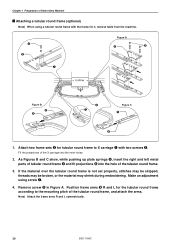
... B and C show, while pushing up plate springs t, insert the right and left metal parts of tubular round frame r and fit projections y into the inner holes. 2. Make an adjustment using a tubular round frame with two screws e. Attach two frame sets w for the tubular round frame according to X carriage q with the frame for it, remove table from the machine. Remove screw o in Figure A. Position frame arms i R and L for tubular round...
... B and C show, while pushing up plate springs t, insert the right and left metal parts of tubular round frame r and fit projections y into the inner holes. 2. Make an adjustment using a tubular round frame with two screws e. Attach two frame sets w for the tubular round frame according to X carriage q with the frame for it, remove table from the machine. Remove screw o in Figure A. Position frame arms i R and L for tubular round...

Instruction Manual - English
Page 97
... startup speed can be set . Speeds up the main shaft at the normal speed. Press twice. 2. Select "Motive Speed" with . 3. The changed settings are stored and the previous screen is displayed. BES-116AC 95 NOMAL UP CAP FLAT Starts up the startup speed of the main shaft when using the cap frame. Select with . 5. Press . 4. Speeds up the startup speed of the...
... startup speed can be set . Speeds up the main shaft at the normal speed. Press twice. 2. Select "Motive Speed" with . 3. The changed settings are stored and the previous screen is displayed. BES-116AC 95 NOMAL UP CAP FLAT Starts up the startup speed of the main shaft when using the cap frame. Select with . 5. Press . 4. Speeds up the startup speed of the...

Instruction Manual - English
Page 105
Feed Timing The timing of needle drop and hoop movement can be adjusted according to the cloth thickness. Thin cloth is displayed. Press . 4. Either thick or thin cloth can be selected. Select the thickness with . 3. BES-116AC 103 Press the END button. Press the END button. The changed settings are stored and the previous screen is set as the standard thickness. 1. The changed settings are stored and the previous screen is displayed. Chapter 5 Setting 2. Press three times. 2. Select with . 5.
Feed Timing The timing of needle drop and hoop movement can be adjusted according to the cloth thickness. Thin cloth is displayed. Press . 4. Either thick or thin cloth can be selected. Select the thickness with . 3. BES-116AC 103 Press the END button. Press the END button. The changed settings are stored and the previous screen is set as the standard thickness. 1. The changed settings are stored and the previous screen is displayed. Chapter 5 Setting 2. Press three times. 2. Select with . 5.
Instruction Manual - English
Page 131
... machine head and fix the upper shaft. Insert the bottom dead center gauge e into the hole in the side of pulley q indicates 180° (where the pulley indication mark " " and the stop mark " " are aligned). Loosen the screw y of the needle bar clamp t securely. 6. Note) • Make sure that it faces the front. After adjustment is finished. Insert the positioning bar w into the rotary hook...
... machine head and fix the upper shaft. Insert the bottom dead center gauge e into the hole in the side of pulley q indicates 180° (where the pulley indication mark " " and the stop mark " " are aligned). Loosen the screw y of the needle bar clamp t securely. 6. Note) • Make sure that it faces the front. After adjustment is finished. Insert the positioning bar w into the rotary hook...
Instruction Manual - English
Page 142
Does the lower thread come out from the bobbin case smoothly? Not embroidered properly • Is the material edge caught in the machine? (Are embroidery hoop and other related parts operating correctly?) • Is the material stretched properly? • Is thread tension proper? Needle (presser foot) interference • Is the embroidery hoop too small? with the needle bar case (back/forth and right/left -hand twist.) • Is there any backlash with embroidery hoop •...
Does the lower thread come out from the bobbin case smoothly? Not embroidered properly • Is the material edge caught in the machine? (Are embroidery hoop and other related parts operating correctly?) • Is the material stretched properly? • Is thread tension proper? Needle (presser foot) interference • Is the embroidery hoop too small? with the needle bar case (back/forth and right/left -hand twist.) • Is there any backlash with embroidery hoop •...


