Brother International PR600IIUPG Support and Manuals
Get Help and Manuals for this Brother International item

View All Support Options Below
Free Brother International PR600IIUPG manuals!
Problems with Brother International PR600IIUPG?
Ask a Question
Free Brother International PR600IIUPG manuals!
Problems with Brother International PR600IIUPG?
Ask a Question
Popular Brother International PR600IIUPG Manual Pages
Users Manual - English - Page 2
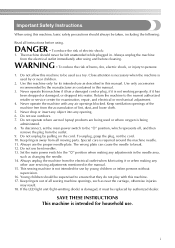
... the plug from all moving parts. Important Safety Instructions
When using this machine, basic safety precautions should always be taken, including the following:
Read all sewing machine openings, such as near children.
2. Never drop or insert any
other user servicing adjustments mentioned in this manual.
3. Do not use as contained in the manual. 15. Keep fingers out of...
Users Manual - English - Page 4

...order to ensure compliance with the instructions, may cause undesired operation. ...Part 15 of the FCC Rules.
Federal Communications Commission (FCC) Declaration of Conformity (For USA Only)
Responsible Party: Brother International Corporation 100 Somerset Corporate Boulevard Bridgewater, NJ 08807-0911 USA TEL : (908) 704-1700
declares that the product Product Name: Brother Sewing Machine Model...
Users Manual - English - Page 5
... moving parts. 2. Always consult the manual when replacing or installing any other parts to turn off the power switch and unplug the cord when:
• Operation is required, first follow the troubleshooting table at www.brother.com
iv Benzene, thinner, and scouring powders can damage the machine, and should never be used. 3. For additional product information and updates, visit...
Users Manual - English - Page 13
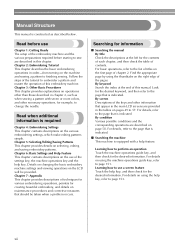
... of this manual. Read when additional information is required
Chapter 4: Embroidering Settings This chapter contains descriptions on selecting, editing and saving embroidery patterns. Chapter 6: Basic Settings and Help Feature This chapter contains descriptions on the LCD will be taken when a problem occurs. Details on changing the basic embroidery machine settings and viewing...
Users Manual - English - Page 14
... READY
1
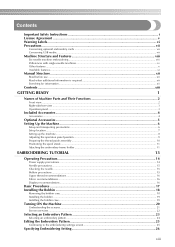
Names of Machine Parts and Their Functions 2
Front view ...2 Right-side/rear view ...3 Operation panel ...3
Included Accessories ...4
Accessories ...4
Optional Accessories...5 Setting Up the Machine...6
Setup and transporting precautions ...6 Setup location ...7 Setting up the machine...8 Adjusting the operation panel position ...9 Preparing the thread guide assembly ...10 Positioning...
Users Manual - English - Page 18
... panel / 3
Included Accessories 4
Accessories / 4
Optional Accessories 5
Setting Up the Machine 6
Setup and transporting precautions / 6
Setup location / 7
Setting up . After checking that all accessories are included, the embroidery machine can be set up the machine / 8
Adjusting the operation panel position / 9
Preparing the thread guide assembly / 10 Positioning the spool stand...
Users Manual - English - Page 19
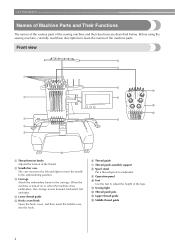
...7 Thread guide assembly support 8 Spool stand
Put 6 thread spools to embroider. 9 Operation panel 0 Feet
Use the feet to the carriage. GETTING READY
Names of Machine Parts and Their Functions
The names of the various parts of the machine parts. Front view
1
2
3
6 54321
4 5
6 7
8 C
9 B D
A
0
1 Thread tension knobs Adjusts the tension of the legs.
Before using the sewing machine...
Users Manual - English - Page 21
...machine.
1.
2.
3.
4.
5.
6.
7.
8.
9.
10.
11.
12.
13.
14.
15.
16.
17.
18.
19.
20.
21.
22.
23.
24.
25.
26.
27.
28.
29.
30.
31.
32
No.
Part Name
Model Name
Parts Code
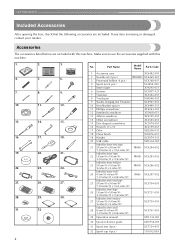
1 Accessory case
XC6482-051
2 Needle set... (H) × 2-3/8 inches (W))
XC5761-051
29 Operation manual
XD1133-051
30 Quick reference guide
XD0754-051
31 Spool mat (6pcs.)
XC7134-051
32 Spool...
Users Manual - English - Page 23
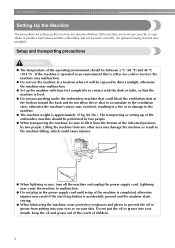
... any other area may damage the machine or result in damage to malfunction.
● Do not plug in the power supply cord until setup of the operating environment should be performed by two people. An optional sewing stand is approximately 37 kg (81 Ibs.). The transporting or setting up correctly, it will not be...
Users Manual - English - Page 27
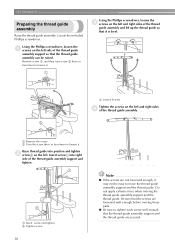
... the screw. 2 Turn the screw three or four times to move the thread guide assembly support and the thread guide. Do not apply extreme force when moving these parts.
● Be sure to tighten each screw well enough that the thread guide assembly can be easy to loosen it . Locate the included Phillips screwdriver. Using...
Users Manual - English - Page 66
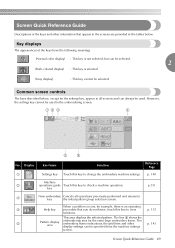
...Common screen controls
The keys described below . p. 140
Machine
2
operations guide Touch this key to change the embroidery machine settings.
However, the settings key cannot be used . This area displays the selected pattern.
No. When a problem occurs, for the extra-large embroidery frame. Screen Quick Reference Guide
Descriptions of the keys have the following meanings.
(Normal...
Users Manual - English - Page 117
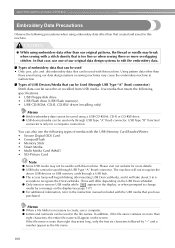
... embroidery machine to edit the embroidery data.
■ Types of embroidery data that is more overlapping stitches. Using pattern data other than
those saved using embroidery data other than
eight characters, the entire file name will differ depending on the display (see page 117).
● For additional information, refer to the instruction manual...
Users Manual - English - Page 160
... purchased, the
extra-large embroidery frame is displayed.
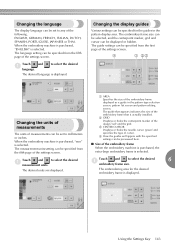
to any of the settings screen. Changing the display guides
Various settings can be specified for the desired embroidery frame is selected. When the embroidery machine is purchased, "mm" is actually installed.
2 GRID Displays or hides the centerpoint marker of the design (red) and the grid.
3 CENTER...
Users Manual - English - Page 168
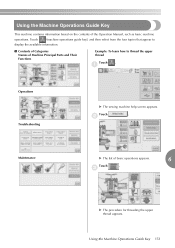
... The procedure for threading the upper thread appears. Touch
(machine operations guide key), and then select from the four topics that appear to
display the available information.
■ Contents of Categories Names of Machine Principal Parts and Their Functions
Example: To learn how to thread the upper thread
Touch .
1
Operations Troubleshooting
X The sewing machine help screen appears.
Users Manual - English - Page 214

...small hole in oil bottle. 2 Apply oil here.
• Use a pointed object to punch a small hole in damage to the
embroidery machine.
● Do not apply too much oil is
applied, wipe off any
other type of oil may get contaminated. Rotate the handwheel (about... drop of oil on the lower needle
bar felt washer every 40 - 50 hours of
sewing time.
● Apply only sewing machine oil.
Brother International PR600IIUPG Reviews
We have not received any reviews for Brother International yet.