
Users Manual - English
Page 2
... persons: 1. Use this manual. Never drop or insert any object into water. Do not use the proper needle plate. SAVE THESE INSTRUCTIONS This machine is required around the machine needle. 11. DANGER - WARNING - To reduce the risk of electric shock: 1. Always use bent needles. 13. Always unplug the machine from the electrical outlet when lubricating it must be supervised to the "{" position when making any adjustments in...
... persons: 1. Use this manual. Never drop or insert any object into water. Do not use the proper needle plate. SAVE THESE INSTRUCTIONS This machine is required around the machine needle. 11. DANGER - WARNING - To reduce the risk of electric shock: 1. Always use bent needles. 13. Always unplug the machine from the electrical outlet when lubricating it must be supervised to the "{" position when making any adjustments in...
Users Manual - English
Page 5
... sewing. Use only neutral soaps or detergents to turn off the power switch and unplug the cord when: • Operation is required, first follow the troubleshooting table at www.brother.com iv For repair or adjustment In the event a malfunction occurs or adjustment is completed • Replacing or removing the needle or any assemblies, needle, or other hot objects. 2. When storing this Operation Manual to inspect and adjust the machine...
... sewing. Use only neutral soaps or detergents to turn off the power switch and unplug the cord when: • Operation is required, first follow the troubleshooting table at www.brother.com iv For repair or adjustment In the event a malfunction occurs or adjustment is completed • Replacing or removing the needle or any assemblies, needle, or other hot objects. 2. When storing this Operation Manual to inspect and adjust the machine...

Users Manual - English
Page 10
... hole in the needle plate 2. With this machine, the embroidery frame is moved to determine the embroidering position, making it continues to operate automatically, from lowering the presser foot to performing the specified operations at the starting the machine, the presser foot is automatically lowered, and the embroidery is sewn while performing pulling thread from the fabric at the time of thread trimming, you don't need to replace the thread spools With single-needle machines, the thread spool must be changed , and the corresponding instructions...
... hole in the needle plate 2. With this machine, the embroidery frame is moved to determine the embroidering position, making it continues to operate automatically, from lowering the presser foot to performing the specified operations at the starting the machine, the presser foot is automatically lowered, and the embroidery is sewn while performing pulling thread from the fabric at the time of thread trimming, you don't need to replace the thread spools With single-needle machines, the thread spool must be changed , and the corresponding instructions...
Users Manual - English
Page 14
...Setup location ...7 Setting up the machine...8 Adjusting the operation panel position ...9 Preparing the thread guide assembly ...10 Positioning the spool stand...11 Attaching the embroidery frame holder ...11 EMBROIDERING TUTORIAL 13 Operating Precautions...14 Power supply precautions ...14 Needle precautions ...15 Checking the needle ...15 Bobbin precautions ...15 Upper thread recommendations...16 Fabric recommendations ...16 Display recommendations...16 Basic Procedures ...17 Installing the Bobbin ...18 Removing the bobbin case ...18 Installing the bobbin ...19 Installing the bobbin case...
...Setup location ...7 Setting up the machine...8 Adjusting the operation panel position ...9 Preparing the thread guide assembly ...10 Positioning the spool stand...11 Attaching the embroidery frame holder ...11 EMBROIDERING TUTORIAL 13 Operating Precautions...14 Power supply precautions ...14 Needle precautions ...15 Checking the needle ...15 Bobbin precautions ...15 Upper thread recommendations...16 Fabric recommendations ...16 Display recommendations...16 Basic Procedures ...17 Installing the Bobbin ...18 Removing the bobbin case ...18 Installing the bobbin ...19 Installing the bobbin case...

Users Manual - English
Page 15
... Upper threading ...35 Threading the needle ...39 Sewing the Embroidery...42 Starting embroidering ...42 Stopping embroidering...44 Checking the Thread Tension 45 Removing the Embroidery Frame and Fabric 46 Removing the embroidery frame ...46 Removing the fabric ...46 Turning OFF the Machine 47 Screen Quick Reference Guide 49 Key displays ...49 Common screen controls ...49 Understanding the pattern type selection screen 50 Understanding the pattern list screen ...51 Understanding the pattern editing screen ...52 Understanding the embroidering settings screen...
... Upper threading ...35 Threading the needle ...39 Sewing the Embroidery...42 Starting embroidering ...42 Stopping embroidering...44 Checking the Thread Tension 45 Removing the Embroidery Frame and Fabric 46 Removing the embroidery frame ...46 Removing the fabric ...46 Turning OFF the Machine 47 Screen Quick Reference Guide 49 Key displays ...49 Common screen controls ...49 Understanding the pattern type selection screen 50 Understanding the pattern list screen ...51 Understanding the pattern editing screen ...52 Understanding the embroidering settings screen...

Users Manual - English
Page 22
....) Note ● The parts code may be differ depending on page 169.) 6. Part Name Model Name Parts Code No. Embroidery card 2. Advanced cap frame Model name: PRCFH2 Parts Code: XC7610-052 4. Bobbin winder set Model Name: PRCF2 Parts Code: XC7609-052 (See instructions on the area where the machine was purchased. ● Embroidery cards sold overseas are available as optional accessories. 1. 2. 3. 4. 5. 1 1. Part Name Model Name Parts Code 1 Alphabet SA298 X58317-003 45 Fancy Work SA345 XA7770-003...
....) Note ● The parts code may be differ depending on page 169.) 6. Part Name Model Name Parts Code No. Embroidery card 2. Advanced cap frame Model name: PRCFH2 Parts Code: XC7610-052 4. Bobbin winder set Model Name: PRCF2 Parts Code: XC7609-052 (See instructions on the area where the machine was purchased. ● Embroidery cards sold overseas are available as optional accessories. 1. 2. 3. 4. 5. 1 1. Part Name Model Name Parts Code 1 Alphabet SA298 X58317-003 45 Fancy Work SA345 XA7770-003...
Users Manual - English
Page 27
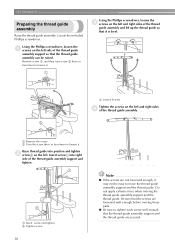
... to move the thread guide assembly support and the thread guide. Using the Phillips screwdriver, loosen the 1 screws on the left side of the thread guide assembly support so that the thread guide assembly can be easy to tighten each screw well enough that the screws are secured. GETTING READY Preparing the thread guide assembly Raise the thread guide assembly. Remove screw 1, and then turn screw 2 three or four times to loosen it . Insert screw1 into position and tighten...
... to move the thread guide assembly support and the thread guide. Using the Phillips screwdriver, loosen the 1 screws on the left side of the thread guide assembly support so that the thread guide assembly can be easy to tighten each screw well enough that the screws are secured. GETTING READY Preparing the thread guide assembly Raise the thread guide assembly. Remove screw 1, and then turn screw 2 three or four times to loosen it . Insert screw1 into position and tighten...

Users Manual - English
Page 61
... stitches to stop button. The machine can be set to overlap the stitching. Memo ● The machine can be stopped at any time, even while it is changed , it is turned on page 92.) ● Before starting to sew, the machine can resume after the machine was turned off Press the start/stop button. 1 X The embroidery machine stops and the start/stop button lights up in red. • The thread...
... stitches to stop button. The machine can be set to overlap the stitching. Memo ● The machine can be stopped at any time, even while it is changed , it is turned on page 92.) ● Before starting to sew, the machine can resume after the machine was turned off Press the start/stop button. 1 X The embroidery machine stops and the start/stop button lights up in red. • The thread...
Users Manual - English
Page 66
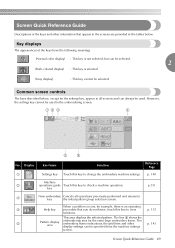
... key to change the embroidery machine settings. key p.151 3 New embroidery Cancels all screens and can always be used . When a problem occurs, for the extra-large embroidery frame. No. This area displays the selected pattern. Screen Quick Reference Guide 49 However, the settings key cannot be used in all operations previously performed and returns to view p. 153 solutions. The line 6 shows the 5 Pattern display area embroidering area...
... key to change the embroidery machine settings. key p.151 3 New embroidery Cancels all screens and can always be used . When a problem occurs, for the extra-large embroidery frame. No. This area displays the selected pattern. Screen Quick Reference Guide 49 However, the settings key cannot be used in all operations previously performed and returns to view p. 153 solutions. The line 6 shows the 5 Pattern display area embroidering area...

Users Manual - English
Page 76
... position of upper thread. - Optional embroidery cards - Embroidery patterns created by the machine 2 EMBROIDERING: ■ Customize the embroidery colors - Check that the positioning pins are placed into the frame's positioning slot and hole. (Refer to page 31.) It is caught under the bobbin's tension spring. ■ The frame came out from under the upper thread guide plates. (Refer to originate the carriage before you re-sew the pattern. ■ Cancel the current design and start...
... position of upper thread. - Optional embroidery cards - Embroidery patterns created by the machine 2 EMBROIDERING: ■ Customize the embroidery colors - Check that the positioning pins are placed into the frame's positioning slot and hole. (Refer to page 31.) It is caught under the bobbin's tension spring. ■ The frame came out from under the upper thread guide plates. (Refer to originate the carriage before you re-sew the pattern. ■ Cancel the current design and start...

Users Manual - English
Page 111
... substituting upper thread already threaded on a different needle bar, the time for the needle bar threaded 3 with the thread that you wish to change, touch so that it changes to . While sewing the color before the one that 1 you wish to embroider with the specified needle bar. 94 Touch the key for sewing can be saved. X The temporary needle bar setting screen appears. Touch , and then press the start /stop button can...
... substituting upper thread already threaded on a different needle bar, the time for the needle bar threaded 3 with the thread that you wish to change, touch so that it changes to . While sewing the color before the one that 1 you wish to embroider with the specified needle bar. 94 Touch the key for sewing can be saved. X The temporary needle bar setting screen appears. Touch , and then press the start /stop button can...

Users Manual - English
Page 113
... often used thread colors to certain needle bars, the trouble of changing the thread spools can be assigned to specify. 1 The color that appears enlarged is the color that is selected. 2 Displays the color that you wish to the needle 3 bar. Select the color to a certain needle bar. EMBROIDERING SETTINGS Reserved Needle Bar Settings Normally, the machine automatically assigns thread colors to it remains applied until the setting is touched. however, a specific thread...
... often used thread colors to certain needle bars, the trouble of changing the thread spools can be assigned to specify. 1 The color that appears enlarged is the color that is selected. 2 Displays the color that you wish to the needle 3 bar. Select the color to a certain needle bar. EMBROIDERING SETTINGS Reserved Needle Bar Settings Normally, the machine automatically assigns thread colors to it remains applied until the setting is touched. however, a specific thread...
Users Manual - English
Page 160
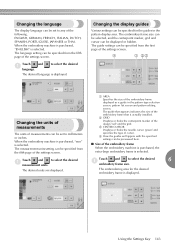
... 1 measurement units. When the embroidery machine is purchased, "mm" is selected. When the embroidery machine is purchased, "ENGLISH" is selected. Changing the units of measurements The units of measurements can be set to any of the embroidery frame displayed as a guide in the pattern display area. The embroidering area for the guides in the pattern type selection screen, pattern list screen and pattern editing screen. Touch and...
... 1 measurement units. When the embroidery machine is purchased, "mm" is selected. When the embroidery machine is purchased, "ENGLISH" is selected. Changing the units of measurements The units of measurements can be set to any of the embroidery frame displayed as a guide in the pattern display area. The embroidering area for the guides in the pattern type selection screen, pattern list screen and pattern editing screen. Touch and...

Users Manual - English
Page 216
... service. Use the Allen screw driver to securely tighten the needle set screw is damaged. 1 Remedy Turn on the embroidery machine. Consult your authorized dealer. Symptom The embroidery machine does not operate. The start /stop button was not pressed. The needle is set too high 7 and not correctly positioned. The area around the hole in needle plate 3 Needle hits hole The presser foot is bent or blunt. Touch the unlock key. Correctly install the needle. Replace the needle...
... service. Use the Allen screw driver to securely tighten the needle set screw is damaged. 1 Remedy Turn on the embroidery machine. Consult your authorized dealer. Symptom The embroidery machine does not operate. The start /stop button was not pressed. The needle is set too high 7 and not correctly positioned. The area around the hole in needle plate 3 Needle hits hole The presser foot is bent or blunt. Touch the unlock key. Correctly install the needle. Replace the needle...

Users Manual - English
Page 218
... correctly positioned. Symptom Probable Cause The needle is bent or blunt. Replace the needle with a new one. The area around the hole in the needle plate is damaged. p.91 Troubleshooting 201 The needle set screw. The area around the embroidery foot hole is damaged. 1 Remedy Correctly install the needle. Slow down the machine sewing speed. Consult your nearest authorized dealer. 1 Scratches/Burrs The needle is loose. Use the Allen screw driver to tighten the needle set screw is...
... correctly positioned. Symptom Probable Cause The needle is bent or blunt. Replace the needle with a new one. The area around the hole in the needle plate is damaged. p.91 Troubleshooting 201 The needle set screw. The area around the embroidery foot hole is damaged. 1 Remedy Correctly install the needle. Slow down the machine sewing speed. Consult your nearest authorized dealer. 1 Scratches/Burrs The needle is loose. Use the Allen screw driver to tighten the needle set screw is...

Users Manual - English
Page 220
... the p.65 embroidery. Delete all stitches with a zero pitch. Correctly thread the bobbin thread. The bobbin is poor. Replace the bobbin case. Remove the thread jammed and clean the hook. The needle is misaligned. Clean the hook and the needle plate. Use tweezers to correctly frame the fabric in the embroidery data. dealer. Firmly set the fabric in the embroidery frame (for example, the fabric is bent or blunt. Replace thread. p.150 The thread density of thread. correctly. p.63...
... the p.65 embroidery. Delete all stitches with a zero pitch. Correctly thread the bobbin thread. The bobbin is poor. Replace the bobbin case. Remove the thread jammed and clean the hook. The needle is misaligned. Clean the hook and the needle plate. Use tweezers to correctly frame the fabric in the embroidery data. dealer. Firmly set the fabric in the embroidery frame (for example, the fabric is bent or blunt. Replace thread. p.150 The thread density of thread. correctly. p.63...

Users Manual - English
Page 222
... machine. The upper thread is not installed correctly. p.35 The bobbin thread is not threaded Check the thread path, and then correctly. Adjust the tension of the needle when embroidering begins. p.85 The upper thread comes out of the bobbin thread. p.150 The upper thread does not reach the bobbin thread when embroidering begins. Clean the thread tension guide plates. Clean the hook. p.193 The upper thread is not correctly threaded. The hook is noisy. thread the upper thread again. p.35 The machine is damaged. Replace and use recommended needle...
... machine. The upper thread is not installed correctly. p.35 The bobbin thread is not threaded Check the thread path, and then correctly. Adjust the tension of the needle when embroidering begins. p.85 The upper thread comes out of the bobbin thread. p.150 The upper thread does not reach the bobbin thread when embroidering begins. Clean the thread tension guide plates. Clean the hook. p.193 The upper thread is not correctly threaded. The hook is noisy. thread the upper thread again. p.35 The machine is damaged. Replace and use recommended needle...

Users Manual - English
Page 224
... pattern into the embroidering area. Troubleshooting 207 Error messages If the start/stop button is pressed while the machine is not correctly set up or if an incorrect operation is performed, the machine stops and informs you of characters so that they extend out of thread has been pulled out, and then re-install the bobbin. (Refer to the instructions in the message. The installed embroidery...
... pattern into the embroidering area. Troubleshooting 207 Error messages If the start/stop button is pressed while the machine is not correctly set up or if an incorrect operation is performed, the machine stops and informs you of characters so that they extend out of thread has been pulled out, and then re-install the bobbin. (Refer to the instructions in the message. The installed embroidery...

Users Manual - English
Page 234
types 65 Embroidery frame holder installing 185 removing 171 Embroidery frame indicators 28, 52, 54 Embroidery patterns 104 Embroidery position 72 Embroidery thread 35 Error messages 207 F Fabric 16, 69 removing 46 Fabric/stabilizer compatibility chart 167 Features viii Feet 2 Floral alphabet patterns 106 Forward/Backward stitch key 57, 79, 81 Frame patterns 108 Front view 2 Mounting jig 174 Moving needle 40 Multi color key 53, 126 N Names of machine parts 2 Needle 15 changing 63 Needle bar case 2 Needle bar key...
types 65 Embroidery frame holder installing 185 removing 171 Embroidery frame indicators 28, 52, 54 Embroidery patterns 104 Embroidery position 72 Embroidery thread 35 Error messages 207 F Fabric 16, 69 removing 46 Fabric/stabilizer compatibility chart 167 Features viii Feet 2 Floral alphabet patterns 106 Forward/Backward stitch key 57, 79, 81 Frame patterns 108 Front view 2 Mounting jig 174 Moving needle 40 Multi color key 53, 126 N Names of machine parts 2 Needle 15 changing 63 Needle bar case 2 Needle bar key...

Users Manual - English
Page 235
APPENDIX S Satin jacket 167 Screen 16, 21, 22, 49 Selecting edited pattern 120 embroidery pattern 23, 102 Set key 51 Setting up 6 Settings key 49, 140 Sewing appliqu 156 pattern aligned with a mark on the fabric 161 Sewing key 55 Sewing light 2 Sewing order 56 Sewing speed 91 Sewing the embroidery 42 Sewing time 56 Short stitch delete 140, 150 Silk 167 Six-needle machine viii Size (horizontal 51, 52 Size (vertical 51, 52 Size key 51, 53...
APPENDIX S Satin jacket 167 Screen 16, 21, 22, 49 Selecting edited pattern 120 embroidery pattern 23, 102 Set key 51 Setting up 6 Settings key 49, 140 Sewing appliqu 156 pattern aligned with a mark on the fabric 161 Sewing key 55 Sewing light 2 Sewing order 56 Sewing speed 91 Sewing the embroidery 42 Sewing time 56 Short stitch delete 140, 150 Silk 167 Six-needle machine viii Size (horizontal 51, 52 Size (vertical 51, 52 Size key 51, 53...


