
Instruction Manual - English
Page 1
TWELVE NEEDLE FOUR HEAD EMBROIDERY MACHINE TWELVE NEEDLE FOUR HEAD EMBROIDERY MACHINE TWELVE NEEDLE SIX HEAD EMBROIDERY MACHINE Please keep this manual before using the machine. BE-1204B-BC BE-1204C-BC BE-1206B-BC INSTRUCTION MANUAL PC Control type Please read this manual within easy reach for quick reference.
TWELVE NEEDLE FOUR HEAD EMBROIDERY MACHINE TWELVE NEEDLE FOUR HEAD EMBROIDERY MACHINE TWELVE NEEDLE SIX HEAD EMBROIDERY MACHINE Please keep this manual before using the machine. BE-1204B-BC BE-1204C-BC BE-1206B-BC INSTRUCTION MANUAL PC Control type Please read this manual within easy reach for quick reference.

Instruction Manual - English
Page 13
... ...2-15 2-10 Installation of Software...2-16 3. Names of Embroidery Machine 1. Software...1-4 2-1 Necessary Systems ...1-4 2-2 Configuration of Software...1-4 2-3 Notes on the Machine Power ...3-7 Register the Machine Name...3-8 Retrieve the Embroidery Data ...3-8 Start Embroidering ...3-9 BE-1204B-BC • BE-1204C-BC • BE-1206B-BC 11 Installation ...2-3 2-1 Transportation of Machine...2-3 2-2 Installation of Machine ...2-5 2-3 Preparation of Needle Bar Case ...2-6 2-4 Mounting of Table...
... ...2-15 2-10 Installation of Software...2-16 3. Names of Embroidery Machine 1. Software...1-4 2-1 Necessary Systems ...1-4 2-2 Configuration of Software...1-4 2-3 Notes on the Machine Power ...3-7 Register the Machine Name...3-8 Retrieve the Embroidery Data ...3-8 Start Embroidering ...3-9 BE-1204B-BC • BE-1204C-BC • BE-1206B-BC 11 Installation ...2-3 2-1 Transportation of Machine...2-3 2-2 Installation of Machine ...2-5 2-3 Preparation of Needle Bar Case ...2-6 2-4 Mounting of Table...

Instruction Manual - English
Page 16
...Machine...6-25 Needle Bar...6-25 Same Speed Range ...6-26 Pause ...6-26 Speed Range...6-27 Head Operation Suspend ...6-27 Hoop Feed Position ...6-28 Embroidery Area...6-29 Embroidery Hoop...6-29 Thread Trimming ...6-31 Thread Breakage Sensor...6-32 Automatic Step Back ...6-33 Automatic Hoop Feed ...6-33 End of embroidery...Step-back Mode ...6-53 Setting Step-forward/Back Distance or Timing...6-54 Stepping Forward/Back...6-55 Resuming Embroidering ...6-56 Moving Embroidery Position ...6-57 Centering Pattern ...6-58 Saving Data ...6-59 Save ...6-59 Save As...6-59 Test ...6-60 Running Other Programs...
...Machine...6-25 Needle Bar...6-25 Same Speed Range ...6-26 Pause ...6-26 Speed Range...6-27 Head Operation Suspend ...6-27 Hoop Feed Position ...6-28 Embroidery Area...6-29 Embroidery Hoop...6-29 Thread Trimming ...6-31 Thread Breakage Sensor...6-32 Automatic Step Back ...6-33 Automatic Hoop Feed ...6-33 End of embroidery...Step-back Mode ...6-53 Setting Step-forward/Back Distance or Timing...6-54 Stepping Forward/Back...6-55 Resuming Embroidering ...6-56 Moving Embroidery Position ...6-57 Centering Pattern ...6-58 Saving Data ...6-59 Save ...6-59 Save As...6-59 Test ...6-60 Running Other Programs...
Instruction Manual - English
Page 20
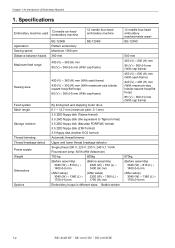
...(the equivalent to Tajima format) 3.5 2DD floppy disk (Barudan FDR/FMC format) 3.5 2DD floppy disk (ZSK format) 3.5 floppy disk (brother ECS format) Automatic thread trimmer Upper and lower thread breakage detector Single phase 200 V, 220 V, 230 V, 240 V,1.1 kVA Flourescent lamp: ...setup) 3040 (W) × 1360 (L) × 1750 (H) mm (After setup) 2320 (W) × 1360 (L) × 1750 (H) mm Embroidery hoops in different sizes, Bobbin winder 12 needle four-head embroidery machine BE-1204C 500 mm 450 (V) × 500 (H) mm 95 (V) × 360 (H) mm (With cap frame) 450 (V) × 500 (H) ...
...(the equivalent to Tajima format) 3.5 2DD floppy disk (Barudan FDR/FMC format) 3.5 2DD floppy disk (ZSK format) 3.5 floppy disk (brother ECS format) Automatic thread trimmer Upper and lower thread breakage detector Single phase 200 V, 220 V, 230 V, 240 V,1.1 kVA Flourescent lamp: ...setup) 3040 (W) × 1360 (L) × 1750 (H) mm (After setup) 2320 (W) × 1360 (L) × 1750 (H) mm Embroidery hoops in different sizes, Bobbin winder 12 needle four-head embroidery machine BE-1204C 500 mm 450 (V) × 500 (H) mm 95 (V) × 360 (H) mm (With cap frame) 450 (V) × 500 (H) ...

Instruction Manual - English
Page 30
Names of Embroidery Machine 1. Chapter 2 Preparation of Machine Components Fluorescent lamp switch Thread tension dial Thread guide C Thread guide B Thread tension base switch STEP BACK / FWD switch Operation panel Cotton stand Thread guide A Fluorescent lamp switch Flat / Cap hoop select switch Table Emergency stop switch Start switch Stop switch Leg Rotary hook cover (Safety device) Power switch Control box Main power switch W1401Q The machine heads are numbered 1 to 6 (1 to 4 in four head models) from the right front. 2-2 BE-1204B-BC • BE-1206B-BC
Names of Embroidery Machine 1. Chapter 2 Preparation of Machine Components Fluorescent lamp switch Thread tension dial Thread guide C Thread guide B Thread tension base switch STEP BACK / FWD switch Operation panel Cotton stand Thread guide A Fluorescent lamp switch Flat / Cap hoop select switch Table Emergency stop switch Start switch Stop switch Leg Rotary hook cover (Safety device) Power switch Control box Main power switch W1401Q The machine heads are numbered 1 to 6 (1 to 4 in four head models) from the right front. 2-2 BE-1204B-BC • BE-1206B-BC

Instruction Manual - English
Page 34
Chapter 2 Preparation of Embroidery Machine 2-3 Preparation of Needle Bar Case [1] [2] [3] Repeat the procedures below for all the heads: 1. Unscrew the screw [1], then detach the bracket [3] and pin [2]. W1225Q 2-6 BE-1204B-BC • BE-1206B-BC
Chapter 2 Preparation of Embroidery Machine 2-3 Preparation of Needle Bar Case [1] [2] [3] Repeat the procedures below for all the heads: 1. Unscrew the screw [1], then detach the bracket [3] and pin [2]. W1225Q 2-6 BE-1204B-BC • BE-1206B-BC

Instruction Manual - English
Page 36
... table supports front [7] in height so as to the other side. Tighten all hexagon socket head cap screws [8] firmly. 2-8 BE-1204B-BC • BE-1204C-BC • BE-1206B-BC Put the table backing plate [4] of each of Embroidery Machine ! Insert the table backing plate [4] into the table backing rubber on to the table...
... table supports front [7] in height so as to the other side. Tighten all hexagon socket head cap screws [8] firmly. 2-8 BE-1204B-BC • BE-1204C-BC • BE-1206B-BC Put the table backing plate [4] of each of Embroidery Machine ! Insert the table backing plate [4] into the table backing rubber on to the table...

Instruction Manual - English
Page 37
For embroidering with the upper surface of the bed. 4. Chapter 2 Preparation of each of the leg section. Attach four hexagon socket head cap screws to be even with flat hoop/sash frame (upper position) [5] [4] [2] [3] [1] [7] [6] W1228Q 1. Adjust the height of the ... steel pipe of table parts R [1], M [2](BE-1206B and BE-1204C only), and L [3] from the back. 2. Attach four (three in BE-1204B)) [7]. Insert the table backing plate [4] of Embroidery Machine ! BE-1204B-BC • BE-1204C-BC • BE-1206B-BC 2-9 Tighten all hexagon socket head cap screws firmly. 5.
For embroidering with the upper surface of the bed. 4. Chapter 2 Preparation of each of the leg section. Attach four hexagon socket head cap screws to be even with flat hoop/sash frame (upper position) [5] [4] [2] [3] [1] [7] [6] W1228Q 1. Adjust the height of the ... steel pipe of table parts R [1], M [2](BE-1206B and BE-1204C only), and L [3] from the back. 2. Attach four (three in BE-1204B)) [7]. Insert the table backing plate [4] of Embroidery Machine ! BE-1204B-BC • BE-1204C-BC • BE-1206B-BC 2-9 Tighten all hexagon socket head cap screws firmly. 5.
Instruction Manual - English
Page 39
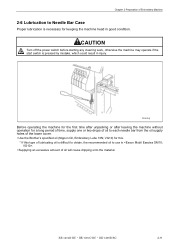
... the first time after unpacking or after leaving the machine without operation for this. * If this type of lubricating oil is difficult to obtain, the recommended oil to use is . • Supplying an excessive amount ...; Use the Brother's specified oil (Nippon Oil, Embroidery Lube 10N; BE-1204B-BC • BE-1204C-BC • BE-1206B-BC 2-11 CAUTION Turn off the power switch before starting any cleaning work, otherwise the machine may operate if the start switch is necessary for keeping the machine head in injury. Chapter 2 Preparation of Embroidery Machine 2-6 Lubrication to...
... the first time after unpacking or after leaving the machine without operation for this. * If this type of lubricating oil is difficult to obtain, the recommended oil to use is . • Supplying an excessive amount ...; Use the Brother's specified oil (Nippon Oil, Embroidery Lube 10N; BE-1204B-BC • BE-1204C-BC • BE-1206B-BC 2-11 CAUTION Turn off the power switch before starting any cleaning work, otherwise the machine may operate if the start switch is necessary for keeping the machine head in injury. Chapter 2 Preparation of Embroidery Machine 2-6 Lubrication to...

Instruction Manual - English
Page 130
... speed range. (→ page 6-27) Cancels the head operation which is not halted on the machine side. (→ page 6-27) Sets the hoop feed position. (→ page 6-28) Sets the area for embroidering. (→ page 6-29) Sets the type of embroidery hoop. (→ page 6-29) Sets the inching ...breakage. (→ page 6-33) Feeds hoop to the hoop feed position automatically after embroidering. (→ page 6-33) Sets if the machine returns to the start point after end of embroidery. (→ page 6-34) Sets details of mending. (→ page 6-35) Sets the adjusting value. (→ page 6-36) ...
... speed range. (→ page 6-27) Cancels the head operation which is not halted on the machine side. (→ page 6-27) Sets the hoop feed position. (→ page 6-28) Sets the area for embroidering. (→ page 6-29) Sets the type of embroidery hoop. (→ page 6-29) Sets the inching ...breakage. (→ page 6-33) Feeds hoop to the hoop feed position automatically after embroidering. (→ page 6-33) Sets if the machine returns to the start point after end of embroidery. (→ page 6-34) Sets details of mending. (→ page 6-35) Sets the adjusting value. (→ page 6-36) ...
Stand Alone Type Instruction Manual - English
Page 1
TWELVE NEEDLE FOUR HEAD EMBROIDERY MACHINE TWELVE NEEDLE SIX HEAD EMBROIDERY MACHINE Please keep this manual before using the machine. BE-1204B-BC BE-1206B-BC INSTRUCTION MANUAL Stand-Alone type Please read this manual within easy reach for quick reference.
TWELVE NEEDLE FOUR HEAD EMBROIDERY MACHINE TWELVE NEEDLE SIX HEAD EMBROIDERY MACHINE Please keep this manual before using the machine. BE-1204B-BC BE-1206B-BC INSTRUCTION MANUAL Stand-Alone type Please read this manual within easy reach for quick reference.

Stand Alone Type Instruction Manual - English
Page 16
... Case...1-8 3-4 Mounting of Table ...1-9 3-5 Mounting of Embroidery Machine 1. Preparation for Embroidering...1-15 4-1 Upper Threading...1-15 4-2 Replacement of Bobbin ...1-17 4-3 Replacing and Selecting Needle...1-19 4-4 Attachment of Embroidery Hoop and Frame 1-20 4-5 Adjustment of Thread Tension ...1-24 Chapter 2 Embroidering Procedures Functions of Operation Panel...2-2 Operation Panel...2-2 Switches at Machine Heads ...2-5 Lamps and switches on the thread...
... Case...1-8 3-4 Mounting of Table ...1-9 3-5 Mounting of Embroidery Machine 1. Preparation for Embroidering...1-15 4-1 Upper Threading...1-15 4-2 Replacement of Bobbin ...1-17 4-3 Replacing and Selecting Needle...1-19 4-4 Attachment of Embroidery Hoop and Frame 1-20 4-5 Adjustment of Thread Tension ...1-24 Chapter 2 Embroidering Procedures Functions of Operation Panel...2-2 Operation Panel...2-2 Switches at Machine Heads ...2-5 Lamps and switches on the thread...

Stand Alone Type Instruction Manual - English
Page 22
...Sewing area Feed system Stitch length Storage medium Thread trimming Thread breakage detect Power supply Weight Dimensions Options 12 needle six-head embroidery machine 12 needle four-head embroidery machine Pattern embroidery Maximum 1000 rpm 360 mm 450 (V) × 360 (H) mm 95 (V) × 360 (H) mm (With ...the equivalent to Tajima format) 3.5 2DD floppy disk (Barudan FDR/FMC format) 3.5 2DD floppy disk (ZSK format) 3.5 floppy disk (brother ECS format) Automatic thread trimmer Upper and lower thread breakage detector Single phase 200 V, 220 V, 230 V, 240 V,1.1 kVA Flourescent lamp...
...Sewing area Feed system Stitch length Storage medium Thread trimming Thread breakage detect Power supply Weight Dimensions Options 12 needle six-head embroidery machine 12 needle four-head embroidery machine Pattern embroidery Maximum 1000 rpm 360 mm 450 (V) × 360 (H) mm 95 (V) × 360 (H) mm (With ...the equivalent to Tajima format) 3.5 2DD floppy disk (Barudan FDR/FMC format) 3.5 2DD floppy disk (ZSK format) 3.5 floppy disk (brother ECS format) Automatic thread trimmer Upper and lower thread breakage detector Single phase 200 V, 220 V, 230 V, 240 V,1.1 kVA Flourescent lamp...

Stand Alone Type Instruction Manual - English
Page 25
... a strong electric noise. Doing so may cause the embroidery machine to do so may start the machine unintentionally through an accidental activation of receiving a serious electric shock, and problems with the adjustment bolts on the sound floor so that may also occur. Install a machine in four head models). The installation should be installed only by...
... a strong electric noise. Doing so may cause the embroidery machine to do so may start the machine unintentionally through an accidental activation of receiving a serious electric shock, and problems with the adjustment bolts on the sound floor so that may also occur. Install a machine in four head models). The installation should be installed only by...

Stand Alone Type Instruction Manual - English
Page 33
... Bar Case Proper lubrication is pressed by mistake, which could result in good condition. W1221Q Before operating the machine for the first time after unpacking or after leaving the machine without operation for keeping the machine head in injury. BE-1204B-BC • BE-1206B-BC 1-13 CAUTION Turn off the power switch before... supply holes of oil will cause dripping onto the material. VG10) for this. • Supplying an excessive amount of the lower cover. • Use the Brother's specified oil (Nippon Oil, Embroidery Lube 10N;
... Bar Case Proper lubrication is pressed by mistake, which could result in good condition. W1221Q Before operating the machine for the first time after unpacking or after leaving the machine without operation for keeping the machine head in injury. BE-1204B-BC • BE-1206B-BC 1-13 CAUTION Turn off the power switch before... supply holes of oil will cause dripping onto the material. VG10) for this. • Supplying an excessive amount of the lower cover. • Use the Brother's specified oil (Nippon Oil, Embroidery Lube 10N;

Cap Frame Device Instruction Manual - English
Page 16
... pressed by mistake, which could result in injury. [1] [6] 0.5 ~ 1.0mm [4] [1] [6] [2] [2] [3] W1428Q 1 1. Install each cap frame driver to the corresponding head according to the number attached. 2 2. Loosen the four screws [2]. 14 Electronic embroidery machine Loosen the two screws [1]. 調整 / Adjustment 注意/CAUTION When making adjustments, turn off the power switch and disconnect...
... pressed by mistake, which could result in injury. [1] [6] 0.5 ~ 1.0mm [4] [1] [6] [2] [2] [3] W1428Q 1 1. Install each cap frame driver to the corresponding head according to the number attached. 2 2. Loosen the four screws [2]. 14 Electronic embroidery machine Loosen the two screws [1]. 調整 / Adjustment 注意/CAUTION When making adjustments, turn off the power switch and disconnect...
Parts Manual - English
Page 1
...-BC-PC/SA BE-1204C-BC-PC/SA BE-1206B-BC-PC/SA BROTHER EMBROIDERY SYSTEMS PARTS BOOK 12 $1- 4 RRNIM4S (/Via ii 1T11 -17 / > F 7 El > 4 i) 12 It 4 50194201 W V >$1.1 -f 1 / > F7 El >'f 1) 12 II- 6 5AVINN (M) >$1.1 41 / >F 7 III >-C1) 12 NEEDLE 4 HEAD EMBROIDERY MACHINE (PC TYPE / SA TYPE) 12 NEEDLE 4 HEAD EMBROIDERY MACHINE(PC TYPE / SA TYPE) 12 NEEDLE 6 HEAD EMBROIDERY MACHINE (PC TYPE / SA...
...-BC-PC/SA BE-1204C-BC-PC/SA BE-1206B-BC-PC/SA BROTHER EMBROIDERY SYSTEMS PARTS BOOK 12 $1- 4 RRNIM4S (/Via ii 1T11 -17 / > F 7 El > 4 i) 12 It 4 50194201 W V >$1.1 -f 1 / > F7 El >'f 1) 12 II- 6 5AVINN (M) >$1.1 41 / >F 7 III >-C1) 12 NEEDLE 4 HEAD EMBROIDERY MACHINE (PC TYPE / SA TYPE) 12 NEEDLE 4 HEAD EMBROIDERY MACHINE(PC TYPE / SA TYPE) 12 NEEDLE 6 HEAD EMBROIDERY MACHINE (PC TYPE / SA...


