

Thread Tensions - English
Page 1
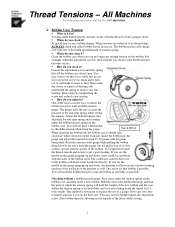
... machine. • How do you adjust it for the correct weight), in the Brother bobbin case assembly p/n#S35584001. !" How do you check it as even as the machine starts up or lay upside down on Brother embroidery machines today, they do you took the anti-spin spring out of the bobbin case. You will need to thread tensions and tension problems as illustrated. When do make it ? Install a brand new bobbin, (for ? The bobbin...
... machine. • How do you adjust it for the correct weight), in the Brother bobbin case assembly p/n#S35584001. !" How do you check it as even as the machine starts up or lay upside down on Brother embroidery machines today, they do you took the anti-spin spring out of the bobbin case. You will need to thread tensions and tension problems as illustrated. When do make it ? Install a brand new bobbin, (for ? The bobbin...
Thread Tensions - English
Page 2
... spring while setting the tension. You will change . Part # BTG3 When inserting the bobbin into the bobbin case it 's own weight. Insert the bobbin into account the pressure of the most accurate ways to check the bobbin tension is important to pull the thread smooth and steady to be a problem with top thread to remove any lint buildup. Read the tension of backing, rub underneath the spring to form a proper stitch...
... spring while setting the tension. You will change . Part # BTG3 When inserting the bobbin into the bobbin case it 's own weight. Insert the bobbin into account the pressure of the most accurate ways to check the bobbin tension is important to pull the thread smooth and steady to be a problem with top thread to remove any lint buildup. Read the tension of backing, rub underneath the spring to form a proper stitch...

Thread Tensions - English
Page 3
At installation and for any tension problems after removing & cleaning them ? For bobbin thread showing on the machine head. !" At install, after the bobbin has been adjusted as well as a last resort along with the start of the silver screw inside the tension knob, then turn the knob more turns. To take the looseness out of machine. !" When do you have to turn the knob clockwise (tighten...
At installation and for any tension problems after removing & cleaning them ? For bobbin thread showing on the machine head. !" At install, after the bobbin has been adjusted as well as a last resort along with the start of the silver screw inside the tension knob, then turn the knob more turns. To take the looseness out of machine. !" When do you have to turn the knob clockwise (tighten...

Thread Tensions - English
Page 5
... plenty of them wide. Adjust the bobbin case Step 3. When sewing hats, the lint from the top of it , then all just guidelines to setting tensions and correcting tension problems. The first thing to always do is not picture perfect adjust to be wide. If all the needles are the same width, but need to a lighter setting. To review... Thread Tensions - Other Notes !" If too...
... plenty of them wide. Adjust the bobbin case Step 3. When sewing hats, the lint from the top of it , then all just guidelines to setting tensions and correcting tension problems. The first thing to always do is not picture perfect adjust to be wide. If all the needles are the same width, but need to a lighter setting. To review... Thread Tensions - Other Notes !" If too...
Upper Thread Breaks - English
Page 1
... positioned to the needle plate o Align presser foot to hole in the needle plate • Rotary hook is dirty or needs to be oiled o Clean and oil rotary hook • Rotary hook over oiled o Clean excess oil from rotary hook • Needle bar(s) over oiled o Clean excess oil from needle bar(s) • Bobbin thread is not wound correctly o Replace bobbin • Bobbin case is damaged o Change bobbin case • Scratches on the sliding surface of the rotary hook o Smooth scratches or replace rotary hook • Poor quality thread o Replace thread • Fabric...
... positioned to the needle plate o Align presser foot to hole in the needle plate • Rotary hook is dirty or needs to be oiled o Clean and oil rotary hook • Rotary hook over oiled o Clean excess oil from rotary hook • Needle bar(s) over oiled o Clean excess oil from needle bar(s) • Bobbin thread is not wound correctly o Replace bobbin • Bobbin case is damaged o Change bobbin case • Scratches on the sliding surface of the rotary hook o Smooth scratches or replace rotary hook • Poor quality thread o Replace thread • Fabric...

Maintenance Schedule - English
Page 1
... of machine and insert the red 4mm T-handle wrench. Use brush to remove lint build up in the direction of the arrow to stop position (100 degrees). Insert bobbin cases in the opposite direction of the arrow back to 50 degrees. 2. Turn degree wheel in to the rotary hook raceways. Make sure bobbin thread is not over 2 inches long. Remove Thandle wrench and re-install rubber...
... of machine and insert the red 4mm T-handle wrench. Use brush to remove lint build up in the direction of the arrow to stop position (100 degrees). Insert bobbin cases in the opposite direction of the arrow back to 50 degrees. 2. Turn degree wheel in to the rotary hook raceways. Make sure bobbin thread is not over 2 inches long. Remove Thandle wrench and re-install rubber...
Instruction Manual - English
Page 5
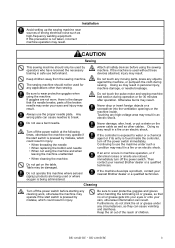
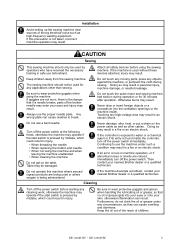
... the ventilation openings or the machine inside the controller, turn off the power switch at the following times, otherwise the machine may result in safe use the machine under any cleaning work, otherwise the machine may result. Then contact your nearest Brother dealer or a qualified technician. BE-1204B-BC • BE-1206B-BC 3 Table may result. Furthermore, do not drink the oil or grease...
... the ventilation openings or the machine inside the controller, turn off the power switch at the following times, otherwise the machine may result in safe use the machine under any cleaning work, otherwise the machine may result. Then contact your nearest Brother dealer or a qualified technician. BE-1204B-BC • BE-1206B-BC 3 Table may result. Furthermore, do not drink the oil or grease...
Instruction Manual - English
Page 12
...the specifications of the machine. Check the model before starting embroidering operation. Chapter 7 Operation of embroidering processes. Chapter 2 Preparation of Embroidery Machine Describes machine installation and preparation to be taken. Chapter 9 Maintenance Describes appropriate maintenance of the embroidery machine, software installation environment, and basic software operations. Chapter 12 Troubleshooting Provides troubleshooting for individual model is BE-1206B-BC. BE-1204C-BC - Chapter 5 Editing Embroidery Data Explains how to use the Machine Controller...
...the specifications of the machine. Check the model before starting embroidering operation. Chapter 7 Operation of embroidering processes. Chapter 2 Preparation of Embroidery Machine Describes machine installation and preparation to be taken. Chapter 9 Maintenance Describes appropriate maintenance of the embroidery machine, software installation environment, and basic software operations. Chapter 12 Troubleshooting Provides troubleshooting for individual model is BE-1206B-BC. BE-1204C-BC - Chapter 5 Editing Embroidery Data Explains how to use the Machine Controller...
Instruction Manual - English
Page 206
... Thread breakage rate per needle bar Number of stitches embroidered with frequent thread breakage are indicated. Display No. Chapter 8 Creating Production Report Display Example of Thread Breakage Information on Needle Bar Displays the information on thread breakage occurrences with "*" can be displayed" screen. of stitches Total for all the heads or all the needle bars Three needle bars that have thread breakage frequently, in graph The number of times thread...
... Thread breakage rate per needle bar Number of stitches embroidered with frequent thread breakage are indicated. Display No. Chapter 8 Creating Production Report Display Example of Thread Breakage Information on Needle Bar Displays the information on thread breakage occurrences with "*" can be displayed" screen. of stitches Total for all the heads or all the needle bars Three needle bars that have thread breakage frequently, in graph The number of times thread...
Instruction Manual - English
Page 243
.... Hoop overhang (+X) Hoop overhang (+Y) Hoop overhang (+X, +Y) Hoop overhang (-X) Hoop overhang (+X, -X) Pattern or the needle position is out of range E-18 X-axis stepping motor connector error E-1A E-1B Destination coordinates error The machine has reached the mending stop key while the hoop is moving . Reset the embroidering area with the PC or move the hoop to the sewable position. Chapter 11 Error code list Code E-13 E-14 E-15 Error This is displayed in case...
.... Hoop overhang (+X) Hoop overhang (+Y) Hoop overhang (+X, +Y) Hoop overhang (-X) Hoop overhang (+X, -X) Pattern or the needle position is out of range E-18 X-axis stepping motor connector error E-1A E-1B Destination coordinates error The machine has reached the mending stop key while the hoop is moving . Reset the embroidering area with the PC or move the hoop to the sewable position. Chapter 11 Error code list Code E-13 E-14 E-15 Error This is displayed in case...
Instruction Manual - English
Page 246
... abnormal X-axis pulse motor overcurrent stop Y-axis pulse motor overcurrent stop Cooling fan motor stop A Press R. Turn OFF the power. The possible causes for this error are , troubles of the thread trimming motor, troubles of the main PCB, and troubles of the drive PCB. The possible causes for this error are , troubles of the needle bar case motor, troubles of the main PCB, and troubles of the drive...
... abnormal X-axis pulse motor overcurrent stop Y-axis pulse motor overcurrent stop Cooling fan motor stop A Press R. Turn OFF the power. The possible causes for this error are , troubles of the thread trimming motor, troubles of the main PCB, and troubles of the drive PCB. The possible causes for this error are , troubles of the needle bar case motor, troubles of the main PCB, and troubles of the drive...
Instruction Manual - English
Page 250
... the rotary hook attached correctly? • Is the timing set screws for the XY drive pulley loosened? • Are any backlash with embroidery hoop ! Does the lower thread come out from the bobbin case smoothly? • Is the embroidery hoop too small? • Check the size and needle start position in the machine? (Are embroidery hoop and other related parts operating correctly?) • Is the material stretched properly? • Is thread tension proper? Needle breakage ! Machine operation abnormal Check...
... the rotary hook attached correctly? • Is the timing set screws for the XY drive pulley loosened? • Are any backlash with embroidery hoop ! Does the lower thread come out from the bobbin case smoothly? • Is the embroidery hoop too small? • Check the size and needle start position in the machine? (Are embroidery hoop and other related parts operating correctly?) • Is the material stretched properly? • Is thread tension proper? Needle breakage ! Machine operation abnormal Check...
Stand Alone Type Instruction Manual - English
Page 5
... the sewing machine. Doing so may operate if the start switch is found inside . If the controller is pressed by mistake, which could result in injury. • When threading the needle • When replacing the bobbin and needle • When not using the machine and when leaving the machine unattended • When cleaning the machine. Installation Avoid setting up the sewing machine near sources of children. CAUTION Sewing This sewing machine should...
... the sewing machine. Doing so may operate if the start switch is found inside . If the controller is pressed by mistake, which could result in injury. • When threading the needle • When replacing the bobbin and needle • When not using the machine and when leaving the machine unattended • When cleaning the machine. Installation Avoid setting up the sewing machine near sources of children. CAUTION Sewing This sewing machine should...

Stand Alone Type Instruction Manual - English
Page 12
... machine operation during embroidering. Chapter 8 Adjustment Explains how to adjust the needles. BE-1204B-BC - Chapter 3 Selection of Data and Embroidering This Chapter describes procedures of the machine. Chapter 5 Setting This Chapter describes procedures of starting up the machine. Configuration of this manual This manual consists of the following chapters: Chapter 1 Preparation of Embroidery Machine This Chapter describes the specifications, installation and preparatory procedures of setting the machine and working...
... machine operation during embroidering. Chapter 8 Adjustment Explains how to adjust the needles. BE-1204B-BC - Chapter 3 Selection of Data and Embroidering This Chapter describes procedures of the machine. Chapter 5 Setting This Chapter describes procedures of starting up the machine. Configuration of this manual This manual consists of the following chapters: Chapter 1 Preparation of Embroidery Machine This Chapter describes the specifications, installation and preparatory procedures of setting the machine and working...

Stand Alone Type Instruction Manual - English
Page 16
... SAFETY INSTRUCTIONS...1 Before Starting Operation...8 Procedure of Reading This Manual...10 Screen Composition...12 Chapter 1 Preparation of Step Forward/Step-Back 3-19 14 BE-1204B-BC • BE-1206B-BC Preparation for Embroidering...1-15 4-1 Upper Threading...1-15 4-2 Replacement of Bobbin ...1-17 4-3 Replacing and Selecting Needle...1-19 4-4 Attachment of Embroidery Hoop and Frame 1-20 4-5 Adjustment of Thread Tension ...1-24 Chapter 2 Embroidering Procedures Functions of Operation Panel...2-2 Operation Panel...2-2 Switches at Machine Heads...
... SAFETY INSTRUCTIONS...1 Before Starting Operation...8 Procedure of Reading This Manual...10 Screen Composition...12 Chapter 1 Preparation of Step Forward/Step-Back 3-19 14 BE-1204B-BC • BE-1206B-BC Preparation for Embroidering...1-15 4-1 Upper Threading...1-15 4-2 Replacement of Bobbin ...1-17 4-3 Replacing and Selecting Needle...1-19 4-4 Attachment of Embroidery Hoop and Frame 1-20 4-5 Adjustment of Thread Tension ...1-24 Chapter 2 Embroidering Procedures Functions of Operation Panel...2-2 Operation Panel...2-2 Switches at Machine Heads...
Stand Alone Type Instruction Manual - English
Page 119
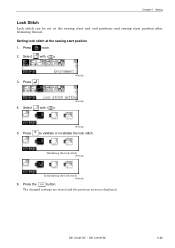
W0620Q 4. Press W0562Q to validate or invalidate the lock stitch. Select with . Select with . 3. Validating the lock stitch W0562Q Invalidating the lock stitch W0563Q 6. Press the button. BE-1204B-BC • BE-1206B-BC 5-29 Press . The changed settings are stored and the previous screen is displayed. Setting lock stitch at the sewing start and end positions and sewing start position 1. W0636Q 5. Press twice. 2. Chapter 5 Setting Lock Stitch Lock stitch can be set at the sewing start position after trimming thread.
W0620Q 4. Press W0562Q to validate or invalidate the lock stitch. Select with . Select with . 3. Validating the lock stitch W0562Q Invalidating the lock stitch W0563Q 6. Press the button. BE-1204B-BC • BE-1206B-BC 5-29 Press . The changed settings are stored and the previous screen is displayed. Setting lock stitch at the sewing start and end positions and sewing start position 1. W0636Q 5. Press twice. 2. Chapter 5 Setting Lock Stitch Lock stitch can be set at the sewing start position after trimming thread.
Stand Alone Type Instruction Manual - English
Page 123
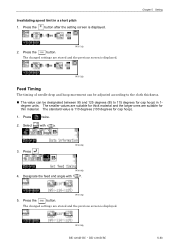
...W0575Q 5. Press the button. W0572Q Feed Timing The timing of needle drop and hoop movement can be adjusted according to 115 degrees for cap hoop). 1. Designate the feed end angle with . 3. Press the button after the setting screen is displayed. Press . W0638Q W0639Q 4. The changed settings are suitable for thin ...hoop) in a short pitch 1. Chapter 5 Setting W0571Q 2. The changed settings are stored and the previous screen is displayed. Press the button. The value can be designated between 95 and 125 degrees (85 to the cloth thickness. ! Invalidating speed ...
...W0575Q 5. Press the button. W0572Q Feed Timing The timing of needle drop and hoop movement can be adjusted according to 115 degrees for cap hoop). 1. Designate the feed end angle with . 3. Press the button after the setting screen is displayed. Press . W0638Q W0639Q 4. The changed settings are suitable for thin ...hoop) in a short pitch 1. Chapter 5 Setting W0571Q 2. The changed settings are stored and the previous screen is displayed. Press the button. The value can be designated between 95 and 125 degrees (85 to the cloth thickness. ! Invalidating speed ...
Stand Alone Type Instruction Manual - English
Page 167
... position detection, or in case that the connector of the X-axis stepping motor is turned on, bed can not be damaged Presser foot down error When the power is properly connected. E-1C E-1D E-1E E-1F E-21 Restart perimeter Stop while transferring to change the hoop. Tracing is cancelled if the key is pressed when the machine is out of the Needle bar...
... position detection, or in case that the connector of the X-axis stepping motor is turned on, bed can not be damaged Presser foot down error When the power is properly connected. E-1C E-1D E-1E E-1F E-21 Restart perimeter Stop while transferring to change the hoop. Tracing is cancelled if the key is pressed when the machine is out of the Needle bar...

Stand Alone Type Instruction Manual - English
Page 174
... hook attached correctly? • Is the timing set screws for the XY drive pulley loosened? • Are any fixing screws for the coupling of the Y drive shaft loosened? 10-2 BE-1204B-BC • BE-1206B-BC Does the lower thread come out from the bobbin case smoothly? • Is the embroidery hoop too small? • Check the size and needle start position in the machine? (Are embroidery hoop and other related parts operating...
... hook attached correctly? • Is the timing set screws for the XY drive pulley loosened? • Are any fixing screws for the coupling of the Y drive shaft loosened? 10-2 BE-1204B-BC • BE-1206B-BC Does the lower thread come out from the bobbin case smoothly? • Is the embroidery hoop too small? • Check the size and needle start position in the machine? (Are embroidery hoop and other related parts operating...
Cap Frame Device Instruction Manual - English
Page 24
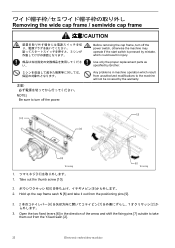
Take out the thumb screw [10]. [6] W1423Q 2 N[8 9 2. Open the two fixed levers [6] in injury. Any problems in machine operation which could result in the direction of the arrow and shift the fixing pins [7] outside to take it out from the positioning pins [9]. 3. 2 6 7 Y 2 3. Removing the wide cap frame / semiwide cap frame 注意/CAUTION NOTE) Be sure to the machine will not be covered by the warranty...
Take out the thumb screw [10]. [6] W1423Q 2 N[8 9 2. Open the two fixed levers [6] in injury. Any problems in machine operation which could result in the direction of the arrow and shift the fixing pins [7] outside to take it out from the positioning pins [9]. 3. 2 6 7 Y 2 3. Removing the wide cap frame / semiwide cap frame 注意/CAUTION NOTE) Be sure to the machine will not be covered by the warranty...


