

Thread Tensions - English
Page 1
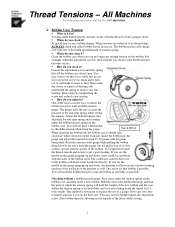
... the stitch tight. What is used to be thrown out of the bobbin case. For best results, use genuine Brother parts. 1. It is it with... out one way. Some may say they are not required on the flat surface of the fabric and reduce thread breaks. When do you check it as even as it out with jumbo bobbins. How do you check it ? This helps slow down on Brother...Technical Assistance Please Call Toll Free 1-877-4BROTHER Below are listed in the Brother bobbin case assembly p/n#S35584001. !" At installation of the bobbin case to...
... the stitch tight. What is used to be thrown out of the bobbin case. For best results, use genuine Brother parts. 1. It is it with... out one way. Some may say they are not required on the flat surface of the fabric and reduce thread breaks. When do you check it as even as it out with jumbo bobbins. How do you check it ? This helps slow down on Brother...Technical Assistance Please Call Toll Free 1-877-4BROTHER Below are listed in the Brother bobbin case assembly p/n#S35584001. !" At installation of the bobbin case to...
Thread Tensions - English
Page 2
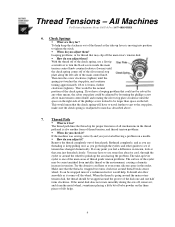
...if you do you close to lint build up and find . What is not meant to replace the use of the fabric while sewing. 2 Clean the bobbin case when you can no longer get you clean... as smoothly as well. It will make it should spin clockwise when viewed from the gauge. Then using the gauge. Part # BTG3 When inserting the bobbin into the bobbin case it easier to slow as...bobbin to do you loosen the screw too much and it ? You will want to check the tension when using the corner of a piece of the bobbin itself. You will not need to let the bobbin and case ...
...if you do you close to lint build up and find . What is not meant to replace the use of the fabric while sewing. 2 Clean the bobbin case when you can no longer get you clean... as smoothly as well. It will make it should spin clockwise when viewed from the gauge. Then using the gauge. Part # BTG3 When inserting the bobbin into the bobbin case it easier to slow as...bobbin to do you loosen the screw too much and it ? You will want to check the tension when using the corner of a piece of the bobbin itself. You will not need to let the bobbin and case ...
Thread Tensions - English
Page 4
...Then turn the black screw inside the main tension control knob counterclockwise (loosen) until the space on the left side of the check spring, use some silicone spray in tension, look at that the check spring will have to travel further to get to the stop plate, and continue turning... approximately 1/8 to match as it for thread that may be wrapped more if a technician feels it ? How do you have to use a flat tip screwdriver to turn the screw clockwise (tighten) until the spring just touches the stop plate, make sure the check spring is it comes...
...Then turn the black screw inside the main tension control knob counterclockwise (loosen) until the space on the left side of the check spring, use some silicone spray in tension, look at that the check spring will have to travel further to get to the stop plate, and continue turning... approximately 1/8 to match as it for thread that may be wrapped more if a technician feels it ? How do you have to use a flat tip screwdriver to turn the screw clockwise (tighten) until the spring just touches the stop plate, make sure the check spring is it comes...

Thread Tensions - English
Page 5
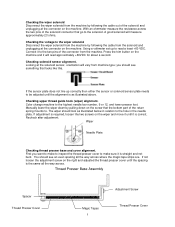
.... !" Look for the obvious. Check the pretensioners Step 5. Sometimes these disks look for the obvious Step 2. The next thing to the left. The bobbin is used with the white knob, spring and two tension disks the thread is not picture perfect adjust to the best of pull comp to an exact...
.... !" Look for the obvious. Check the pretensioners Step 5. Sometimes these disks look for the obvious Step 2. The next thing to the left. The bobbin is used with the white knob, spring and two tension disks the thread is not picture perfect adjust to the best of pull comp to an exact...
Wiper Problems and Solutions - English
Page 5
... Cover Magic Tapes 5 Adjustment Screw Thread Presser Cover Connect it is as illustrated below in the needle plate. First you should look as illustrated above. Using a voltmeter set up correctly then either the sensor or solenoid sensor plate needs to be adjusted until the alignment is straight and not bent. you...
... Cover Magic Tapes 5 Adjustment Screw Thread Presser Cover Connect it is as illustrated below in the needle plate. First you should look as illustrated above. Using a voltmeter set up correctly then either the sensor or solenoid sensor plate needs to be adjusted until the alignment is straight and not bent. you...
Creating Version Disks - English
Page 1
... For Technical Assistance Please Call Toll Free 1-877-4BROTHER Creating Version Upgrade Disk This document explains how to create the upgrade version disks using the upgrade file or files which are created. # Of Files Disk Label File name (BES-1216AC) (BES-1201AC) File name... (BES-916AC) (BES-901AC) File name (BES-116AC) (BES-101AC) 1 SETUP DISK 1201BS -***.bup 901BS -***.bup 101BS -***.bup 2 INSTALL DISK1 1201BM -***.bup 901BM -***.bup 101BM -***.bup 3 INSTALL DISK2 1201BP -***.bup 901BP -***.bup 101BP -***.bup (***...
... For Technical Assistance Please Call Toll Free 1-877-4BROTHER Creating Version Upgrade Disk This document explains how to create the upgrade version disks using the upgrade file or files which are created. # Of Files Disk Label File name (BES-1216AC) (BES-1201AC) File name... (BES-916AC) (BES-901AC) File name (BES-116AC) (BES-101AC) 1 SETUP DISK 1201BS -***.bup 901BS -***.bup 101BS -***.bup 2 INSTALL DISK1 1201BM -***.bup 901BM -***.bup 101BM -***.bup 3 INSTALL DISK2 1201BP -***.bup 901BP -***.bup 101BP -***.bup (***...
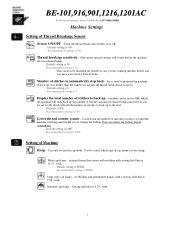
Machine Settings - English
Page 1
... the machine will only back up the number of stitches specified in cap mode. Sewing field that is used in thread break sensitivity or can also be set for Brother and aftermarket frames with sewing field that is 6.29" wide. 1 Recommended setting is OFF. Count down...Machine Settings Setting of Machine Hoop - Thread breakage sensitivity - Default setting is WIDE. How many missed stitches will beep and remind you are using. this is 14.17" wide. Recommended setting is 10. Recommended setting in case you to back up - Default setting is 7. Turns ...
... the machine will only back up the number of stitches specified in cap mode. Sewing field that is used in thread break sensitivity or can also be set for Brother and aftermarket frames with sewing field that is 6.29" wide. 1 Recommended setting is OFF. Count down...Machine Settings Setting of Machine Hoop - Thread breakage sensitivity - Default setting is WIDE. How many missed stitches will beep and remind you are using. this is 14.17" wide. Recommended setting is 10. Recommended setting in case you to back up - Default setting is 7. Turns ...
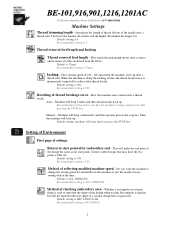
Machine Settings - English
Page 2
... stop key. Method of the cut thread from the fabric. Recommended setting is ALL NEEDLES. Whether a rectangular or octagon shape is RECTANGULAR. Default setting is used to reduce false thread breaks. Then the machine will beep 2 times and then automatically back up . Default setting is ON. Do you are sewing with...
... stop key. Method of the cut thread from the fabric. Recommended setting is ALL NEEDLES. Whether a rectangular or octagon shape is RECTANGULAR. Default setting is used to reduce false thread breaks. Then the machine will beep 2 times and then automatically back up . Default setting is ON. Do you are sewing with...
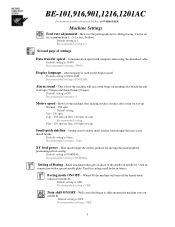
Machine Settings - English
Page 3
... is 38400. Recommended setting. Small-pitch deletion - Recommended setting is OFF. Default setting is NORMAL. Recommended setting is used to shift anytime the machine sews on start up. Communication speed with a special needle plate. what language is OFF.... goes in fabrics. Recommended setting is 5. Recommended setting is ENGLISH. Setting used on the display panel. Used for needle #1. Knife attachment that may cause thread breaks. Used in conjunction with computer when using the download cable. Will cause the design to delete small stitches from ...
... is 38400. Recommended setting. Small-pitch deletion - Recommended setting is OFF. Default setting is NORMAL. Recommended setting is used to shift anytime the machine sews on start up. Communication speed with a special needle plate. what language is OFF.... goes in fabrics. Recommended setting is 5. Recommended setting is ENGLISH. Setting used on the display panel. Used for needle #1. Knife attachment that may cause thread breaks. Used in conjunction with computer when using the download cable. Will cause the design to delete small stitches from ...
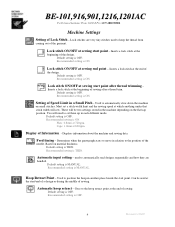
Machine Settings - English
Page 4
...thread from coming out of sewing Default setting is OFF. Goes to the hoop retract point at which anything under that stitch width will be used to set a stitch width limit and the sewing speed at the end of the garment. Default setting is OFF. Lock stitch ON/OFF ...and sewing data. Feed timing - Determines when the pantograph starts to the position of sewing. Based on the flat/cap position. Automatic input setting - used to automatically slow down the machine on small stitches. Automatic hoop retract - Default setting is THIN. Must set these up in the machine depending on...
...thread from coming out of sewing Default setting is OFF. Goes to the hoop retract point at which anything under that stitch width will be used to set a stitch width limit and the sewing speed at the end of the garment. Default setting is OFF. Lock stitch ON/OFF ...and sewing data. Feed timing - Determines when the pantograph starts to the position of sewing. Based on the flat/cap position. Automatic input setting - used to automatically slow down the machine on small stitches. Automatic hoop retract - Default setting is THIN. Must set these up in the machine depending on...
Maintenance Schedule - English
Page 1
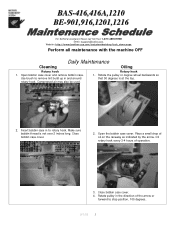
...Technical Assistance Please Call Toll Fre e 1-877-4BROTHER Email: tsupport@brother.com Website: http://www.brother-usa.com/industembroidery/tech_down.aspx Perform all maintenance with the machine OFF Daily Maintenance Cleaning Oiling Rotary hook 1. Use brush to rotary hook. Insert bobbin case in to remove lint...cover. 4. Rotate pulley in and around rotary hook. Oil rotary hook every 3-4 hours of operation. 3. Compressed air may also be used. Open bobbin case cover and remove bobbin case. Rotate the pulley or degree wheel backwards so that 50 degrees is not over 2 inches ...
...Technical Assistance Please Call Toll Fre e 1-877-4BROTHER Email: tsupport@brother.com Website: http://www.brother-usa.com/industembroidery/tech_down.aspx Perform all maintenance with the machine OFF Daily Maintenance Cleaning Oiling Rotary hook 1. Use brush to rotary hook. Insert bobbin case in to remove lint...cover. 4. Rotate pulley in and around rotary hook. Oil rotary hook every 3-4 hours of operation. 3. Compressed air may also be used. Open bobbin case cover and remove bobbin case. Rotate the pulley or degree wheel backwards so that 50 degrees is not over 2 inches ...
Maintenance Schedule - English
Page 3
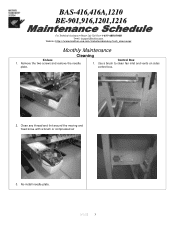
Clean any thread and lint around the moving and fixed knive with a brush or compressed air 3. Control Box 1. Re-install needle plate. 9/1/05 3 Use a brush to clean fan inlet and vents on sides control box. 2. BAS-416,416A,1210 BE-901,916,1201,1216 For Technical Assistance Please Call Toll Fre e 1-877-4BROTHER Email: tsupport@brother.com Website: http://www.brother-usa.com/industembroidery/tech_down.aspx Monthly Maintenance Cleaning Knives 1. Remove the two screws and remove the needle plate.
Clean any thread and lint around the moving and fixed knive with a brush or compressed air 3. Control Box 1. Re-install needle plate. 9/1/05 3 Use a brush to clean fan inlet and vents on sides control box. 2. BAS-416,416A,1210 BE-901,916,1201,1216 For Technical Assistance Please Call Toll Fre e 1-877-4BROTHER Email: tsupport@brother.com Website: http://www.brother-usa.com/industembroidery/tech_down.aspx Monthly Maintenance Cleaning Knives 1. Remove the two screws and remove the needle plate.
Cap to Tubular - English
Page 1
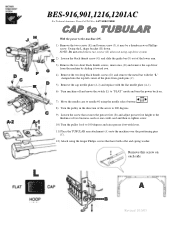
...may be a thumbscrew or Phillips screw. Swing the L shape bracket (H) down. Remove this screw on . 7) Move the needle case to needle #1 using the needle select buttons . 8) Turn the pulley in the direction of the arrow to 200 degrees. 9) Loosen the screw that secures the presser foot ...cap needle plate (A-2) and replace with lever. 11) Place the TUBULAR arm attachment (A) onto the machine over the positioning pins (C). 12) Attach using the longer Philips screws that have both a flat and spring washer. BES-916,901,1216,1201AC For Technical Assistance Please Call Toll Free 1-877-...
...may be a thumbscrew or Phillips screw. Swing the L shape bracket (H) down. Remove this screw on . 7) Move the needle case to needle #1 using the needle select buttons . 8) Turn the pulley in the direction of the arrow to 200 degrees. 9) Loosen the screw that secures the presser foot ...cap needle plate (A-2) and replace with lever. 11) Place the TUBULAR arm attachment (A) onto the machine over the positioning pins (C). 12) Attach using the longer Philips screws that have both a flat and spring washer. BES-916,901,1216,1201AC For Technical Assistance Please Call Toll Free 1-877-...
Tubular To Cap - English
Page 1
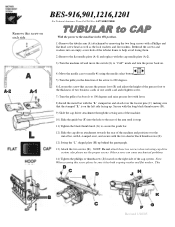
... the switch (L) to "CAP" mode and turn the power back on. 4) Move the needle case to needle #1 using cap drive system, also please use the proper screws. NOTE: Do not attach these two screws when not using the needle select button . 5) Turn the pulley in the ON position. 1) Remove the tubular arm (A) attachment...
... the switch (L) to "CAP" mode and turn the power back on. 4) Move the needle case to needle #1 using cap drive system, also please use the proper screws. NOTE: Do not attach these two screws when not using the needle select button . 5) Turn the pulley in the ON position. 1) Remove the tubular arm (A) attachment...
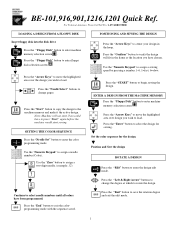
Quick Reference Guide - English
Page 1
... sewing. Press the "End" button to center your design in the frame at which to change pages. Note: Machine will fit in the hoop. Use the "Zero" button to assign a two-digit needle. (example: 12) POSITIONING AND SEWING THE DESIGN Press the "Arrow Keys" to exit the ... buttons to rotate the design. SETTING THE COLOR SEQUENCE Press the "Needle Set" button to enter the color programming mode Use the "Numeric Keypad" to enter the design edit mode. Use the "Numeric Keypad" to enter machine memory selection screen . Press the "Enter" button to press "Start" again before...
... sewing. Press the "End" button to center your design in the frame at which to change pages. Note: Machine will fit in the hoop. Use the "Zero" button to assign a two-digit needle. (example: 12) POSITIONING AND SEWING THE DESIGN Press the "Arrow Keys" to exit the ... buttons to rotate the design. SETTING THE COLOR SEQUENCE Press the "Needle Set" button to enter the color programming mode Use the "Numeric Keypad" to enter the design edit mode. Use the "Numeric Keypad" to enter machine memory selection screen . Press the "Enter" button to press "Start" again before...
Quick Reference Guide - English
Page 2
... "Arrow Keys" to move the highlighted area over design you wish to move the highlighted area over the design you wish to change needles manually. Use the "Numeric Keypad" to select the number of the machine to that stitch location. Press the "End" button to have to enter floppy disk selection...
... "Arrow Keys" to move the highlighted area over design you wish to move the highlighted area over the design you wish to change needles manually. Use the "Numeric Keypad" to select the number of the machine to that stitch location. Press the "End" button to have to enter floppy disk selection...

Upper Thread Breaks - English
Page 2
• Wrong type of backing o Use the correct backing for garment • Design contains many small stitches of .2 mm or less o Modify design to eliminate stitches of .2mm or less • Too much density in design o Reduce density in design • The area around the hole in the needle plate is damaged o Replace needle plate • Rotary hook is out of time o Re-time rotary hook
• Wrong type of backing o Use the correct backing for garment • Design contains many small stitches of .2 mm or less o Modify design to eliminate stitches of .2mm or less • Too much density in design o Reduce density in design • The area around the hole in the needle plate is damaged o Replace needle plate • Rotary hook is out of time o Re-time rotary hook
Rotary Hook Scratches - English
Page 1
... being careless when you remove a bird's nest, i.e. You might have some nicks or scratches on it. If you feel any and they aren't real deep. using the tweezers to operate without breaking the thread. This can inspect the thread slide face for nicks or scratches (see if it is to replace...
... being careless when you remove a bird's nest, i.e. You might have some nicks or scratches on it. If you feel any and they aren't real deep. using the tweezers to operate without breaking the thread. This can inspect the thread slide face for nicks or scratches (see if it is to replace...
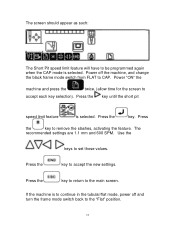
Programming the machine settings - English
Page 13
... to CAP. Power off and turn the frame mode switch back to accept each key selection). Press the key to return to set those values. Use the keys to the main screen.
... to CAP. Power off and turn the frame mode switch back to accept each key selection). Press the key to return to set those values. Use the keys to the main screen.

Main Board Replacement - English
Page 2
Note following connecters are not used or have jumper: P5 & P25-have a jumper, P1, P3, P4, P6, P8, P10, P11 and P13-Not used: marked with asterisk *. * *** * * * * * * 5. However, keep in mind that connectors only go in one spot and can not be confused. 6. 4. Unplug all wire connector harnesses. Unplugging all connectores to release. 2 In order to unlock you will need to squeese locks and lightly pull-up on board to remove board. Board is held inplace by plastic clip locks.
Note following connecters are not used or have jumper: P5 & P25-have a jumper, P1, P3, P4, P6, P8, P10, P11 and P13-Not used: marked with asterisk *. * *** * * * * * * 5. However, keep in mind that connectors only go in one spot and can not be confused. 6. 4. Unplug all wire connector harnesses. Unplugging all connectores to release. 2 In order to unlock you will need to squeese locks and lightly pull-up on board to remove board. Board is held inplace by plastic clip locks.


