
Head Board Replacement - English
Page 1
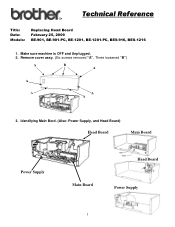
Technical Reference Title: Date: Models: Replacing Head Board February 25, 2009 BE-901, BE-901-PC, BE-1201, BE-1201-PC, BES-916, BES-1216 1. Remove cover assy. (Six screws removed "A", Three loosened "B") A B A A A A A 3. Make sure machine is OFF and Unplugged. 2. Identifying Main Bord. (Also: Power Supply, and Head Board) Head Board Main Board Power Supply Head Board Main Board Power Supply 1
Technical Reference Title: Date: Models: Replacing Head Board February 25, 2009 BE-901, BE-901-PC, BE-1201, BE-1201-PC, BES-916, BES-1216 1. Remove cover assy. (Six screws removed "A", Three loosened "B") A B A A A A A 3. Make sure machine is OFF and Unplugged. 2. Identifying Main Bord. (Also: Power Supply, and Head Board) Head Board Main Board Power Supply Head Board Main Board Power Supply 1
Main Board Replacement - English
Page 1
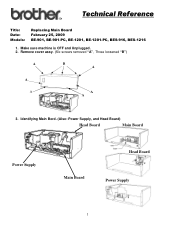
Identifying Main Bord. (Also: Power Supply, and Head Board) Head Board Main Board Power Supply Head Board Main Board Power Supply 1 Make sure machine is OFF and Unplugged. 2. Remove cover assy. (Six screws removed "A", Three loosened "B") A B A A A A A 3. Technical Reference Title: Date: Models: Replacing Main Board February 25, 2009 BE-901, BE-901-PC, BE-1201, BE-1201-PC, BES-916, BES-1216 1.
Identifying Main Bord. (Also: Power Supply, and Head Board) Head Board Main Board Power Supply Head Board Main Board Power Supply 1 Make sure machine is OFF and Unplugged. 2. Remove cover assy. (Six screws removed "A", Three loosened "B") A B A A A A A 3. Technical Reference Title: Date: Models: Replacing Main Board February 25, 2009 BE-901, BE-901-PC, BE-1201, BE-1201-PC, BES-916, BES-1216 1.

Power Supply Replacement - English
Page 1
Technical Reference Title: Date: Models: Replacing Power Supply Board February 25, 2009 BE-901, BE-901-PC, BE-1201, BE-1201-PC, BES-916, BES-1216 1. Make sure machine is OFF and Unplugged. 2. Remove cover assy. (Six screws removed "A", Three loosened "B") A B A A A A A 3. Identifying Main Bord. (Also: Power Supply, and Head Board) Head Board Main Board Power Supply Head Board Main Board Power Supply 1
Technical Reference Title: Date: Models: Replacing Power Supply Board February 25, 2009 BE-901, BE-901-PC, BE-1201, BE-1201-PC, BES-916, BES-1216 1. Make sure machine is OFF and Unplugged. 2. Remove cover assy. (Six screws removed "A", Three loosened "B") A B A A A A A 3. Identifying Main Bord. (Also: Power Supply, and Head Board) Head Board Main Board Power Supply Head Board Main Board Power Supply 1

Instruction Manual - English
Page 1
NINE NEEDLE ONE HEAD EMBROIDERY MACHINE TWELVE NEEDLE ONE HEAD EMBROIDERY MACHINE BE-0901E-AC-PC BE-1201B-AC-PC INSTRUCTION MANUAL PC Control type Please read this manual within easy reach for quick reference. Please keep this manual before using the machine.
NINE NEEDLE ONE HEAD EMBROIDERY MACHINE TWELVE NEEDLE ONE HEAD EMBROIDERY MACHINE BE-0901E-AC-PC BE-1201B-AC-PC INSTRUCTION MANUAL PC Control type Please read this manual within easy reach for quick reference. Please keep this manual before using the machine.

Instruction Manual - English
Page 3
... for buying a BROTHER sewing machine. The picture inside the circle indicates the nature of this machine and to prevent accidents and injury to ensure safe operation of the thing that can be done. (For example, the symbol at left means "you must make the ground connection".) BE-0901E-AC-PC• BE-1201B-AC-PC 1 This...
... for buying a BROTHER sewing machine. The picture inside the circle indicates the nature of this machine and to prevent accidents and injury to ensure safe operation of the thing that can be done. (For example, the symbol at left means "you must make the ground connection".) BE-0901E-AC-PC• BE-1201B-AC-PC 1 This...
Instruction Manual - English
Page 4
...supply should be greater than the machine consumption. Do not use , and no oil or grease gets into your eyes or onto your Brother dealer or a qualified electrician for the machine. Temperatures which are greater than this machine outdoors. In the event of lint or dust. ... electrical noise may cause problems with correct operation. 2 Notes on the sound floor so that it will not move. 2 BE-0901E-AC-PC• BE-1201B-AC-PC Sources of 5°C to 85% during use . Never operate the sewing machine with correct operation. If the ground connection is the ...
...supply should be greater than the machine consumption. Do not use , and no oil or grease gets into your eyes or onto your Brother dealer or a qualified electrician for the machine. Temperatures which are greater than this machine outdoors. In the event of lint or dust. ... electrical noise may cause problems with correct operation. 2 Notes on the sound floor so that it will not move. 2 BE-0901E-AC-PC• BE-1201B-AC-PC Sources of 5°C to 85% during use . Never operate the sewing machine with correct operation. If the ground connection is the ...
Instruction Manual - English
Page 5
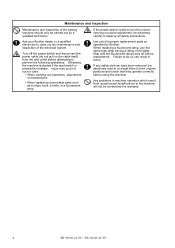
... the start switch is pressed by operators who have received the necessary training in a fire or an electric shock. BE-0901E-AC-PC• BE-1201B-AC-PC 3 Turn off the power switch immediately. If the machine develops a problem, contact your eyes and injury may result. Keep...protective goggles when using the sewing machine. Never drop or insert foreign objects or a screwdriver into your eyes or onto your nearest Brother dealer or a qualified technician. Otherwise burns may result in safe use the machine under any applications other cables. If this machine ...
... the start switch is pressed by operators who have received the necessary training in a fire or an electric shock. BE-0901E-AC-PC• BE-1201B-AC-PC 3 Turn off the power switch immediately. If the machine develops a problem, contact your eyes and injury may result. Keep...protective goggles when using the sewing machine. Never drop or insert foreign objects or a screwdriver into your eyes or onto your nearest Brother dealer or a qualified technician. Otherwise burns may result in safe use the machine under any applications other cables. If this machine ...
Instruction Manual - English
Page 6
...If the power switch needs to be left on the cable itself) from unauthorized modifications to perform the following operations. Ask your Brother dealer or a qualified electrician to their original positions and check that they operate correctly before replacement. Turn off before using the ... Maintenance and inspection of the sewing machine should only be carried out by Brother. Otherwise, the machine is started if the start switch is pressed by the warranty. 4 BE-0901E-AC-PC• BE-1201B-AC-PC When replacing a fluorescent lamp, use the same-type lamp having a rating...
...If the power switch needs to be left on the cable itself) from unauthorized modifications to perform the following operations. Ask your Brother dealer or a qualified electrician to their original positions and check that they operate correctly before replacement. Turn off before using the ... Maintenance and inspection of the sewing machine should only be carried out by Brother. Otherwise, the machine is started if the start switch is pressed by the warranty. 4 BE-0901E-AC-PC• BE-1201B-AC-PC When replacing a fluorescent lamp, use the same-type lamp having a rating...
Instruction Manual - English
Page 7
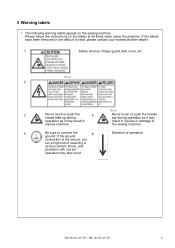
BE-0901E-AC-PC• BE-1201B-AC-PC 5 If the labels have been removed or are difficult to connect the ground. the sewing machine. 5 Be sure to read, please contact your nearest Brother dealer. 1 Safety devices: Finger guard, Belt cover, etc. 3 Warning labels * The following warning labels appear on the labels at all times when using...
BE-0901E-AC-PC• BE-1201B-AC-PC 5 If the labels have been removed or are difficult to connect the ground. the sewing machine. 5 Be sure to read, please contact your nearest Brother dealer. 1 Safety devices: Finger guard, Belt cover, etc. 3 Warning labels * The following warning labels appear on the labels at all times when using...
Instruction Manual - English
Page 9
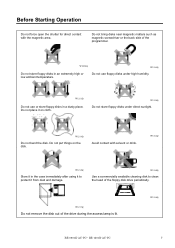
.... W1214Q W1215Q Store it in the case immediately after using it to clean the head of the floppy disk drive periodically. W1218Q BE-0901E-AC-PC• BE-1201B-AC-PC 7 W1211Q Do not use floppy disks under direct sunlight. Before Starting Operation Do not force open the shutter for direct contact with solvent or...
.... W1214Q W1215Q Store it in the case immediately after using it to clean the head of the floppy disk drive periodically. W1218Q BE-0901E-AC-PC• BE-1201B-AC-PC 7 W1211Q Do not use floppy disks under direct sunlight. Before Starting Operation Do not force open the shutter for direct contact with solvent or...

Instruction Manual - English
Page 10
Slide the notch in this direction to prevent undesired data deletion. Protecting data in floppy disks Write-protection is available for disks which contain important data. It is read-only. A write-protected disk is recommended to provide write-protection for a floppy disk to write data. To do so, slide the write-protect notch to prevent data loss or overwriting. W1219Q 8 BE-0901E-AC-PC• BE-1201B-AC-PC Slide the notch in this direction to open the slot as shown below.
Slide the notch in this direction to prevent undesired data deletion. Protecting data in floppy disks Write-protection is available for disks which contain important data. It is read-only. A write-protected disk is recommended to provide write-protection for a floppy disk to write data. To do so, slide the write-protect notch to prevent data loss or overwriting. W1219Q 8 BE-0901E-AC-PC• BE-1201B-AC-PC Slide the notch in this direction to open the slot as shown below.
Instruction Manual - English
Page 11
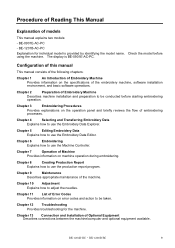
...of the machine. Check the model before starting embroidering operation. BE-1204B-BC • BE-1206B-BC 9 BE-1201B-AC-PC Explanation for the machine. Chapter 3 Embroidering Procedures Provides explanations on the operation panel and briefly reviews the flow of ...specifications of models This manual explains two models: - Chapter 12 Troubleshooting Provides troubleshooting for individual model is BE-0901E-AC-PC. BE-0901E-AC-PC - Chapter 7 Operation of embroidering processes. Chapter 8 Creating Production Report Explains how to adjust the needles. Chapter 4...
...of the machine. Check the model before starting embroidering operation. BE-1204B-BC • BE-1206B-BC 9 BE-1201B-AC-PC Explanation for the machine. Chapter 3 Embroidering Procedures Provides explanations on the operation panel and briefly reviews the flow of ...specifications of models This manual explains two models: - Chapter 12 Troubleshooting Provides troubleshooting for individual model is BE-0901E-AC-PC. BE-0901E-AC-PC - Chapter 7 Operation of embroidering processes. Chapter 8 Creating Production Report Explains how to adjust the needles. Chapter 4...
Instruction Manual - English
Page 12
... 1. Software ...1-4 2-1 Necessary Systems...1-4 2-2 Configuration of Software ...1-5 2-3 Notes on the Machine Power...3-5 Register the Machine Name ...3-6 Retrieve the Embroidery Data ...3-6 Start Embroidering ...3-7 10 BE-0901E-AC-PC• BE-1201B-AC-PC Preparation for Embroidering...2-12 3-1 Upper Threading...2-12 3-2 Replacement of Bobbin ...2-14 3-3 Replacing and Selecting Needle...2-15 3-4 Preparation of Machine for Operation...2-16 3-5 Attachment of...
... 1. Software ...1-4 2-1 Necessary Systems...1-4 2-2 Configuration of Software ...1-5 2-3 Notes on the Machine Power...3-5 Register the Machine Name ...3-6 Retrieve the Embroidery Data ...3-6 Start Embroidering ...3-7 10 BE-0901E-AC-PC• BE-1201B-AC-PC Preparation for Embroidering...2-12 3-1 Upper Threading...2-12 3-2 Replacement of Bobbin ...2-14 3-3 Replacing and Selecting Needle...2-15 3-4 Preparation of Machine for Operation...2-16 3-5 Attachment of...
Instruction Manual - English
Page 13
... ...5-17 Vertical Flip ...5-17 Point Symmetry...5-17 Repeat ...5-17 Resize ...5-20 Delete Stitch...5-20 Insert or Delete Code ...5-21 Insert Lock Stitch...5-22 BE-0901E-AC-PC• BE-1201B-AC-PC 11
... ...5-17 Vertical Flip ...5-17 Point Symmetry...5-17 Repeat ...5-17 Resize ...5-20 Delete Stitch...5-20 Insert or Delete Code ...5-21 Insert Lock Stitch...5-22 BE-0901E-AC-PC• BE-1201B-AC-PC 11
Instruction Manual - English
Page 14
... Display ...6-20 Minimizing and Aligning Windows...6-21 Language...6-23 Copying Data to Other Machines...6-23 Configuration ...6-24 Upgrading the Machine Program ...6-24 12 BE-0901E-AC-PC• BE-1201B-AC-PC
... Display ...6-20 Minimizing and Aligning Windows...6-21 Language...6-23 Copying Data to Other Machines...6-23 Configuration ...6-24 Upgrading the Machine Program ...6-24 12 BE-0901E-AC-PC• BE-1201B-AC-PC

Instruction Manual - English
Page 15
... ...6-57 Resuming Embroidering...6-58 Moving Embroidery Position ...6-59 Centering Pattern...6-60 Saving Data ...6-61 Save ...6-61 Save As...6-61 Running Other Programs ...6-62 BE-0901E-AC-PC• BE-1201B-AC-PC 13
... ...6-57 Resuming Embroidering...6-58 Moving Embroidery Position ...6-59 Centering Pattern...6-60 Saving Data ...6-61 Save ...6-61 Save As...6-61 Running Other Programs ...6-62 BE-0901E-AC-PC• BE-1201B-AC-PC 13

Instruction Manual - English
Page 16
... Recess Time Setting...8-17 Save As CSV...8-18 Printing Production Report...8-19 Page Setup...8-19 Print ...8-19 Copying Report Data ...8-20 14 BE-0901E-AC-PC• BE-1201B-AC-PC Jog Switches...7-5 4-1 Hoop Movement to Start Position ...7-5 5. Area Check...7-6 5-1 External Tracing...7-6 5-2 Automatic Hoop Movement in Area ...7-6 6. Operating Procedures...7-2 1-1 Power Source ...7-2 1-2 Preparation for Hoop Movement...
... Recess Time Setting...8-17 Save As CSV...8-18 Printing Production Report...8-19 Page Setup...8-19 Print ...8-19 Copying Report Data ...8-20 14 BE-0901E-AC-PC• BE-1201B-AC-PC Jog Switches...7-5 4-1 Hoop Movement to Start Position ...7-5 5. Area Check...7-6 5-1 External Tracing...7-6 5-2 Automatic Hoop Movement in Area ...7-6 6. Operating Procedures...7-2 1-1 Power Source ...7-2 1-2 Preparation for Hoop Movement...
Instruction Manual - English
Page 17
... Height ...10-7 4. Adjustment of Timing Between Needle and Rotary Hook 10-6 3. Contents Chapter 9 Maintenance 1. Adjusting Needle Bar Height...10-2 2. Attaching Bobbin Winder ...13-2 BE-0901E-AC-PC• BE-1201B-AC-PC 15
... Height ...10-7 4. Adjustment of Timing Between Needle and Rotary Hook 10-6 3. Contents Chapter 9 Maintenance 1. Adjusting Needle Bar Height...10-2 2. Attaching Bobbin Winder ...13-2 BE-0901E-AC-PC• BE-1201B-AC-PC 15
Instruction Manual - English
Page 20
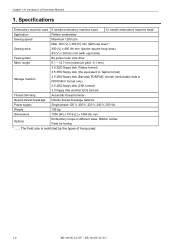
... to Tajima format) Storage medium 3.5 2DD floppy disk (Barudan FDR/FMC format) (embroidary data in FDR35III/V format only) 3.5 2DD floppy disk (ZSK format) 3.5 floppy disk (brother ECS format) Thread trimming Automatic thread trimmer Needle thread breakage Needle thread breakage detector Power supply Single phase 120 V, 200 V, 220 V, 240 V, 500 VA Weight... in different sizes, Bobbin winder, Parts for boring * ...... The field size is restricted by the types of Embroidery Machine 1. Specifications Embroidery machine used . 1-2 BE-0901E-AC-PC• BE-1201B-AC-PC
... to Tajima format) Storage medium 3.5 2DD floppy disk (Barudan FDR/FMC format) (embroidary data in FDR35III/V format only) 3.5 2DD floppy disk (ZSK format) 3.5 floppy disk (brother ECS format) Thread trimming Automatic thread trimmer Needle thread breakage Needle thread breakage detector Power supply Single phase 120 V, 200 V, 220 V, 240 V, 500 VA Weight... in different sizes, Bobbin winder, Parts for boring * ...... The field size is restricted by the types of Embroidery Machine 1. Specifications Embroidery machine used . 1-2 BE-0901E-AC-PC• BE-1201B-AC-PC

Instruction Manual - English
Page 21
Chapter 1 An Introduction of Embroidery Machine BE-0901E-AC-PC• BE-1201B-AC-PC 1-3
Chapter 1 An Introduction of Embroidery Machine BE-0901E-AC-PC• BE-1201B-AC-PC 1-3


