
Users Manual - English
Page 5
... Precautions ...7-11 Replacing the Transfer Roll Cartridge 7-12 Replacing the Fuser unit (FP-12CL 7-14 Fuser unit Handling Precautions 7-14 Replacing the Fuser unit ...7-15 Printing Reports and Lists ...7-18 Confirming Printer Configuration and Network Settings 7-19 Checking the Print Log ...7-20 Confirming Printer Status from Your Computer 7-21 Checking Status and Remaining Amounts of...
... Precautions ...7-11 Replacing the Transfer Roll Cartridge 7-12 Replacing the Fuser unit (FP-12CL 7-14 Fuser unit Handling Precautions 7-14 Replacing the Fuser unit ...7-15 Printing Reports and Lists ...7-18 Confirming Printer Configuration and Network Settings 7-19 Checking the Print Log ...7-20 Confirming Printer Status from Your Computer 7-21 Checking Status and Remaining Amounts of...
Users Manual - English
Page 6
Consumable Items ...A-2 Toner Cartridges (TN-12BK/TN12-Y/TN12-M/TN12-C A-2 Print Head Cartridge (PH-12CL A-2 Transfer Roll Cartridge (TR-11CL A-2 Fuser unit (FP-12CL) ...A-2 Getting Product Support Information A-3 General Specifications ...A-4 Printer Specifications ...A-4 Network Specifications ...A-7 Common Specifications ...A-7 TCP/IP Specifications ...A-7 NetBIOS Specifications ...A-7 NetWare Specifications ...A-7 AppleTalk Specifications ...A-7 Printable Area ...A-8 Important information for choosing your paper A-8 Life...
Consumable Items ...A-2 Toner Cartridges (TN-12BK/TN12-Y/TN12-M/TN12-C A-2 Print Head Cartridge (PH-12CL A-2 Transfer Roll Cartridge (TR-11CL A-2 Fuser unit (FP-12CL) ...A-2 Getting Product Support Information A-3 General Specifications ...A-4 Printer Specifications ...A-4 Network Specifications ...A-7 Common Specifications ...A-7 TCP/IP Specifications ...A-7 NetBIOS Specifications ...A-7 NetWare Specifications ...A-7 AppleTalk Specifications ...A-7 Printable Area ...A-8 Important information for choosing your paper A-8 Life...
Users Manual - English
Page 22
... how to avoid injuries or burns. Do not place magnetic objects near the fuser unit). Magnets can fall over or the heavy object can activate the printer accidentally, resulting in injuries. Turn off the printer immediately and call your dealer or Brother Customer Service. Do not use excessive force to remove it so as...
... how to avoid injuries or burns. Do not place magnetic objects near the fuser unit). Magnets can fall over or the heavy object can activate the printer accidentally, resulting in injuries. Turn off the printer immediately and call your dealer or Brother Customer Service. Do not use excessive force to remove it so as...
Users Manual - English
Page 33
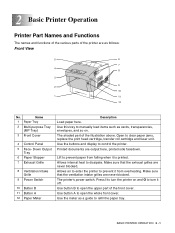
...display to clear paper jams, replace the print head cartridge, transfer roll cartridge and fuser unit. Use button B to open the upper part of the front cover. Use button A to open the whole front cover. BASIC PRINTER OPERATION 2 - 1 Lift to turn it is printed. Press I to turn...the meter as cards, transparencies, envelopes, and so on and O to prevent paper from overheating. Open to control the printer. Printed documents are never blocked. Allows internal heat to prevent it from falling when it off. Make sure that the exhaust grilles are output here, printed side ...
...display to clear paper jams, replace the print head cartridge, transfer roll cartridge and fuser unit. Use button B to open the upper part of the front cover. Use button A to open the whole front cover. BASIC PRINTER OPERATION 2 - 1 Lift to turn it is printed. Press I to turn...the meter as cards, transparencies, envelopes, and so on and O to prevent paper from overheating. Open to control the printer. Printed documents are never blocked. Allows internal heat to prevent it from falling when it off. Make sure that the exhaust grilles are output here, printed side ...
Users Manual - English
Page 35
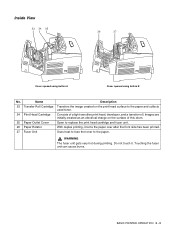
... heat to fuse the toner to replace the print head cartridge and fuser unit. Consists of this drum. Images are initially created as an electrical charge on the print head surface to the paper and collects used toner. BASIC PRINTER OPERATION 2 - 3 Inside View 23 24 25 26 27 Cover ...opened using button A Cover opened using button B No. Name 23 Transfer Roll Cartridge 24 Print Head Cartridge 25 Paper Outlet Cover 26 Paper Rotator 27 Fuser Unit Description Transfers the image created on...
... heat to fuse the toner to replace the print head cartridge and fuser unit. Consists of this drum. Images are initially created as an electrical charge on the print head surface to the paper and collects used toner. BASIC PRINTER OPERATION 2 - 3 Inside View 23 24 25 26 27 Cover ...opened using button A Cover opened using button B No. Name 23 Transfer Roll Cartridge 24 Print Head Cartridge 25 Paper Outlet Cover 26 Paper Rotator 27 Fuser Unit Description Transfers the image created on...
Users Manual - English
Page 69
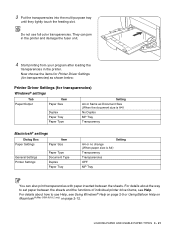
... - 21 Do not use Help, see Help. For details about the way to use full color transparencies. Now choose the items for Printer Driver Settings (for transparencies) as shown below: Printer Driver Settings (for transparencies) Windows® settings Tab Paper/Output Item Paper Size Duplex Paper Tray ...(When paper size is A4) Transparency Transparencies OFF MP Tray You can jam in the printer and damage the fuser unit. 4 Start printing from your program after loading the transparencies in the printer. For details about how to set paper between the sheets. 3 Put the transparencies into...
... - 21 Do not use Help, see Help. For details about the way to use full color transparencies. Now choose the items for Printer Driver Settings (for transparencies) as shown below: Printer Driver Settings (for transparencies) Windows® settings Tab Paper/Output Item Paper Size Duplex Paper Tray ...(When paper size is A4) Transparency Transparencies OFF MP Tray You can jam in the printer and damage the fuser unit. 4 Start printing from your program after loading the transparencies in the printer. For details about how to set paper between the sheets. 3 Put the transparencies into...
Users Manual - English
Page 96
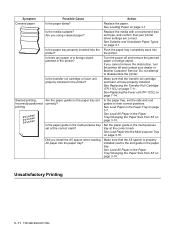
... confirm that your dealer or Brother Customer Service. Replace the media with a recommend size and type, and confirm that your printer driver settings are correct. See Replacing the Fuser unit (FP-12CL) on page 7-14 5 - 7 TROUBLESHOOTING See Replacing the Fuser unit (FP-12CL) on ...page 7-14. Contact your printer driver settings are printed Possible Cause Action Is...
... confirm that your dealer or Brother Customer Service. Replace the media with a recommend size and type, and confirm that your printer driver settings are correct. See Replacing the Fuser unit (FP-12CL) on page 7-14 5 - 7 TROUBLESHOOTING See Replacing the Fuser unit (FP-12CL) on ...page 7-14. Contact your printer driver settings are printed Possible Cause Action Is...
Users Manual - English
Page 98
... page 7-5. The print head cartridge, transfer roll cartridge, or fuser unit is old or damaged. See Replacing the Print Head Cartridge (PH-12CL) on page 1-1. Is the color registration correctly adjusted? Is the print head cartridge properly installed in the printer? See Adjusting Color Registration on page 7-5. Make sure that the print head cartridge...
... page 7-5. The print head cartridge, transfer roll cartridge, or fuser unit is old or damaged. See Replacing the Print Head Cartridge (PH-12CL) on page 1-1. Is the color registration correctly adjusted? Is the print head cartridge properly installed in the printer? See Adjusting Color Registration on page 7-5. Make sure that the print head cartridge...
Users Manual - English
Page 100
...the multi-purpose tray at the correct mark? Replace the media with a recommend size and type, and confirm that your dealer or Brother Customer Service. See Suitable and Unsuitable Paper Types on page 7-14. printing In the paper tray, set the side and end guides... damp? Make sure that the transfer roll cartridge and fuser unit are correct. Is the transfer roll cartridge or fuser unit properly installed in the printer? See Load Paper into printer? Turn the power off and contact your printer driver settings are properly installed. See Replacing the Transfer Roll...
...the multi-purpose tray at the correct mark? Replace the media with a recommend size and type, and confirm that your dealer or Brother Customer Service. See Suitable and Unsuitable Paper Types on page 7-14. printing In the paper tray, set the side and end guides... damp? Make sure that the transfer roll cartridge and fuser unit are correct. Is the transfer roll cartridge or fuser unit properly installed in the printer? See Load Paper into printer? Turn the power off and contact your printer driver settings are properly installed. See Replacing the Transfer Roll...
Users Manual - English
Page 105
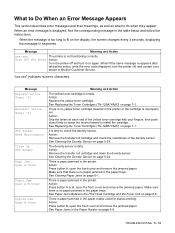
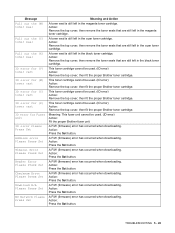
...with your dealer or Brother Customer Service. There is no paper jammed in the paper trays. Action: Replace the yellow toner cartridge. There is paper jammed in the paper rotator used for duplex printing. Message Meaning and Action xxx-xxx Turn OFF the Power The printer is no paper ...jammed in the paper trays. See Paper Jams Between the Print Head Cartridge and the Fuser Unit on page 6-6. Make sure there is not functioning correctly.
...with your dealer or Brother Customer Service. There is no paper jammed in the paper trays. Action: Replace the yellow toner cartridge. There is paper jammed in the paper rotator used for duplex printing. Message Meaning and Action xxx-xxx Turn OFF the Power The printer is no paper ...jammed in the paper trays. See Paper Jams Between the Print Head Cartridge and the Fuser Unit on page 6-6. Make sure there is not functioning correctly.
Users Manual - English
Page 107
...the print head cartridge all the way into the printer. Action: Replace the fuser unit. The fuser unit is not inserted in the printer or the fuser unit is set improperly. Action: Load paper xxxx into paper tray 1. See Cancel Printing at the printer's Control Panel on the computer. If the computer.... Paper is not properly loaded in tray N or is different from that are incorrect, and reprint. Action: Push the fuser unit all the way into the printer. See Load Paper in tray 1. See Replacing the Transfer Roll Cartridge (TR-11CL) on page 7-14. See Replacing the...
...the print head cartridge all the way into the printer. Action: Replace the fuser unit. The fuser unit is not inserted in the printer or the fuser unit is set improperly. Action: Load paper xxxx into paper tray 1. See Cancel Printing at the printer's Control Panel on the computer. If the computer.... Paper is not properly loaded in tray N or is different from that are incorrect, and reprint. Action: Push the fuser unit all the way into the printer. See Load Paper in tray 1. See Replacing the Transfer Roll Cartridge (TR-11CL) on page 7-14. See Replacing the...
Users Manual - English
Page 109
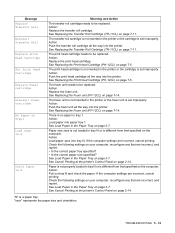
... remove the toner seals that are still left in the black toner cartridge. This toner cartridge cannot be used . (ID error) Action: Fit the proper Brother fuser unit. A F/W (firmware) error has occurred when downloading. Action: Press the Set button. A F/W (firmware) error has occurred when downloading. Action: Press the... cannot be used . (ID error) Action: Remove the top cover, then fit the proper Brother toner cartridge. Action: Press the Set button. Action: Press the Set button. Meaning: This fuser unit cannot be used . (ID error) Action: Remove the top cover, then fit the proper...
... remove the toner seals that are still left in the black toner cartridge. This toner cartridge cannot be used . (ID error) Action: Fit the proper Brother fuser unit. A F/W (firmware) error has occurred when downloading. Action: Press the Set button. A F/W (firmware) error has occurred when downloading. Action: Press the... cannot be used . (ID error) Action: Remove the top cover, then fit the proper Brother toner cartridge. Action: Press the Set button. Action: Press the Set button. Meaning: This fuser unit cannot be used . (ID error) Action: Remove the top cover, then fit the proper...
Users Manual - English
Page 116
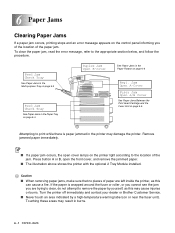
...the jammed paper. ■ The illustration above shows the printer with the optional 2 Tray Module installed. Press button A or B, open cover lamps on or near the fuser unit). Turn the printer off immediately and contact your dealer or Brother Customer Service. ■ Never touch an area indicated ...by yourself, as this may damage the printer. 6 Paper Jams Clearing Paper Jams If a paper jam occurs,...
...the jammed paper. ■ The illustration above shows the printer with the optional 2 Tray Module installed. Press button A or B, open cover lamps on or near the fuser unit). Turn the printer off immediately and contact your dealer or Brother Customer Service. ■ Never touch an area indicated ...by yourself, as this may damage the printer. 6 Paper Jams Clearing Paper Jams If a paper jam occurs,...
Users Manual - English
Page 121
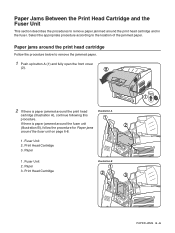
... the front cover (2). 2 If there is paper jammed around the fuser unit (Illustration B), follow the procedure for Paper jams around the fuser unit on page 6-8. Fuser Unit 2. Print Head Cartridge 3. Paper 1. Fuser Unit 2. If there is paper jammed around the print head cartridge and... in the fuser. Illustration A 1. Paper 3. Print Head Cartridge Illustration B PAPER JAMS ...
... the front cover (2). 2 If there is paper jammed around the fuser unit (Illustration B), follow the procedure for Paper jams around the fuser unit on page 6-8. Fuser Unit 2. Print Head Cartridge 3. Paper 1. Fuser Unit 2. If there is paper jammed around the print head cartridge and... in the fuser. Illustration A 1. Paper 3. Print Head Cartridge Illustration B PAPER JAMS ...

Users Manual - English
Page 122
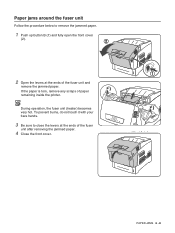
3 Open the fuser unit levers and remove the jammed paper. If the paper is torn, remove any scraps of paper remaining inside the printer. 4 Be sure to close the fuser unit levers after removing the jammed paper. 5 Close the front cover. 6 - 7 PAPER JAMS
3 Open the fuser unit levers and remove the jammed paper. If the paper is torn, remove any scraps of paper remaining inside the printer. 4 Be sure to close the fuser unit levers after removing the jammed paper. 5 Close the front cover. 6 - 7 PAPER JAMS
Users Manual - English
Page 123
During operation, the fuser unit (heater) becomes very hot. PAPER JAMS 6 - 8 To prevent burns, do not touch it with your bare hands. 3 Be sure to remove the jammed paper. 1 Push up button B (1) and fully open the front cover (2). 2 Open the levers at the ends of the fuser unit after removing the jammed paper. 4 Close the front cover. If the paper is torn, remove any scraps of paper remaining inside the printer. Paper jams around the fuser unit Follow the procedure below to close the levers at the ends of the fuser unit and remove the jammed paper.
During operation, the fuser unit (heater) becomes very hot. PAPER JAMS 6 - 8 To prevent burns, do not touch it with your bare hands. 3 Be sure to remove the jammed paper. 1 Push up button B (1) and fully open the front cover (2). 2 Open the levers at the ends of the fuser unit after removing the jammed paper. 4 Close the front cover. If the paper is torn, remove any scraps of paper remaining inside the printer. Paper jams around the fuser unit Follow the procedure below to close the levers at the ends of the fuser unit and remove the jammed paper.
Users Manual - English
Page 140
... AC power cord and allow the printer to do not replace the unit when required. For details about consumables, see Life Span of Consumable Items on page A-1. HOT" (fuser area). ■ To prevent electric shock, always turn the printer off and disconnect the power cord from... the AC outlet/socket before replace the fuser unit. 7 - 14 ROUTINE MAINTENANCE AND CONSUMABLE REPLACEMENT Replace the fuser unit as soon as the message prompting...
... AC power cord and allow the printer to do not replace the unit when required. For details about consumables, see Life Span of Consumable Items on page A-1. HOT" (fuser area). ■ To prevent electric shock, always turn the printer off and disconnect the power cord from... the AC outlet/socket before replace the fuser unit. 7 - 14 ROUTINE MAINTENANCE AND CONSUMABLE REPLACEMENT Replace the fuser unit as soon as the message prompting...
Users Manual - English
Page 141
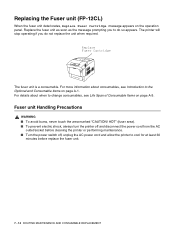
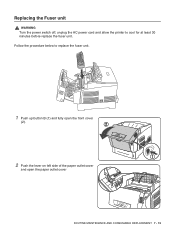
Follow the procedure below to cool for at least 30 minutes before replace the fuser unit. Replacing the Fuser unit WARNING Turn the power switch off, unplug the AC power cord and allow the printer to replace the fuser unit. 1 Push up button B (1) and fully open the front cover (2). 2 Push the lever on left side of the paper outlet cover and open the paper outlet cover ROUTINE MAINTENANCE AND CONSUMABLE REPLACEMENT 7 - 15
Follow the procedure below to cool for at least 30 minutes before replace the fuser unit. Replacing the Fuser unit WARNING Turn the power switch off, unplug the AC power cord and allow the printer to replace the fuser unit. 1 Push up button B (1) and fully open the front cover (2). 2 Push the lever on left side of the paper outlet cover and open the paper outlet cover ROUTINE MAINTENANCE AND CONSUMABLE REPLACEMENT 7 - 15
Users Manual - English
Page 142
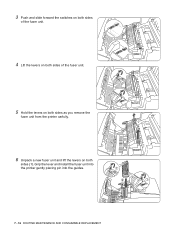
Grip the lever and install the fuser unit into the printer gently placing pin into the guides. 7 - 16 ROUTINE MAINTENANCE AND CONSUMABLE REPLACEMENT 3 Push and slide forward the switches on both sides of the fuser unit. 4 Lift the levers on both sides of the fuser unit. 5 Hold the levers on both sides as you remove the fuser unit from the printer carfully. 6 Unpack a new fuser unit and lift the levers on both sides (1).
Grip the lever and install the fuser unit into the printer gently placing pin into the guides. 7 - 16 ROUTINE MAINTENANCE AND CONSUMABLE REPLACEMENT 3 Push and slide forward the switches on both sides of the fuser unit. 4 Lift the levers on both sides of the fuser unit. 5 Hold the levers on both sides as you remove the fuser unit from the printer carfully. 6 Unpack a new fuser unit and lift the levers on both sides (1).
Users Manual - English
Page 143
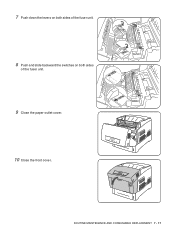
7 Push down the levers on both sides of the fuser unit. 8 Push and slide backward the switches on both sides of the fuser unit. 9 Close the paper outlet cover. 10 Close the front cover. ROUTINE MAINTENANCE AND CONSUMABLE REPLACEMENT 7 - 17
7 Push down the levers on both sides of the fuser unit. 8 Push and slide backward the switches on both sides of the fuser unit. 9 Close the paper outlet cover. 10 Close the front cover. ROUTINE MAINTENANCE AND CONSUMABLE REPLACEMENT 7 - 17


