
User Guide
Page 2
Retain this User's Guide with Brother, you need to call Customer Service Please complete the following information for future reference: Model Number: FAX-2440C and MFC-620CN (Circle your purchase, in the event of theft, fire or warranty service. If you will be recorded as a permanent record ...of your model number) Serial Number:* Date of Purchase: Place of Purchase: * The serial number is on -line at http://www.brother.com/registration By...
Retain this User's Guide with Brother, you need to call Customer Service Please complete the following information for future reference: Model Number: FAX-2440C and MFC-620CN (Circle your purchase, in the event of theft, fire or warranty service. If you will be recorded as a permanent record ...of your model number) Serial Number:* Date of Purchase: Place of Purchase: * The serial number is on -line at http://www.brother.com/registration By...
User Guide
Page 5
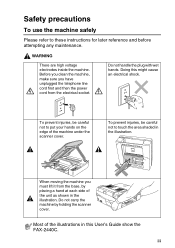
... base, by holding the scanner cover. iii To prevent injuries, be careful not to touch the area shaded in the illustration. Doing this User's Guide show the FAX-2440C. Safety precautions To use the machine safely Please refer to put your hands on the edge of the machine under the scanner cover. Most...
... base, by holding the scanner cover. iii To prevent injuries, be careful not to touch the area shaded in the illustration. Doing this User's Guide show the FAX-2440C. Safety precautions To use the machine safely Please refer to put your hands on the edge of the machine under the scanner cover. Most...
User Guide
Page 21
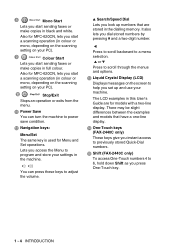
... a two-line display. Press to scroll backward to a menu selection. ▲ or ▼ Press to power save condition. E Shift (FAX-2440C only) To access One-Touch numbers 4 to 6, hold down Shift as you instant access to help you start sending faxes or make copies in the...machine. D One-Touch keys (FAX-2440C only) These keys give you press One-Touch key. 1 - 4 INTRODUCTION C Liquid Crystal Display (LCD) Displays messages on your machine. There may be slight differences between the examples and models that are stored in this User's Guide are for Menu and Set operations. ...
... a two-line display. Press to scroll backward to a menu selection. ▲ or ▼ Press to power save condition. E Shift (FAX-2440C only) To access One-Touch numbers 4 to 6, hold down Shift as you instant access to help you start sending faxes or make copies in the...machine. D One-Touch keys (FAX-2440C only) These keys give you press One-Touch key. 1 - 4 INTRODUCTION C Liquid Crystal Display (LCD) Displays messages on your machine. There may be slight differences between the examples and models that are stored in this User's Guide are for Menu and Set operations. ...
User Guide
Page 92
... ▲ or ▼ to select PC Fax Receive. Make sure your PC is connected and turned on. (For details See Using Brother PC-FAX software on page 5-1 in Software User's Guide on the CD-ROM.) ■ If you select Backup Print:On, the machine will have set up PC Fax Receive you will...
... ▲ or ▼ to select PC Fax Receive. Make sure your PC is connected and turned on. (For details See Using Brother PC-FAX software on page 5-1 in Software User's Guide on the CD-ROM.) ■ If you select Backup Print:On, the machine will have set up PC Fax Receive you will...
User Guide
Page 138
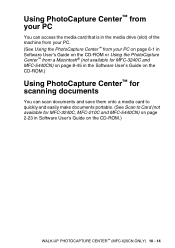
... is in the media drive (slot) of the machine from your PC. (See Using the PhotoCapture Center™ from your PC on page 6-1 in Software User's Guide on the CD-ROM or Using the PhotoCapture Center™ from a Macintosh® (not available for MFC-3240C and MFC-5440CN) on page 8-45 in... the Software User's Guide on the CD-ROM.) Using PhotoCapture Center™ for scanning documents You can scan documents and save them onto a media card to quickly and easily...
... is in the media drive (slot) of the machine from your PC. (See Using the PhotoCapture Center™ from your PC on page 6-1 in Software User's Guide on the CD-ROM or Using the PhotoCapture Center™ from a Macintosh® (not available for MFC-3240C and MFC-5440CN) on page 8-45 in... the Software User's Guide on the CD-ROM.) Using PhotoCapture Center™ for scanning documents You can scan documents and save them onto a media card to quickly and easily...
User Guide
Page 142
... trademarks of Microsoft in this User's Guide, the Software User's Guide, and the Network User's Guide (MFC-620CN only) are registered trademarks of NewSoft Technology Corporation. CompactFlash is a registered trademark of Sony Corporation. Memory Stick is a registered trademark of SanDisk Corporation. Ltd. IMPORTANT INFORMATION 11 - 4 All rights reserved. SanDisk is a licensee of International Business Machine Corporation. Microdrive...
... trademarks of Microsoft in this User's Guide, the Software User's Guide, and the Network User's Guide (MFC-620CN only) are registered trademarks of NewSoft Technology Corporation. CompactFlash is a registered trademark of Sony Corporation. Memory Stick is a registered trademark of SanDisk Corporation. Ltd. IMPORTANT INFORMATION 11 - 4 All rights reserved. SanDisk is a licensee of International Business Machine Corporation. Microdrive...
User Guide
Page 146
...all faxes in the machine's memory, press 2. 4. To keep all faxes to another fax machine by pressing Menu/Set, 9, 0, 2 in Software User's Guide on page 5-1 in Step1. The machine's memory will hold faxes for several hours, so you can transfer the Fax Journal report to your PC, press... are present, you will not lose any foreign obstacles from the power source for several minutes and then reconnect it . Please see Using Brother PC-FAX software on the CD-ROM.) TROUBLESHOOTING AND ROUTINE MAINTENANCE 12 - 4 Transfer faxes to your PC. After faxes are transferred, disconnect...
...all faxes in the machine's memory, press 2. 4. To keep all faxes to another fax machine by pressing Menu/Set, 9, 0, 2 in Software User's Guide on page 5-1 in Step1. The machine's memory will hold faxes for several hours, so you can transfer the Fax Journal report to your PC, press... are present, you will not lose any foreign obstacles from the power source for several minutes and then reconnect it . Please see Using Brother PC-FAX software on the CD-ROM.) TROUBLESHOOTING AND ROUTINE MAINTENANCE 12 - 4 Transfer faxes to your PC. After faxes are transferred, disconnect...
User Guide
Page 151
.... In the printer driver 'Basic' tab, click 'Settings,' and check 'Enhanced Normal Printing.' The Brother Solutions Center offers the latest FAQs and troubleshooting tips. Visit us at http://solutions.brother.com. White horizontal lines appear in the Power Save condition. Cartridges remain fresh for your ink cartridges...of paper. (See About paper on page 1-10.) If horizontal bands appear when using . (See Media Type on page 1-8 in Software User's Guide on the CD-ROM and Setting the Paper Type on some types of paper you continue to have horizontal bands, change the Media Type ...
.... In the printer driver 'Basic' tab, click 'Settings,' and check 'Enhanced Normal Printing.' The Brother Solutions Center offers the latest FAQs and troubleshooting tips. Visit us at http://solutions.brother.com. White horizontal lines appear in the Power Save condition. Cartridges remain fresh for your ink cartridges...of paper. (See About paper on page 1-10.) If horizontal bands appear when using . (See Media Type on page 1-8 in Software User's Guide on the CD-ROM and Setting the Paper Type on some types of paper you continue to have horizontal bands, change the Media Type ...

User Guide
Page 152
... Colour Enhancement. Printing appears dirty or ink seems to reduce the print resolution. The printouts are cut off . (See Media Type on page 1-8 in Software User's Guide on page 1-15.) Try setting the Display setting to load paper, envelopes and post cards on page 1-15.) Check that the paper size setting in...
... Colour Enhancement. Printing appears dirty or ink seems to reduce the print resolution. The printouts are cut off . (See Media Type on page 1-8 in Software User's Guide on page 1-15.) Try setting the Display setting to load paper, envelopes and post cards on page 1-15.) Check that the paper size setting in...
User Guide
Page 161
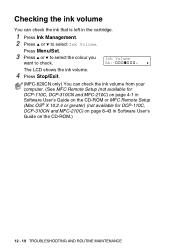
Ink Volume Bk:- + The LCD shows the ink volume. 4 Press Stop/Exit. (MFC-620CN only) You can check the ink that is left in Software User's Guide on page 8-43 in the cartridge. 1 Press Ink Management. 2 Press ▲ or ▼ to check. Checking the ink volume You can check the ink volume ...from your computer. (See MFC Remote Setup (not available for DCP-110C, DCP-310CN and MFC-210C) on page 4-1 in Software User's Guide on the CD-ROM or MFC Remote Setup (Mac OS® X 10.2.4 or greater) (not available for DCP-110C, DCP-310CN and MFC-210C) on...
Ink Volume Bk:- + The LCD shows the ink volume. 4 Press Stop/Exit. (MFC-620CN only) You can check the ink that is left in Software User's Guide on page 8-43 in the cartridge. 1 Press Ink Management. 2 Press ▲ or ▼ to check. Checking the ink volume You can check the ink volume ...from your computer. (See MFC Remote Setup (not available for DCP-110C, DCP-310CN and MFC-210C) on page 4-1 in Software User's Guide on the CD-ROM or MFC Remote Setup (Mac OS® X 10.2.4 or greater) (not available for DCP-110C, DCP-310CN and MFC-210C) on...
User Guide
Page 182
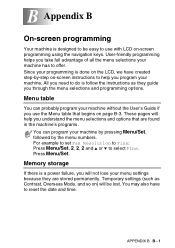
...begins on -screen programming using the navigation keys. You may also have created step-by the menu numbers. Since your menu settings because they guide you need to do is follow the instructions as Contrast, Overseas Mode, and so on) will help you program your machine has to offer....with LCD on page B-3. Temporary settings (such as they are found in the machine's programs. You can probably program your machine without the User's Guide if you take full advantage of all the menu selections your machine. B Appendix B On-screen programming Your machine is designed to be lost.
...begins on -screen programming using the navigation keys. You may also have created step-by the menu numbers. Since your menu settings because they guide you need to do is follow the instructions as Contrast, Overseas Mode, and so on) will help you program your machine has to offer....with LCD on page B-3. Temporary settings (such as they are found in the machine's programs. You can probably program your machine without the User's Guide if you take full advantage of all the menu selections your machine. B Appendix B On-screen programming Your machine is designed to be lost.
User Guide
Page 188
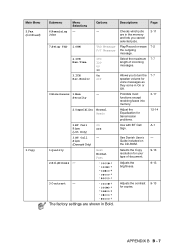
Only) 3.BT Call - Play/Record or erase the outgoing message. Adjust the Equalization for copies. Adjusts the brightness. See Danish User's Guide included on the CD-ROM. Page 3-11 7-2 7-7 7-7 3-17 12-14 A-1 - 9-13 9-13 9-13 APPENDIX B B - 7 Allows you cancel selected jobs. Options - 7.Setup TAD 1.OGM TAD Message F/T ...
Only) 3.BT Call - Play/Record or erase the outgoing message. Adjust the Equalization for copies. Adjusts the brightness. See Danish User's Guide included on the CD-ROM. Page 3-11 7-2 7-7 7-7 3-17 12-14 A-1 - 9-13 9-13 9-13 APPENDIX B B - 7 Allows you cancel selected jobs. Options - 7.Setup TAD 1.OGM TAD Message F/T ...
User Guide
Page 190
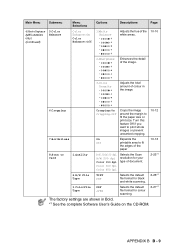
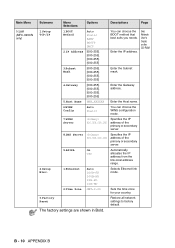
...the edges of the paper 8.Scan to Card 1.Quality 2.B/W File Type B/W 200x100 dpi B/W 200 dpi Color 150 dpi Color 300 dpi Color 600 dpi Selects the Scan resolution for colour scanning. 2-27*1 The factory settings are shown in the ... the default file format for your type of colour in Bold. *1 See the complete Software User's Guide on the CD-ROM. Main Menu Submenu Menu Selections Options Descriptions Page 4.PhotoCapture (MFC-620CN only) (Continued) 5.Color Enhance Color Enhance:On Color Enhance:Off 1.White Balance - + - + - + - + - + Adjusts the hue of the 10-10...
...the edges of the paper 8.Scan to Card 1.Quality 2.B/W File Type B/W 200x100 dpi B/W 200 dpi Color 150 dpi Color 300 dpi Color 600 dpi Selects the Scan resolution for colour scanning. 2-27*1 The factory settings are shown in the ... the default file format for your type of colour in Bold. *1 See the complete Software User's Guide on the CD-ROM. Main Menu Submenu Menu Selections Options Descriptions Page 4.PhotoCapture (MFC-620CN only) (Continued) 5.Color Enhance Color Enhance:On Color Enhance:Off 1.White Balance - + - + - + - + - + Adjusts the hue of the 10-10...
User Guide
Page 191
B - 10 APPENDIX B The factory settings are shown in Bold. See Network User's Guide on the CD-ROM 3.Subnet Mask [000-255]. [000-255]. [000-255]. [000-255] Enter the Subnet mask. 4.Gateway [000-255]. [000-255]. [000-255]. [...
B - 10 APPENDIX B The factory settings are shown in Bold. See Network User's Guide on the CD-ROM 3.Subnet Mask [000-255]. [000-255]. [000-255]. [000-255] Enter the Subnet mask. 4.Gateway [000-255]. [000-255]. [000-255]. [...
User Guide
Page 197
...by sending and receiving fax machines while communicating information. Fine resolution Resolution is used for changing your machine when you do not have the User's Guide with you press Mono Start or Colour Start to text you can use this mode if you can edit. Group number A combination ... You can store faxes in a Speed-Dial location for copying and faxing photographs. G - 3 GLOSSARY Help list A printout of the machine (FAX-2440C only) or press Speaker Phone so you lift the handset of the complete Menu table that shows interactive messages during On-Screen Programming and shows...
...by sending and receiving fax machines while communicating information. Fine resolution Resolution is used for changing your machine when you do not have the User's Guide with you press Mono Start or Colour Start to text you can use this mode if you can edit. Group number A combination ... You can store faxes in a Speed-Dial location for copying and faxing photographs. G - 3 GLOSSARY Help list A printout of the machine (FAX-2440C only) or press Speaker Phone so you lift the handset of the complete Menu table that shows interactive messages during On-Screen Programming and shows...

Quick Setup Guide
Page 1
Setting Up the Machine Using the FAX as a Printer or for PC-FAX Send Quick Setup Guide FAX-2440C Before you can use the machine, you must set up the machine. To find the best solution for your problem or question, access the Brother Solutions Center: http://solutions.brother.com Keep this "Quick Setup Guide" for quick and easy reference at all times. Please read this "Quick Setup Guide" and User's Guide in a convenient place for proper set up instructions. Version A Setting Up the Machine Setup is Complete!
Setting Up the Machine Using the FAX as a Printer or for PC-FAX Send Quick Setup Guide FAX-2440C Before you can use the machine, you must set up the machine. To find the best solution for your problem or question, access the Brother Solutions Center: http://solutions.brother.com Keep this "Quick Setup Guide" for quick and easy reference at all times. Please read this "Quick Setup Guide" and User's Guide in a convenient place for proper set up instructions. Version A Setting Up the Machine Setup is Complete!

Quick Setup Guide
Page 2
Hint Indicates notes and useful tips to the machine. Indicates cautions that must be observed to the User's Guide. User's Guide Indicates reference to prevent possible personal injury. ■ Warning Indicates warnings that must be observed to use the machine properly or to prevent damage to remember when using the machine.
Hint Indicates notes and useful tips to the machine. Indicates cautions that must be observed to the User's Guide. User's Guide Indicates reference to prevent possible personal injury. ■ Warning Indicates warnings that must be observed to use the machine properly or to prevent damage to remember when using the machine.
Quick Setup Guide
Page 3
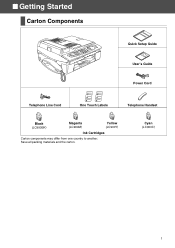
Save all packing materials and the carton. Cyan (LC900C) 1 ■ Getting Started Carton Components Quick Setup Guide User's Guide Power Cord Telephone Line Cord One Touch Labels Telephone Handset Black (LC900BK) Magenta (LC900M) Yellow (LC900Y) Ink Cartridges Carton components may differ from one country to another.
Save all packing materials and the carton. Cyan (LC900C) 1 ■ Getting Started Carton Components Quick Setup Guide User's Guide Power Cord Telephone Line Cord One Touch Labels Telephone Handset Black (LC900BK) Magenta (LC900M) Yellow (LC900Y) Ink Cartridges Carton components may differ from one country to another.
Quick Setup Guide
Page 4
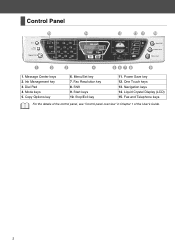
Message Center keys 2. Dial Pad 4. One Touch keys 13. Stop/Exit key 11. Ink Management key 3. Mode keys 5. Power Save key 12. Fax and Telephone keys For the details of the control panel, see "Control panel overview" in Chapter 1 of the User's Guide. 2 Menu/Set key 7. Control Panel 1. Copy Options key 6. Fax Resolution key 8. Start keys 10. Shift 9. Navigation keys 14. Liquid Crystal Display (LCD) 15.
Message Center keys 2. Dial Pad 4. One Touch keys 13. Stop/Exit key 11. Ink Management key 3. Mode keys 5. Power Save key 12. Fax and Telephone keys For the details of the control panel, see "Control panel overview" in Chapter 1 of the User's Guide. 2 Menu/Set key 7. Control Panel 1. Copy Options key 6. Fax Resolution key 8. Start keys 10. Shift 9. Navigation keys 14. Liquid Crystal Display (LCD) 15.
Quick Setup Guide
Page 6
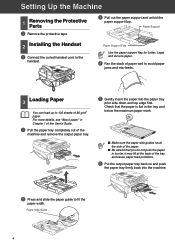
... the side of the paper. ■ Be careful that you do not push the paper in Chapter 1 of the User's Guide. 1 Pull the paper tray completely out of 80 g/m2 paper. Paper Support 2 Installing the Handset 1 Connect the curled handset cord to 100 sheets of the ...
... the side of the paper. ■ Be careful that you do not push the paper in Chapter 1 of the User's Guide. 1 Pull the paper tray completely out of 80 g/m2 paper. Paper Support 2 Installing the Handset 1 Connect the curled handset cord to 100 sheets of the ...


