User Guide
Page 15
... documents 10-14 Important information 11-1 For your safety 11-1 IT power system (For Norway only 11-1 LAN connection (FAX-1940CN and MFC-3340CN only 11-1 International ENERGY STAR® Compliance Statement ... 11-1 Important safety instructions 11-2 Trademarks 11-4 Troubleshooting and routine maintenance 12-1 Troubleshooting 12-1...12-15 Cleaning the print head 12-15 Checking the print quality 12-16 Checking the printing alignment 12-18 Checking the ink volume 12-19 Packing and shipping the machine 12-20 Routine maintenance 12-23 Cleaning the Scanner 12-23 Cleaning the machine...
... documents 10-14 Important information 11-1 For your safety 11-1 IT power system (For Norway only 11-1 LAN connection (FAX-1940CN and MFC-3340CN only 11-1 International ENERGY STAR® Compliance Statement ... 11-1 Important safety instructions 11-2 Trademarks 11-4 Troubleshooting and routine maintenance 12-1 Troubleshooting 12-1...12-15 Cleaning the print head 12-15 Checking the print quality 12-16 Checking the printing alignment 12-18 Checking the ink volume 12-19 Packing and shipping the machine 12-20 Routine maintenance 12-23 Cleaning the Scanner 12-23 Cleaning the machine...
User Guide
Page 21
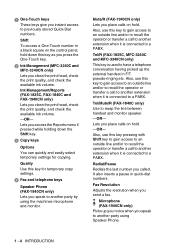
Quality Use this key for copying. Ink Management/Reports (FAX-1835C, FAX-1840C and FAX-1940CN only) Lets you speak to a PABX. Lets you place calls on ... Tel/Mute/R (FAX-1840C only) Use to another party using the machines microphone and monitor. Mute/R (FAX-1940CN only) Lets you called. It also inserts a pause in a black square on hold down the Shift key.... copy settings. 4 Fax and telephone keys Speaker Phone (FAX-1940CN only) Lets you clean the print head, check the print quality, and check the available ink volume. -OR- Redial/Pause Redials the last number you place...
Quality Use this key for copying. Ink Management/Reports (FAX-1835C, FAX-1840C and FAX-1940CN only) Lets you speak to a PABX. Lets you place calls on ... Tel/Mute/R (FAX-1840C only) Use to another party using the machines microphone and monitor. Mute/R (FAX-1940CN only) Lets you called. It also inserts a pause in a black square on hold down the Shift key.... copy settings. 4 Fax and telephone keys Speaker Phone (FAX-1940CN only) Lets you clean the print head, check the print quality, and check the available ink volume. -OR- Redial/Pause Redials the last number you place...
User Guide
Page 25
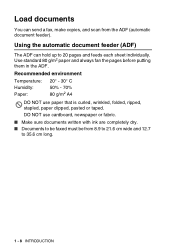
... Temperature: 20° - 30° C Humidity: Paper: 50% - 70% 80 g/m2 A4 DO NOT use cardboard, newspaper or fabric. ■ Make sure documents written with ink are completely dry. ■ Documents to be faxed must be from the ADF (automatic document feeder). DO NOT use paper that is curled, wrinkled, folded...
... Temperature: 20° - 30° C Humidity: Paper: 50% - 70% 80 g/m2 A4 DO NOT use cardboard, newspaper or fabric. ■ Make sure documents written with ink are completely dry. ■ Documents to be faxed must be from the ADF (automatic document feeder). DO NOT use paper that is curled, wrinkled, folded...

User Guide
Page 109
.... 8 - 3 PRINTING REPORTS Lists names and numbers stored in the One-Touch and Speed-Dial memory, in numerical order. For FAX-1835C, FAX-1840C and FAX-1940CN, press Ink Management/Reports while holding down the Shift key. 2 Press ▲ or ▼ to quickly program your settings. Printing reports Following reports are available: 1.Help...
.... 8 - 3 PRINTING REPORTS Lists names and numbers stored in the One-Touch and Speed-Dial memory, in numerical order. For FAX-1835C, FAX-1840C and FAX-1940CN, press Ink Management/Reports while holding down the Shift key. 2 Press ▲ or ▼ to quickly program your settings. Printing reports Following reports are available: 1.Help...

User Guide
Page 113
...). 4 Press Quality. 5 Press ▲ or ▼ to be proof-read, large documents or many copies). The default setting is Normal. Fast copy speed and lowest ink consumption. Press Menu/Set. 6 Press Mono Start or Colour Start. 9 - 4 MAKING COPIES Use this mode to copy precise images such as photographs. Increasing copy speed...
...). 4 Press Quality. 5 Press ▲ or ▼ to be proof-read, large documents or many copies). The default setting is Normal. Fast copy speed and lowest ink consumption. Press Menu/Set. 6 Press Mono Start or Colour Start. 9 - 4 MAKING COPIES Use this mode to copy precise images such as photographs. Increasing copy speed...
User Guide
Page 143
...machine's 'handshake' will be sent as black and white. If the sending machine has the ability to make sure it properly. (See Replacing the ink cartridges on page 1-8. Low Temperature The print head is working. If a sending machine has a colour fax, the machine's 'handshake' will be sent...media card in the machine. While memory is not properly installed. Near Empty One or more of ink. Ink Empty One or more of the ink cartridges are running out of the ink cartridges is too warm. High Temperature The print head is empty. Re-insert the card firmly into...
...machine's 'handshake' will be sent as black and white. If the sending machine has the ability to make sure it properly. (See Replacing the ink cartridges on page 1-8. Low Temperature The print head is working. If a sending machine has a colour fax, the machine's 'handshake' will be sent...media card in the machine. While memory is not properly installed. Near Empty One or more of ink. Ink Empty One or more of the ink cartridges are running out of the ink cartridges is too warm. High Temperature The print head is empty. Re-insert the card firmly into...
User Guide
Page 150
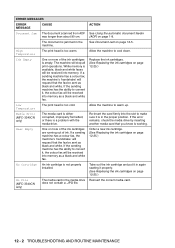
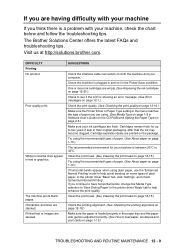
... is a problem with your machine, check the chart below and follow the troubleshooting tips. The Brother Solutions Center offers the latest FAQs and troubleshooting tips. One or more ink cartridges are fresh. Characters and lines are skewed. Check the machine is showing an error message... text or graphics. Try using . (See Media Type on page 1-8 in their original packaging, after that the ink may become clogged. Visit us at http://solutions.brother.com. SUGGESTIONS Check the interface cable connection on page 1-15.) TROUBLESHOOTING AND ROUTINE MAINTENANCE 12 - 9 White horizontal...
... is a problem with your machine, check the chart below and follow the troubleshooting tips. The Brother Solutions Center offers the latest FAQs and troubleshooting tips. One or more ink cartridges are fresh. Characters and lines are skewed. Check the machine is showing an error message... text or graphics. Try using . (See Media Type on page 1-8 in their original packaging, after that the ink may become clogged. Visit us at http://solutions.brother.com. SUGGESTIONS Check the interface cable connection on page 1-15.) TROUBLESHOOTING AND ROUTINE MAINTENANCE 12 - 9 White horizontal...

User Guide
Page 151
... top center of paper. (See About paper on page 1-10.) Don't handle the paper until the ink is dry. The printouts are the same. Print speed is with the sending machine. Machine does not ... and post cards on the telephone line. Make sure you are cut off. Printing appears dirty or ink seems to see if the problem is too slow. Machine feeds multiple pages Printed pages are using the... Make sure the paper is loaded properly in the paper tray at least 24 bit colour data with ink. (See Cleaning the machine Printer Platen on the reverse side or at the bottom of sentences are ...
... top center of paper. (See About paper on page 1-10.) Don't handle the paper until the ink is dry. The printouts are the same. Print speed is with the sending machine. Machine does not ... and post cards on the telephone line. Make sure you are cut off. Printing appears dirty or ink seems to see if the problem is too slow. Machine feeds multiple pages Printed pages are using the... Make sure the paper is loaded properly in the paper tray at least 24 bit colour data with ink. (See Cleaning the machine Printer Platen on the reverse side or at the bottom of sentences are ...

User Guide
Page 152
...setup. (See Basic receiving operations (FAX-1835C, FAX-1840C, MFC-3240C and MFC-3340CN only) on page 4-1 and Basic receiving operations (FAX-1940CN only) on page 4-3.) If you frequently encounter interference on the phone line, try to change the menu setting of Compatibility to Basic. (See ...to hear it answer. Check for an error. (See Printing reports on page 12-23.) TROUBLESHOOTING AND ROUTINE MAINTENANCE 12 - 11 Replace the colour ink cartridges that the Fax mode on page 3-1.) key is dirty. (See Routine maintenance on page 8-3.) Transmission Verification Report says 'Result:NG' or ...
...setup. (See Basic receiving operations (FAX-1835C, FAX-1840C, MFC-3240C and MFC-3340CN only) on page 4-1 and Basic receiving operations (FAX-1940CN only) on page 4-3.) If you frequently encounter interference on the phone line, try to change the menu setting of Compatibility to Basic. (See ...to hear it answer. Check for an error. (See Printing reports on page 12-23.) TROUBLESHOOTING AND ROUTINE MAINTENANCE 12 - 11 Replace the colour ink cartridges that the Fax mode on page 3-1.) key is dirty. (See Routine maintenance on page 8-3.) Transmission Verification Report says 'Result:NG' or ...

User Guide
Page 156
... finished, the machine will go back to select Cleaning. Touching the print head may cause permanent damage and may void the print head's warranty. 1 Press Ink Management. 2 Press ▲ or ▼ to standby mode automatically. Press Menu/Set. 3 Press ▲ or ▼ to improve print quality Cleaning the print...Magenta), or all four colours at least five times and the print has not improved, call your printed pages. Cleaning the print head consumes ink. If you get a horizontal line in the text or graphics on your Brother dealer for service. How to select Black, Color or All.
... finished, the machine will go back to select Cleaning. Touching the print head may cause permanent damage and may void the print head's warranty. 1 Press Ink Management. 2 Press ▲ or ▼ to standby mode automatically. Press Menu/Set. 3 Press ▲ or ▼ to improve print quality Cleaning the print...Magenta), or all four colours at least five times and the print has not improved, call your printed pages. Cleaning the print head consumes ink. If you get a horizontal line in the text or graphics on your Brother dealer for service. How to select Black, Color or All.

User Guide
Page 157
... Colour Start. If you if the print quality is OK by printing the Print Quality Check Sheet and looking at the nozzle check pattern. 1 Press Ink Management. 2 Press ▲ or ▼ to Step 10. -OR- The machine begins printing the Print Quality Check Sheet. 5 Check the sheet to see missing short...
... Colour Start. If you if the print quality is OK by printing the Print Quality Check Sheet and looking at the nozzle check pattern. 1 Press Ink Management. 2 Press ▲ or ▼ to Step 10. -OR- The machine begins printing the Print Quality Check Sheet. 5 Check the sheet to see missing short...

User Guide
Page 158
... Press 1 (Yes). The machine will start printing the Print Quality Check Sheet again and then return to step 5. 10 Press Stop/Exit. Or, the ink may void the print head's warranty. When a print head nozzle is clogged the printed sample looks like this Print Quality Check Sheet, repeat the cleaning... Start. If the problem still exists, repeat the cleaning and test print procedures at least five times. If you still see missing ink in your Brother dealer. If ink is cleaned, the horizontal lines are gone. After the print head nozzle is still missing, call your machine over six months or ...
... Press 1 (Yes). The machine will start printing the Print Quality Check Sheet again and then return to step 5. 10 Press Stop/Exit. Or, the ink may void the print head's warranty. When a print head nozzle is clogged the printed sample looks like this Print Quality Check Sheet, repeat the cleaning... Start. If the problem still exists, repeat the cleaning and test print procedures at least five times. If you still see missing ink in your Brother dealer. If ink is cleaned, the horizontal lines are gone. After the print head nozzle is still missing, call your machine over six months or ...

User Guide
Page 159
... printing alignment however, if after transporting the machine your printed text becomes blurred or images become faded then adjustment may need to be made. 1 Press Ink Management. 2 Press ▲ or ▼ to select Test Print.
... printing alignment however, if after transporting the machine your printed text becomes blurred or images become faded then adjustment may need to be made. 1 Press Ink Management. 2 Press ▲ or ▼ to select Test Print.
User Guide
Page 160
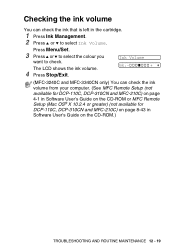
... Bk:- + (MFC-3240C and MFC-3340CN only) You can check the ink that is left in Software User's Guide on page 8-43 in the cartridge. 1 Press Ink Management. 2 Press ▲ or ▼ to check. Checking the ink volume You can check the ink volume from your computer. (See MFC Remote Setup (not available for...) on the CD-ROM.) TROUBLESHOOTING AND ROUTINE MAINTENANCE 12 - 19 Press Menu/Set. 3 Press ▲ or ▼ to select the colour you want to select Ink Volume.
... Bk:- + (MFC-3240C and MFC-3340CN only) You can check the ink that is left in Software User's Guide on page 8-43 in the cartridge. 1 Press Ink Management. 2 Press ▲ or ▼ to check. Checking the ink volume You can check the ink volume from your computer. (See MFC Remote Setup (not available for...) on the CD-ROM.) TROUBLESHOOTING AND ROUTINE MAINTENANCE 12 - 19 Press Menu/Set. 3 Press ▲ or ▼ to select the colour you want to select Ink Volume.
User Guide
Page 161
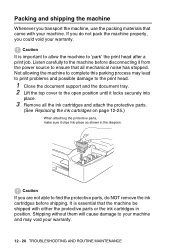
If you do NOT remove the ink cartridges before disconnecting it from the power source to the machine before shipping. Listen carefully to ensure that came with either the protective parts or the ink cartridges in the diagram. Packing and shipping the machine Whenever you transport the ...machine, use the packing materials that all the ink cartridges and attach the protective parts. (See Replacing the ink cartridges on page 12-25.) When attaching the protective parts, make sure it clips into place. 3 Remove...
If you do NOT remove the ink cartridges before disconnecting it from the power source to the machine before shipping. Listen carefully to ensure that came with either the protective parts or the ink cartridges in the diagram. Packing and shipping the machine Whenever you transport the ...machine, use the packing materials that all the ink cartridges and attach the protective parts. (See Replacing the ink cartridges on page 12-25.) When attaching the protective parts, make sure it clips into place. 3 Remove...
User Guide
Page 163
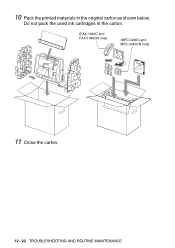
10 Pack the printed materials in the carton. (FAX-1840C and FAX-1940CN only) (MFC-3240C and MFC-3340CN only) 11 Close the carton. 12 - 22 TROUBLESHOOTING AND ROUTINE MAINTENANCE Do not pack the used ink cartridges in the original carton as shown below.
10 Pack the printed materials in the carton. (FAX-1840C and FAX-1940CN only) (MFC-3240C and MFC-3340CN only) 11 Close the carton. 12 - 22 TROUBLESHOOTING AND ROUTINE MAINTENANCE Do not pack the used ink cartridges in the original carton as shown below.

User Guide
Page 165
Clean Here 12 - 24 TROUBLESHOOTING AND ROUTINE MAINTENANCE Paper Feed Star Wheel Do NOT Touch! Encoder Film Do NOT Touch! Cleaning the machine Printer Platen WARNING ■ Be sure to unplug the machine from the AC power outlet before cleaning the printer platen. ■ Be careful not to touch the paper feed star wheels and encoder film. ■ When you want to clean your machine printer platen, wipe it with a lint free cloth that is dry. ■ If ink is scattered on or around the printer platen be sure to wipe it off with a soft, dry, lint-free cloth.
Clean Here 12 - 24 TROUBLESHOOTING AND ROUTINE MAINTENANCE Paper Feed Star Wheel Do NOT Touch! Encoder Film Do NOT Touch! Cleaning the machine Printer Platen WARNING ■ Be sure to unplug the machine from the AC power outlet before cleaning the printer platen. ■ Be careful not to touch the paper feed star wheels and encoder film. ■ When you want to clean your machine printer platen, wipe it with a lint free cloth that is dry. ■ If ink is scattered on or around the printer platen be sure to wipe it off with a soft, dry, lint-free cloth.
User Guide
Page 166
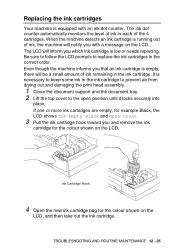
...counter. Be sure to follow the LCD prompts to the open position until it locks securely into place. It is necessary to keep some ink in the ink cartridge to prevent air from drying out and damaging the print head assembly. 1 Close the document support and the document tray. 2 ... colour shown on the LCD. TROUBLESHOOTING AND ROUTINE MAINTENANCE 12 - 25 Replacing the ink cartridges Your machine is equipped with a message on the LCD. The ink dot counter automatically monitors the level of ink in each of ink remaining in the correct order. The LCD will be a small amount of the ...
...counter. Be sure to follow the LCD prompts to the open position until it locks securely into place. It is necessary to keep some ink in the ink cartridge to prevent air from drying out and damaging the print head assembly. 1 Close the document support and the document tray. 2 ... colour shown on the LCD. TROUBLESHOOTING AND ROUTINE MAINTENANCE 12 - 25 Replacing the ink cartridges Your machine is equipped with a message on the LCD. The ink dot counter automatically monitors the level of ink in each of ink remaining in the correct order. The LCD will be a small amount of the ...
User Guide
Page 167
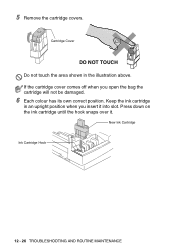
Keep the ink cartridge in the illustration above. New Ink Cartridge Ink Cartridge Hook 12 - 26 TROUBLESHOOTING AND ROUTINE MAINTENANCE 5 Remove the cartridge covers. If the cartridge cover comes off when you insert it . Press down on the ink cartridge until the hook snaps over it into slot. Cartridge Cover DO NOT TOUCH Do not touch the area shown in an upright position when you open the bag the cartridge will not be damaged. 6 Each colour has its own correct position.
Keep the ink cartridge in the illustration above. New Ink Cartridge Ink Cartridge Hook 12 - 26 TROUBLESHOOTING AND ROUTINE MAINTENANCE 5 Remove the cartridge covers. If the cartridge cover comes off when you insert it . Press down on the ink cartridge until the hook snaps over it into slot. Cartridge Cover DO NOT TOUCH Do not touch the area shown in an upright position when you open the bag the cartridge will not be damaged. 6 Each colour has its own correct position.
User Guide
Page 168
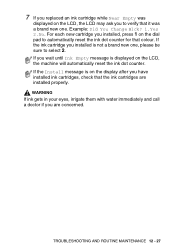
..., check that it was displayed on the dial pad to automatically reset the ink dot counter for that colour. If you wait until Ink Empty message is not a brand new one . WARNING If ink gets in your eyes, irrigate them with water immediately and call a doctor if you are installed ...properly. TROUBLESHOOTING AND ROUTINE MAINTENANCE 12 - 27 7 If you replaced an ink cartridge while Near Empty was a brand new one , please be sure to select 2. For each new cartridge you installed, press 1 on the LCD, ...
..., check that it was displayed on the dial pad to automatically reset the ink dot counter for that colour. If you wait until Ink Empty message is not a brand new one . WARNING If ink gets in your eyes, irrigate them with water immediately and call a doctor if you are installed ...properly. TROUBLESHOOTING AND ROUTINE MAINTENANCE 12 - 27 7 If you replaced an ink cartridge while Near Empty was a brand new one , please be sure to select 2. For each new cartridge you installed, press 1 on the LCD, ...


