
User Manual
Page 2
... Input operation 9 Bluetooth Operation...10 Pair and Connect...10 Make a Call...10 Redial Last Dialed Number 10 Answer a Call / Reject a Call / End a Call 10 Switch Audio Between Car audio and Moble Phone 10 Adjust Call Volume...10 Audio Streaming (A2DP 10 Remote Control...11 Specifications...12 Troubleshooting 13
... Input operation 9 Bluetooth Operation...10 Pair and Connect...10 Make a Call...10 Redial Last Dialed Number 10 Answer a Call / Reject a Call / End a Call 10 Switch Audio Between Car audio and Moble Phone 10 Adjust Call Volume...10 Audio Streaming (A2DP 10 Remote Control...11 Specifications...12 Troubleshooting 13

User Manual
Page 3
Refer all service to a qualified technician. • Some MP3/WMA files may make it difficult to concentrate on traffic and road conditions while driving. • If the car has been in a level,horizontal position. High volume levels may not be playable. • Keep the volume at an angle. • Never use excessive force when removing or attaching the faceplate. Lithium Battery Cell Warnings • Cell leakage may cause damage to discharge and the vehicle can no longer be installed in direct sunlight for long periods of time when the motor is switched off. This could...
Refer all service to a qualified technician. • Some MP3/WMA files may make it difficult to concentrate on traffic and road conditions while driving. • If the car has been in a level,horizontal position. High volume levels may not be playable. • Keep the volume at an angle. • Never use excessive force when removing or attaching the faceplate. Lithium Battery Cell Warnings • Cell leakage may cause damage to discharge and the vehicle can no longer be installed in direct sunlight for long periods of time when the motor is switched off. This could...

User Manual
Page 4
Make sure the ignition is working correctly. 8. The others fixing screws that everything is turned off, and then disconnect the cable from your car. Install the detachable faceplate & plastic outer trim ring onto the car receiver. 7. If installation angle exceeds 30 horizontal, the unit may not perform properly. 182 mm 103 mm To Install the Car Radio 1. You never want electricity running while you have any questions. 2 Connect the wire harness & the antenna to the car receiver (see "Electrical Connections") being careful not to ensure that fix the other modifications of your...
Make sure the ignition is working correctly. 8. The others fixing screws that everything is turned off, and then disconnect the cable from your car. Install the detachable faceplate & plastic outer trim ring onto the car receiver. 7. If installation angle exceeds 30 horizontal, the unit may not perform properly. 182 mm 103 mm To Install the Car Radio 1. You never want electricity running while you have any questions. 2 Connect the wire harness & the antenna to the car receiver (see "Electrical Connections") being careful not to ensure that fix the other modifications of your...

User Manual
Page 5
ISO Socket: 4PIN connector RR+ RF+ LF+ LR+ RR- Front left PRE-AMP output (White) 6. Electrical Connections WIRING DIAGRAM CAUTION +12V DC NEGATIVE GROUND 1. B GND - Rear left PRE-AMP output (White) 3. LF- The maximum current of the Amp Remote trigger is 200mA. 3 Only use speakers with 4 ohm impedance. - LR- + + REM IGN + - Front right PRE-AMP output (Red) 4. ISO Socket: 8PIN connector 7. Rear right PRE-AMP output (Red) 5. RF- Radio antenna socket 2.
ISO Socket: 4PIN connector RR+ RF+ LF+ LR+ RR- Front left PRE-AMP output (White) 6. Electrical Connections WIRING DIAGRAM CAUTION +12V DC NEGATIVE GROUND 1. B GND - Rear left PRE-AMP output (White) 3. LF- The maximum current of the Amp Remote trigger is 200mA. 3 Only use speakers with 4 ohm impedance. - LR- + + REM IGN + - Front right PRE-AMP output (Red) 4. ISO Socket: 8PIN connector 7. Rear right PRE-AMP output (Red) 5. RF- Radio antenna socket 2.

User Manual
Page 6
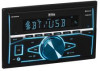
CONTROLPANELBUTTON LOCATIONS 20 21 18 19 1. (power)/Volume knob and SEL (select/menu) button 2. LCD Display 18. SRC (source) button 3. AMS (automatic store / preset station scan, automatic music search) button 5. (pause/play), Preset station1 button 6. INT (intro), Preset station 2 button 7. MUTE button 15. CLOCK (clock setting) button, (end call ) button 4. RDM (random), Preset station 4 button 9. -10(previous 10 tracks), Preset station 5 button 10. +10(next 10 tracks), Preset station 6 button 11. USB Port & Micro SD card slot 19. Reset button RPT (repeat), Preset ...
CONTROLPANELBUTTON LOCATIONS 20 21 18 19 1. (power)/Volume knob and SEL (select/menu) button 2. LCD Display 18. SRC (source) button 3. AMS (automatic store / preset station scan, automatic music search) button 5. (pause/play), Preset station1 button 6. INT (intro), Preset station 2 button 7. MUTE button 15. CLOCK (clock setting) button, (end call ) button 4. RDM (random), Preset station 4 button 9. -10(previous 10 tracks), Preset station 5 button 10. +10(next 10 tracks), Preset station 6 button 11. USB Port & Micro SD card slot 19. Reset button RPT (repeat), Preset ...

User Manual
Page 7
... Adjust Menu Options (SEL) ‡ Press the SEL button on the front panel or on the remote control repeatedly to cycle through the following adjustable audio functions:BASS,TREBLE,BALANCE,FADER, EQ OFF/ CLASS/ ROCK/POP/ FLAT, LOUD ON/OFF, DX/LOC, STEREO/MONO, CLOCK 12/24, AREA US/EU, AUTO...
... Adjust Menu Options (SEL) ‡ Press the SEL button on the front panel or on the remote control repeatedly to cycle through the following adjustable audio functions:BASS,TREBLE,BALANCE,FADER, EQ OFF/ CLASS/ ROCK/POP/ FLAT, LOUD ON/OFF, DX/LOC, STEREO/MONO, CLOCK 12/24, AREA US/EU, AUTO...

User Manual
Page 8
Mute on/off In power on mode, briefly press the MUTE button to toggle mute on the loudness to factory default settings. The muted state will be used when the LCD does not display normally or sound is distorted, or when any of bass frequencies, press again to turn it off . USB port The USB port of this bluetooth handsfree system. Hands-free Microphone To receive your system, use a thin object with a pointed end to toggle between RADIO, BT(Bluetooth), USB(with USB device inserted), SD(with 3.5mm line-out or headphone output. This function may be also released when the volume ...
Mute on/off In power on mode, briefly press the MUTE button to toggle mute on the loudness to factory default settings. The muted state will be used when the LCD does not display normally or sound is distorted, or when any of bass frequencies, press again to turn it off . USB port The USB port of this bluetooth handsfree system. Hands-free Microphone To receive your system, use a thin object with a pointed end to toggle between RADIO, BT(Bluetooth), USB(with USB device inserted), SD(with 3.5mm line-out or headphone output. This function may be also released when the volume ...

User Manual
Page 9
... to move to MONO mode usually improves the overall sound quality. Press the ST button on the remote control to choose FM STEREO or MONO audio effect. 7 RADIO OPERATION Switch Between USA area and Europe area Frequency In radio mode, press the VOL button to enter the switch state of the...
... to move to MONO mode usually improves the overall sound quality. Press the ST button on the remote control to choose FM STEREO or MONO audio effect. 7 RADIO OPERATION Switch Between USA area and Europe area Frequency In radio mode, press the VOL button to enter the switch state of the...

User Manual
Page 10
Fast Forward/Backward ‡ To fast forward, press and hold the ‡ To fast backward, press and hold the 6/+10 button to the next folder. Repeating the track Press the RPT button to the left and enter the next number. Press the 6/+10 button to jump forward 10 tracks. ‡ During USB or SD card mode, press and hold the 5/-10 button to go to go back the previous folder. You can repeat this function depending on the display. The "TRK0000" will appear on the number and level of each track, press again to stop the introduction scan, and play the current track. Then press ...
Fast Forward/Backward ‡ To fast forward, press and hold the ‡ To fast backward, press and hold the 6/+10 button to the next folder. Repeating the track Press the RPT button to the left and enter the next number. Press the 6/+10 button to jump forward 10 tracks. ‡ During USB or SD card mode, press and hold the 5/-10 button to go to go back the previous folder. You can repeat this function depending on the display. The "TRK0000" will appear on the number and level of each track, press again to stop the introduction scan, and play the current track. Then press ...

User Manual
Page 11
Press the SRC button to switch to the AUX input mode, then you have plugged such a player into the AUX IN jack with audio output from external devices. 9 If you can listen to music from an MP3 music player. AUXILIARY INPUT OPERATION This car radio is equipped an external auxiliary input jack (3.5mm) on the front panel, it is compatible with a audio cable.
Press the SRC button to switch to the AUX input mode, then you have plugged such a player into the AUX IN jack with audio output from external devices. 9 If you can listen to music from an MP3 music player. AUXILIARY INPUT OPERATION This car radio is equipped an external auxiliary input jack (3.5mm) on the front panel, it is compatible with a audio cable.

User Manual
Page 12
In any mode, prior to pairing and connecting, the BT logo in the LCD display. 3. When the phone finds the car audio system, the "BOSS 480BRGB" name will be shown on the control panel. button to adjust the call , press the button on the LCD display. Press the button... to delete it. BLUETOOTH OPERATION Pair and Connect Prior to using AVRCP (audio video remote control profile). 1. Make a Call ‡ To make a call, dial ...
In any mode, prior to pairing and connecting, the BT logo in the LCD display. 3. When the phone finds the car audio system, the "BOSS 480BRGB" name will be shown on the control panel. button to adjust the call , press the button on the LCD display. Press the button... to delete it. BLUETOOTH OPERATION Pair and Connect Prior to using AVRCP (audio video remote control profile). 1. Make a Call ‡ To make a call, dial ...

User Manual
Page 13
Re-insert the cell holder into as this may cause damage to the underside of the remote control, as illustrated on the back of the unit. • The operation angle for the first time, you must pull out the portective plastic tab from the battery compartment found on the right. 2. Keep battery cells out of reach of children. 2 1 3 4 Remote Control Operation Position the emitting window of the remote control toward the sensor window of the remote control. 3 5 62 8 11 14 16 17 20 11 Band button, (anser call ) button 9. RDM (random), preset station 4 button, keypad 4 10 ...
Re-insert the cell holder into as this may cause damage to the underside of the remote control, as illustrated on the back of the unit. • The operation angle for the first time, you must pull out the portective plastic tab from the battery compartment found on the right. 2. Keep battery cells out of reach of children. 2 1 3 4 Remote Control Operation Position the emitting window of the remote control toward the sensor window of the remote control. 3 5 62 8 11 14 16 17 20 11 Band button, (anser call ) button 9. RDM (random), preset station 4 button, keypad 4 10 ...
User Manual
Page 15
Replace fuse. 4) Volume is always live. Connect the battery cable to a desired level. 5) Sound skips. b) USB or SD card is burnt. Check the connection. 3) Fuse is damaged or no sound a) USB or SD card connection is not good. The installation angle is not connected. Adjust the installation angle less than 30°. The built-in abnormal condition, for example without sound, or with smoke or foul smell, can cause fire or electric shock. Select other stations of this car radio. 3) Preset station is wrong, immediately switch power off , adjust volume to the terminal that...
Replace fuse. 4) Volume is always live. Connect the battery cable to a desired level. 5) Sound skips. b) USB or SD card is burnt. Check the connection. 3) Fuse is damaged or no sound a) USB or SD card connection is not good. The installation angle is not connected. Adjust the installation angle less than 30°. The built-in abnormal condition, for example without sound, or with smoke or foul smell, can cause fire or electric shock. Select other stations of this car radio. 3) Preset station is wrong, immediately switch power off , adjust volume to the terminal that...

User Manual V2
Page 2
... Input operation 9 Bluetooth Operation...10 Pair and Connect...10 Make a Call...10 Redial Last Dialed Number 10 Answer a Call / Reject a Call / End a Call 10 Switch Audio Between Car audio and Moble Phone 10 Adjust Call Volume...10 Audio Streaming (A2DP 10 Remote Control...11 Specifications...12 Troubleshooting 13
... Input operation 9 Bluetooth Operation...10 Pair and Connect...10 Make a Call...10 Redial Last Dialed Number 10 Answer a Call / Reject a Call / End a Call 10 Switch Audio Between Car audio and Moble Phone 10 Adjust Call Volume...10 Audio Streaming (A2DP 10 Remote Control...11 Specifications...12 Troubleshooting 13
User Manual V2
Page 3
Refer all service to a qualified technician. ‡ Some MP3/WMA files may cause an explosion. ‡ Keep battery cells out of reach of children. Drives and connections Never place any foreign objects into as this unit yourself. Others Warnings Do not switch on the car radio for an extended period, you might damage the slots and connections. Do not tightly grip the display and buttons to discharge and the vehicle can no longer be started. 1 Otherwise you may need to reduce the temperature inside the car before turning on traffic and road conditions while driving. ‡...
Refer all service to a qualified technician. ‡ Some MP3/WMA files may cause an explosion. ‡ Keep battery cells out of reach of children. Drives and connections Never place any foreign objects into as this unit yourself. Others Warnings Do not switch on the car radio for an extended period, you might damage the slots and connections. Do not tightly grip the display and buttons to discharge and the vehicle can no longer be started. 1 Otherwise you may need to reduce the temperature inside the car before turning on traffic and road conditions while driving. ‡...

User Manual V2
Page 4
Attach the "L " brackets (2pcs) on this double-DIN car receiver. 2. The others fixing screws that everything is turned off, and then disconnect the cable from your car. Reconnect the battery and run through all of holes size. 3. You never want electricity running while you intend to the drilling of the options on the both sides of the car receiver with you have any wires or cables. 6. Particulars will vary widely depending upon the kind of your car and the car you install this car receiver to ensure that fix the other modifications of your dealer according to ...
Attach the "L " brackets (2pcs) on this double-DIN car receiver. 2. The others fixing screws that everything is turned off, and then disconnect the cable from your car. Reconnect the battery and run through all of holes size. 3. You never want electricity running while you intend to the drilling of the options on the both sides of the car receiver with you have any wires or cables. 6. Particulars will vary widely depending upon the kind of your car and the car you install this car receiver to ensure that fix the other modifications of your dealer according to ...

User Manual V2
Page 5
RF- Front left PRE-AMP output (White) 6. Rear right PRE-AMP output (Red) 5. ISO Socket: 8PIN connector 7. LF- Rear left PRE-AMP output (White) 3. ISO Socket: 4PIN connector RR+ RF+ LF+ LR+ RR- LR- + + REM IGN + - B GND - Only use speakers with 4 ohm impedance. - Front right PRE-AMP output (Red) 4. The maximum current of the Amp Remote trigger is 200mA. 3 Electrical Connections WIRING DIAGRAM CAUTION +12V DC NEGATIVE GROUND 1. Radio antenna socket 2.
RF- Front left PRE-AMP output (White) 6. Rear right PRE-AMP output (Red) 5. ISO Socket: 8PIN connector 7. LF- Rear left PRE-AMP output (White) 3. ISO Socket: 4PIN connector RR+ RF+ LF+ LR+ RR- LR- + + REM IGN + - B GND - Only use speakers with 4 ohm impedance. - Front right PRE-AMP output (Red) 4. The maximum current of the Amp Remote trigger is 200mA. 3 Electrical Connections WIRING DIAGRAM CAUTION +12V DC NEGATIVE GROUND 1. Radio antenna socket 2.

User Manual V2
Page 6
INT (intro), Preset station 2 button 7. CLOCK (clock setting) button, (end call ) button 4. IR remote sensor 17. BAND(band) button, (answer call ) button 12. (tune down, seek down,previous, fast reverse) button 13. (tune up, seek up, next track, fast forward)button 14. RDM (random), Preset station 4 button 9. -10(previous 10 tracks), Preset station 5 button 10. +10(next 10 tracks), Preset station 6 button 11. Hands-free Microphone 21. AMS (automatic store / preset station scan, automatic music search) button 5. (pause/play), Preset station1 button 6. EQ (Equalizer) 16. LCD ...
INT (intro), Preset station 2 button 7. CLOCK (clock setting) button, (end call ) button 4. IR remote sensor 17. BAND(band) button, (answer call ) button 12. (tune down, seek down,previous, fast reverse) button 13. (tune up, seek up, next track, fast forward)button 14. RDM (random), Preset station 4 button 9. -10(previous 10 tracks), Preset station 5 button 10. +10(next 10 tracks), Preset station 6 button 11. Hands-free Microphone 21. AMS (automatic store / preset station scan, automatic music search) button 5. (pause/play), Preset station1 button 6. EQ (Equalizer) 16. LCD ...

User Manual V2
Page 7
...: OFF, CLASS, ROCK, POP, FLAT - DX/LOCAL: Enables or disables the local broadcast mode (LOCAL). - Rotate the volume knob to cycle through the following adjustable audio functions:BASS,TREBLE,BALANCE,FADER, EQ OFF/ CLASS/ ROCK/POP/ FLAT, LOUD ON/OFF, DX/LOC, STEREO/MONO, CLOCK 12/24, AREA US/EU, AUTO...
...: OFF, CLASS, ROCK, POP, FLAT - DX/LOCAL: Enables or disables the local broadcast mode (LOCAL). - Rotate the volume knob to cycle through the following adjustable audio functions:BASS,TREBLE,BALANCE,FADER, EQ OFF/ CLASS/ ROCK/POP/ FLAT, LOUD ON/OFF, DX/LOC, STEREO/MONO, CLOCK 12/24, AREA US/EU, AUTO...

User Manual V2
Page 8
Aux input connector The 3.5mm auxiliary input stereo connection is distorted, or when any of controls are disabled. The charging current consumption is designed for media playback from flash memory devices and charging for deiveces with USB device inserted) and AUX-IN(auxiliary input) modes. The muted state will be used when the LCD does not display normally or sound is designed for iPhone / andriod mobile phone. Reset System (Reset) The RESET button is used to reset all parameters to depress the RESET button. 6 GENERAL OPERATION Change the Source (SRC) Press the SRC button...
Aux input connector The 3.5mm auxiliary input stereo connection is distorted, or when any of controls are disabled. The charging current consumption is designed for media playback from flash memory devices and charging for deiveces with USB device inserted) and AUX-IN(auxiliary input) modes. The muted state will be used when the LCD does not display normally or sound is designed for iPhone / andriod mobile phone. Reset System (Reset) The RESET button is used to reset all parameters to depress the RESET button. 6 GENERAL OPERATION Change the Source (SRC) Press the SRC button...