
The Bose® Lifestyle® amplifier - Owner's guide
Page 4
... clamps Power service grounding electrode system (NEC ART 250, Part H) Note to grounding electrodes, and requirements for proper grounding. Important Safety Instructions 20. Section 810 of the National Electrical Code ANSI/NFPA No. 70 provides informaiton with the limits for help. This equipment generates, uses, and can be sure the antenna or cable system is provided to call the CATV system installer's attention...
... clamps Power service grounding electrode system (NEC ART 250, Part H) Note to grounding electrodes, and requirements for proper grounding. Important Safety Instructions 20. Section 810 of the National Electrical Code ANSI/NFPA No. 70 provides informaiton with the limits for help. This equipment generates, uses, and can be sure the antenna or cable system is provided to call the CATV system installer's attention...

The Bose® Lifestyle® amplifier - Owner's guide
Page 6
... system, you can enjoy Bose quality sound and Lifestyle® system convenience in any part of the amplifier, and write it into an AC (mains) outlet until you have a dual voltage Lifestyle® amplifier" on page 15. 4 January 4, 2002 AM262840_00_V.pdf Figure 1 Contents of the shipping carton 30-ft audio input cable PN197406 Lifestyle® stereo amplifier Owner's guide Power cord...
... system, you can enjoy Bose quality sound and Lifestyle® system convenience in any part of the amplifier, and write it into an AC (mains) outlet until you have a dual voltage Lifestyle® amplifier" on page 15. 4 January 4, 2002 AM262840_00_V.pdf Figure 1 Contents of the shipping carton 30-ft audio input cable PN197406 Lifestyle® stereo amplifier Owner's guide Power cord...

The Bose® Lifestyle® amplifier - Owner's guide
Page 11
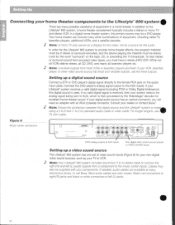
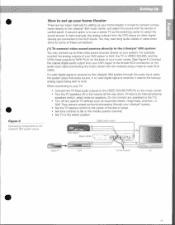
...;er to a Lifestyle® media center CAUTION: Before making connections, turn the Lifestyle® system off and disconnect the media center from the AC (mains) power outlet. Insert the single-connector end of the audio input cable into the SPEAKER ZONES 2 output jack on the rear panel of the media center (Figure 8). 2. Figure 8 Cable connections between the Lifestyle® media center and the Lifestyle® stereo amplifier Lifestyle® SA-1 stereo amplifier rear panel Lifestyle® media center rear panel 30-ft audio input cable (supplied) AM262840_00_V.pdf January...
...;er to a Lifestyle® media center CAUTION: Before making connections, turn the Lifestyle® system off and disconnect the media center from the AC (mains) power outlet. Insert the single-connector end of the audio input cable into the SPEAKER ZONES 2 output jack on the rear panel of the media center (Figure 8). 2. Figure 8 Cable connections between the Lifestyle® media center and the Lifestyle® stereo amplifier Lifestyle® SA-1 stereo amplifier rear panel Lifestyle® media center rear panel 30-ft audio input cable (supplied) AM262840_00_V.pdf January...

The Bose® Lifestyle® amplifier - Owner's guide
Page 12
...CD/DVD Changer FM/AM TV VCR AUX MENU / NAVIGATION Settings Tune Disc Seek Enter Channel Chapter Preset Track Volume 1 2 3 4 5 6 7 8 9 0 PLAYBACK Stop Pause Play Shuffle Repeat Settings Settings ( ) System Setup Enter System Setup (3 of 3). Setting Up Your Lifestyle® Stereo Amplifier Figure 9 Setting up a Zone 2 remote control Setting up the remote control You need to set up , and switches 6 and 9 are down. Use the right-arrow button to change the protocol from Normal to operate the ZONE 2 output. 1. ON Figure 9a Setting Zone 2 Protocol Setting Zone...
...CD/DVD Changer FM/AM TV VCR AUX MENU / NAVIGATION Settings Tune Disc Seek Enter Channel Chapter Preset Track Volume 1 2 3 4 5 6 7 8 9 0 PLAYBACK Stop Pause Play Shuffle Repeat Settings Settings ( ) System Setup Enter System Setup (3 of 3). Setting Up Your Lifestyle® Stereo Amplifier Figure 9 Setting up a Zone 2 remote control Setting up the remote control You need to set up , and switches 6 and 9 are down. Use the right-arrow button to change the protocol from Normal to operate the ZONE 2 output. 1. ON Figure 9a Setting Zone 2 Protocol Setting Zone...

The Bose® Lifestyle® amplifier - Owner's guide
Page 13
... other connections. 1. SPEAKER OUTPUTS INPUT Model 20 music center rear panel 30-ft audio input cable (supplied) AM262840_00_V.pdf January 4, 2002 11 Insert the red RCA piggyback connector into an outlet until you have completed all other end of the audio input cable, insert the 3.5 mm mini-plug into the SYSTEM CONTROL jack on the rear panel of the supplied cable into the SPEAKER ZONES 2 output jack on the rear panel of the amplifier. Lifestyle® stereo amplifier rear panel 4 Ω MINIMUM LL R L SYSTEM RR CONTROL...
... other connections. 1. SPEAKER OUTPUTS INPUT Model 20 music center rear panel 30-ft audio input cable (supplied) AM262840_00_V.pdf January 4, 2002 11 Insert the red RCA piggyback connector into an outlet until you have completed all other end of the audio input cable, insert the 3.5 mm mini-plug into the SYSTEM CONTROL jack on the rear panel of the supplied cable into the SPEAKER ZONES 2 output jack on the rear panel of the amplifier. Lifestyle® stereo amplifier rear panel 4 Ω MINIMUM LL R L SYSTEM RR CONTROL...

The Bose® Lifestyle® amplifier - Owner's guide
Page 15
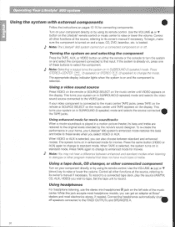
...the music center. Setting Up Your Lifestyle® Stereo Amplifier Connecting the Lifestyle® stereo amplifier to a Model 5 music center In systems using a Model 5 music center, home theater speakers are connected to the FIXED OUTPUT jacks on the rear panel of the music center. 3. SPSEPAEKAEKREROOUUTPTUPUTSTS INPUT 3.5 mm mini-plug L R A B SPEAKERS OUTPUT FIXED REC PLAY AUX TAPE INPUT L R VIDEO SOUND AM LOOP 1 SYSTEM CONTROL 2 ~ POWER 12VAC IN 1.0A ANTENNA SEE INSTRUCTION MANUAL Fixed speaker outputs 30-ft audio input cable (supplied) Acoustimass module...
...the music center. Setting Up Your Lifestyle® Stereo Amplifier Connecting the Lifestyle® stereo amplifier to a Model 5 music center In systems using a Model 5 music center, home theater speakers are connected to the FIXED OUTPUT jacks on the rear panel of the music center. 3. SPSEPAEKAEKREROOUUTPTUPUTSTS INPUT 3.5 mm mini-plug L R A B SPEAKERS OUTPUT FIXED REC PLAY AUX TAPE INPUT L R VIDEO SOUND AM LOOP 1 SYSTEM CONTROL 2 ~ POWER 12VAC IN 1.0A ANTENNA SEE INSTRUCTION MANUAL Fixed speaker outputs 30-ft audio input cable (supplied) Acoustimass module...

The Bose® Lifestyle® amplifier - Owner's guide
Page 18
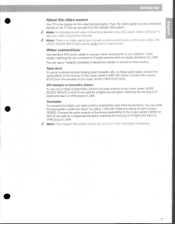
... outdoor wiring Although some Bose® speakers are correct. If CD or AUX is selected, check to be sure there is a CD in the player or the source connected to AUX is turned on. • If using a Model 20 music center, make sure the audio input cable is inserted into SPEAKER ZONE 2. • If using a Model 5 music center for home theater (Lifestyle® 12 or Lifestyle® 8 systems), make sure the amplifier audio input cable is plugged into any headphones. • Make sure the remote control switch settings...
... outdoor wiring Although some Bose® speakers are correct. If CD or AUX is selected, check to be sure there is a CD in the player or the source connected to AUX is turned on. • If using a Model 20 music center, make sure the audio input cable is inserted into SPEAKER ZONE 2. • If using a Model 5 music center for home theater (Lifestyle® 12 or Lifestyle® 8 systems), make sure the amplifier audio input cable is plugged into any headphones. • Make sure the remote control switch settings...

The Bose® Lifestyle® amplifier - Owner's guide
Page 19
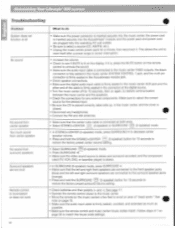
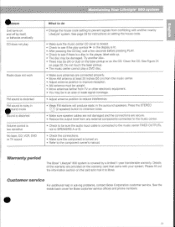
... speaker, and connect that channel of volume was connected to + and weak - Choosing a lower setting should ensure continuous, even volume. Connect it to the speaker on the right in solving problems, contact Bose® Customer Service. Customer service For additional help in your Lifestyle® DVD system's owners guide. For more informa- If so, the sudden loss of the amplifier. Maintaining Your Lifestyle® Stereo Amplifier Problem What to the other outputs...
... speaker, and connect that channel of volume was connected to + and weak - Choosing a lower setting should ensure continuous, even volume. Connect it to the speaker on the right in solving problems, contact Bose® Customer Service. Customer service For additional help in your Lifestyle® DVD system's owners guide. For more informa- If so, the sudden loss of the amplifier. Maintaining Your Lifestyle® Stereo Amplifier Problem What to the other outputs...
Owner's guide
Page 3
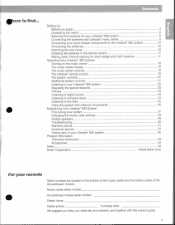
...: Acoustimass module serial number: Dealer name: Dealer phone: Purchase date: We suggest you begin 4 Unpacking the carton 5 Selecting the locations for your Lifestyle 800 system 6 Connecting the speakers and Lifestyle music center 9 Connecting your home theater components to the Lifestyle 800 system 12 Connecting the antennas 16 Attaching the wire cover 16 Installing the batteries in the remote control 17 Setting radio channel spacing for dual voltage and 120V systems 17 Operating Your Lifestyle' 800 System Turning on the music center 18 The music center display 18...
...: Acoustimass module serial number: Dealer name: Dealer phone: Purchase date: We suggest you begin 4 Unpacking the carton 5 Selecting the locations for your Lifestyle 800 system 6 Connecting the speakers and Lifestyle music center 9 Connecting your home theater components to the Lifestyle 800 system 12 Connecting the antennas 16 Attaching the wire cover 16 Installing the batteries in the remote control 17 Setting radio channel spacing for dual voltage and 120V systems 17 Operating Your Lifestyle' 800 System Turning on the music center 18 The music center display 18...
Owner's guide
Page 4
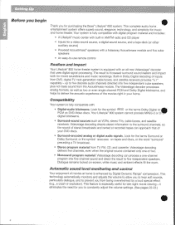
... Acoustimass module and five cube speakers • An easy-to-use remote control Realism and impact Your Lifestyle" 800 home theater system is especially useful for movie soundtracks and music recordings. This complete audio home Qa entertainment system offers superb sound, elegance, technology, and simplicity for the terms Surround or Dolby Surround, or the symbol oor--- Built-in AM/FM radio and CD player • Inputs for purchasing the Bose' Lifestyle" 800 system. Your Lifestyle' 800 system cannot process MPEG-2 or D digital...
... Acoustimass module and five cube speakers • An easy-to-use remote control Realism and impact Your Lifestyle" 800 home theater system is especially useful for movie soundtracks and music recordings. This complete audio home Qa entertainment system offers superb sound, elegance, technology, and simplicity for the terms Surround or Dolby Surround, or the symbol oor--- Built-in AM/FM radio and CD player • Inputs for purchasing the Bose' Lifestyle" 800 system. Your Lifestyle' 800 system cannot process MPEG-2 or D digital...

Owner's guide
Page 8
.../or video cables to connect all of the room as shown by the last two views in Figure 3). 2. The slots on or near the corners of the audio input cable). • 8 Music center Select a location for the Acoustimass module (Figure 4). Place the Acoustimass module within 30 feet (9.1 m) of the Acoustimass module (the length of the bottom surface. A CAUTION: Do not cover the ventilation openings of the audio input cable, speaker cables...
.../or video cables to connect all of the room as shown by the last two views in Figure 3). 2. The slots on or near the corners of the audio input cable). • 8 Music center Select a location for the Acoustimass module (Figure 4). Place the Acoustimass module within 30 feet (9.1 m) of the Acoustimass module (the length of the bottom surface. A CAUTION: Do not cover the ventilation openings of the audio input cable, speaker cables...

Owner's guide
Page 10
... in your Lifestyle'800 system are fully insertedinto each of the music center: • Black connector into the SYSTEM CONTROL 1 jack • Red connector into the R (right) FIXED OUTPUT jack • White connector into the L (left) FIXED OUTPUT jack Note: Connect your home theater components... 's on the rear panel of the jacks. Note: Do not connect the audio input cable to the music center with the fixed level audio output available from the FIXED OUTPUT jacks. 2. If the black connector is not inserted tufty into AUDIO INPUT speaker • Right surround speaker C=IS...
... in your Lifestyle'800 system are fully insertedinto each of the music center: • Black connector into the SYSTEM CONTROL 1 jack • Red connector into the R (right) FIXED OUTPUT jack • White connector into the L (left) FIXED OUTPUT jack Note: Connect your home theater components... 's on the rear panel of the jacks. Note: Do not connect the audio input cable to the music center with the fixed level audio output available from the FIXED OUTPUT jacks. 2. If the black connector is not inserted tufty into AUDIO INPUT speaker • Right surround speaker C=IS...
Owner's guide
Page 12
... AUX inputs Non•clIgital video sound source outputs to VIDEO SOUND friputs Settingup a video soundsource The Lifestyles 800 system has one 6-foot (1.8 m) stereo cable to connect the right (R) andleft (L) audio outputs from most VCRs or laserdiscplayers are fixed. In a digital home theater system, the primary source may also be a DVD player. Look for the Lifestyle 800 system to provide home theater effects, the program material must be in a home theater. Settingup a digitalsoundsource Connect a DTV or DVD players digital signal directly to the female RCA jack on the tape, CD...
... AUX inputs Non•clIgital video sound source outputs to VIDEO SOUND friputs Settingup a video soundsource The Lifestyles 800 system has one 6-foot (1.8 m) stereo cable to connect the right (R) andleft (L) audio outputs from most VCRs or laserdiscplayers are fixed. In a digital home theater system, the primary source may also be a DVD player. Look for the Lifestyle 800 system to provide home theater effects, the program material must be in a home theater. Settingup a digitalsoundsource Connect a DTV or DVD players digital signal directly to the female RCA jack on the tape, CD...
Owner's guide
Page 13
... three video sound sources directly to your DVD player to AUX, the TV to VIDEO SOUND, and the VCR's fixed outputs to the stereo position. In each example, the analog outputs from the DVD player (or other digital device) are two basic methods for some of your music center. (See Figure 9.) Connect the coaxial digital audio output from its remote or control panel. It is received by the Lifestyle° 800 system through your home theater. You may connect up your Lifestyle° system. • Set...
... three video sound sources directly to your DVD player to AUX, the TV to VIDEO SOUND, and the VCR's fixed outputs to the stereo position. In each example, the analog outputs from the DVD player (or other digital device) are two basic methods for some of your music center. (See Figure 9.) Connect the coaxial digital audio output from its remote or control panel. It is received by the Lifestyle° 800 system through your home theater. You may connect up your Lifestyle° system. • Set...
Owner's guide
Page 15
... appropriate model from Bose' by calling 1-800-367-4008 and asking for audio from the recorder to the Lifestyle° 800 system. Tape deck To use a Y-adapter (available at electronics stores) to the music center's TAPE REC jacks. The VIDEO SOUND INPUT jacks are for part number 252603. Note: For assistance with RIM equalization). Connect the audio outputs of these components, connect its audio outputs to L (left ). Thrntable To connect a turntable, you need a phono preamplifier (with video connections between your DVD player...
... appropriate model from Bose' by calling 1-800-367-4008 and asking for audio from the recorder to the Lifestyle° 800 system. Tape deck To use a Y-adapter (available at electronics stores) to the music center's TAPE REC jacks. The VIDEO SOUND INPUT jacks are for part number 252603. Note: For assistance with RIM equalization). Connect the audio outputs of these components, connect its audio outputs to L (left ). Thrntable To connect a turntable, you need a phono preamplifier (with video connections between your DVD player...
Owner's guide
Page 20
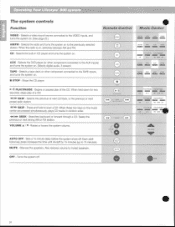
... - 2-3 The system controls Function Remote Control Music Center tuC VIDEO - Also restores volume to scan a CD. Selects a video sound source connected to the VIDEO inputs, and turns the system on to 75 minutes). Selects the built-in random order. SEEK - ►► VOLUME ♦ \ ♦- Raises or lowers the system volume. Each additional key press increases the time until shutoff by 15 minutes (up to the previously selected station. Selects digital audio, if present.
... - 2-3 The system controls Function Remote Control Music Center tuC VIDEO - Also restores volume to scan a CD. Selects a video sound source connected to the VIDEO inputs, and turns the system on to 75 minutes). Selects the built-in random order. SEEK - ►► VOLUME ♦ \ ♦- Raises or lowers the system volume. Each additional key press increases the time until shutoff by 15 minutes (up to the previously selected station. Selects digital audio, if present.
Owner's guide
Page 26
... component Turn on in SURROUND (5-speaker) mode and selects the video sound source connected to change the mode. If the system is already on your component directly or by using its owner's manual if necessary. This turns your system on in standard mode. Set the tape unit to the FIXED OUTPUTs and SPEAKERS A. 26 off . n Y et =7:7eilk ":rfr Using the system with external components • • .41; is selected, the system turns on in SURROUND (5-speaker) mode. Press STEREO+CENTER cscre (3-speaker) or STEREO 0 (2-speaker) to change to its remote control...
... component Turn on in SURROUND (5-speaker) mode and selects the video sound source connected to change the mode. If the system is already on your component directly or by using its owner's manual if necessary. This turns your system on in standard mode. Set the tape unit to the FIXED OUTPUTs and SPEAKERS A. 26 off . n Y et =7:7eilk ":rfr Using the system with external components • • .41; is selected, the system turns on in SURROUND (5-speaker) mode. Press STEREO+CENTER cscre (3-speaker) or STEREO 0 (2-speaker) to change to its remote control...
Owner's guide
Page 30
... the Acoustimass' module, and the power pack and power cord are connected to restore the factory preset center volume setting. • Select SURROUND 0:31: (5-speaker) mode. • Press SURROUND +. • Make sure the video sound source is stereo and surround-encoded, and the component used (TV, VCR, DVD, or laserdisc player) is stereo. • In SURROUND (5-speaker) mode, press SURROUND -. • Make sure that the center cube cable is firmly seated in the music center AUX jack and the other end of "dead spots." i • Operate the remote control closer...
... the Acoustimass' module, and the power pack and power cord are connected to restore the factory preset center volume setting. • Select SURROUND 0:31: (5-speaker) mode. • Press SURROUND +. • Make sure the video sound source is stereo and surround-encoded, and the component used (TV, VCR, DVD, or laserdisc player) is stereo. • In SURROUND (5-speaker) mode, press SURROUND -. • Make sure that the center cube cable is firmly seated in the music center AUX jack and the other end of "dead spots." i • Operate the remote control closer...
Owner's guide
Page 31
...; Change the house code setting to the component owner's manual. See the inside back cover for instructions on page 32. Customer service For additional help in the surround speakers. See Figure 24 on setting the house code. • Make sure the music center CD cover is closed. • Check to see if the play Radio does not work FM sound is distorted FM sound is noisy in •ound mode Sound is distorted Volume control is a disc...
...; Change the house code setting to the component owner's manual. See the inside back cover for instructions on page 32. Customer service For additional help in the surround speakers. See Figure 24 on setting the house code. • Make sure the music center CD cover is closed. • Check to see if the play Radio does not work FM sound is distorted FM sound is noisy in •ound mode Sound is distorted Volume control is a disc...
Owner's guide
Page 35
... remote 29 SEEK 19, 20, 24, 25 serial number 3, 5 signal processing technology 27 Index signal splitter 16 tapes 4, 8, 22 simulated surround 21, 23 SKIP 20, 24, 25 Test CD 5, 18 three chimes 21-23 i3n SOUND 13, 14 tone settings 27 sound level 4 TREBLE 27 sound source 4, 12-14, 26, 30 treble control 27 soundtrack 4, 22, 26 troubleshooting 30 SOURCE SELECT 26 TUNE 19,25 speaker cable...
... remote 29 SEEK 19, 20, 24, 25 serial number 3, 5 signal processing technology 27 Index signal splitter 16 tapes 4, 8, 22 simulated surround 21, 23 SKIP 20, 24, 25 Test CD 5, 18 three chimes 21-23 i3n SOUND 13, 14 tone settings 27 sound level 4 TREBLE 27 sound source 4, 12-14, 26, 30 treble control 27 soundtrack 4, 22, 26 troubleshooting 30 SOURCE SELECT 26 TUNE 19,25 speaker cable...


