Owner's guide
Page 10
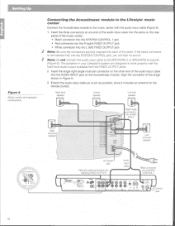
...on the Acoustimass module. The speakers in Figure 6. 3. Insert the single right-angle multi-pin connector on the rear panel of the music center: • Black connector into the ...the R (right) FIXED OUTPUT jack • White connector into each of the audio input cable into AUDIO INPUT I- If the black connector is not inserted fully into SYSTEM CONTROL r 4e5 ...Pil'ASK;Vt>"4.-1 7#>10;PACP" 4:;:iv.+Z1-0).•• Connecting the Acoustimass' module to the Lifestyle' music center Connect the Acoustimass module to the music center with the fixed level audio output available...
...on the Acoustimass module. The speakers in Figure 6. 3. Insert the single right-angle multi-pin connector on the rear panel of the music center: • Black connector into the ...the R (right) FIXED OUTPUT jack • White connector into each of the audio input cable into AUDIO INPUT I- If the black connector is not inserted fully into SYSTEM CONTROL r 4e5 ...Pil'ASK;Vt>"4.-1 7#>10;PACP" 4:;:iv.+Z1-0).•• Connecting the Acoustimass' module to the Lifestyle' music center Connect the Acoustimass module to the music center with the fixed level audio output available...
Owner's guide
Page 26
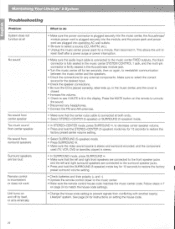
...; In SURROUND mode, press SURROUND -. • Make sure that the center cube cable is connected at all No sound No sound from center speaker Too much sound from center speaker No sound from conflicting with another nearby Lifestyle system. Make sure to select the correct source for ten seconds, then on... connected to the music center FIXED outputs, the black connector is fully seated in the music center SYSTEM CONTROL 1 jack and the multi-pin connector is firmly seated in the music center, and the cover is closed. • Increase the volume. • Check to select a source (CD, ...
...; In SURROUND mode, press SURROUND -. • Make sure that the center cube cable is connected at all No sound No sound from center speaker Too much sound from center speaker No sound from conflicting with another nearby Lifestyle system. Make sure to select the correct source for ten seconds, then on... connected to the music center FIXED outputs, the black connector is fully seated in the music center SYSTEM CONTROL 1 jack and the multi-pin connector is firmly seated in the music center, and the cover is closed. • Increase the volume. • Check to select a source (CD, ...

The Bose® Lifestyle® amplifier - Owner's guide
Page 9
... the Lifestyle® system off and disconnect the music center from the AC (mains) power outlet. At the other connections. 1. Insert the red RCA piggyback connector into the L (left) INPUT jack. Insert the single multi-pin connector at one end of the audio input cable into ... into the SYSTEM CONTROL jack on the rear of the supplied cable into the R (right) INPUT jack of the amplifier. 3. Figure 6 Cable connections between a multi-room interface and the Lifestyle® stereo amplifier Lifestyle® stereo amplifier rear panel Multi-room interface rear...
... the Lifestyle® system off and disconnect the music center from the AC (mains) power outlet. At the other connections. 1. Insert the red RCA piggyback connector into the L (left) INPUT jack. Insert the single multi-pin connector at one end of the audio input cable into ... into the SYSTEM CONTROL jack on the rear of the supplied cable into the R (right) INPUT jack of the amplifier. 3. Figure 6 Cable connections between a multi-room interface and the Lifestyle® stereo amplifier Lifestyle® stereo amplifier rear panel Multi-room interface rear...

The Bose® Lifestyle® amplifier - Owner's guide
Page 13
...RCA piggyback connector into the L (left) INPUT jack. Lifestyle® stereo amplifier rear panel 4 Ω MINIMUM LL R L SYSTEM RR CONTROL L R +- Insert the single multi-pin connector at one end of the audio input cable into the SYSTEM CONTROL jack on the rear panel of... the amplifier. 3. Setting Up Your Lifestyle® Stereo Amplifier Connecting the Lifestyle® stereo amplifier to a Model 20 music...
...RCA piggyback connector into the L (left) INPUT jack. Lifestyle® stereo amplifier rear panel 4 Ω MINIMUM LL R L SYSTEM RR CONTROL L R +- Insert the single multi-pin connector at one end of the audio input cable into the SYSTEM CONTROL jack on the rear panel of... the amplifier. 3. Setting Up Your Lifestyle® Stereo Amplifier Connecting the Lifestyle® stereo amplifier to a Model 20 music...

The Bose® Lifestyle® amplifier - Owner's guide
Page 15
... the white piggyback jack. Insert the single multi-pin connector at one end of the amplifier (Figure 12). 2. Figure 12 Cable connections between the Model 5 music center and the Lifestyle® stereo amplifier Model 5 music center rear panel Lifestyle® stereo amplifier rear panel 4 Ω MINIMUM LL LL...
... the white piggyback jack. Insert the single multi-pin connector at one end of the amplifier (Figure 12). 2. Figure 12 Cable connections between the Model 5 music center and the Lifestyle® stereo amplifier Model 5 music center rear panel Lifestyle® stereo amplifier rear panel 4 Ω MINIMUM LL LL...

